Hey Guys, Pepsi here with another article. This one I feel is pertinent for diagnosing transmission issues. I've compiled this from a few of my articles and some more threads. I also got help from my one friend Mitch who was nice enough to copy a ATSG manual for me.
|
ALWAYS THE FIRST STEP…. |
|
CHECK YOUR DAM FLUID! Ha, yes you guessed it most times low/high fluid levels will cause tons of issues, its best to check your fluid first. Checking your fluid can save you a ton of time and agony especially if you’re following gremlins around. So to check your fluid you must part on level ground and idle your truck in NEUTRAL not Park or any other gear. Check to make sure your fluid is between the two sets of dots, either the lower set or the upper set. Also take note one says “COLD” the other “HOT” this is in reference to your transmission temperature. It’s best to have a warm engine and warm fluid when measuring hot marks. |
Now that you've done this, This next section will be of use in understanding what clutches do what and when. If you identify your issue from here great if not then well get to testing pressures.
|
Shorthanded Diagnostics… |
|
The rear clutch is applied in all forward ranges (D, 2, 1). The overrunning clutch is applied in first gear (D, 2 and 1 ranges) only.
The rear band is applied in 1 and R range only. |
|
Examples…
For another example, if the transmission also slips in Reverse, the front clutch is slipping. If the transmission does not slip in Reverse, the rear clutch is slipping. |
|
This process of elimination can be used to identify a slipping unit and check operation. Although road test analysis will help determine the slipping unit, the actual cause of a malfunction usually cannot be determined until hydraulic and air pressure tests are performed. Practically any condition can be caused by leaking hydraulic circuits or sticking valves. |
----------------------------------------------------------------
Line Pressure Testing
OK So now comes the fun part. You will need a pair of pressure gauges. I bought a pair of cheap Home Depot 0-300 psi gauges, and used some grease gun hose and then some nylon tubing to connect the two. As you can see on this chart that it mirrors the Shorthand Diagnostics section.
|
Clutch and Band Application Chart |
||||||||
|
Shift Lever Position |
Transmission Clutches and Bands |
Overdrive Clutches |
||||||
|
Front Clutch |
Front Band |
Rear Clutch |
Rear band |
Over-running Clutch |
Overdrive Clutch |
Direct Clutch |
Over Running Clutch |
|
|
Reverse |
X |
|
|
X |
|
|
X |
|
|
Drive(1) |
|
|
X |
|
X |
|
X |
X |
|
Drive(2) |
|
X |
X |
|
|
|
X |
X |
|
Drive(3) |
X |
|
X |
|
|
|
X |
X |
|
Drive(4) |
X |
|
X |
|
|
X |
|
|
|
Man (2) |
|
X |
X |
|
X |
|
X |
X |
|
Man (1) |
|
|
X |
X |
X |
|
X |
X |
Using this chart we can now know which test port to use for testing. Now for the testing phase.
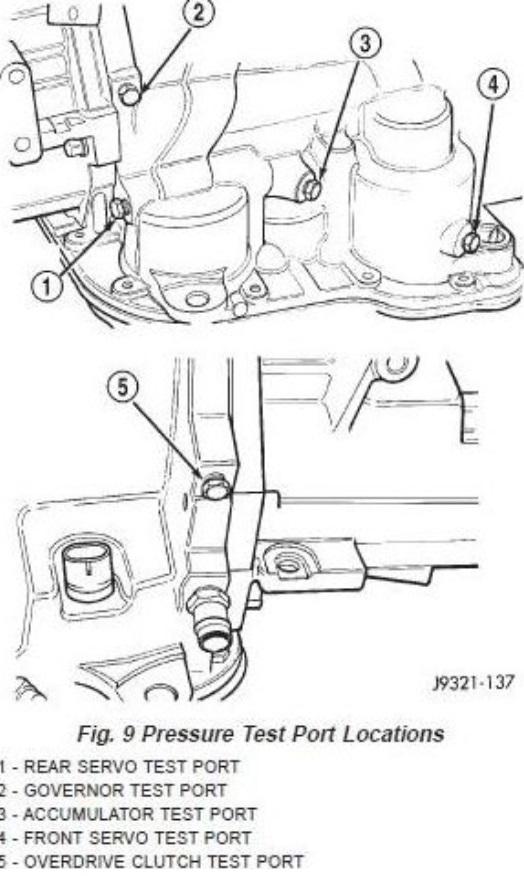
Here we can see the locations of the test ports on your 47re. Ports 1-4 are located on the Passenger side, Port #5 is on the drivers side of the transmission above the one transmission cooler line.
Preparations Required.....
So in order to perform these tests you MUST jack the rear axle up so the tires are off the ground, Block the front tires, and then unhook the the TV lever from the transmission side. When testing you want to watch that the accumulator moves in a smooth fashion, and that both ports are reporting where they should be.
You will leave one of the pressure gauges on at the Accumulator port through tests 1-4.
NOTES:
-Built automatics will see different line pressures, all line pressures are for OEM transmission's.
-Built Automatics will see roughly 75-90 psi at idle, and between 120 and 170psi in gear at WOT. Reverse will be over 250psi usually.
-WOT Is defined as the TV lever being moved fully rearward into the open position. You should see a smooth increase of line pressure to the maximum.
Test One:[Manual 1]
This test checks pump output, pressure regulation, and condition of the rear clutch and servo circuit. This test is performed in M1 at 1000 rpm. Line pressure at the accumulator port should be 54-60psi at idle, and gradually increase to 90-96 at WOT (wide open throttle). Rear servo port should have the same pressure within 3psi.
Test Two:[Manual 2]
This test checks pump output, line pressure and pressure regulation. This test is performed in D2 at 1000 rpm. Line pressure should be 54-60psi at idle and gradually increase to 90-96psi at WOT.
Test Three: This test checks pressure regulation and condition of the clutch circuits. This test is performed in D with the O/D switch off at 1600 rpm. Line pressure at the accumulator port should be 54-60psi at idle, and gradually increase to 90-96psi at WOT. Front servo pressure should be the same within 3 psi.
Test Four: This test checks pump output, pressure regulation and the front clutch and rear servo circuits. This test is performed in Reverse at 1600 rpm. Pressure at the accumulator port should be 145-175psi at idle, and gradually increase to 230-260psi at WOT.
Test Five: This test checks governor operation by measuring governor pressure response to changes in vehicle speed. This test is performed in Drive between 0-30 mph. Governor pressure should be 0 psi at 0 mph, and gradually increase approx 1 psi for every 1 mph.
Current Version 1.0
Written by John Armstrong Jr.
01/20/2019
-
 2
2