
Better Headlights for your 2nd Gen Dodge Ram Truck
Parts Needed::
Morimoto Projector Kit ( ensure you get the 9004 kit with the High beam controller AKA Motocontrol and the longer thread reflector)
Clear lense housings ( not required, but way better output, ensure housings are aimable.)
Flat head Screw driver
Phillips Screw Driver
T15 torx screw driver
10mm socket extension / 10mm open ended wrench
Oven
Epoxy
Why to upgrade to Bi-xenon Projectors
It's no secret that 2nd Gen Dodge Ram Headligts are terrible from the factory. There are various things you can do to help, Britebox relay system, bulbs, sport conversion, and my least favorite.....HID's, or a Projector retrofit like this. While the retrofit is the most costly I believe that it is the best choice. No tonly do you get to upgrade to xenon bulbs, but you upgrade to projectors that were designed for the xenon bulb, which is key.
I truly hate seeing guys throwing HID's into their halogen AKA oem housings and claiming that output is great for only $50. What they don't relize is that when you throw a differently configured bulb into a halogen housing you are going to scatter light.
The key to not scattering light, AKA blinding oncoming traffic is ensuring that the reflector housing is engineered for the bulb that is in it. The distance of the filmate is key when it comes to how light reflects in the housing. As you can see here moving the filmate, or installing a different type of bulb throws everything off.
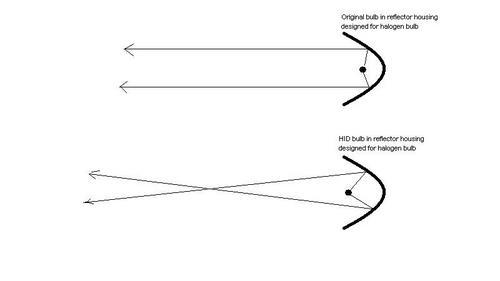
This is why I always prefer that if you are going to run different lights that you ensure the housing is right for the bulb. since the Morimoto projectors are bulb for a xenon mini h1 bulb you don't have to worry about it. You can have your cake and eat it too.
The Design of the Morimoto Mini H1 Projector headlights
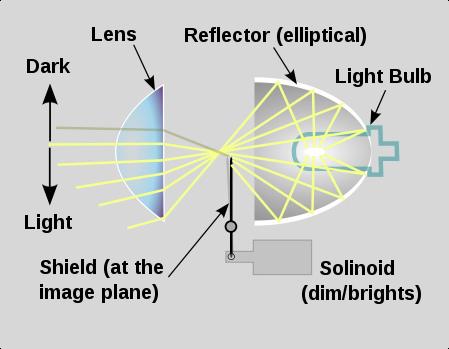
You can see from the above that the Shield, or Cutoff Plate ensures that the light is reflected and projected in a manner than doesn't blind people. The result of a sheild in the up position does this
You can clearly see the cutoff and how it prevents oncoming traffic from being blinded.
Here is a closer look at the Cutoff Shield
To activate you High Beams the shield is pulled down allowing light to be projected without being cutoff. The result is
Ok that is enough on why I choose the Morimoto Mini H1 Bixenon projectors as the new headlights for my 2nd Gen Dodge Ram.
Break Down of the Projectors
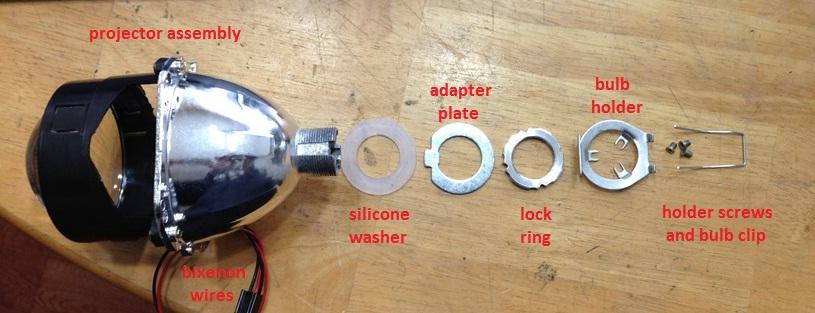
This is most of the hardware you will get with your kit. The nice thing about the Morimoto kit is it allows you to install the projectors into the OEM bulb socket. This allows you to retain the OEM aiming ablility. the only hole you will need to drill is for the High Beam wiring.
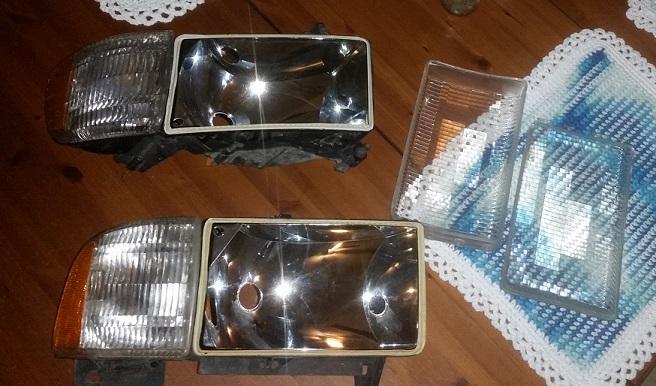
Sport Housings
I decided to jump to sport lights in the middle of this process. These are the lights I got from Ebay. I am VERY happy with them.
Amazon Sport Headlight Housings Link PN: 55077025ac 55077025AG
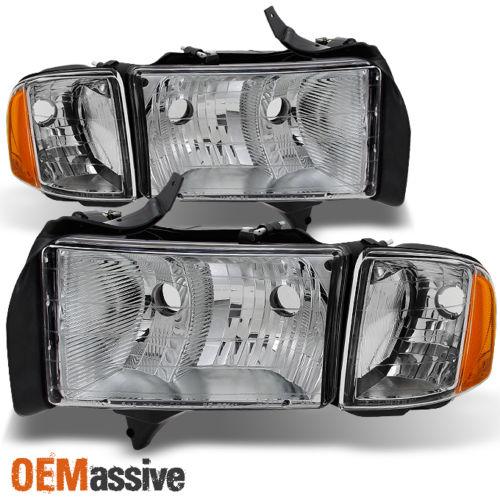
They required a little cutting to get the projectors set in them, but nothing bad. You can get extended threads projectors so I would suggest that.
Removing your housings
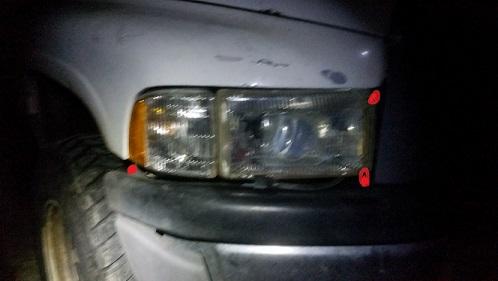
to remove your Stock 2nd Gen Dodge Ram Headlights you will need a 10mm socket and an extension. There are 3 bolts holding the light in. Remove the 3 10mm bolts holding the light in (Red dots in picture). The lower inner bolt is somewhat hard to get to. I found that going from under the truck was easiest.
Next pull the light straight back to pull it out of the push fittings. You should feel it "pop" out 3 or 4 inches. Next remove your blinker bulbs and disconnect the headlight bulb. Next remove the housing by sliding them towards the outside of the truck, twisting somwhat to free the housing. Take your time as this can be a stubborn part to get out.
once you have both housings out you can go inside.
Removing the headlight lens
The easiest way I know of to get the lens off the housing is to use the oven. I set my ovens temp to 170*f and put the housings in for 30 minutes or so to heat the glue and make the lens easy to remove. Ensure you keep and eye on the housing while it is in the over. I have seen some ovens that are not accurate on heat and ended up melting the housing.
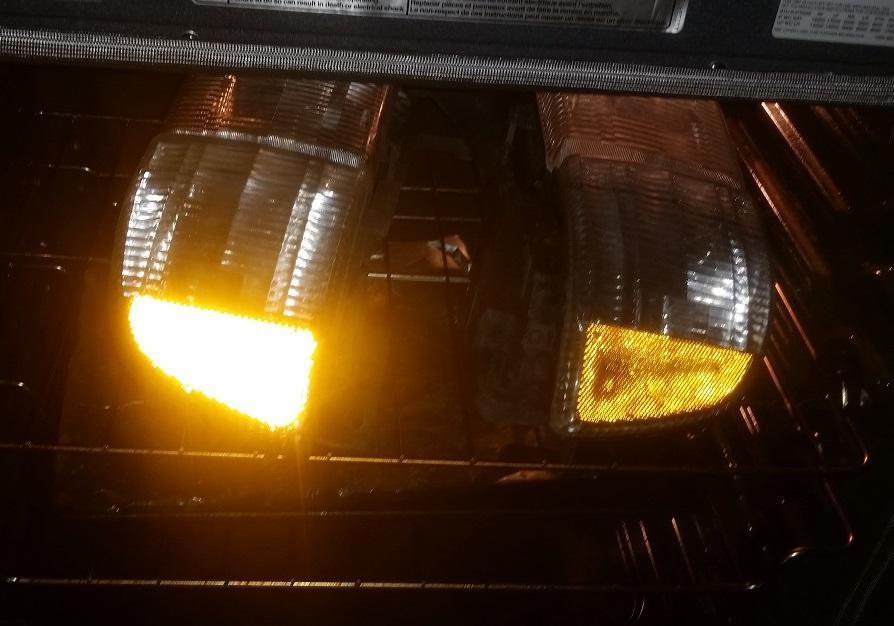
Once your housings are to temp remove them and carefully use a flathead screw driver to pry the lens open.
Move slowly around the lense and pry the lens off. you should feel it release, don't pry hard, if the glue isn't letting go put it back in the oven for another 10 minutes, increase temp if needed.
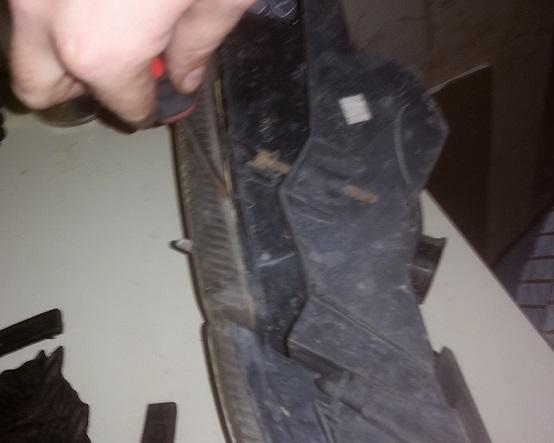
Your end result should be like this
It is key to notice that if you are using the OEM lenses that your output will be less than wonderful. you can see in the image above the Fluted design to help scatter the halogen bulb output. This however makes the cutoff line fuzzy. This is why a clear lens is worth having.
Installing the Projector
Remove all of your hardware from the projector so there is nothing on it.
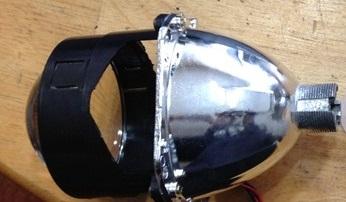
The threaded section should fit into the OEM bulb hole. Insert the projector into the housing from the front. Turn the housing over and insert the rubber washer, then the alighment washer, then the locknut. Tighten the lock nut down somewhat snug. Don't over tighten as you will have to level the projector by rotating the projector in the housing until the output is level.
The housing back should look like this
The Front will look like this

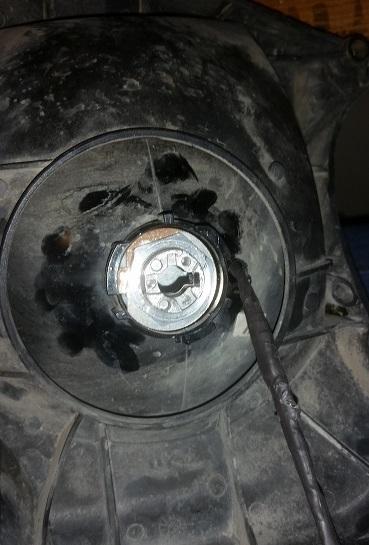
Note the Red Dot. you will need to drill a small hole here to run the high beam wires though.
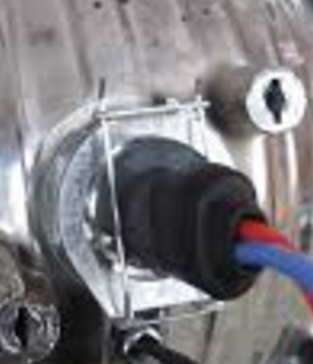
Once you have your projector in the housing, install the Bulb holder onto the back of the projector, there are threaded holes for the small phillips screws.
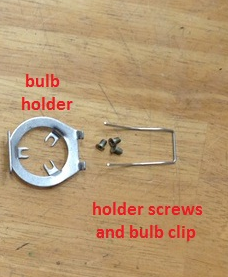
Install the bulb then the retaining clip.
Installing the wiring
The Morimoto Wiring Harness only requires connection to one of the 2 oem plugs. The wiring harness looks like this
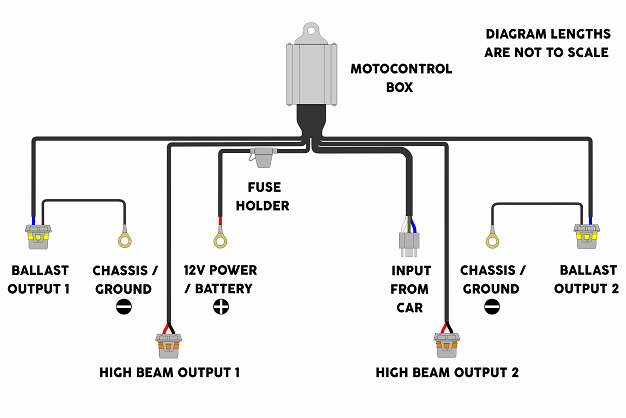
you need to make connection to the Battery + then a body ground on the end of each Ballast Output. The Input from the car plug will be a female socket 9004 connection. I choose to install the bulk of the harness on the Passengers side since I have more space over there. This system already draws power right form the battery so there is no need for a Bright Box type relay system.
You will need mount the ballast's one on each side near the back of the light. I choose to the left and right of the radiator right above the light.
Plug your ballast into the "Ballast output" plug from the harness.
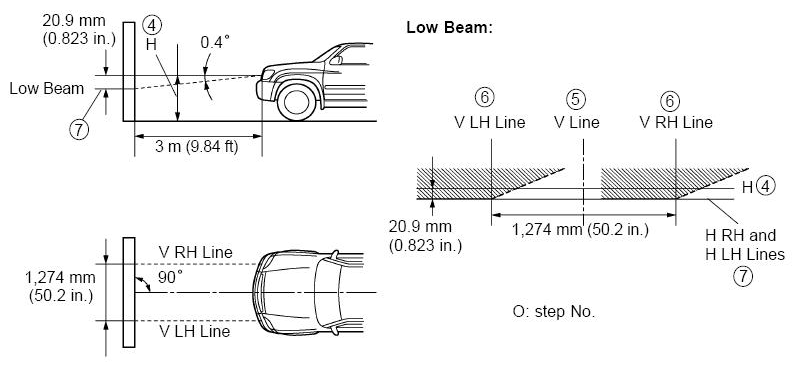
Leveling / Tuning your lights
after everything is reinstalled into the housings you will need to put them into the truck and level the projectors. This needs to be done before you put the lense back on. Connect the bulbs to the wiring in the truck. Install the housings and install the bolts to ensure that hte housing is tight and won't move.
You will need a large flat surface and level ground to do this. Park 20ish yards away from the wall on flat ground, turn the lights on. The truck will need to be running to trip the ballasts and ignite the bulbs. Once the bulbs are on you can kill the truck.
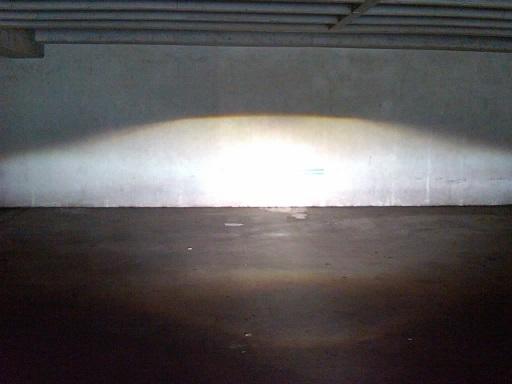
Look at the output of the light once side at a time and level the cutoff line by rotating the projector in the housing slowly until you are happy with the level of the light
You can see in this picture that the projector needs to be rotated slight clockwise.
Once you are happy with the level of the cutoff remove the housing and tighten the locknut down. Be careful not to move the housing or projector. Repeat the process for both lights. Remember you are not aiming hte lights, only leveling the cutoff line.
Ensure that the hole you drilled for the high beams is sealed with RTV or epoxy.
Reinstall the lense
Once you are happy with both sides use some epoxy to reattach the lenses to the housing. Ensure that it is a tight seal. Allow time for the epoxy to setup.
Reinstalling housings and aiming headlights
Reinstall the housings and install all bolts ensuring that the lights are held tight. Connect all lights and wiring to the housings.
Now you will need ot aim your new lights. You will need the T20 torx to aim the lights.
Park 25ish yards away from the large flat wall on level ground.
Typical rule of thumb is you want your light hot spots to be directly in front of the bulb. Easiest way to ensure this is done is to pull close to the wall, aim the lights left and right until it is right in front of the bulb, then slowly reverse ensure that the hotspot does not move left or night as you backup. If the hotspot moves left or right adjust the housings to counter act this.
Next you need to aim your lights up / down. Again rule of thumb is you want your hotspot at 25 yards to be 1- 4" lower than the level of your headlights. IE pointed down slightly. This will take some adjusthing. The cutoff lenses will keep you from needing to point your lights down very much. Depending on the height of your truck you might be able to get away with 1" of drop at 25 yards. The higher your truck is lifted the move drop your lights will need to keep from blinding people.
This might take some trial and error. Drive around some, if peolle flash you drop your lights some until you are no longer flashed.
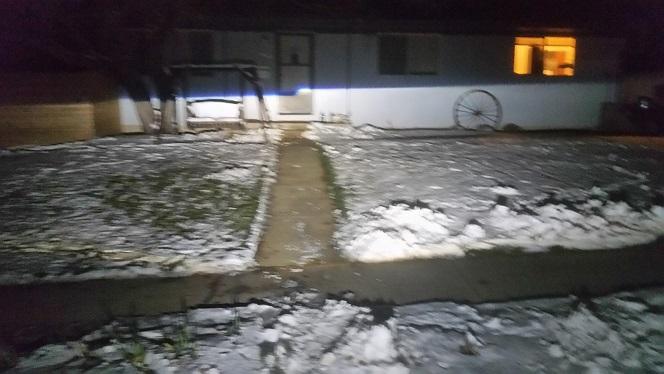
In the end you should end up with lights that are much better than OEM. Your cutoff's should be straight and you should have a VERY wide beam.
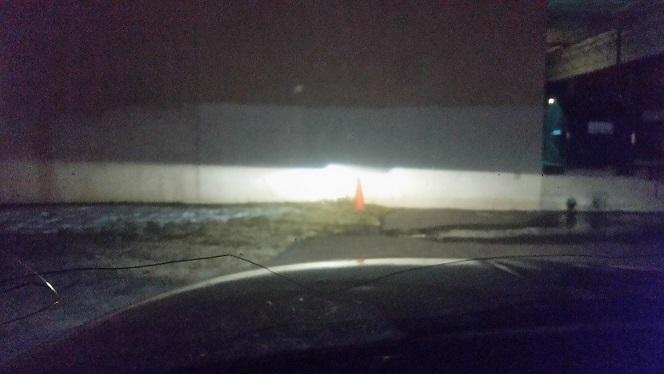
the ground is not level but you get the idea.
this article should work for all 2nd gen Dodge Ram trucks 1994 , 1995, 1996, 1997, 1998, 1999. 2000, 2001, 2002.
-
 7
7
-
 2
2