


Will add pics to steps shortly. This covers the 47 and 48 RE transmissions but there is evidence that it is used on other years / types of Chrysler products. Procedure should be similar for the other automatics used in the 2500 3500 line of trucks.
OK, changed out the Neutral Safety Switch, AKA transmission range sensor last night. Easy job, but messy as all get out. You'll need a drain pan, 1/4 drive ratchet, 6" extension ( 4" would probably work ), small TORX bits ( forgot to check the size ), 1qt or more of ATF+4 ( depending on how fast you are ). Wouldn't be a bad idea to do this in conjunction with a fluid and filter change of the transmission.
1) Set parking brake
2) Block wheels from rolling back on you in case parking brake don't work
3) With engine not running shift to Neutral
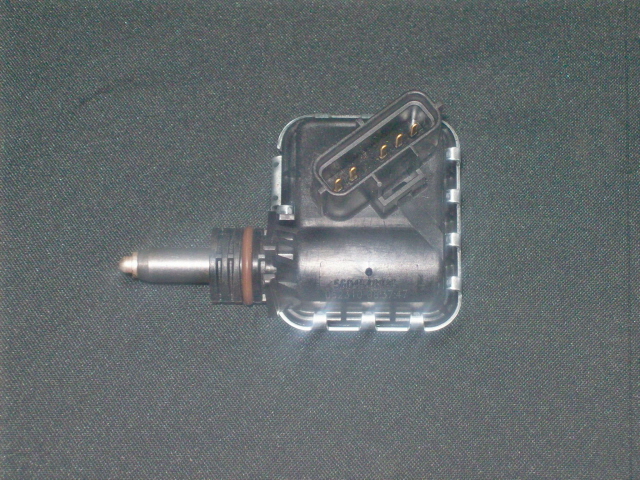
4) Slide under the truck about right where the front of the oil pan is for the transmission, on the drivers side. When looking at the side of the transmission casing, you will see where the shifter cable connects to the linkage on the transmission. Right behind it is the Safety switch. It will have wires and a connector on it and will be black plastic with two Torx head screws holding it to the casing.
5) Pull out the Red locking coller on the connector, unplug the wires from the switch. Check this connector for fluid build up inside it. If there is any use electrical contact cleaner in the spray can to clean it out. Once clean put some Dielectric grease on the connector covering the female section of the plug.
6) Remove the two Torx bolts, and be ready for a face full of oil.
7) At this point as soon as you put some pressure on the switch to pull it out, you need to have the drain pan in place to catch the fluid stream that is going to gush out the side of the case. And have the new switch in hand to stick back in place of the old one. Depending on how quick you are will depend on how much fluid you will lose.
8) Insert and tighten the two Torx screws holding the switch in place.
9) Connect the plug to the switch.
10) Push Red locking coller on plug back in.
11) Check transmission dip stick to ensure there is at least some fluid showing on the stick. If not, add some till it just starts to show on the stick.
12) Place gear selecter back in park, and go through the start procedure to start the truck.
13) While placing your foot on the brake pedal, put the gear selector through it's complete range of movement, allowing a moment between positions for the fluid to flow throught the valve body. Once you have done this, ending with the selector in the park position. Double check to be sure the parking brake is still applied, and shift the gear selector into neutral.
14) Now check the transmission fluid on the dipstick, with engine running. Add ATF+4 until the stick reads full, following the directions on the stick.
15) Place the gear selector back into the park position.
16) Release the parking brake, and back the truck up so you can clean up the mess under it, and go for a test drive.
17) Once the test drive is over, set the parking brake and repeat the directions starting with step 14, until the transmission fluid level is at a satisfactory level on the dipstick.
It takes longer to prepare and clean up, than it does to do the change out and test drive. You will notice right away that the movment of the gear selector is firmer, than it was before the change out. The reason for this is that the switch you just put in is also the tensioning device ( detent ) for the gear selectors position on the pawl inside the transmission. So when the spring is weak in the switch it creats a situation in which the ECM does not know what gear the transmission is in, there by causing the no start situation I was experiancing.
-
 1
1
There are no reviews to display.