Jump to content

Welcome To Mopar1973Man.Com LLC

We are privately owned, with access to a professional Diesel Mechanic, who can provide additional support for Dodge Ram Cummins Diesel vehicles. Many detailed information is FREE and available to read. However, in order to interact directly with our Diesel Mechanic, Michael, by phone, via zoom, or as the web-based option, Subscription Plans are offered that will enable these and other features.  Go to the Subscription Page and Select a desired plan. At any time you wish to cancel the Subscription, click Subscription Page, select the 'Cancel' button, and it will be canceled. For your convenience, all subscriptions are on auto-renewal.

Posted

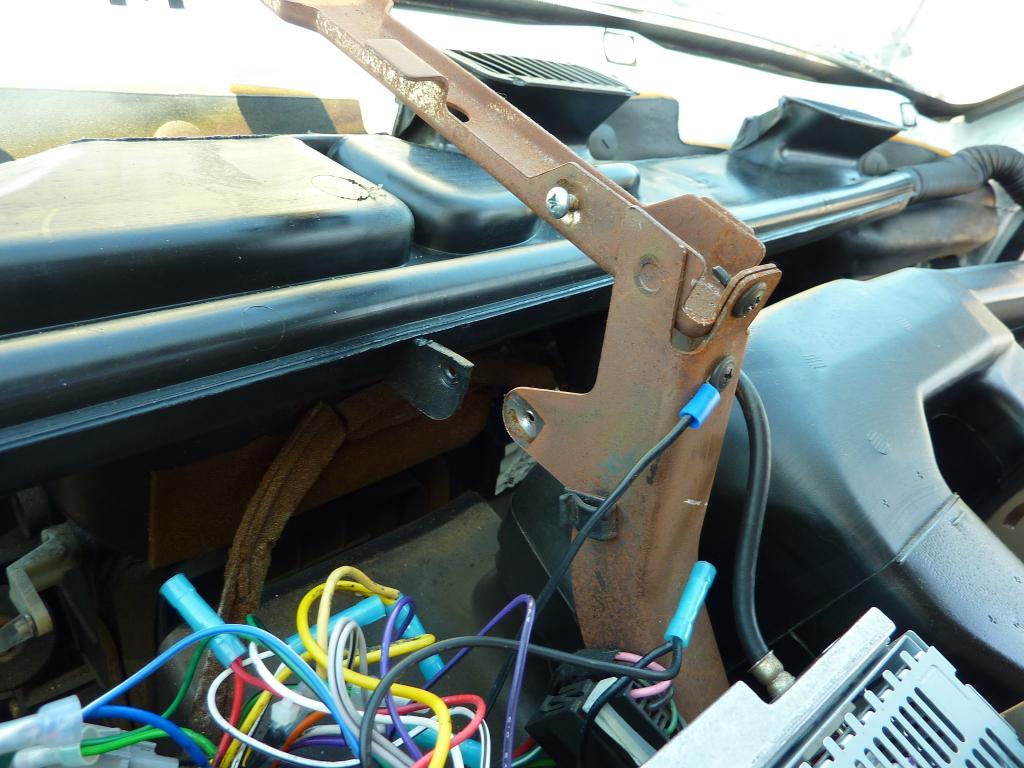
Has anyone replaced the dash cap with a new one? On my 96, which should be the same for 94 - 97, How do you get to the screws on passenger side and the defrost vents? No problem removing the old dash because it was so broken I could just about reach in from the top. However to install the new dash there are screws on the passenger side and on the defrost vents that have to be screwed in from the windshield side of the dash. I understand that I need to unbolt and tilt the entire dash toward the seat but it still looks near impossible to reach these screws. Any experienced advice?

post-10975-138698186664_thumb.jpg

  • Replies 2
  • Views 1.2k
  • Created
  • Last Reply

Top Posters In This Topic

Posted Images

Featured Replies

Make sure you drop the steering collumn. I used a 5/16 socket and 1/4 drive ratchet with a two inch extension on the screws on the front on mine. They were hex headed and also had the slots for phillips screwdriver, but the socket and ratchet gave me a lot more easily usable torque and also was shorter, so it was easier to fit my big hand back there with it. Your screws may not be hex headed, but hopefully they are.

  • Author

Finished this job over the weekend; I took some pictures and will post those in a bit. maybe it is just me but jobs like this always seem more involved than they need to be.

1. If you wish to paint the replacement - SEM makes good paints for this application and if you want to have factory like colors, try to use an actual color chip chart in a store that stocks the paints. The representation of colors from the internet can get you close but in the end you will guess.

2. Remove Radio, adjustable AC vents, and instrument cluster, basically most of what bolts into the dash. (I did not need to remove the heater controls or the headlight switch.

3. Plan to drop the steering column (thanks awoods9520) and completely drop the dash, removing the two pivot bolts behind the kick panels. I also disconnected some wiring at the passenger end which allowed a few extra inches of access. (I used a cardboard box to support the dash on the passenger side while the steering column supports it on the driver side.)

4. Once the dash is dropped, remove defrost and passenger side AC plenums. The defrost plenum is held onto the dash cap by two screws on each vent and one screw on the center dash brace. The AC plenum is held on by three screws, one on each vent. (I found it necessary to remove the plenums to allow access to the screws that hold the dash cap to the passenger side of the dashboard.)

5. Repair any broken plastic on the dashboard frame; I used Superglue, epoxy and even shoegoo for a semi flexible repair. Friction tape over some of these points to add a bit more strength/flexibility in the future.

6. Use felt and friction tape on friction points. The old dash should show you where these are. Also, you can count on the foam around the air ducts to fall apart so you may want to plan to replace that too. Mine was a sticky mess and I was able to replace with foam tape from the hardware store.

Installation:

1. The screws on the passenger side (I think there are five of them) all attach from the rear of the dash and will require that you reach in from the side and underneath the new dash cap. If the air plenums are out of the way this is not too difficult and for this I can only suggest to be patient, use a magnetic tip screwdriver and even use the tape the screw onto the screwdriver trick. The attachment screws on the driver’s side are easy to attach and all done from the front. (before I began this job I pre-screwed each of the connection points to cut the threads into the cap plastic. This just made the screwing in job a bit easier)

2. Once the passenger side dash screws are attached you need to reattach the plenums. (There are three dash support brackets on the top (ends and middle) that the dash cap needs to align with. There are tabs on the new cap that need to fit into a hole on each bracket. Alignment of the defrost plenum will be impossible if these brackets are not aligned.) I did the AC plenum first but in retrospect not sure if this is the best sequence. In fact I wonder if it would be possible to attach the defrost plenum to the dash cap before even putting the replacement into place. All of these screws are attached from behind the dash, driving back towards the interior of the cab. I used an assortment of screwdrivers, a mirror and patience.

3. When the plenums are reconnected you only need to reinstall the pivot bolts, reconnect any wires you disconnected, reattach the steering column and raise and pivot the entire dash back into place. Screw in the five bolts on the top of the dash and tighten the pivot bolts. Reconnect all of the parts you removed and clean up.

post-10975-138698187011_thumb.jpg

post-10975-138698187021_thumb.jpg

post-10975-138698187031_thumb.jpg

post-10975-138698187043_thumb.jpg

post-10975-138698187054_thumb.jpg

post-10975-138698187064_thumb.jpg

Did This Forum Post Help You?

Show the author some love by liking their post!

Welcome To Mopar1973Man.Com LLC

We are privately owned, with access to a professional Diesel Mechanic, who can provide additional support for Dodge Ram Cummins Diesel vehicles. Many detailed information is FREE and available to read. However, in order to interact directly with our Diesel Mechanic, Michael, by phone, via zoom, or as the web-based option, Subscription Plans are offered that will enable these and other features.  Go to the Subscription Page and Select a desired plan. At any time you wish to cancel the Subscription, click Subscription Page, select the 'Cancel' button, and it will be canceled. For your convenience, all subscriptions are on auto-renewal.