
Erratic Tachometer or No Tachometer
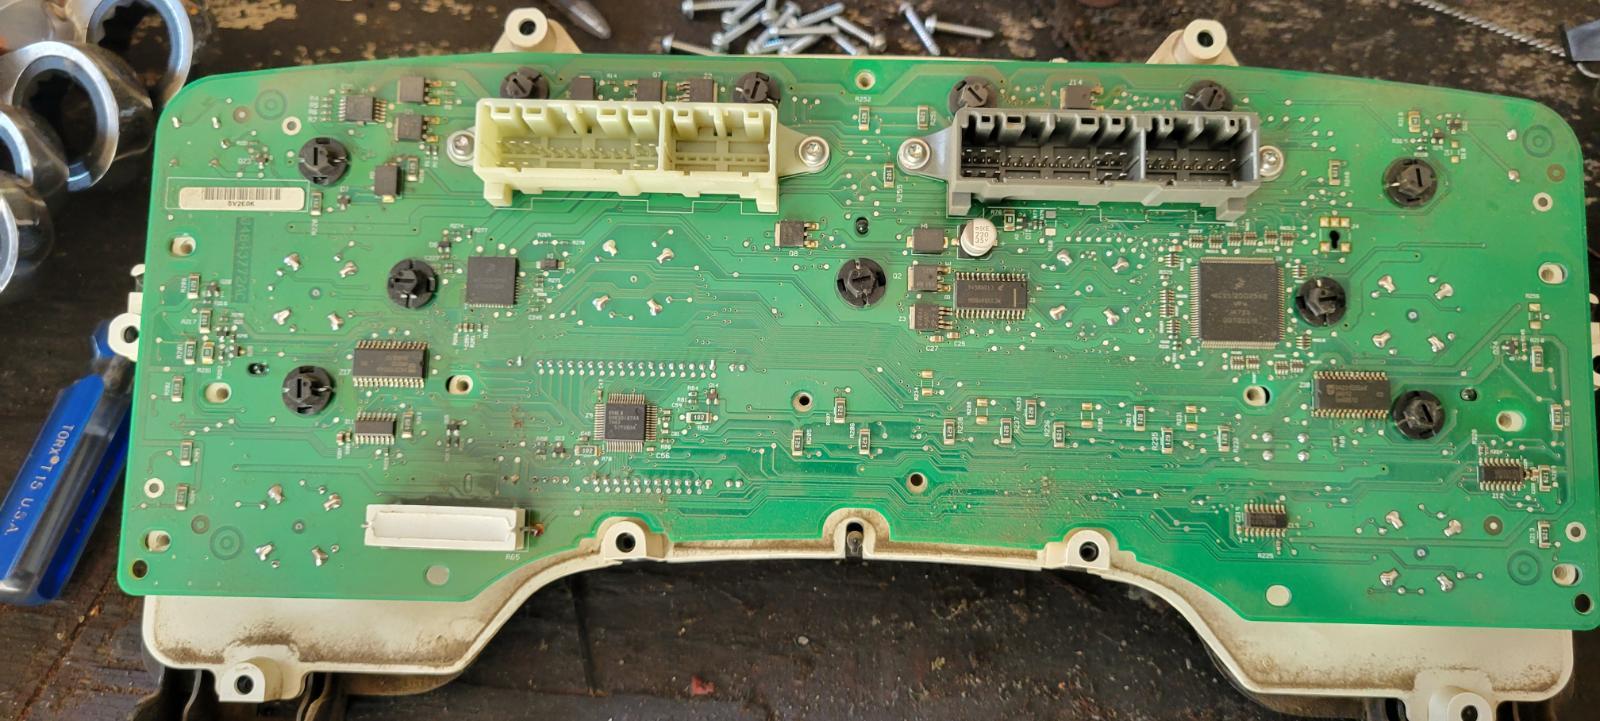
For all of you with 3rd generation trucks where the tachometer is bouncing or just showing true values, you need to continue to read on here. The reason for poor tachometer performance is caused by the lead-free solder used on the cluster printed circuit board. Now the biggest thing your going to need is a Philips screwdriver and a T15 Torx screwdriver and a good fine-tipped soldering iron. Remove the instrument cluster from the dash and remove the black plastic cover on the back of the cluster. How do you do this? The knee bolster needs to be removed first. There are 2 Phillips screws at the bottom. Then it unsnaps from the top. Now remove the center trim around the stereo there are no screws it's simply unsnaps. Now you should see the cluster trim screws should be 4 Phillips screws holding the trim in place. Now be careful the headlight switch is plugged into the back. Now the cluster is held in by 4 Phillips screws. Tilt the steering wheel all the way down to gain a bit more room. Staring on the passenger side of the instrument cluster tilt it out to gain room to unplug the connectors on the back of the instrument cluster. There are 3 plugs in total. Once unplugged you can remove the cluster and take it to a suitable work table.
Now at this point, there are 18 screws. These are all T15 Torx screws. Remove all Torx screws holding the black plastic cover in place. Be careful the outside screws hold the cluster front lens in place so be careful not to damage the gauge needles or front side. Also do not remove any screws on the plugs not required. Now there are 3 chips, in particular, to pay attention to. There are 28 legs in total on these 3 chips that control the data for the tachometer gauge. Here is where you are going to use a fine-tipped soldering iron and carefully heat each leg of these chips and flow the solder again. DO NOT add any solder at all it is not required. When you complete one chip take your cellphone and start your camera and set the zoom for 3x. Now you'll be able to get up close and look at all the legs and verify that no solder has a bridge between any of the legs. Then move on to the next chip and repeat. When all 3 chips are done double check your work this is very important if there are any bridges between any of the legs of any chip you might cause irreparable damage.
For the detailed article please visit the Elite Articles.