


Lone Watie
Unpaid Member
-
Joined
-
Last visited
Everything posted by Lone Watie
-
Crack one of the unused ports on the filtered side of the canister (side towards the VP), install a plug in there if needed, and just loosen it ever so slightly, you'll air bubbles come out, and then a small stream of fuel once the air is out of the system, and the canister is full. Might need to bump the key several times to get it all primed up. Usually takes me anywhere from 6-7 times of key bumping to prime my filter, I have same as you. I'll try to get a pic on here for you. I wouldn't touch the inlet to the VP from the canister, it's kind of a pain to get to and when you need to tighten it back up once the canister's primed, your hand will inevitably snag on a hose and you'll be more frustrated.
-
Richard told me that some guys run the toggle switch directly to the pigtail harness for the OEM pump. In other words, they leave the Hobbs in place, which would be akin to not having it there at all, just don't connect the spade connectors to it, rather they simply connect the two wires which would normally go to the hobbs directly to the wires for the toggle, so I suppose you could take the hobbs out of the fuel flow. Question is, how would you prime after a filter change (are you asking the question based on the stock filter in place? Without the stock pump, you would have no way to prime the filter other than continuously cranking until the air is out of the fuel boss lines to the filter, which as mentioned, could burn out your starter. The assassin pump doesn't use the stock lift pump, if I recall correctly. Take a look at this pdf on the fuel boss instructions, and you'll see the plumbing going to the stock and the fuel boss and you'll see what we're talking about. With the fuel boss system, the ECM connection to the stock pump is pig-tailed so that for starts and primes, the stock lift pump works as it supposed to with the key bump, and when initially turning the key to on for 2 seconds, and to supply pressure for the start. Once pressure builds, the hobbs senses it and shuts off the stocker, and lets the fuel boss do its thing.98.5-02-Fuel-Boss-Install-Manual.pdf
-
My isolator is going on 3 years now, and I have it isolated as well from rubbing against anything under the hood, and my FP has been verified with a test gauge. Also using a needle valve on it. I just wanted post-filter pressure for dirty filter indications. I guess I could have plumbed in a tee right after the filter and achieved the same effect. I might do that just for ease of getting to the gauge connection. Down on the VP inlet is a little tight with all the other hoses and lines down there.
-
Thanks for the link; I'll shoot him an email. I sent a PM, but hasn't responded yet. I'm sure he will. I'll be ordering the dowel pin kit soon and get that taken care of.
-
I read about that there as well. The only things GDP has mentioned to me is with the regulator, or in this case, as it's called with the fuel boss, the bypass valve, that some debris might get stuck in the spring and cause the bypass valve to stick open, which will diminish fuel pressure with this system. I believe cumminsdieselpwr had that issue a couple weeks ago after his install. There is a check valve in the system as well which goes from a tee up to the stock lift pump, but if the fuel boss is working properly, then the check valve won't be used, as the stock pump will not be operating. It's just there to keep fuel from flowing backwards back down to the tee, from where it flows forward to the fuel boss. I think the guy at CF mentioned that it was his bypass valve spring had failed somehow, causing the piston in the bypass valve/regulator to stay closed, which caused the catastrophic failure of the stock filter due to over pressurization. I believe the only difference between the assassin and the fuel boss is a draw straw (assassin) and no stock lift pump in the setup (assassin). Fuel Boss = Stock Lift Pump when needed and No Draw Straw. I never could find the install instructions on the internet for the assassin to compare their setup, though. But, with no stock lift pump with the assassin, there would be no check valve going to the stocker, only a bypass on the return to the tank, which both systems have. If I'm incorrect with these assumptions, please correct me.
-
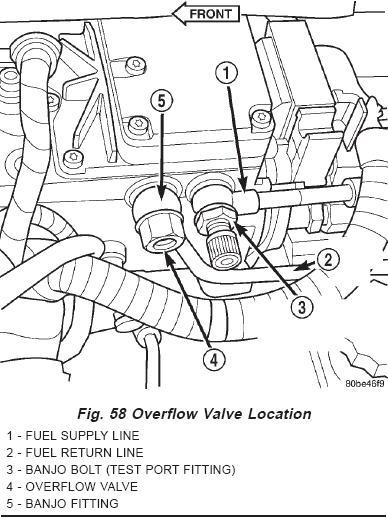
There are 2 banjo fittings at the front of the vp, one is the inlet, the other is the overflow valve, to which the return from the VP is attached. The one furthest most to the front is the overflow, the one aft of that, towards the rear, or right in the picture, of the truck is the inlet from your FASS/AirDog/Stock Filter,whichever you have. Here's a pic mopar man has posted in the articles section of the forum. The left of the pic is the front of the VP as looking at it from the left side of the engine compartment. Right side is to the rear of the truck. Hope this helps. And, to answer your question, yes, that piece replaces the banjo fitting in the pic. The only difference is the the fitting from vulcan (I believe Geno's has that part as well see this link http://www.genosgarage.com/BANJO-BOLT-TAPPED-985-09-59L-67L/productinfo/BF%2DLONG%2DTAPPED/) is extended so that it can be tapped for the 1/8" NPT for your FP gauge. I used the 3/8" line kit from vulcan to go from the stock filter to the VP inlet, and added that so I could attach my FP gauge line there as well. You should be good. Hopefully, if I'm wrong, others will chime in on this. Other than the FASS, our VPs should be the same. I'm a 1999 as well. By the way, Richard at Glacier Diesel, from whom I got my fuel boss, mentioned yesterday to me, as a side note, that the overflow valve has been known to cause erratic pressure readings when it starts getting weak. I don't know the internal make up of that overflow valve. Geno's sells that as well for something around $36 and is as easy to replace as the banjo fitting we're discussing. I'm going to order one from Geno's to have in the toolbox if needed. Here's a link for that as well http://www.genosgarage.com/BOSCH-VP44-FUEL-OVERFLOW-VALVE-985-02-24V/productinfo/1467445003/
-
Also picked up an extra belt. I need to go through all my fittings though, I have a drip coming from somewhere near the filter/stock lift pump, one of those two lines. I'm gonna put my money on the hobbs fitting, as it's only held by hose clamps, not a pushLok. I might get me a pushlok tee from Geno's and replace that setup, looks more secure. I'll also pick up a new VP overflow valve. Who knows how long that things been on there. Richard mentioned that many times, when a shop replaces the VP, they reuse the old overflow valve. Took a long trip today 200 mi round trip and she did well.
-
That big wrench looks a little more user friendly than the set I borrowed from napa, which had some sort of adjustable bolt holder that was next to impossible to keep on the bolts. I'll get a hold of JL and see what we can do. Thanks for the tips.
-
From the article, that's what I was afraid of. Guess I'll do that next. Did you have any trouble with getting the fan off? I need a 36mm wrench and a tool to hold the hub, which napa will loan me, but I tried to get the fan off the other day and it gave me a hard time. Maybe there's an easier way. That's probably the most difficult part of doing this. At least the KDP kit is inexpensive. I've had enough fun this week though, and this will have to wait a couple weeks.
-
Is there an easy way to determine whether my 24v is included in the early model 24v engines where the dowel pin is an issue as referenced in the TDR article below: http://www.genosgarage.com/GenosGarageTechArticles/TDR57_KillerDowelPin.pdf
-
The inlet for the VP is 12mm, though, so sooner or later something at 12mm is going to have to be plumbed into the VP. I'm running the 3/8 in kit from vulcan from my filter to the fitting referenced above into the VP.
-
Well, after a week of flushing radiator, changing water pump, replacing thermostat, and an unforeseen alternator replacement, I finally got around to installing my Fuel Boss yesterday morning, and finished it up this afternoon. I'm in the process of doing a write-up on it with all my notes and comments, but wanted to let you all know that it's working as advertised. Richard at GDP was always available for my various questions. I primed her up with a mityvac pump to the fuel boss, and keyed the stock pump several times to get out all the air and prime the filter. I cranked it for about 20 seconds or so and she coughed and started. She's running about 15-17 steady PSI for me, and when I step on it, or go faster, it builds up to around 18 PSI. I'm quite pleased with it.
-
I don't know the size, but there is some sort of 90 degree elbow I'm using right at the VP inlet that is tapped for 1/8 in pipe threads which is where my FP gauge is hooked up to. You should be able to do this no problem. It is a 90º banjo bolt I believe with the 1/8 in threads tapped into the opposite of the elbow. Call Vulcan Performance, they should be able to help you out or visit the website: http://www.vulcanperformance.com They have a large variety of fittings. I'll do some research right now to see if I can find it, it's where I got mine. Here you go, I think this is what I used - it's a tapped banjo bolt with 1/8" NPT, it wasn't an elbow but straight. http://www.vulcanperformance.com/Tapped-Banjo-Bolt-p/tbb.htm
-
My lower hose is not at the very bottom of the tank so was concerned about not getting all the old stuff out. My valve actually turned quite easily. It was when I refilled I noticed the dripping coming from the disintegrated o-ring. I have to confess that in the 14 years since I've had the truck I haven't ever flushed it, so it was imperative to get all the stuff out. It took me about 3 quick drives with water in it to flush it out nice and good. All is good now. I replaced my water pump and t-stat as well, which was very painless. I didn't even cuss this time when putting that serp belt back on. I had nothing to lose when I noticed the drip from the drain, and figured if I couldn't get the valve out, I would be out a radiator anyway, so pulled and twisted until she came out. 2$ at napa for a couple o-rings and she's all good. The alternator didn't fare so well, though. I was trying to change the bearings (bosch) and somehow in my process I froze up the rotor.
-
I just put some vise grips on it and kept twisting and pulling it counter-clockwise and it came out with all the pieces of old o-ring. It didn't take too much force. I don't know if it made it easier or not, but I pulled the radiator out before figuring out the o-rings were bad while diagnosing the leak. Probably was a good idea, as enabled me to really flush that radiator out and make sure there were no pieces of o-ring left in there.
-
I changed my alternator this morning. Went from a Bosch to a Napa Denso. The install went well, but when I started the truck, the scan gauge II did not pick up the water temp for the intake temp for about 5 minutes. I shut the truck off, restarted, and started registering water temp and intake temp after a few seconds. The alternator is putting out 14+ VDC. Rated at 136 Amps. There were no codes thrown, and yesterday was working fine after my radiator flush/water pump repl/and t-stat replacement. Anyone have any ideas of anything I should check should this recur? Thanks.
-
Thanks. I picked one up at Napa last night and will stick her on there this morning.
-
2 new o-rings from Napa and back in business. Unfortunately, my alternator went bad while trying to replace the brushes. don't know what I did but the rotor seized.
-
Will a denso alternator fit if my original is a bosch, i.e. are the connectors and mounts the same? I was trying to replace the brushes today with Gould's brush/bearing kit, and the rotor seized on my somehow, and now need new alternator. Thanks.
-
Is the radiator drain plug repairable? Mine opened and closed without a hitch, but closed it now to fill back up and is dripping and can't get it to stop. Thanks.
-
I'm all good now: 3.55, Dana 60 front, Spicer 70 Rear. Thanks for the help.
-
Sounds good. I should have the sticker under the hood still, so will check. Thanks.
-
How can I tell the gear ratio on my axles? Just curious is all.
-
Well. sounds like a plan, then, I'll do the same.
-
Do you disconnect both hoses to accomplish that? I understand, thinking that you don't want to push a bunch of muck into the block or the water pump.

