


Central Axle Disconnect (CAD) System Troubleshooting
4WD dodge trucks from 94-early 02’ had a CAD system for the front axle. It messes up a lot so here is a rundown on how to track the problems. One alternative is a posi lock cable that allows you to engage the CAD manually, eliminating a lot of problems. http://www.4x4posi-lok.com/
Vacuum Lines
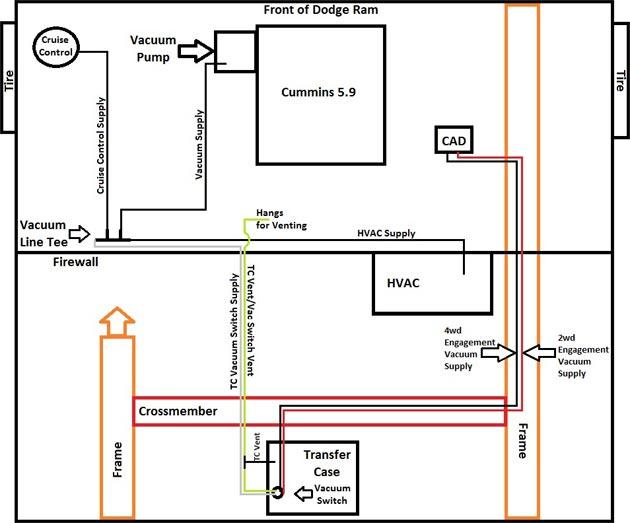
There are 4 vacuum lines that serve a purpose for the CAD. First off is the white or grey line. This line is the supply line for vacuum. It runs from a T connector on the firewall, down to the vacuum switch located on the top of the of transfer case. Secondly is a green line. This line T’s into the transfer case vent (marked in the pic) and also goes to the vacuum switch to serve as the vacuum vent. It runs up to the firewall and has a fancy end on it that keeps dirt out. Then there are the red and black lines that control the actual CAD. I think red is for 2wd and the black controlled 4wd. They go directly from the vacuum switch to the CAD on the axle. They swap vacuum so one will have vacuum and the other will just be vented.
One cause of issues can be the vacuum lines being full of mud. Blow through each one to make sure they are all clear, any connection can be pulled off, there is nothing that is permanent, if it is rubber, it can be pulled.
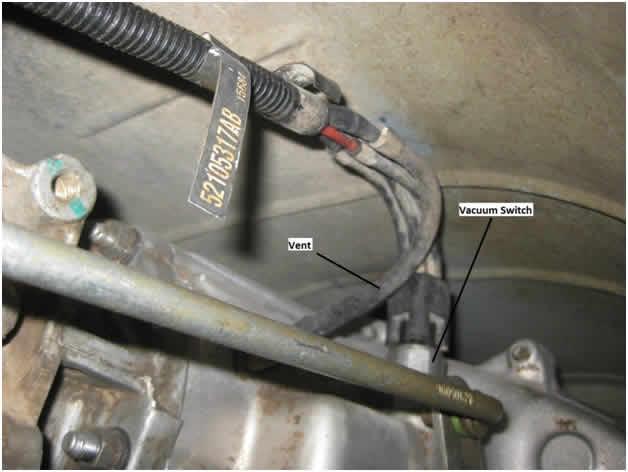
Vacuum Switch
The switch itself is very simple and merely swaps vacuum between the red and black lines. All 4 lines go onto the big black connector which will pull off of the vacuum switch. Then you will have just the switch and 4 little ½” tubes where the vacuum lines go. To ensure it is working, take the grey line out and make sure it is getting vacuum (truck must be running). Then pull the red and black lines and the red should have vacuum if it is in 2wd and when you put it in 4wd, the vacuum should switch to the black. You can pull each line out of the 5” or so black hose coming out of the switch so you can feel for vacuum there, just remember where each line went. Make sure the big black connector is not full of mud and you might have to take the vacuum switch out by unscrewing it from the transfer case, then look in it and make sure it doesn’t have mud in the 4 ports either. If it does not switch vacuum, it is junk. NAPA has them in stock as they are a common part among vehicles.
CAD Vacuum Solenoid
The solenoid that does the actual 4wd engaging runs by vacuum with a diaphragm that pushes or pulls the axle coupling to engage or disengage 4wd. You can take it off of the truck and hook the vacuum lines up and see if it moves in and out. It should move in and out easily by hand. If it does not move easily by hand and does not move in and out when you switch vacuum (make sure it actually has vacuum at the lines too), then it is junk and must be replaced. NAPA has those too for much cheaper than anyone else. Ebay has them for even cheaper.
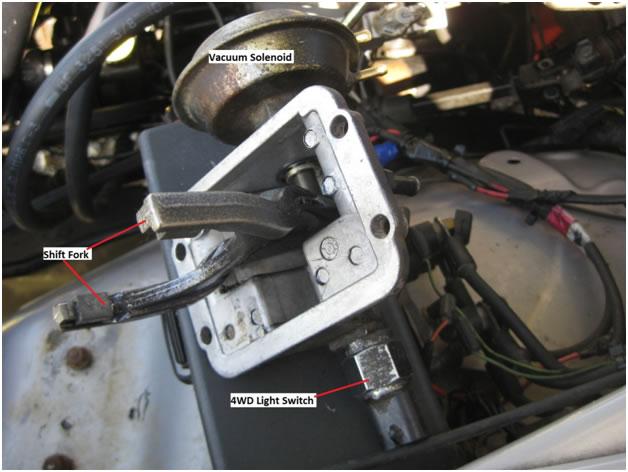
4WD Light Switch
The 4WD indicator light you see on your dash is ran by the switch that is in the CAD housing. When the shift fork moves forward into 4wd, the shaft presses the light switch because it is just a push button. If your light doesn’t work you can test the switch with a multimeter set on ohms. Take the electrical connector off and measure resistance. It should go to 0 (or close to it, maybe 0-10ohms) when it is in 4wd and be at infinity (open) when it is 2wd. You can do it in the truck or you can simply unscrew the switch and just press the button by hand. If it does not do that, it is junk. If I remember, this was a dealer only part. (See video at end)
Shifting Fork
The fork is what moves the coupling back and forth and all I wanted to mention here is that there are 2 versions of it. One is for 94-99’ 2500s, and the other is for 2000-early 2002 2500s. 1500s use the same fork but for different years.
-
 2
2