Gregturley
Monthly Subscription
-
Joined
-
Last visited
Everything posted by Gregturley
-
@IBMobile that would be a very nice feature to have. I was thinking about looking into a way to do it but it may be above my head and price range. Hopefully you can come up with something not too complicated.
-
Parts from Amazon finally showed up. Got it plumbed with push to connect and air brake line. Looks a little cleaner now. PARTS, PRICES, SOURCES: Exhaust housing w/vacuum cylinder: traded .40s&w ammo about $45 Vacuum solenoid: Pacbrake # C11829: eBay $90.31 Pacbrake Superlube: #C18037: eBay $14.75 Push to connect 1/4" tube to 1/8" npt 10 pack: Amazon $14.68 Quickun Air Pneumatic Mufflers, 1/8" Male Thread Sintered Bronze Exhaust Muffler Silencer (Pack of 3): Amazon $6.58 Tailonz Pneumatic 1/4 Inch od Push to Connect Fittings Pneumatic Fittings Kit 10 Spliters+10 Elbows+10 tee+10 Straight (40 pcs): Amazon $14.99 15' 1/4" Air brake line: Parker store $12.00 1/16" steel pipe plug: Parker store $1.25 Wire, relay, relay base, butt connectors, heat shrink, switch, led, sheet metal, screws, zip ties, 1/4" vacuum line, vacuum tee, I already had. Total cost was around $190.00 and a few days to get everything freed up, plumbed and wired.
-
@pepsi71ocean if your alt is working for you theres really no reason to change it. If you have a big electrical demand or when it craps out its an affordable upgrade. Saved me a bunch of money and my lights no longer dim with Metallica making my ears bleed!
-
02 Dodge Durango 5.9l V8 alternator is 160 amp and all you have to do is swap the pulley with your stock pulley. I cut down some nuts that grab more threads if you need one let me know. Part number in in a thread on here i did a month or so ago.
-
@Mopar1973Man just submitted the article. If any changes need to be made let me know.
-
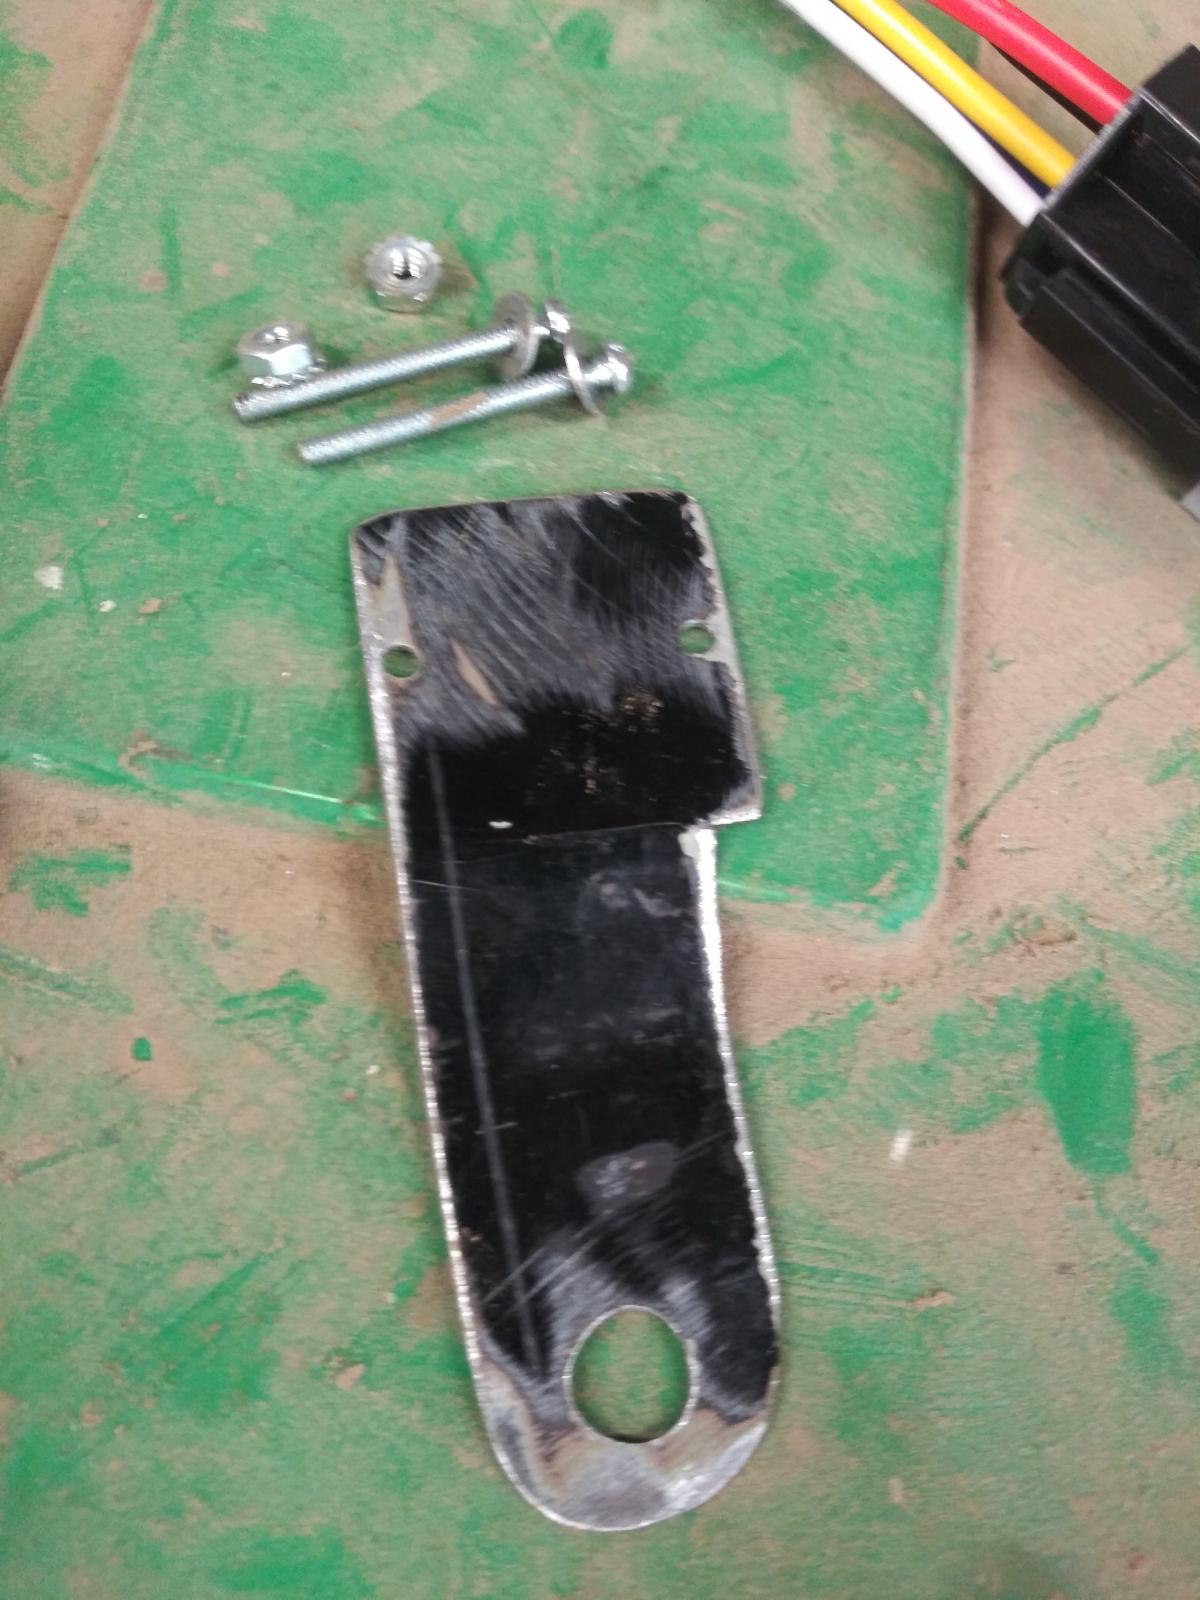
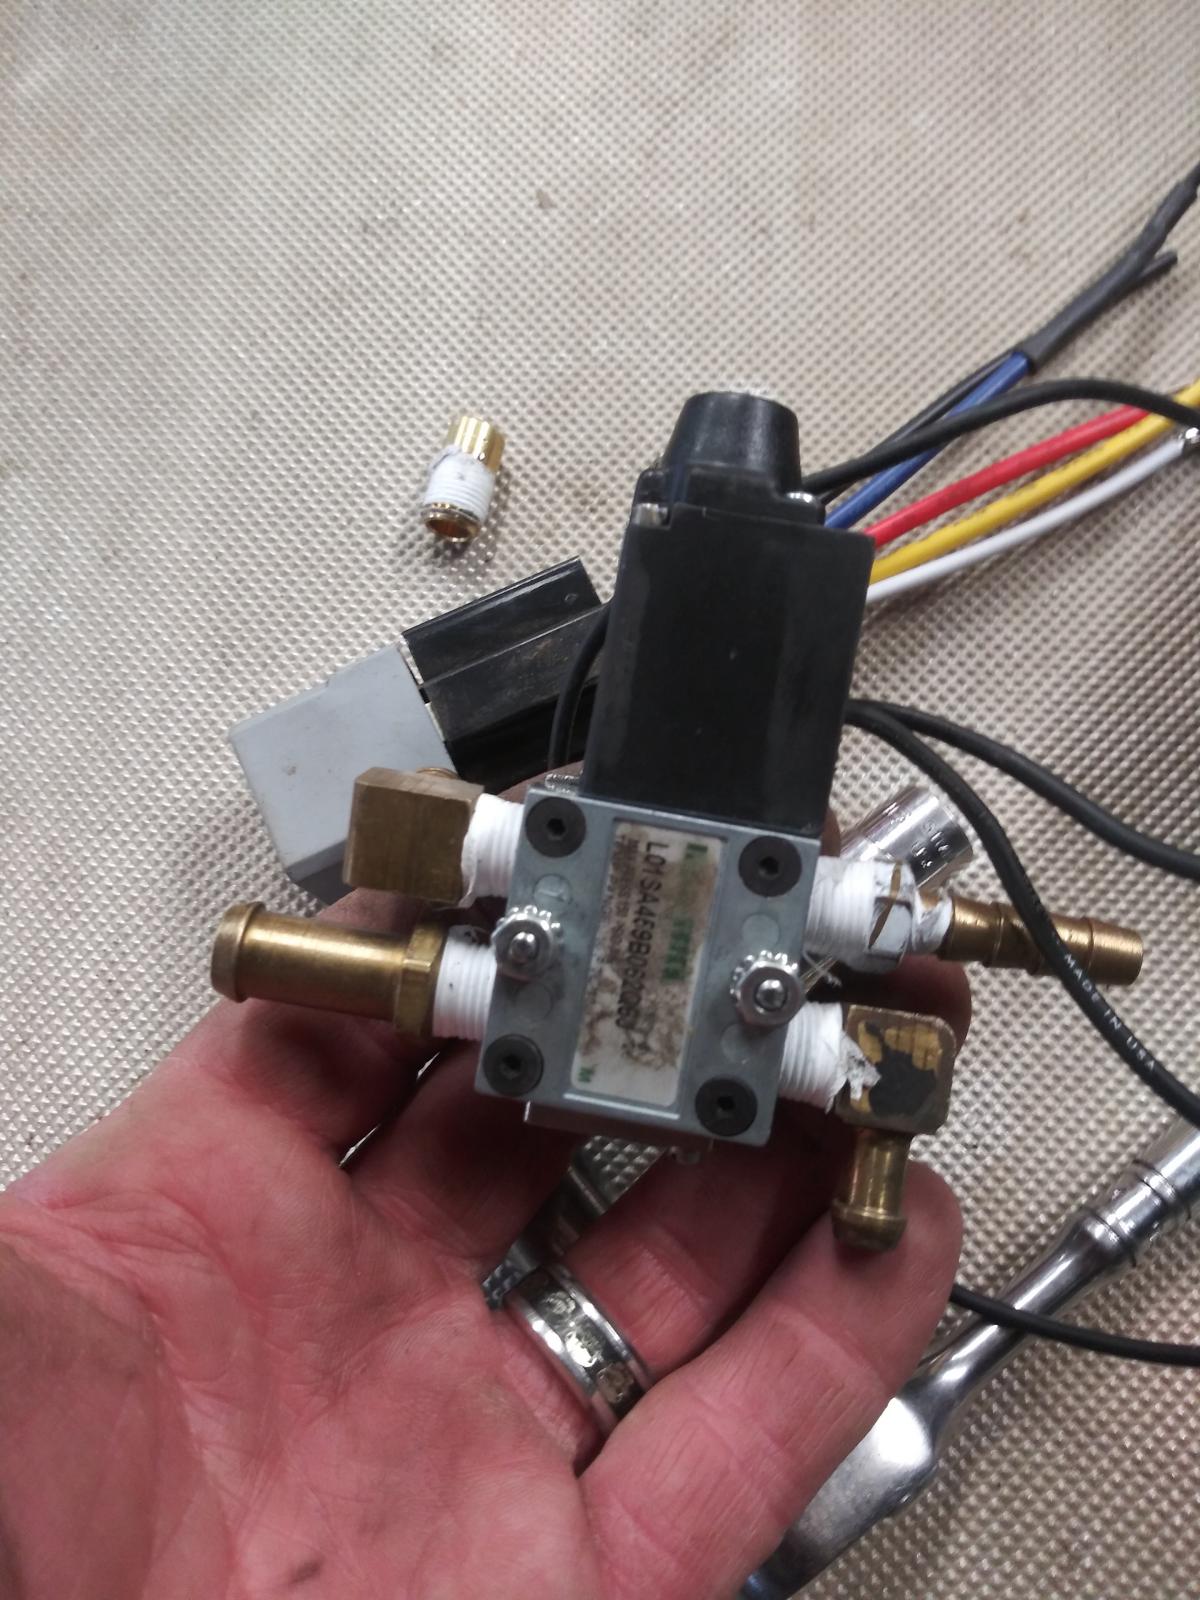
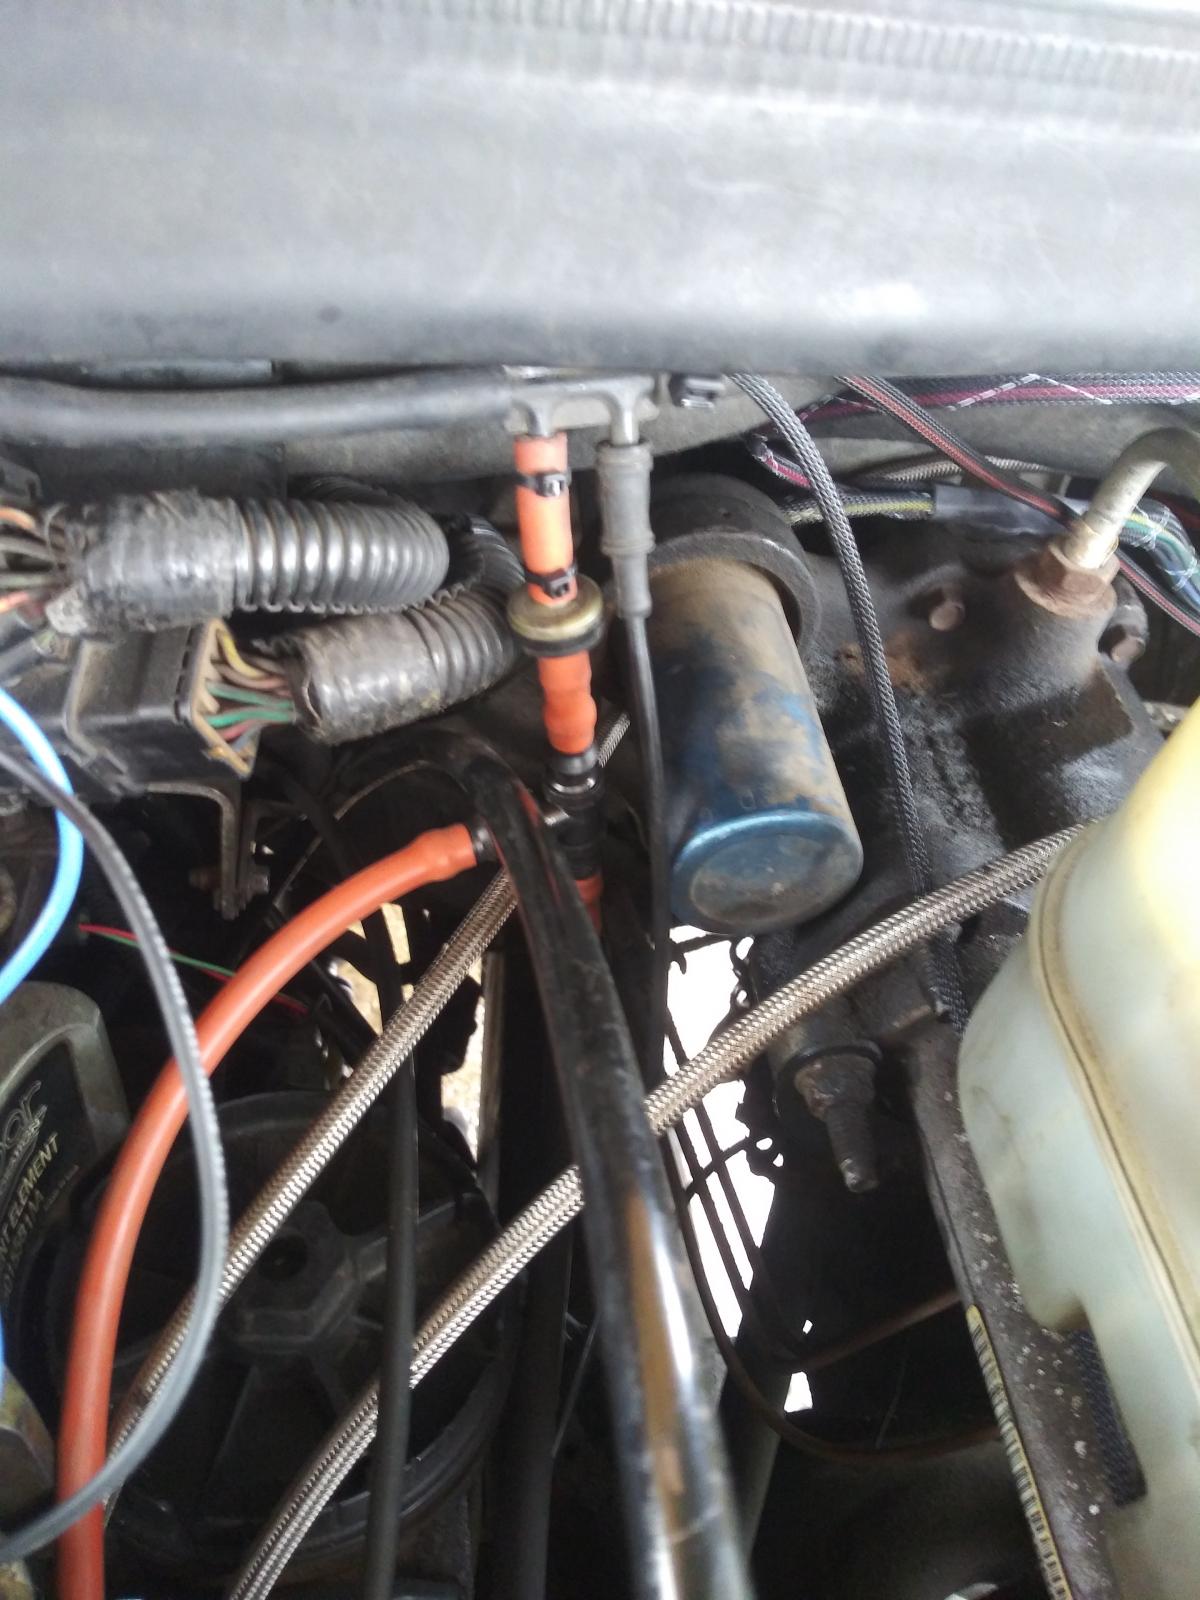
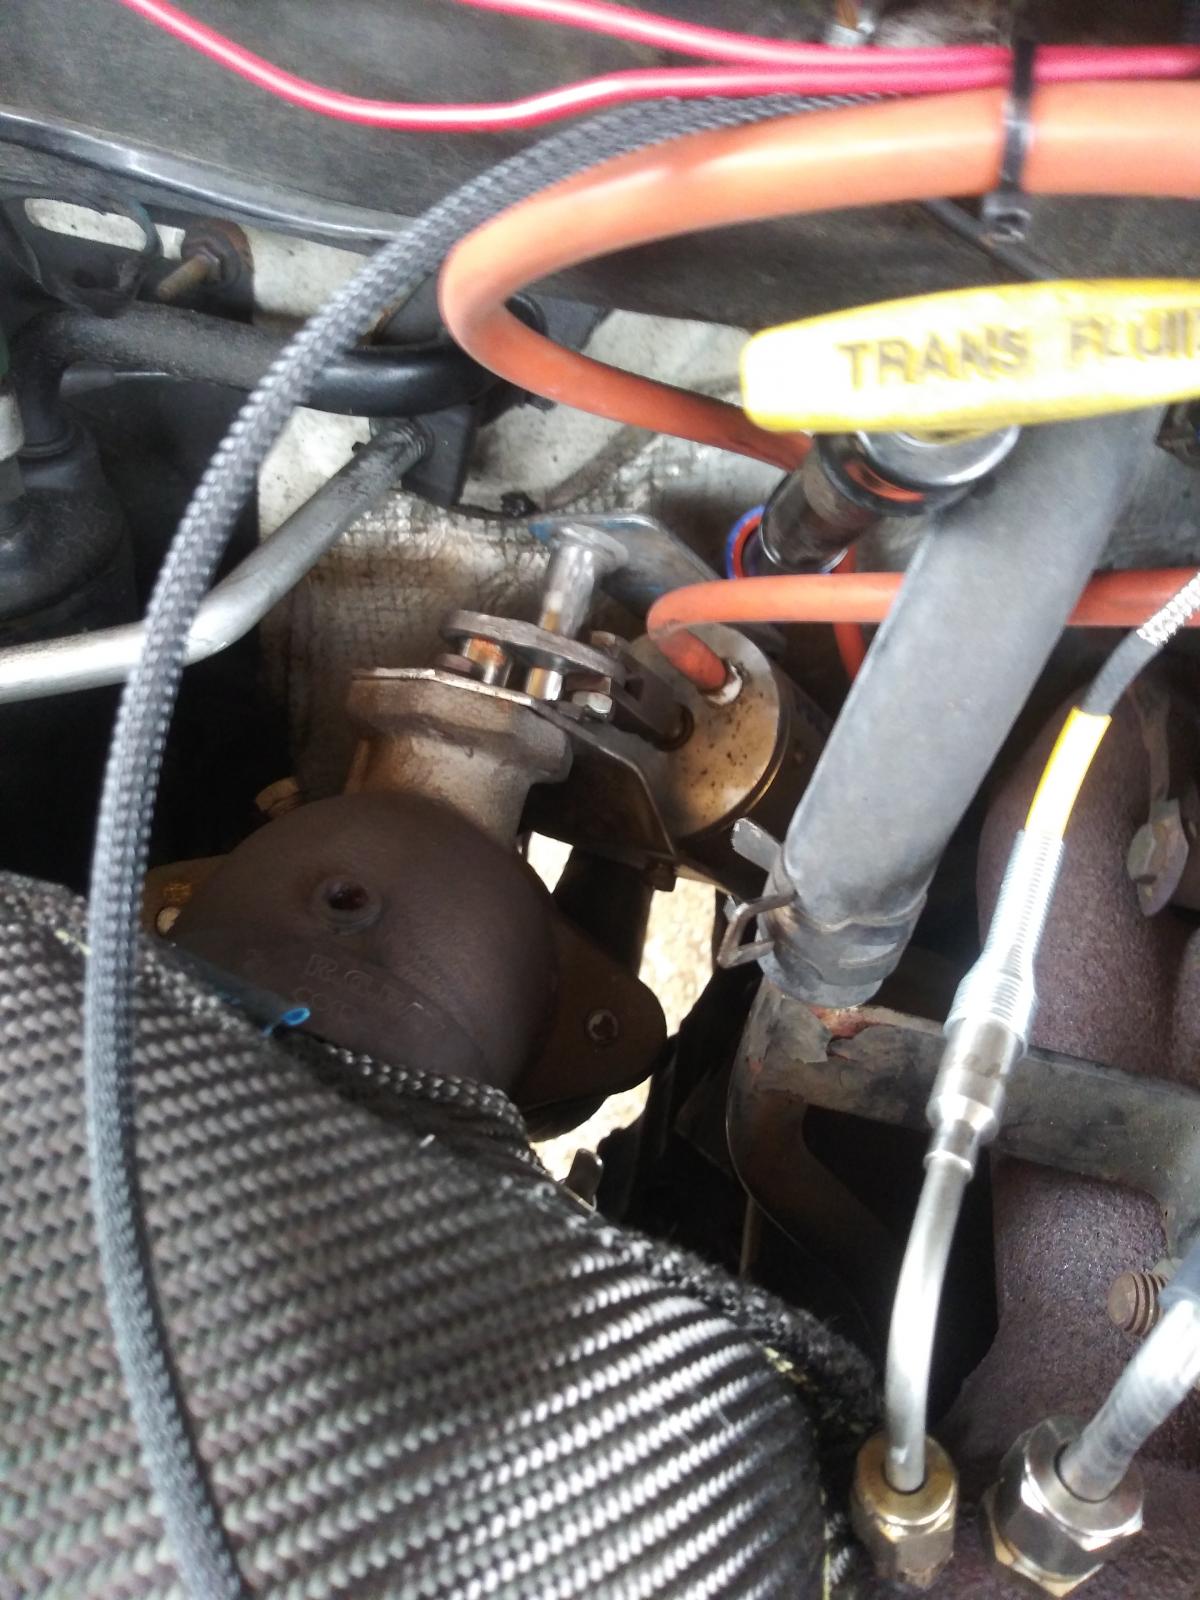
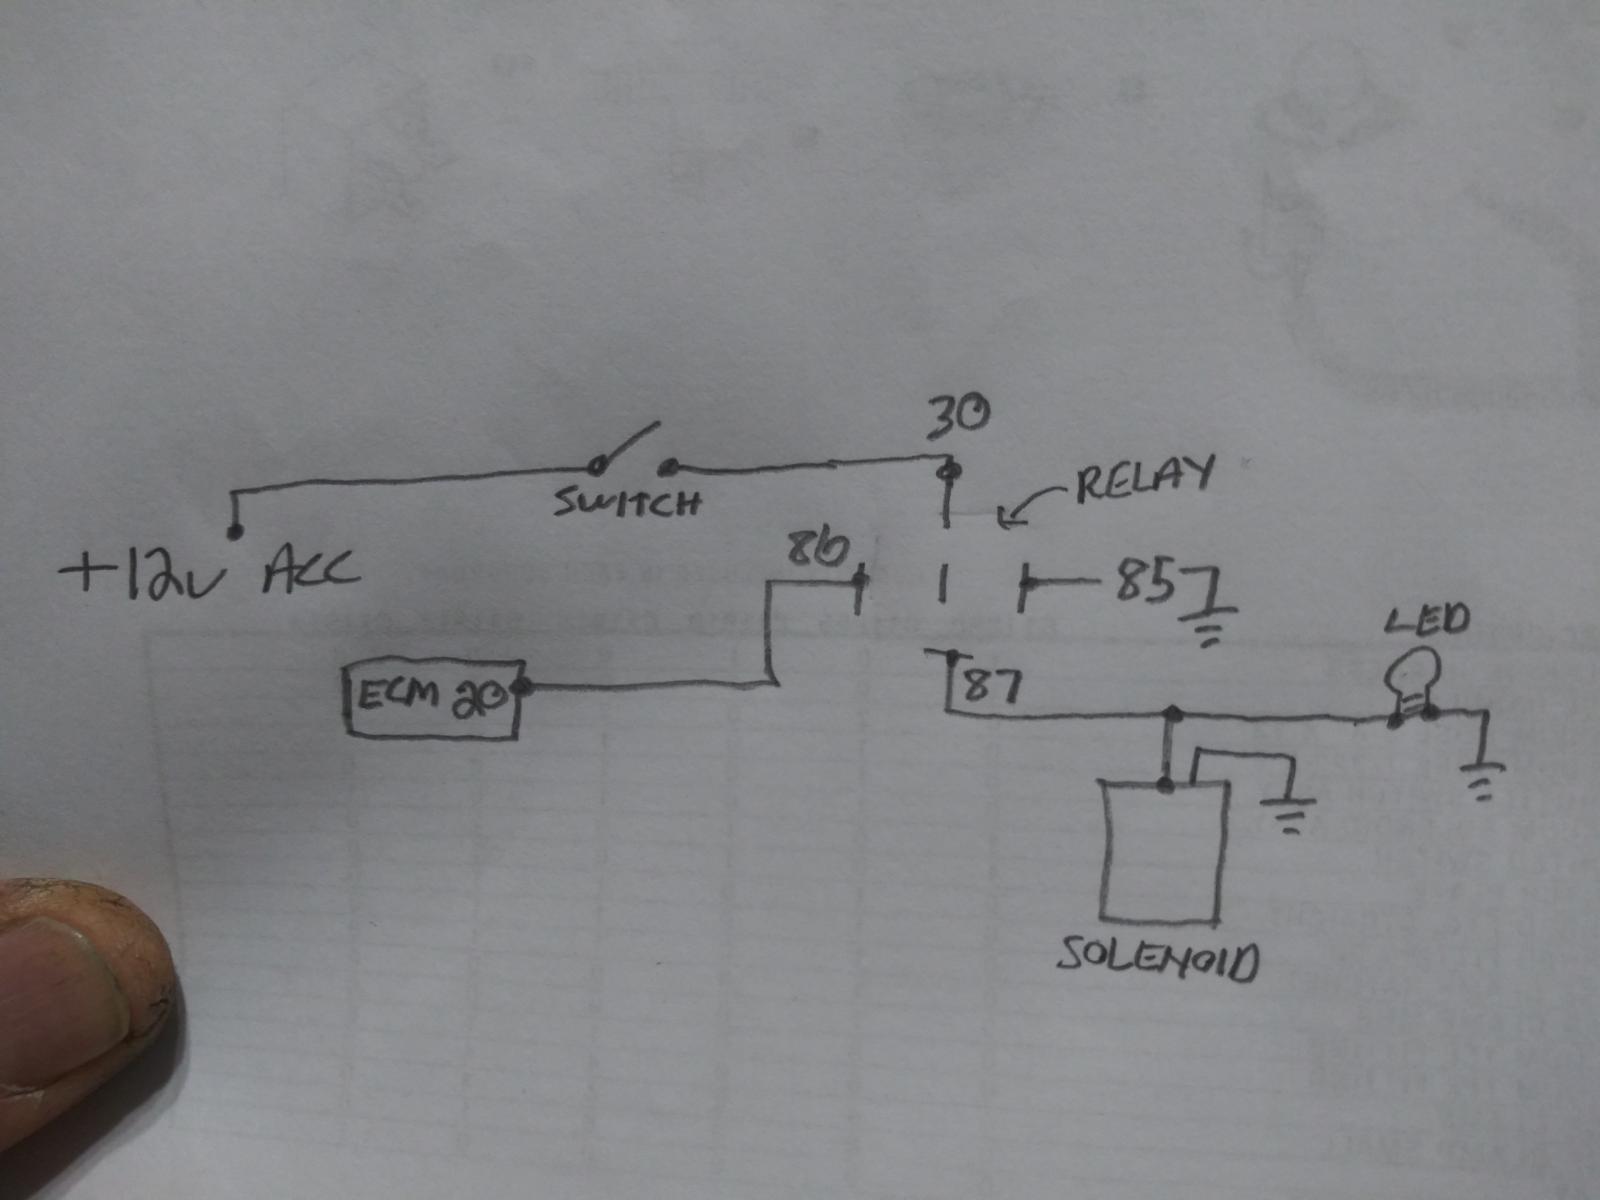
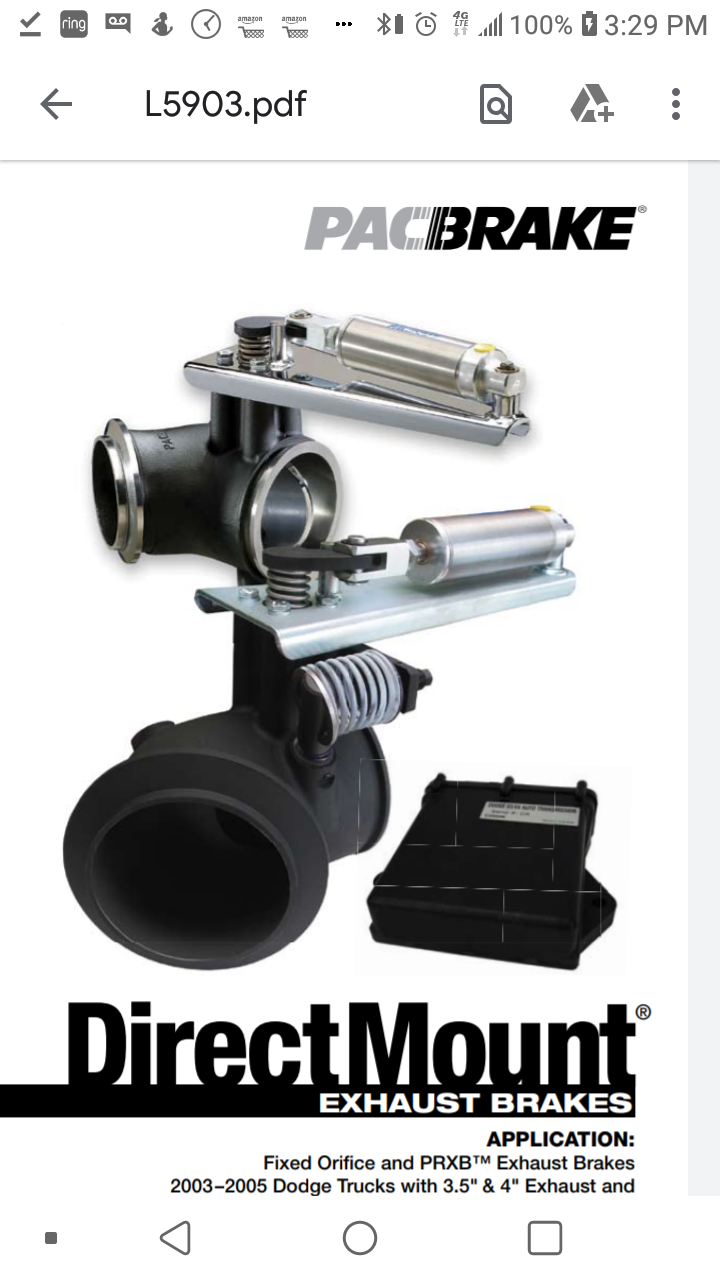
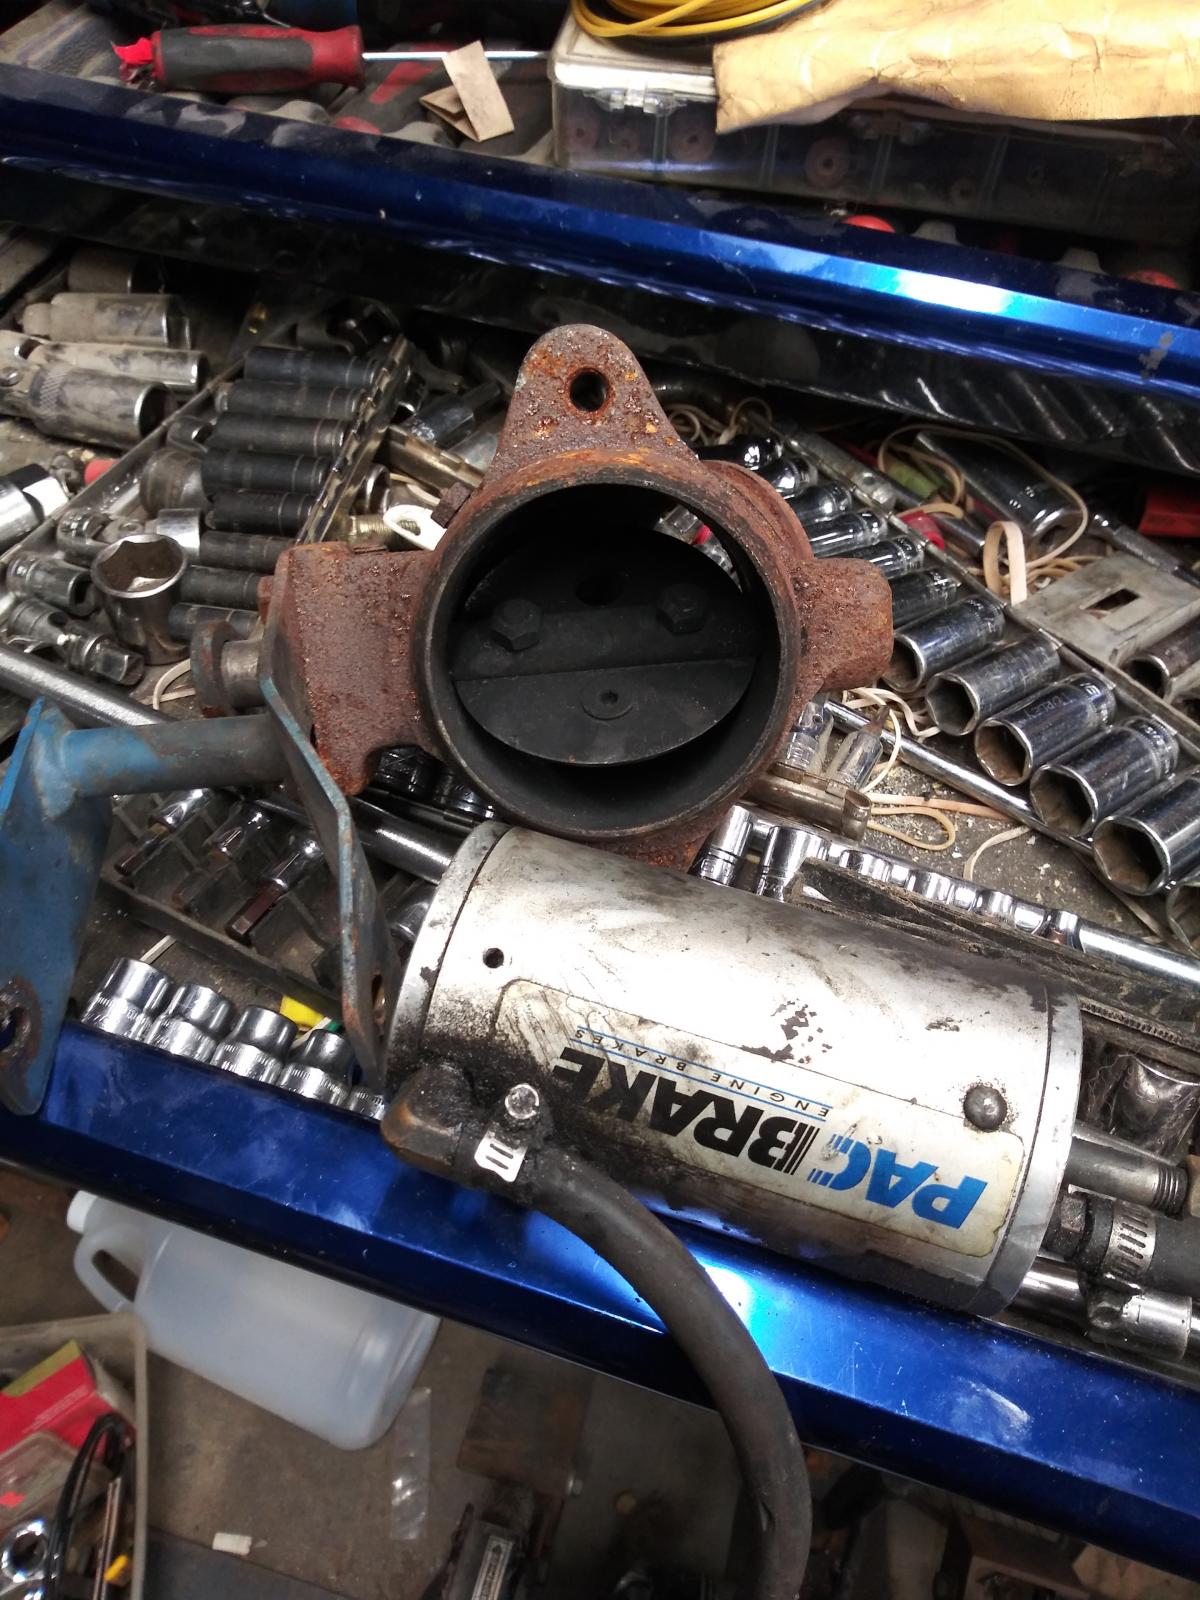
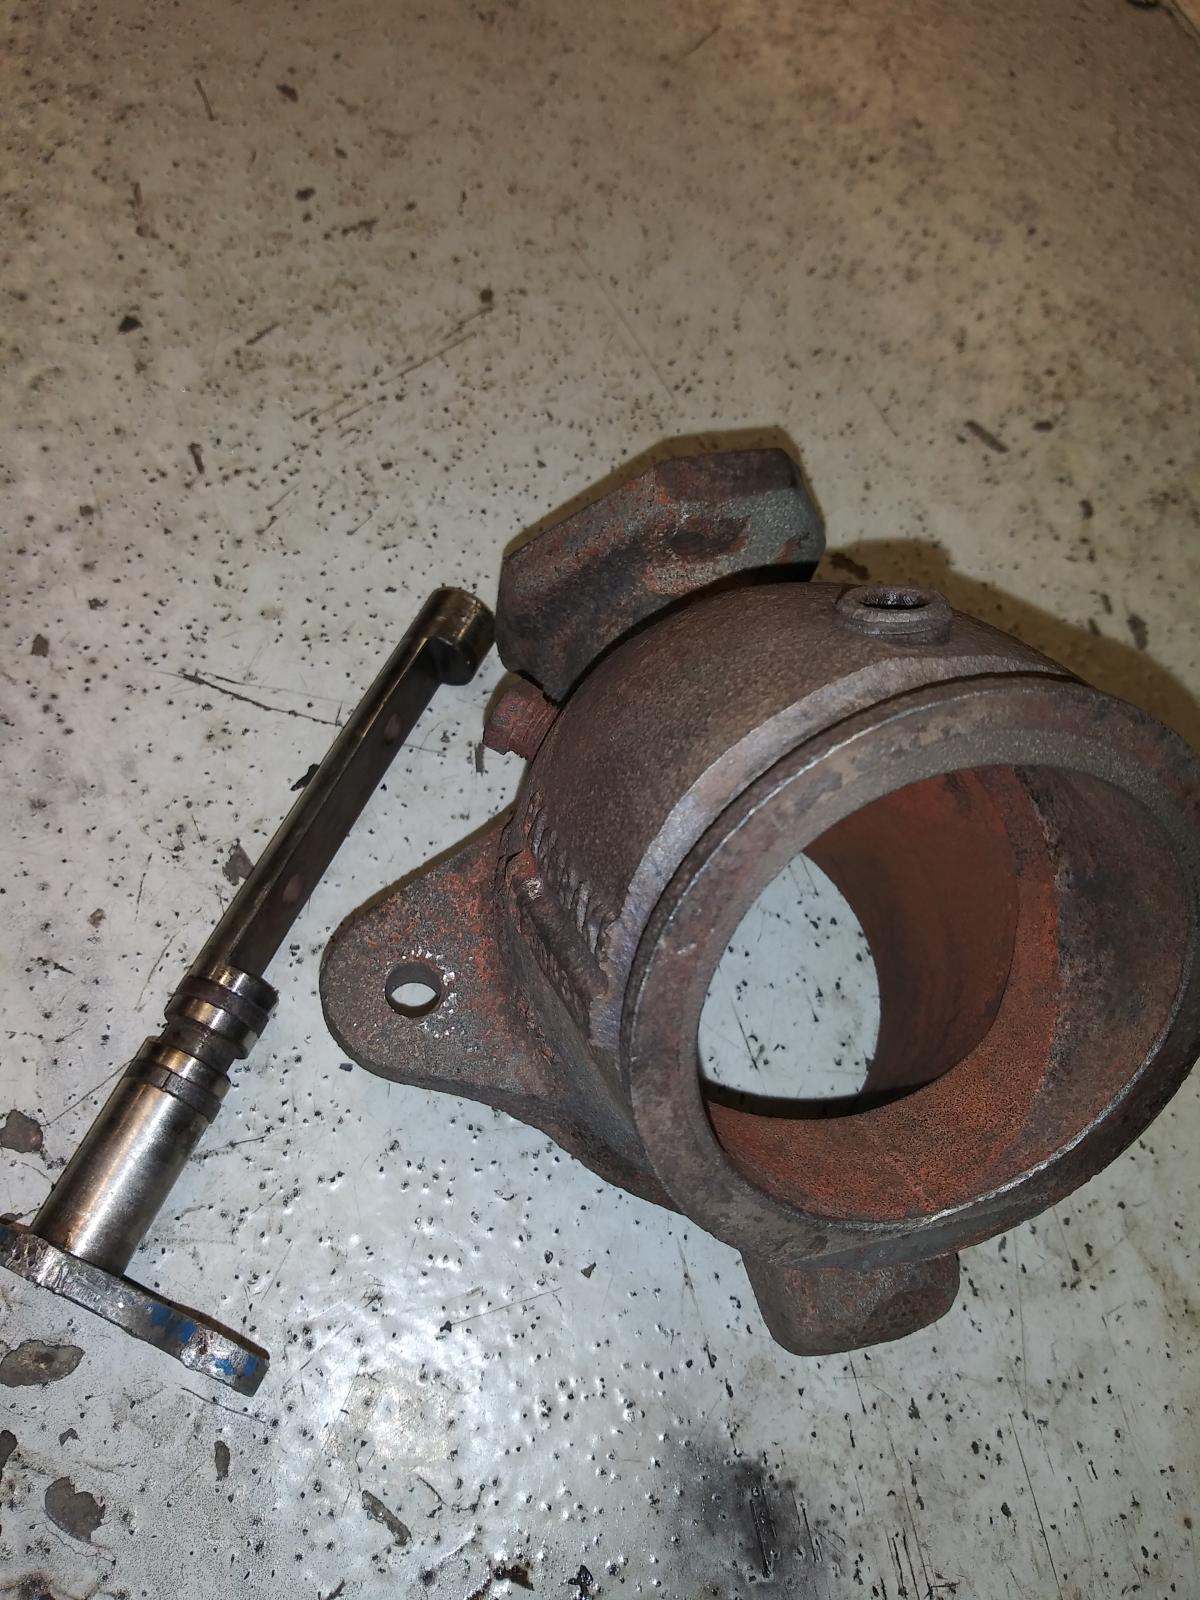
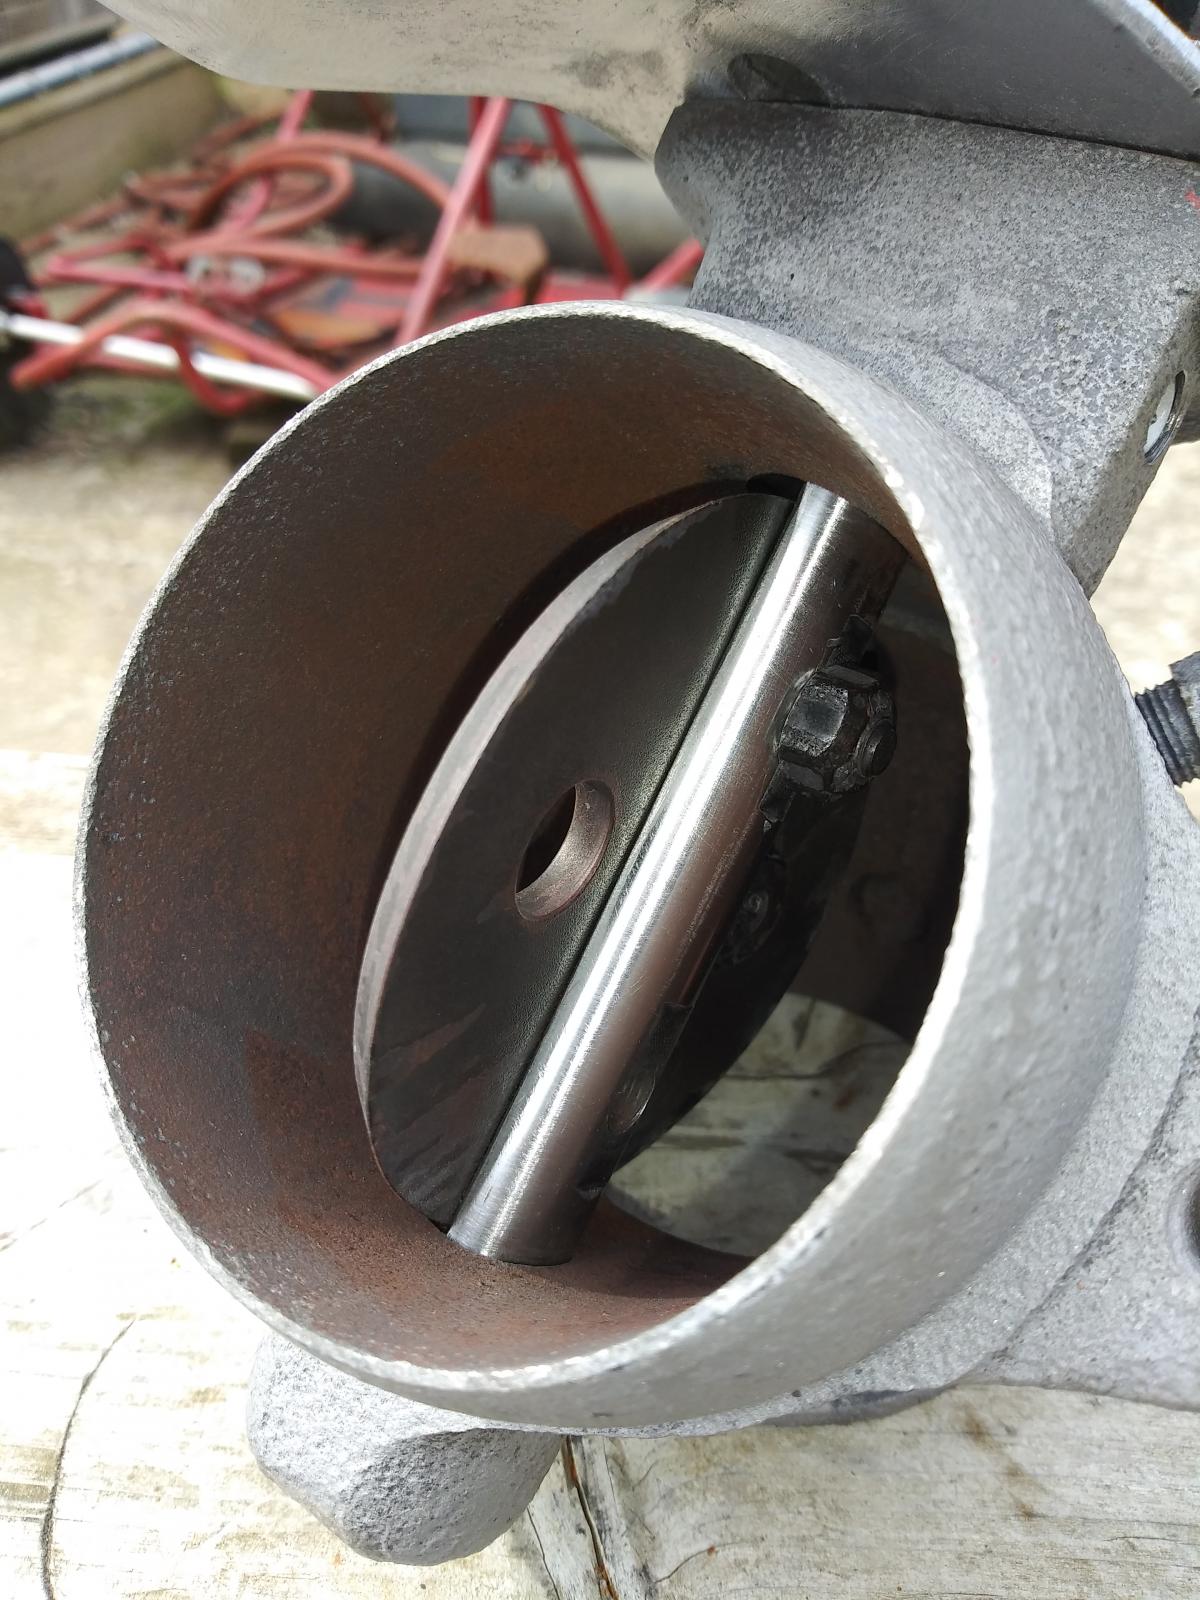
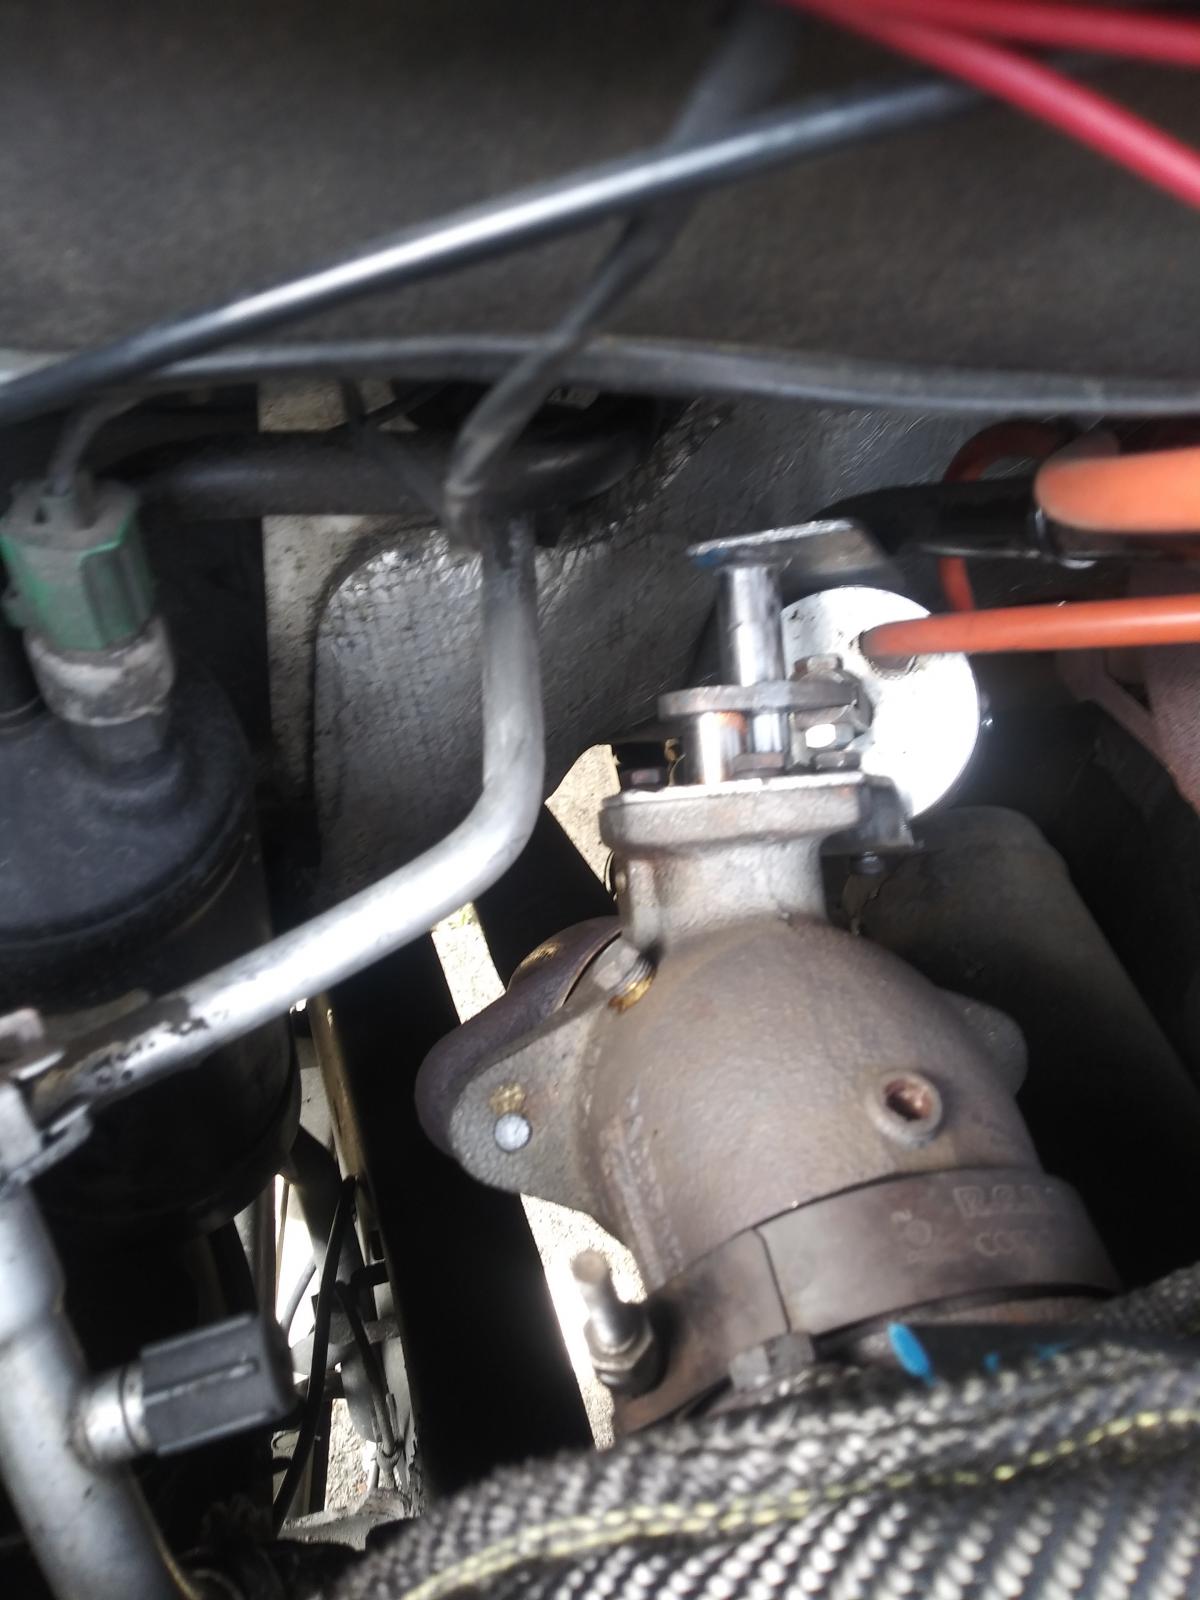
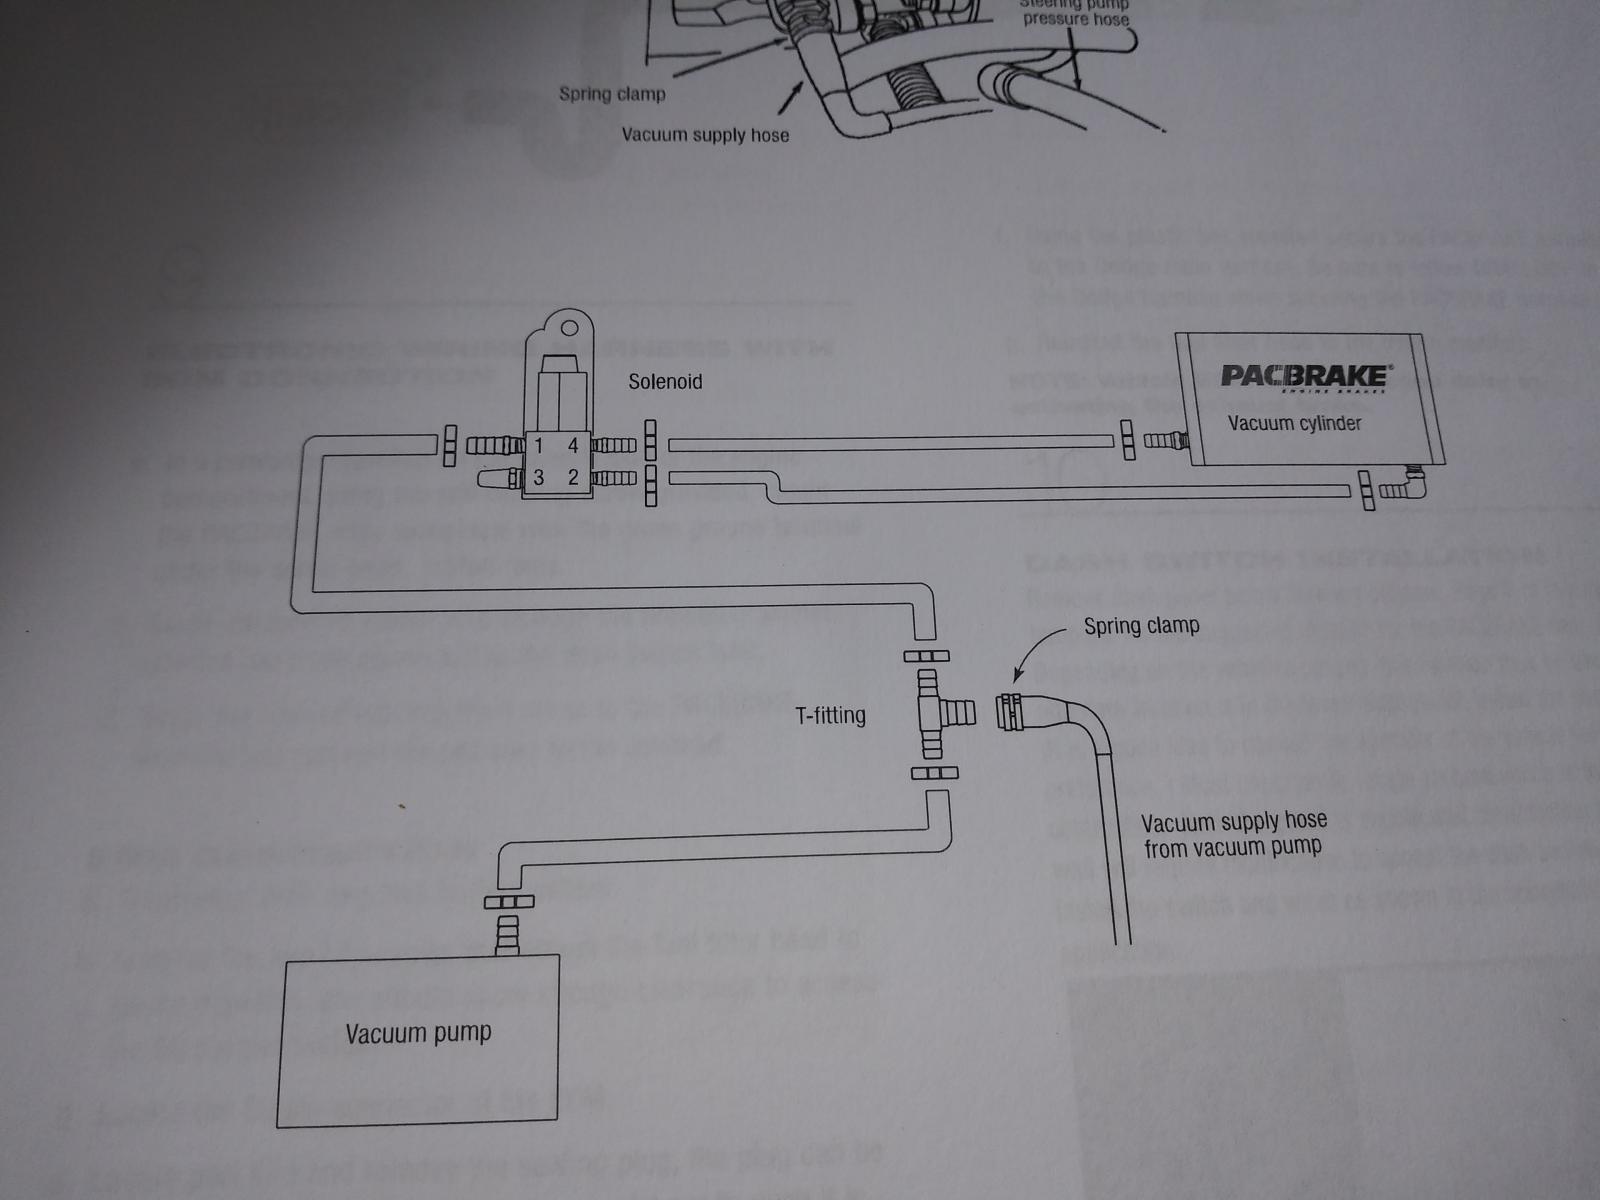
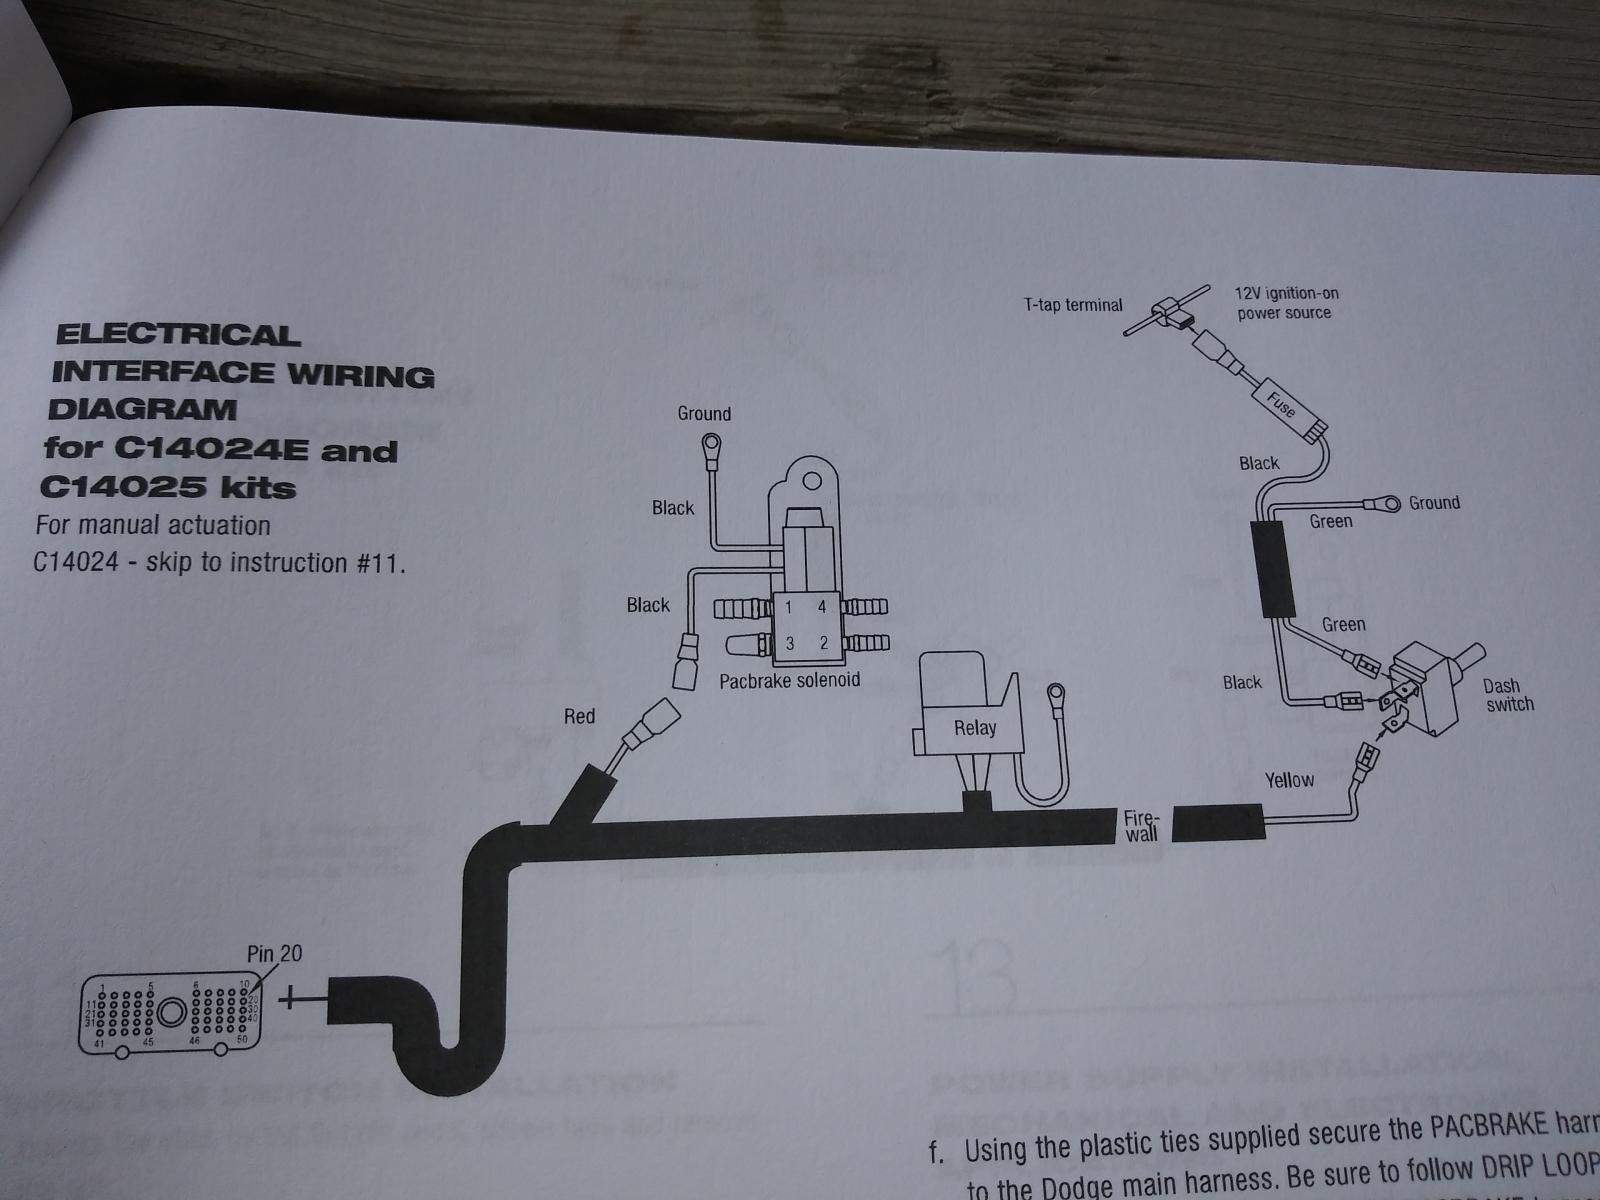
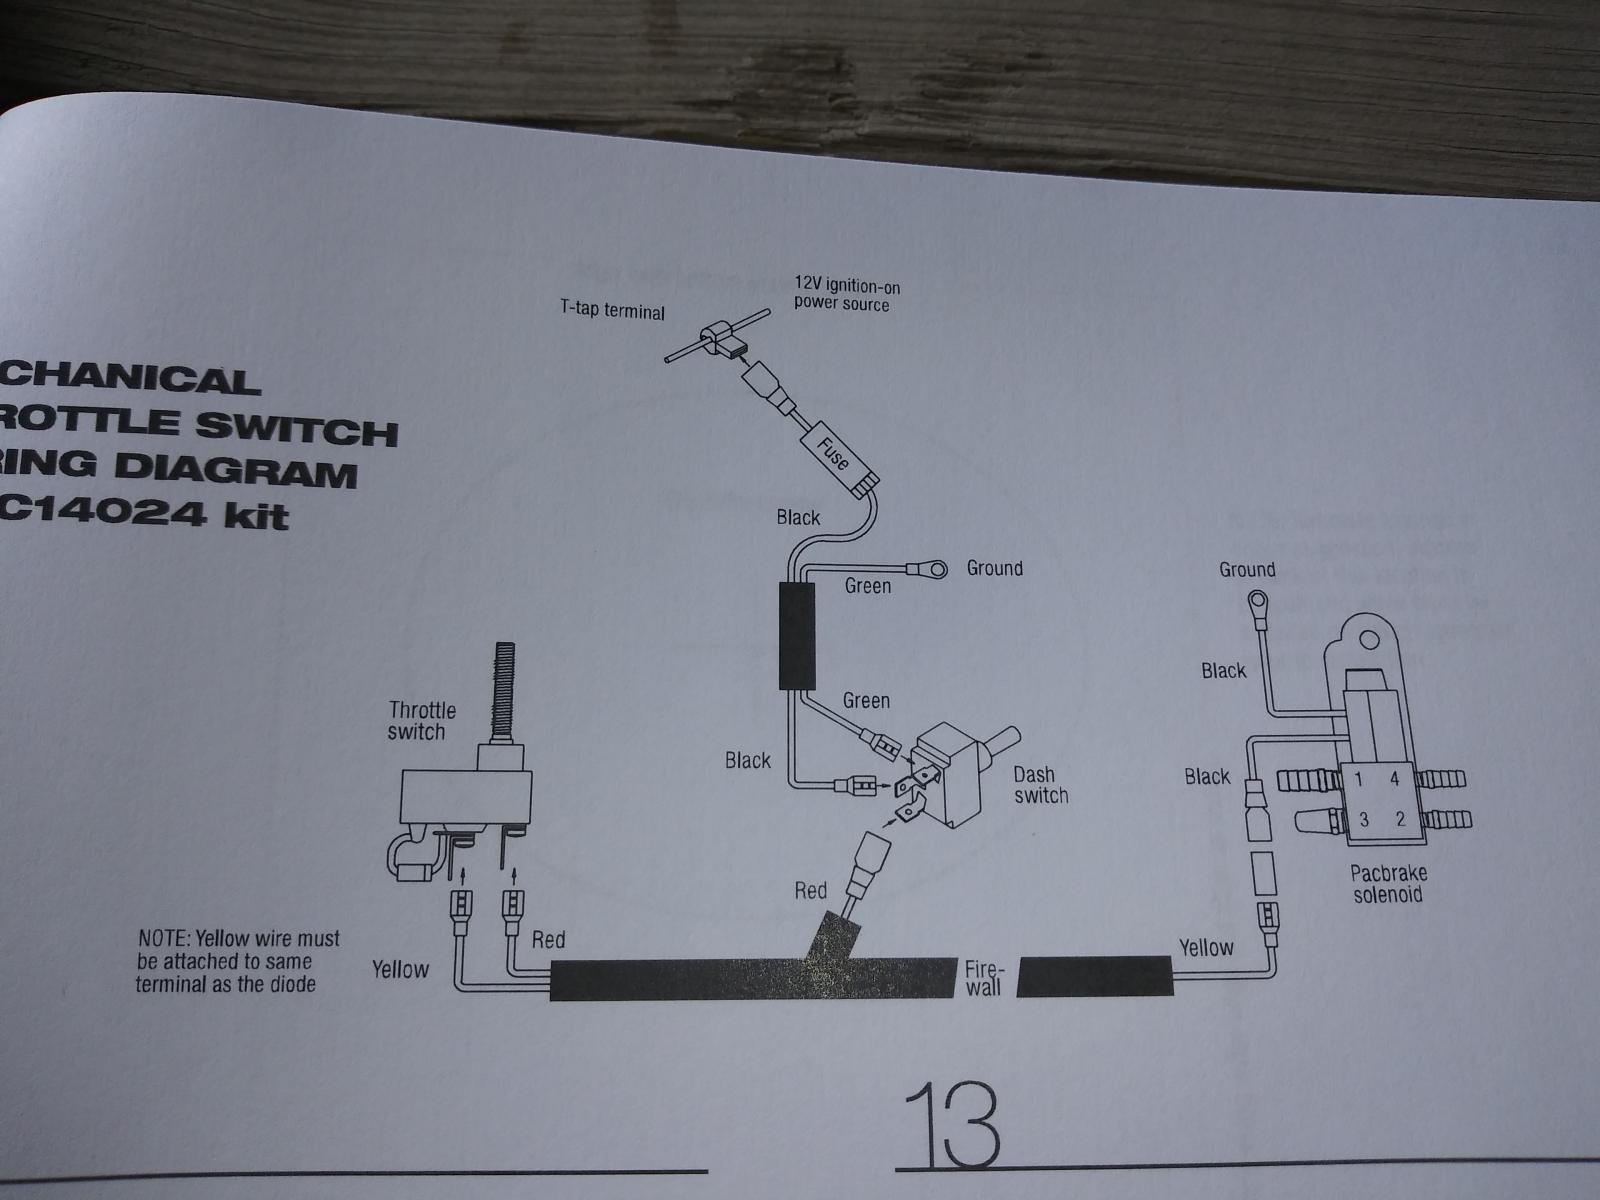
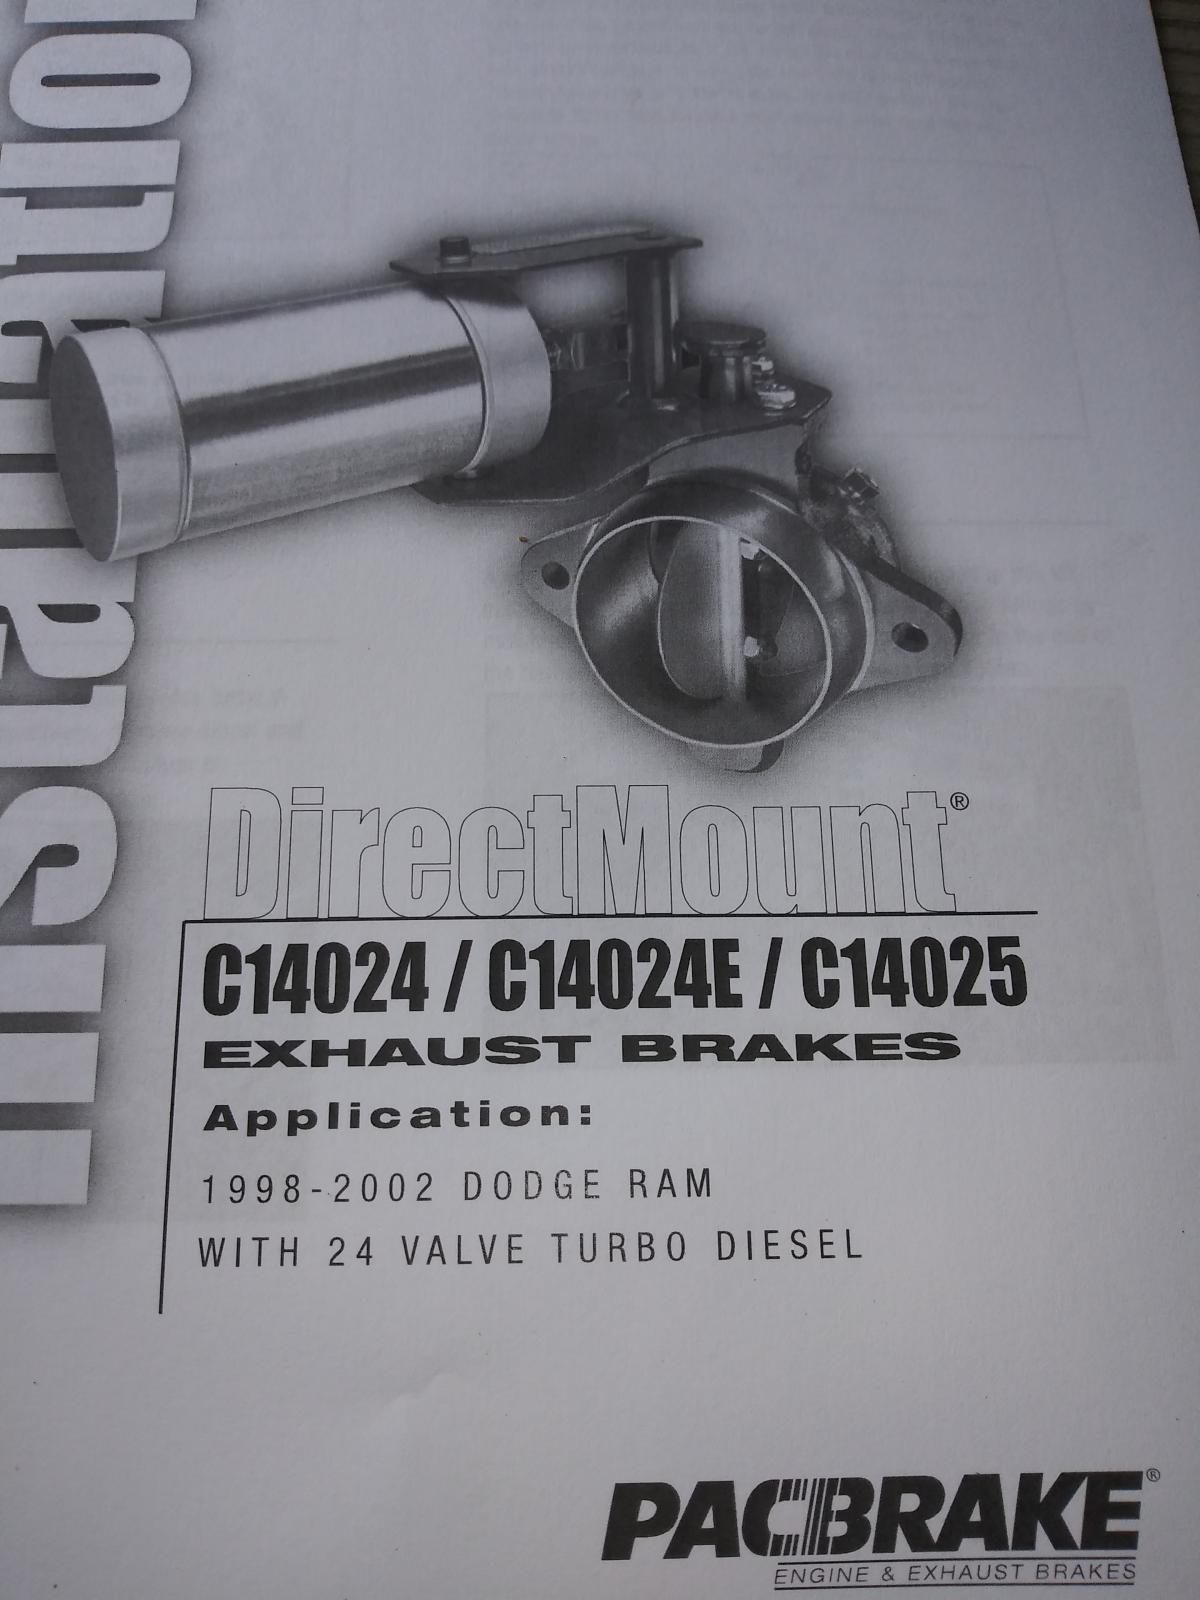
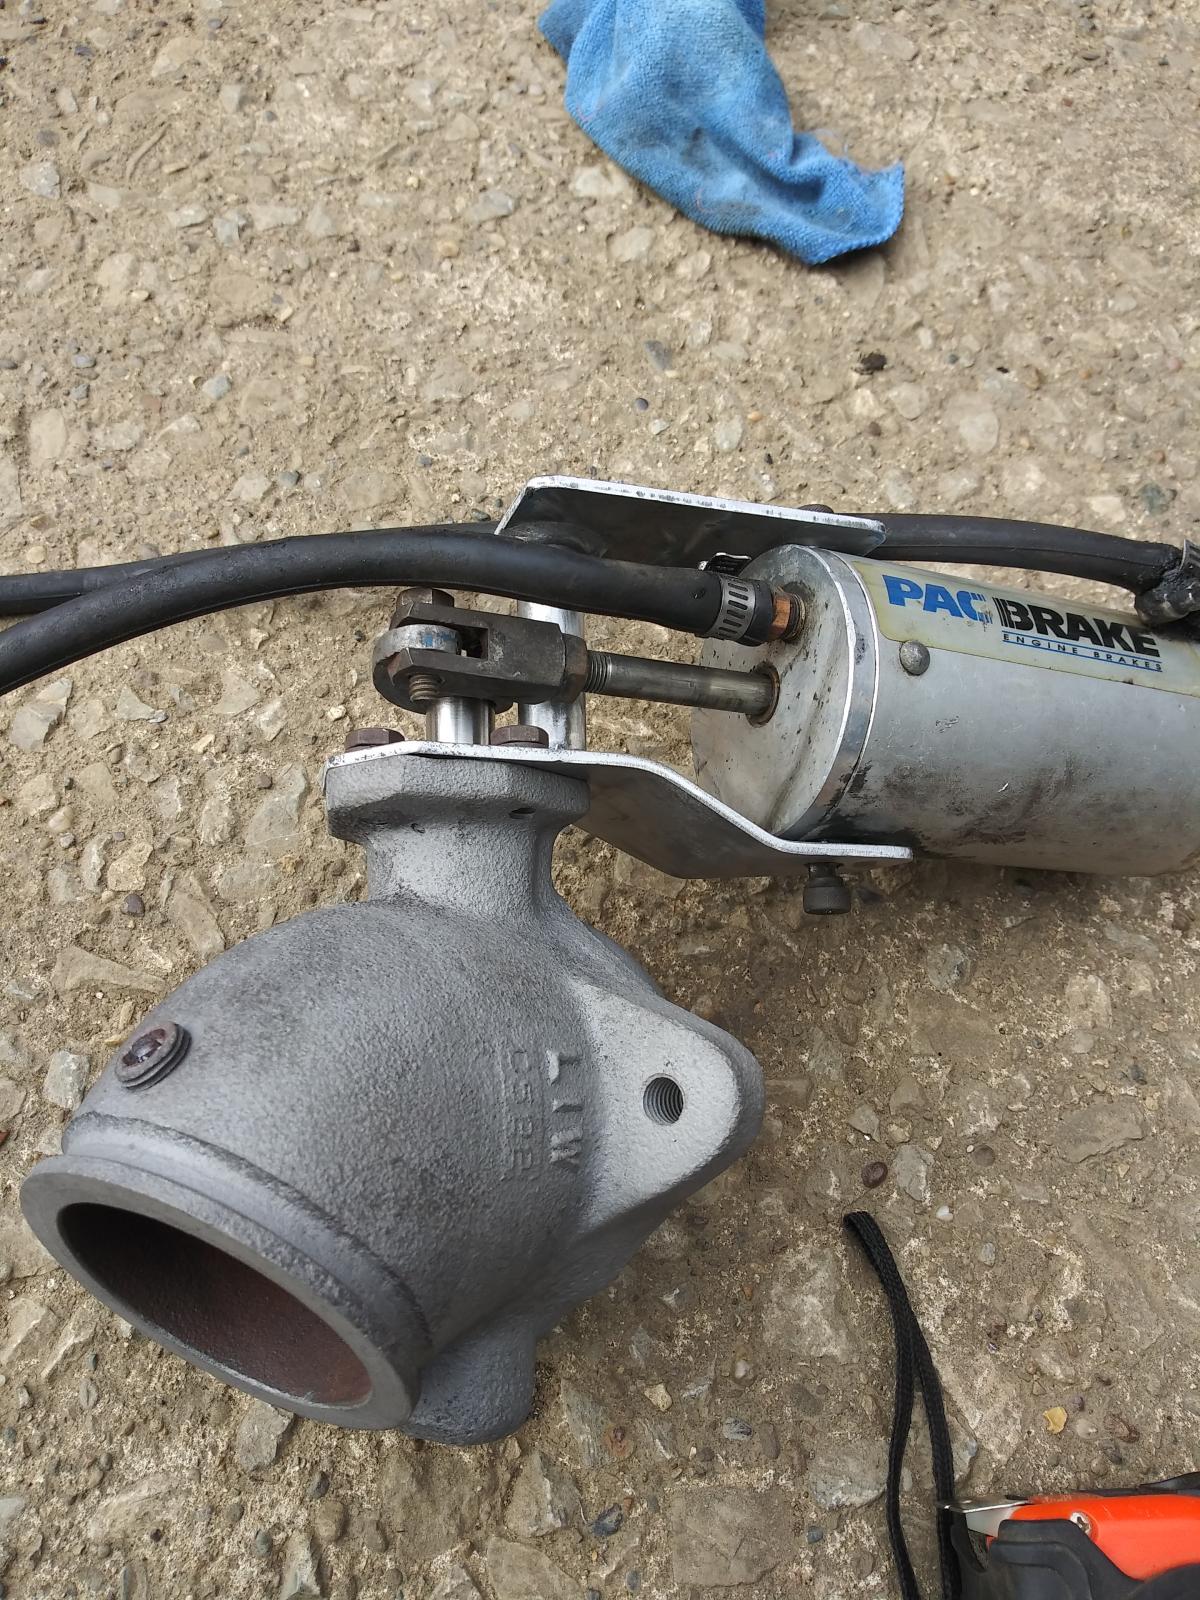
This article will detail my used Pacbrake install. Part numbers listed are the ones i used, unless noted, and what i know works. This can be used with vacuum or air cylinders and controlled by the Cummins ECM, a throttle switch, or manual momentary switch. As of 3-20 all parts still available from Pacbrake except the brake housing. Much of this info can be found on Pacbrake's website in PDFs L2016.pdf for brakes C14024/C14024E/C14025, and L1018.pdf parts list. Do yourself a favor, download and read both. They are linked below. If you have a manual transmission there is plenty of room around the vacuum cylinder. In automatic trucks the transmission dipstick tube will need to be bent slightly. Slide a long 1/2" extension about 8" down the tube and push it towards the driver side of the truck. It would help to have someone under the truck to hold the bottom of the tube while doing this. Bend a little at a time. It took me a couple tries to get it where i wanted it and it is a tight fit. Make sure the cylinder does not touch the tube at all. NOTE: If you are putting this on an automatic truck I highly recommend a converter lock up switch. Ibmobile has an excellent write up that will walk you through every step and works perfect. I used his write up to build mine. MY PARTS LIST: Pacbrake: Brake housing C10293 (used) $-trade Vacuum cylinder C11828 (used) $-trade Solenoid valve C11829 (new-eBay) $90.31 Superlube C18037 (new-eBay) $14.75 Amazon: 1/8" npt to 1/4" tube (air brake line) need 5. 1/4" push to connect fittings 1/8" npt muffler TE Connectivity: Terminal for Cummins ECM (5 for $2.33/free shipping) If you want a pre-terminated wire for the ECM try this: 3164263 Cummins GARAGE STASH: I keep most electrical items i used on hand but most all can be found at any auto parts house. Relay base (Amazon) Mini toggle switch (Amazon Blue LED (Amazon or eBay) 18 gauge wire, heat shrink, non-insulated connectors Zip ties Bosch relay -- resistor or diode suppressed Metal for solenoid bracket #4x1.5" machine screw/nuts for solenoid (2) Vacuum tee 1/4" vacuum hose 1/4" air brake line -- local Parker store Diode from ford crown vic under hood fuse box (photo below) VACUUM CYLINDER BRAKE W/ECM CONTROL: Disconnect both batteries. Start with brake housing (#1 in pic). It should have the bracket for the cylinder bolted to it. Butterfly must move freely. Clean as needed. Remove the 2 1/4" bolts from butterfly and 3 bolts from the cylinder bracket. Shaft and bracket must be removed and installed together. Pay attention to how the butterfly bolts to the shaft. It is not flat and must be put back together correctly. Do not force the shaft out of the housing. I had to soak and heat mine for 2 days to get it to turn. When it started moving i used an air chisel to tap it up while turning it with vise grips clamped on the lever that the cylinder attaches to. There are sealing rings on the shaft--do not damage them. Polish shaft and clean shaft holes in housing. I used fine crocus cloth and WD-40 to polish the shaft and some fine sanding drums from my porting kit to clean up the bores in the housing that the shaft rides in. I used copper anti-seize and Pacbrake Superlube to lube everything up. The shaft and bracket must be installed together. Make sure to use lock nuts on the butterfly when putting it back together. Also make sure that the butterfly does not touch the inside of the exhaust housing. It should pivot freely and not stick or rub. Blasted, polished, lubed. Make sure your cylinder doesn't leak vacuum. Mine leaked. I removed the rivets from the rear cap and it slid off. I carefully removed seals from piston, cleaned everything up and wiped seals and cylinder walls with Superlube. I do not have a source for new seals. Reassemble. No photos because I didn't think it would work but it did. Assembled, tested, working. Install brake on truck per Pacbrake instructions. Check around everything for clearance and tighten downpipe evenly. Auto trans will need dipstick tube tweaked as described above. Unbolt factory fuel filter housing from intake and move aside( do not remove fuel lines), unbolt connector from the Cummins ECM on the driver side of the block and unplug. I think it is a 4mm Allen bolt. There is a small rubber plug in the #20 ECM location. Remove it with a small pair of needle nose pliers or push it out from the inside with a paperclip. Install wire w/terminal 1062-20-0144 into location 20. Push it firmly and pull back to make sure it locked. I had to push harder than expected but it locked in nicely.Reinstall ECM connector and fuel filter housing. Mount solenoid and relay. I made a bracket from a piece of sheet metal i had and used #4 machine screws and nuts with loctite to attach the solenoid to the bracket. I used an air horn bolt and grounded both with that bolt. The solenoid and relay can be mounted anywhere thats convenient as long as you can route the vacuum lines safely. Wire relay, switch, led and solenoid to this diagram. It needs to be wired to a key on 12 volt source. If using a relay with a diode do NOT switch connections at 85 & 86. I used a diode to protect the LED from current spikes from the coil of the vacuum solenoid. I get them from the underhood fuse box of ford crown vics. I do not have a part number for it. My LED is wired to light when the brake activates. If you want it light when the switch is on connect it to load side of the switch. Hook up vacuum lines as shown below. NOTE: If you are using a DOUBLE ACTING AIR CYLINDER simply plumb your air supply into the solenoid at vacuum supply location and REVERSE lines going to the cylinder. You will probably want some kind of regulator between your air tank and the solenoid. Play with air pressure to control the moving speed of the cylinder. I do not recommend a single acting spring return cylinder with this brake housing. From my research, the brakes that use a single acting cylinder also use a spring on the exhaust housing lever. Reconnect batteries, reset APPS, and check operation. NOTE: The way above is how i wired mine. Be aware the brake will apply anytime the throttle is closed and the exhaust brake switch and key are on. There is no input from vehicle speed, gear selected or anything else. The brake opens as soon as the throttle is off idle. My mostly finished install. NOTE: The 2 following install options will work but I have not wired a truck using either of these 2 methods. The throttle switch only way will make the brake apply as soon as the throttle is at idle and the exhaust brake power switch is on. This was the 2nd option in Pacbrake's instructions. The momentary switch wiring will only work when the throttle is closed, exhaust brake power switch is on, and you manually activate the momentary switch. THROTTLE SWITCH ACTIVATION: Pacbrake throttle switch kit C11911 Plumbing is the same. Use this basic diagram. If wanted, add light at power switch or throttle switch. Instructions for adjusting throttle are in L2016.pdf from Pacbrake. MANUAL MOMENTARY SWITCH ACTIVATION W/THROTTLE SWITCH: I am recommending using the throttle switch as a safety measure in this install. This prevents brake activation with throttle open.Wiring will be same as above with the addition of a normally open momentary switch. Throttle and momentary switch must both be closed for brake to activate. The switch can be any normally open momentary switch mounted anywhere that is convenient for you. You can find foot activated exhaust brake switches if you shop around. L2016.pdf L1018.pdf
-
We had Crown Vics that came factory with silicone coolant hoses. Hoses would outlast the cars.
-
@Royal Squire silicone vacuum line. Oil doesn't affect it like rubber
-
Got it up and working. Its not pretty, its temporary. Tired of waiting for parts so i threw it together with what i had laying around in the garage. This spring/summer I'm pulling the interior, fixing the dash and rewiring the whole truck so ill make it neat & pretty then. But for now here it is. Please don't laugh. I'll get started on the article tonight with all the info.

-
@Mopar1973Man i can try to make an article when this is up and working with part numbers and sources. Its easier than i thought it would be. Biggest challenge is finding a valve that works. Sent 5 valves back to Amazon because of not switching or leaking. Wasted a week trying to save $$$$. There are more sophisticated set ups out there now that will work based on mph and such. I'm guessing ill have around $175 in this when done so i cant complain if i have to flip a switch when i get off the highway.
-
Here is my wiring diagram for the Pacbrake using the Cummins ECM. I found the correct terminal on my 2nd try and they are cheap. $2.33 for 5 with free shipping had them in 2 days. Source and PN will be listed when i get everything together. I am wiring it so the led lights when the brake is closed, not when the switch is turned on. Pacbrake says there is a 3 second delay from closed throttle to brake activation. In my tests I'm seeing 1 to 1.5 seconds to relay closing, so i guess another 1-1.5 seconds for butterfly to close sounds close. Relay opens instantly with throttle, i noticed no delays. The only thing i don't like is with the switch on the brake will apply any time throttle is closed. I see that getting old in heavy stop & go traffic, drive thrus, etc so i may add a momentary switch along with the toggle switch but I'll add that later if i decide to. Just waiting on Amazon now.
-
@wil440 I'd do some measuring of your turbo and the brake before I bought it. I think it would fit in the space but downpipe would be biggest issue. Is it air or vacuum canister? If you don't have onboard air that can get pricey fast. As far as the wiring its easy. I'm getting ready to draw up a diagram and post it in my used pacbrake install thread if you need it.
-
@wil440 look like this? Use a v band clamp at both ends? If so you could probably make it work as long as the flange that mates to the turbo is the same diameter as the turbo outlet but you will have to modify your downpipe. Or maybe use a downpipe from a 3rd gen on your 2nd? But i am only guessing this. Lot more work than finding the right year stuff. Looks like anything from 94-02 will work with the correct wiring.
-
@wil440 if they use the same 5 bolt pattern (think they do but can't say 100%) i would think you could make it work. Control side is probably different but Pacbrakes wiring for 2nd gens is very simple. The newer ones seem use compressed air instead of vacuum so you'll need a compressor. When i make mine and verify operation ill post a wiring diagram.
-
@015point9 look for safety wire. Easy to find and almost always stainless. Summit, Jegs have it and the pliers. I was worried brass would melt so i reused the lower hex head plug. The lube plug i replaced with steel and lots of anti-seize. Guess after a week or so I'll retorque them.
-
@IBMobile guy in Taylorsville ky had one listed few weeks ago on Facebook marketplace. Looked last night can't find it. If i see one I'll message you.
-
@IBMobile i get it completely. I wanted one but can't afford to buy new then found this one. The guy i traded with didn't even mention it until we met up. You can get every replacement part from Pacbrake except the exhaust flange/butterfly valve. They don't make it anymore. I could have bought the harness, solenoid with fittings, etc. from them but I'm doing this on the cheap. Found the correct terminal for the ecm and got the wire in it today. Look for one used and build your own. Looks simple enough and so far has been.
-
@015point9 the hex head plug came out and i reused it. The allen head plug is stuck. I'd have to drill it out so its staying. Theres a 1/16" plug that you can't see thats used to lube the shaft. I drilled it out and saved the threads. Put in a new pipe plug. Lubed everything with copper anti-seize.
-
Bits and pieces of this are in 2 different places here so i decided to start a new thread on this. I'll list all prices and where i bought everything at the end. I'm doing this as cheap as i can, but the way i think will be most problem free. If you see something i did wrong or need to change let me know. I started with a used exhaust flange and vacuum cylinder. Took a few days to get the butterfly free and cleaned up but its working now. I had to buy a vacuum solenoid and i am using push to connect fittings and line for most of it. Reason for this is if i have to change to an air cylinder i wont have to change my plumbing. Amazon should have the rest of my parts here by Sunday so until then I'll figure out mounting locations and build the wiring harness.

-
@IBMobile don't know if you got a brake yet but today i called Pacbrake and talked to them. Very helpful and nice. Answered all my questions and looked up part numbers for me to verify. 1st impression was very good. Talked to me about building my wiring harness and options for vacuum solenoid. I ordered their vacuum solenoid today. Kinda blew my budget but after 6 leaking valves from Amazon i gave up. If my 2nd try at wire terminals doesn't pan out ill be ordering a wiring harness from them also. Got flange and cylinder mounted on truck with vacuum line holding it open for time being. Hope to have it working in about a week.
-
@dripley thanks. I found a pdf from pacbrake on one of their older set up. No controller used with it. Could be wired as manual or use cummins ecm to activate it. Uses a momentary switch on throttle pedal. Closes brake when pedal is at rest and opens when you step on pedal. Looking at it i can build it easy enough with a switch to turn the system on & off, micro switch, relays and air solenoids. I have most what i need already. I'm not sure about by vacuum cylinder though. Held with no leaks the other day now its got a slow bleed down. Might be going air actuated. I like tinkering and building crap and if this works I'll have a max of $80 in it, including initial trade. It came with a turbo i swapped for. 1st pic is vacuum. 2nd is cummins ecm as controller 3rd is manual control
-
Now.

-
I'm in the middle of piecing together a pacbrak set-up. Just got the butterfly free and polished up. Checking vacuum cylinder now to see if it leaks. @Tractorman what do you lube yours with? I ordered pacbrake lube should be here Sat. Should i use copper anti-seize on the shaft or just the lube? Like most my projects cost is a big factor. If vacuum cylinder is bad I'm going to make a air controlled activator. Hope to have it on in 4 or 5 days I'll let you know how it works.
-
Got it apart finally. Time to polish things up a bit. Should i use copper anti seize use on the shaft or just get some pacbrake super lube?

-
@Tractorman how easy does the butterfly move with the cylinder disconnected? Flop around free, move with a couple fingers or trying to open a pickle jar tight? Its moving but it takes some muscle. I think its way too tight still.