

Welcome To Mopar1973Man.Com LLC
We are privately owned, with access to a professional Diesel Mechanic, who can provide additional support for Dodge Ram Cummins Diesel vehicles. Many detailed information is FREE and available to read. However, in order to interact directly with our Diesel Mechanic, Michael, by phone, via zoom, or as the web-based option, Subscription Plans are offered that will enable these and other features. Go to the Subscription Page and Select a desired plan. At any time you wish to cancel the Subscription, click Subscription Page, select the 'Cancel' button, and it will be canceled. For your convenience, all subscriptions are on auto-renewal.
- Replies 22
- Views 4k
- Created
- Last Reply
Top Posters In This Topic
-
 Baconbitsforu 11 posts
 -
 dripley 2 posts
 -
 H.R.D 2 posts
 -
 Pondsy 1 post
Featured Replies
Did This Forum Post Help You?
Show the author some love by liking their post!
Welcome To Mopar1973Man.Com LLC
We are privately owned, with access to a professional Diesel Mechanic, who can provide additional support for Dodge Ram Cummins Diesel vehicles. Many detailed information is FREE and available to read. However, in order to interact directly with our Diesel Mechanic, Michael, by phone, via zoom, or as the web-based option, Subscription Plans are offered that will enable these and other features. Go to the Subscription Page and Select a desired plan. At any time you wish to cancel the Subscription, click Subscription Page, select the 'Cancel' button, and it will be canceled. For your convenience, all subscriptions are on auto-renewal.
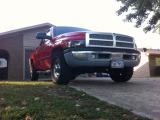
Well I tried using the members ride page but it would not let me post on my stuff. Also I like hearing opinions about my truck so Ill make a blog here and just copy what Ive done to here from cummins form then keep it up to date!
--- Update to the previous post...
Well its been a month or so Ive not been on DB. Been to busy with finals and work. But I thought instead of a bunch of posts about what all I did to the truck Ill just make one super giant post.
First off I finally got my sound system installed to the truck.
A sony Headunit with usb and aux inputs
6X9 Rockford fosgate 3 ways in the doors
6.5 Rockford fosgate 3 ways in the back doors (I bit to big but I made the speaker opening bigger with a saw zaw.)
2 MTx 10's in a thunderform box
and a 1000 watt alpine class D amp
Next I replaced the interior lights with LED's. Also found a write up on cummins forum on fixing the map light switch so I did that to. Its soooo much brighter I can now see the floorboards at night.
--- Update to the previous post...
Lastly I plasti-diped my wheels. This stuff is great. Super easy to put on stands up to anything and if you don't like it it will pull off like tape.
Also got my 300,000 mile badge :tu: Going to black out the bumpers grill and running boards next. Ill be posting that to here.
http://i1143.photobucket.com/albums/n634/baconbitsforu/dc8806de.jpg
http://i1143.photobucket.com/albums/n634/baconbitsforu/2fe7e583.jpg
--- Update to the previous post...
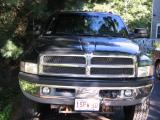
Well I got the grill sprayed its not the best but I plan on keeping it till I run up on a new grill to put on thats not all burned from the heat gun http://i1143.photobucket.com/albums/n634/baconbitsforu/8f6ce7dc.jpg
--- Update to the previous post...
Painted the back bumper http://img.tapatalk.com/4b5b9ff4-caec-84a5.jpg
http://img.tapatalk.com/4b5b9ff4-cb02-5228.jpg
--- Update to the previous post...
Heres the bumper now....
http://i1143.photobucket.com/albums/n634/baconbitsforu/16aab6eb.jpg
--- Update to the previous post...
So to add to my list of things to do this weekend I picked up a high idle box.
http://i1143.photobucket.com/albums/n634/baconbitsforu/DSC03646.jpg
It's incredibly handy in the winter for faster warmup or even the summer time for cold AC. The left switch is the IAT switch, the center is the 3/6 cylinder selector, and the right switch is the ECT switch to force high idle a warm engine.
I should have a bit of fun with it.
--- Update to the previous post...
Painted the front bumper. http://img.tapatalk.com/48ac3918-00d5-155f.jpghttp://img.tapatalk.com/48ac3918-00e5-c7be.jpghttp://img.tapatalk.com/48ac3918-00f6-ac66.jpghttp://img.tapatalk.com/48ac3918-0104-0830.jpghttp://img.tapatalk.com/48ac3918-0110-1732.jpg
Sent from my iPhone
--- Update to the previous post...
So This weekend I installed my projector fog light housings. They have a 6000k HID and white halo ring. Matches better than the stock lights also wont burn up like the stock lights.
http://i1143.photobucket.com/albums/n634/baconbitsforu/199e2513.jpg
http://i1143.photobucket.com/albums/n634/baconbitsforu/1758e8b1.jpg
--- Update to the previous post...
Well After several weekends I FINELY got these suckers hooked up! Been waiting on time and parts. So I got 2 of the 100 watt spots and mounted them to the axle with 2 pipe bands each.
http://i1143.photobucket.com/albums/n634/baconbitsforu/a0421182.jpg
Took a while to find out what wires went where in this mess that some one made for me. There are wires coming and going everywhere!
http://i1143.photobucket.com/albums/n634/baconbitsforu/ec362b43.jpg
http://i1143.photobucket.com/albums/n634/baconbitsforu/6e9e9a04.jpg
Put the relay on the inside of the frame after I did a waterproof job with some tape and got it up out of the way.
http://i1143.photobucket.com/albums/n634/baconbitsforu/5c61f8e0.jpg
http://i1143.photobucket.com/albums/n634/baconbitsforu/5c61f8e0.jpg
Next I ran my switched power and a ground to the lights. I ran a ground just to play it safe and have a ton of wire on hand. Ran the wires in that plastic wire covering, through the frame rails and down to the axle.
http://i1143.photobucket.com/albums/n634/baconbitsforu/2361ad17.jpg
http://i1143.photobucket.com/albums/n634/baconbitsforu/f14f7fe6.jpg
http://i1143.photobucket.com/albums/n634/baconbitsforu/b0fafb8c.jpg
Lastly I ran the wires to each light zip tieing the wire to the axle. And man them suckers are bright. Cant wait to try them out later!
http://i1143.photobucket.com/albums/n634/baconbitsforu/5d66bd1d.jpg
http://i1143.photobucket.com/albums/n634/baconbitsforu/4b066b2a.jpg
http://i1143.photobucket.com/albums/n634/baconbitsforu/465ce71e.jpg
Shot of headlights.
http://i1143.photobucket.com/albums/n634/baconbitsforu/50ea3320.jpg
--- Update to the previous post...
So this week 2/20/2012
Ive just done some here and there stuff to the truck.
Got a flat on the way to college ended up being late but good news I can change a flat in 7 minutes "flat".
http://i1143.photobucket.com/albums/n634/baconbitsforu/f78bba03.jpg
http://i1143.photobucket.com/albums/n634/baconbitsforu/65b59963.jpg
Rewired my fog halo's had a wire loose. Also coated the connections in waterproofing.
http://i1143.photobucket.com/albums/n634/baconbitsforu/724fb554.jpg
http://i1143.photobucket.com/albums/n634/baconbitsforu/9b4d198e.jpg
http://i1143.photobucket.com/albums/n634/baconbitsforu/28c3fd7b.jpg
Lastly I fixed my cup holder my friend broke. Ive been kidding with her that the cables have a 300 pound breaking point.
http://i1143.photobucket.com/albums/n634/baconbitsforu/54d82f87.jpg