


Mopar1973Man
Owner
-
Joined
-
Last visited
Everything posted by Mopar1973Man
-
Wire tap hooks to the fuel solenoid lead. Then the tuner will extend the pulse on the fuel solenoid in microseconds.
-
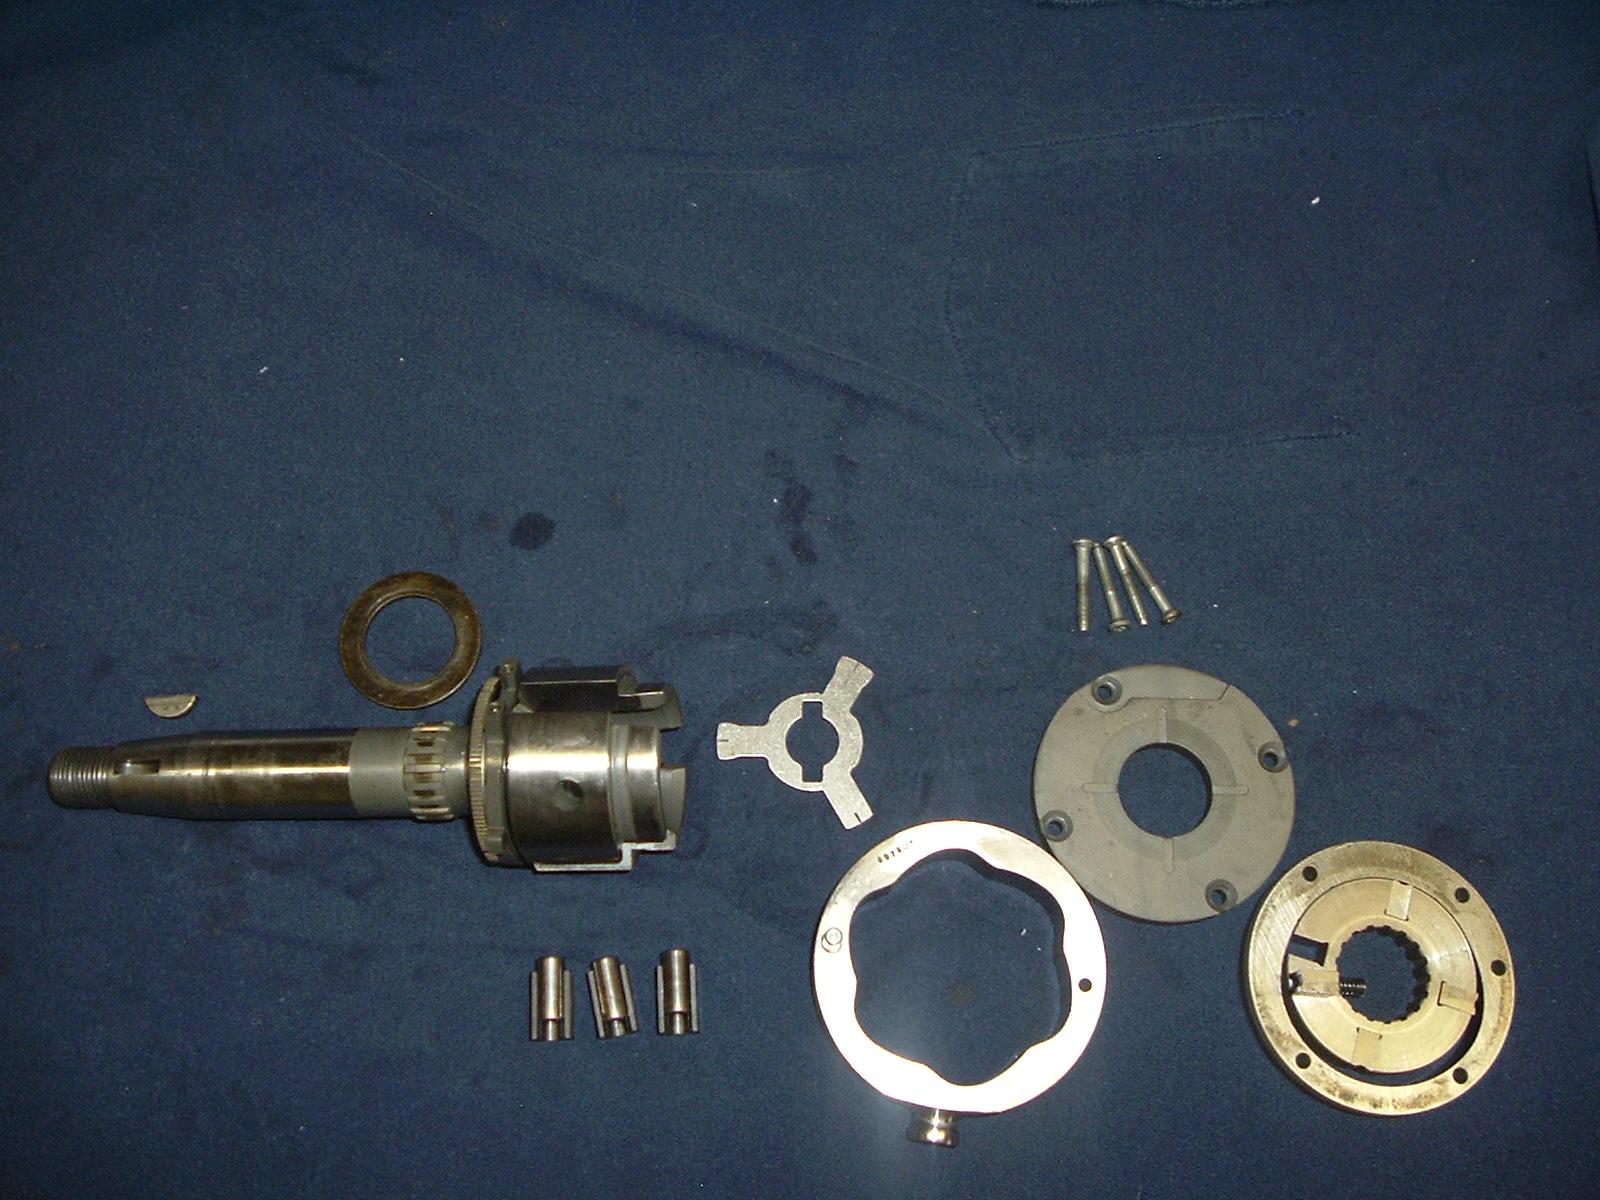
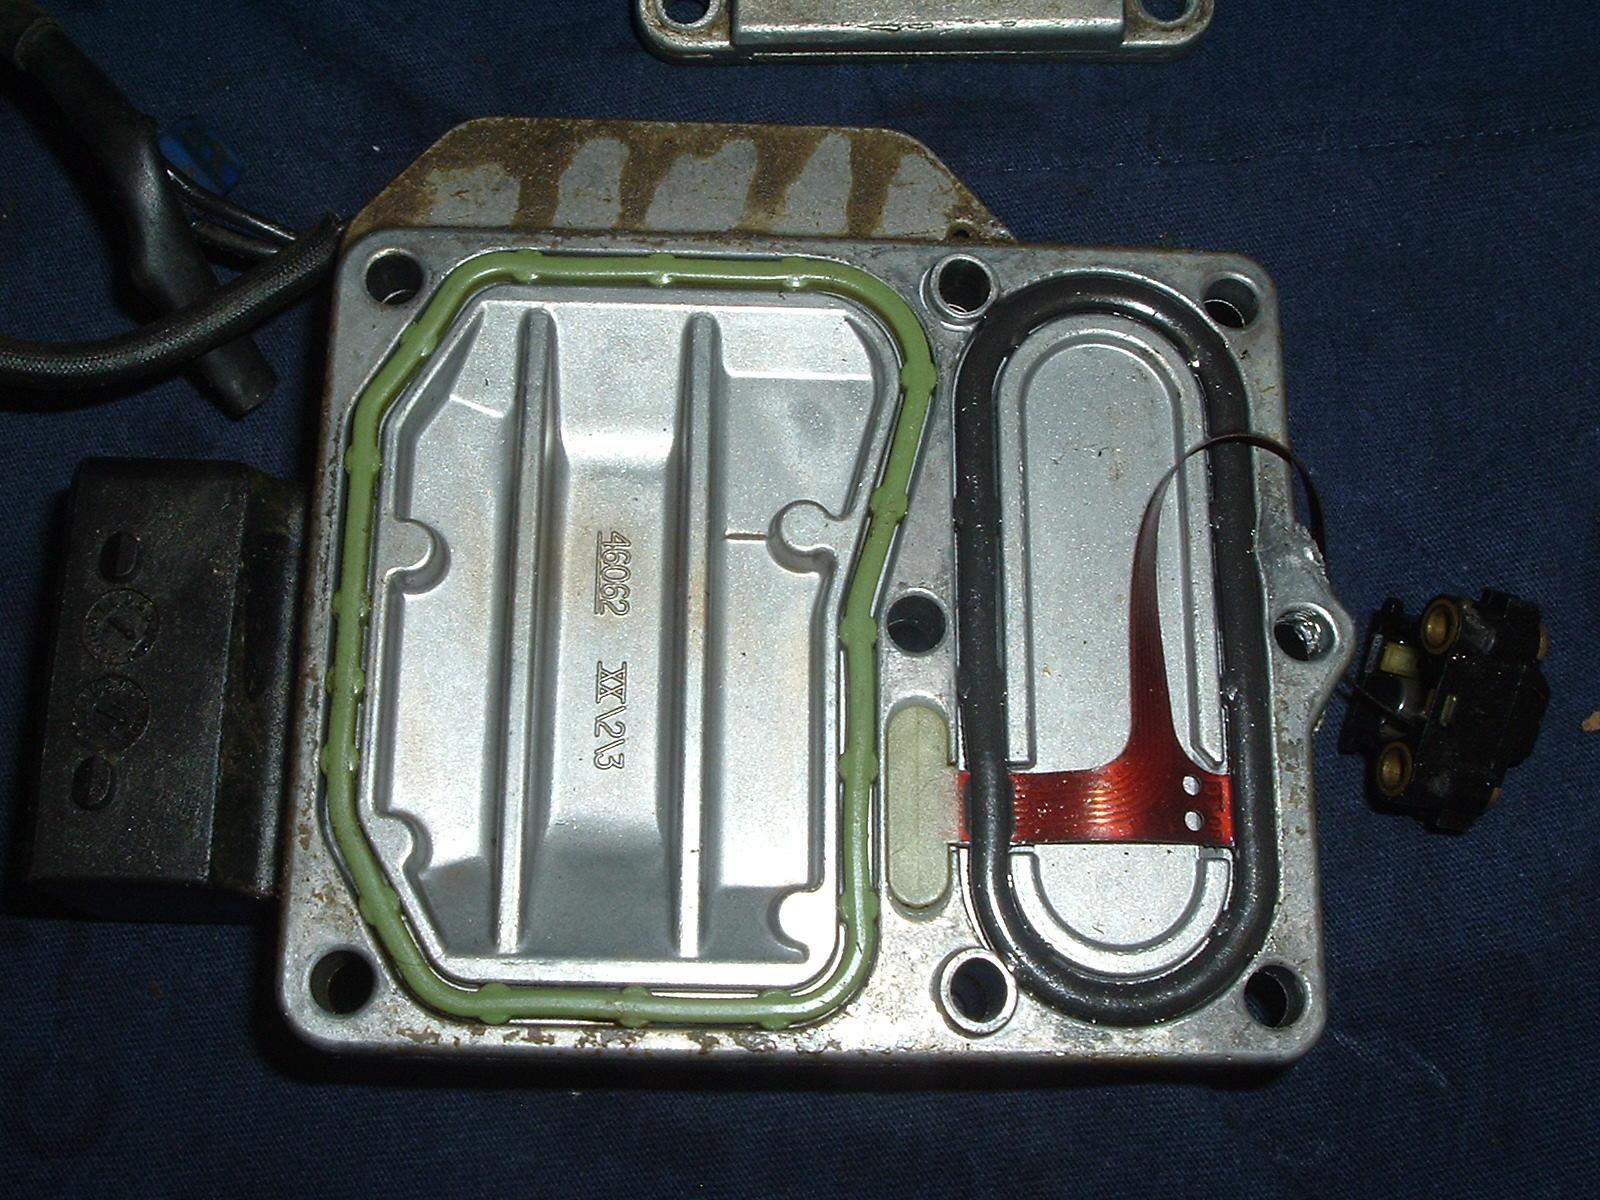
Yup, there is but the only thing that sensor does is report the cam speed which is the same as the VP44 (half of the crank speed). Then there is a fuel temp sensor that reports the fuel temp in the VP44. The P0112 code is the IAT sensor IIRC is low volt code meaning the sensor line is shorted to ground. Remember the IAT sets timing on the VP44 basically in a nutshell if IAT falls below +80*F then ECM calls for an extra +3 degrees of timing. When it rises above 80*F then it retards the timing. As for things hooked ot the PSG. You have a electronic solenoid to control the fuel pin for throttle. Then you have the hydraulic solenoid to control fuel pressure to advance and retard timing. Then the one sensor that sees the cam speed and the fuel temp that's all there is there is no other magic or witchcraft inside the PSG. You can see that sensor here right of the PSG. Here is the tone wheel... Look at the mainshaft and you can see the tone wheel for the sensor.
-
The ECM provides timing information based on RPM and engine load which is based on throttle position.
-
If you purchase a Bosch Certified pump it should have a NEW PSG module. If so it is sold blank which means it will be ran on a Bosch 815 test stand for 3 hour to calibrate and test. After passing all test then the PSG is flashed. It is policy for all Bosch certified builders to core out the old PSG and replace. One's that reuse the old PSG are not a certified rebuiler and are not test standing the rebuilt pumps.
-
I know there are a lot of guys out here that love their oversized tires and I will admit they look super cool. Now to make it all come together and make it a rocket ship on rails you need the proper final ratio. Optimal for most daily drivers that are here optimal final ratio to the ground is 3.73:1 after the tires. The problem is any size larger than a factory 265's on 3.55 gears is going to lower the ratio. I created a chart of the final ratio with some tire sizes to see the results. Subscribing members only...
-
So... 122*F - 40 = 82*F outside temp roughly. Typically the intake and fuel temp will match on a long run. IAT is typically +40*F higher than outside air. You'll find that no cold air intake will change this being the intercooler does all the work. Turbo will create heat when compressing air. Engine oil temp seems pretty good. Just a bit high meaning either the vehicle is heavy or being worked hard. Possibly timing is set up wrong. The lower the engine oil temp the better. I typically float 158*F to 165*F. The coolant is spot on for temperature. Just remember Cummins ECM CANBus can't show temps over 204*F and it will flip over to -40*F. Big questions... What is your cruising RPM's at 65 MPH? What is EGT's at 65 MPH? What is your boost at 65 MPH? What is your timing at 65 MPH? Clues to gaining the best... Stock HX35W and +150 HP injectors... 66 MPH is 2,000 RPM Boost at 65 MPH is 2 PSI EGTs at 65 MPH is 550 to 600*F Timing at cruise state is 23 to 25 degrees at 65 MPH. Going higher to 80 MPH. 80 MPH is 2,450 RPM Boost at 80 MPH is 5 PSI EGT's at 80 MPH is 600*F to 700*F Timing at cruise state is 27 degrees at 80 MPH. Make you think... On working with me to get a solid tune...
-
Look at the engine where the lift pump should have been. It will be an aluminum bypass block and the wiring has been extended toward the rear.
-
@Auto Computer Specialist would be my first step. Give them a call and see if they can help you... Their list for contacts are in the Vendor list and also in the Vendor forum.
-
Actually did really good but running CANBus tuning didn't take much get Beast side stepping in 4WD. Instate travel was impressive running 2,450 RPMs and floating 600°F. Engine load was about 22% on the flat. Mo bing through the snow power wasn't an issue it was just keeping a strong hold on the wheel keep Beast heading straight. Being I was running 3rd and 4th most of the way home MPGs are down plus the added drag of the 4WD and deep snow.
-
Well, yesterday was a heck of a trip. So, @Honey Badger had some shopping to do and help her oldest son with his taxes. I also had a few items to pick up from the stores down there. The evening before we were talking about taking Minnie down but when I looked at the weather reports it said 50‰ chance of snow. We packed up that morning at 9:30 am and headed south. Everything doing good weather was sunny and warm, roads were clear and dry. Fast forward to the evening, we had dinner with Honey Badger's son, her father was there, and @Tatted Hemi and I were discussing web stuff. We left Boise at 8 pm and headed home. By the time I hit Weiser ID it was snowing (2,400 feet), I was thankful we took Beast. It was horrible. I plowed highways 3 to 9 inches deep. By the time I hit Midvale Grade my average speed was 45 MPH. Oh, it gets worse. Hit Council ID and Fort Hall Grade and I was down to 35 MPH chugging along in 4th gear. New Meadows ID last 20 miles I was down to 25 MPH and nearly see 2 truck length at times couldn't see the road edges. Made it home at 1:30 am and got to bed at 3 am and packed in our shopping kinds of stuff. This was so gnarly of a trip my left shoulder and hand are sore from Gorilla Grip on the wheel and fighting deep snow. Beast did extremely good, few times she would sidestep sideways pulling a bit too much power on hills. We are tired and sore this morning be we made the trip safely and no issues.
-
That center bolt you have to be careful not to over torque the bolt. I've seen several that broke the nut assembly inside the PDC. Then the but spins inside and never really tightens.
-
Just understand dead pedal is part of the safety software to prevent WOT runaway. So when the APPS value goes out of range the ECM ignores the APPS sensor value and uses idle software for safety. I sure would not like it if the throttle went wide open with no way to stop.
-
We try to help out where we can. He's right it can be difficult some times to understand what is going on. Suggestion is grab some photos with your phone and post them up then we can see what you talking about.
-
28.2 MPG hand math. I did another trip from Seattle WA filled the tank drove 300 miles across Washington to the Idaho border and used a touch more than a 1/4 tank across the entire state of Washington last summer. Even this winter with temps as low as -20*F I was still holding close to 22 MPG running 25 degrees of timing at 2,000 RPMs. My current tune is way aggressive timing at a cruise state. Under power, it drops to about 18 degrees at 2k RPMs and flat tucks tall and bails down the pavement. Oh give me some time and I'll be getting the Quadzilla added to the store very soon. https://store.mopar1973man.com/2nd-generation-24-valve/tuners-programmers.html
-
Yeah, you gotta look closely for cracked fuses. I've seen fuses that cracked and look like they are whole and not blown but still don't work. Blown fuses are a little easier to see.
-
I've got boxes of stuff either from Beast or Thor I've got piled up on the top shelf. My problem is eventually I find someone that needs that part and it goes bye-bye out the door in someone else's truck.
-
Sound like someone needs to go over to the Download section pull up a Dodge FSM for that and look over the wiring maps. The key switch typically turns off both of those unless someone has created a new path by wiring modification. I would look under the dash first for modified wiring.
-
Tell you the truth all the grill guards I've seen after a deer hit one typically the grill and headlights are wiped out and just add weight to the truck and not very practical for actually guarding the grill. Now a winch bumper with grill guard now you are talking about something that will actually guard the front very well.
-
Correct. Tank vent with a rollover valve. Make sure the nipple is clear and not blocked.
-
A small piece of 4" exhaust pipe fits wonderfully.
-
P0740-TCC OUT OF RANGE For a complete wiring diagram Refer to Section 8W. • When Monitored: The Torque Converter Clutch (TCC) is in FEMCC or PEMCC, Transmission temperature is hot, Engine temperature is greater than 38° C or 100° F, Transmission Input Speed greater than engine speed, TPS less than30°, and brake not applied. • Set Condition: The TCC is modulated by controlling the duty cycle of the L/R Solenoid until the difference between the Engine RPM and the Transmission Input Speed RPM or duty cycle is within a desired range. The DTC is set after the period of 10 seconds and 3 occurrences of either: FEMCC - with slip greater than 100 RPM or PEMCC - duty cycle greater than 85%. Possible Causes RELATED L/R SOLENOID OR PRESSURE SWITCH DTCS PRESENT INTERNAL TRANSMISSION Always perform the Pre-Diagnostic Troubleshooting procedure before proceeding. (Refer to 21 - TRANSMISSION/TRANSAXLE/AUTOMATIC - 42RLE - STANDARD PROCEDURE) Theory of Operation When in 2nd, 3rd, or 4th gear, the torque converter clutch (TCC) can be locked or partially locked when certain conditions are met. The TCC piston is electronically modulated by increasing the duty cycle of the LR/TCC solenoid until the torque converter slip difference (difference between engine and turbine speed) is within 60 RPM. Then the LR/TCC solenoid is fully energized (FEMCC / 100% duty cycle). Torque converter slip is monitored in FEMCC to ensure adequate clutch capacity. The transmission will attempt normal EMCC operation (not in Limp-in) even after the MIL is illuminated. MIL will illuminate after 5 minutes of accumulated slip in FEMCC. Diagnostic Test 1. CHECK IF RELATED DTCS ARE PRESENT With the scan tool, read Transmission DTCs Are the DTCs P0750 and/or P0841 present also? Yes>> Refer to the Transmission category and perform the appropriate symptom. No>> Go To 2 2. CHECK IF THE DTC IS CURRENT Ignition on, engine not running. With the scan tool, record and erase DTCs. Drive the vehicle until it is fully warmed up to at least 43° C (110° F). Perform the following step 3 times. Drive the vehicle at 50 mph and allow 4th gear to engage for at least 10 seconds. Close the throttle, then tip back in until the throttle angle is between 25 and 29 degrees. Note that if you go over 30 degrees, you must back off of the throttle and retry. Did the TCC engage during any of the attempts? Yes>> Go To 3 No>> Perform the Hydraulic Pressure test per the Service Information and repair the internal transmission components and Torque convertor as necessary. Perform 42RLE TRANSMISSION VERIFICATION TEST - VER 1. (Refer to 21 - TRANSMISSION/TRANSAXLE/AUTOMATIC - 42RLE - STANDARD PROCEDURE) 3. INTERMITTENT WIRING AND CONNECTORS The conditions necessary to set the DTC are not present at this time. Using the schematics as a guide, inspect the wiring and connectors specific to this circuit. Wiggle the wiring and connectors while checking for shorted and open circuits. This DTC can also be set under extreme temperature conditions. This is usually caused by an internal problem. Verify if the problem is only experienced under extreme hot or cold conditions. With the scan tool, check the DTC EVENT DATA to help identify the conditions in which the DTC was set. Check for Service Information Tune-ups or Service Bulletins for any possible causes that may apply. Were there any problems found? Yes>> Repair as necessary. Perform 42RLE TRANSMISSION VERIFICATION TEST - VER 1. (Refer to 21 - TRANSMISSION/ TRANSAXLE/AUTOMATIC - 42RLE - STANDARD PROCEDURE) No>> Test Complete.
-
Now before too much time goes by make sure to make a filter stand so the 3 studs don't eat holes into the air filter. Flat plate of aluminum and 3 nuts below and the plate then 3 nuts on top. Set it up in a way that the top nuts are flush with the top of the stud.
-
Typically I would roll the truck in the shop during an oil change and lay on the creeper and roll from the front to the back looking at everything inspecting for leaks, loose bolts, damage, etc.
-
I could most likely pass a smog test with my DAP +150HP Injectors (7 x 0.010), Quadzilla Adrenaline, and stock HX35W turbo. The way my tune is set up and the fuel table I run there is no smoke. If I wanted to hide the tune I could easily stash it up in the dash and hide most of the wiring. Some of the main reasons I can do this with such big injectors is the fact that other tuners like Edge CTS or Edge EZ do not allow for timing adjustments. Strangely I'm now running upwards of 24 to 25 degrees BTDC at 2,000 RPM which no other tuner can do and burn so cool in EGTs that at my 65 MPH speed I'm right at 550 to 600-degree EGTs with about 2 PSI of boost. Bonus is having super high MPG's. That should make you think...
-
Please do... It really does help people understand the level of damage and what it took to repair your truck.


