


Tractorman
Yearly Subscription
-
Joined
-
Last visited
-
Currently
Viewing Topic: Rough idle when warmed up and I am losing my mind
Everything posted by Tractorman
-
The 12 valve engine ('94-'98) uses a P7100 injection pump - no electronics. The Gen3 engine (starting in '03) uses a common rail fuel injection system. The only comparison engine that would work for you to test would be in a VP44 truck ('98.5-'02). If a single cylinder is misfiring, it would feel similar to a gasoline spark ignition six cylinder engine misfiring on a single cylinder - such as a spark plug misfiring. The misfire in your engine would feel stronger as more engine throttle and load were applied, whether or not it is a random cylinder or all cylinders. I suspect that it is all cylinders if it very jerky under power. The fuel solenoid inside a VP44 injection pump fires every cylinder, so if its electrical power source is temporarily interrupted, all cylinders will be affected until electrical power is restored. John
-
I have never done the type of testing that you are doing, so I don't any experience here. But, it would be good to see the same tests performed on a good running VP44 truck and compare the results. Is that possible for you to do? Is the bottom horizontal scale "time in milliseconds"? When the engine cuts out, does it feel like is a random cylinder misfiring, or does it feel like all injectors quit firing briefly? John
-
APPS (accelerator pedal position sensor) on the Cummins. When the APPS becomes output signal becomes intermittent as it ages, a specific code is usually set and the engine typically goes right to idle - referred to as "dead pedal". The dead pedal lasts for about 10 seconds or so, then goes back to normal until the next event. The photo below is from one of your earlier posts. I would be specifically concerned with re-checking the voltage to the injection pump. Voltage falling down to 9.5 volts could easily cause intermittent operation of the fuel solenoid valve in the injection pump resulting in random injection events not happening. This does match your symptoms. John John

-
I re-read all of your posts. Do you still get voltage fluctuations at the injection pump, especially under acceleration? If so, those low voltage readings on your original graph could cause the fuel solenoid to misfire. Something that has not been discussed is fuel supply. If the injection pump is continuously getting the proper voltage, then maybe the fuel supply is inadequate during hard accelerations. Do you have an operational fuel pressure gauge in the cab? John
-
Yes. The 140 amp fuse is reliable. It is not used on the passenger side battery because it has no fuse holder. People typically buy a 150 amp fuse (with holder) of their choice to use on the passenger side battery. I have changed mine to this setup three years and 35,000 miles ago. It has been working fine. John
-
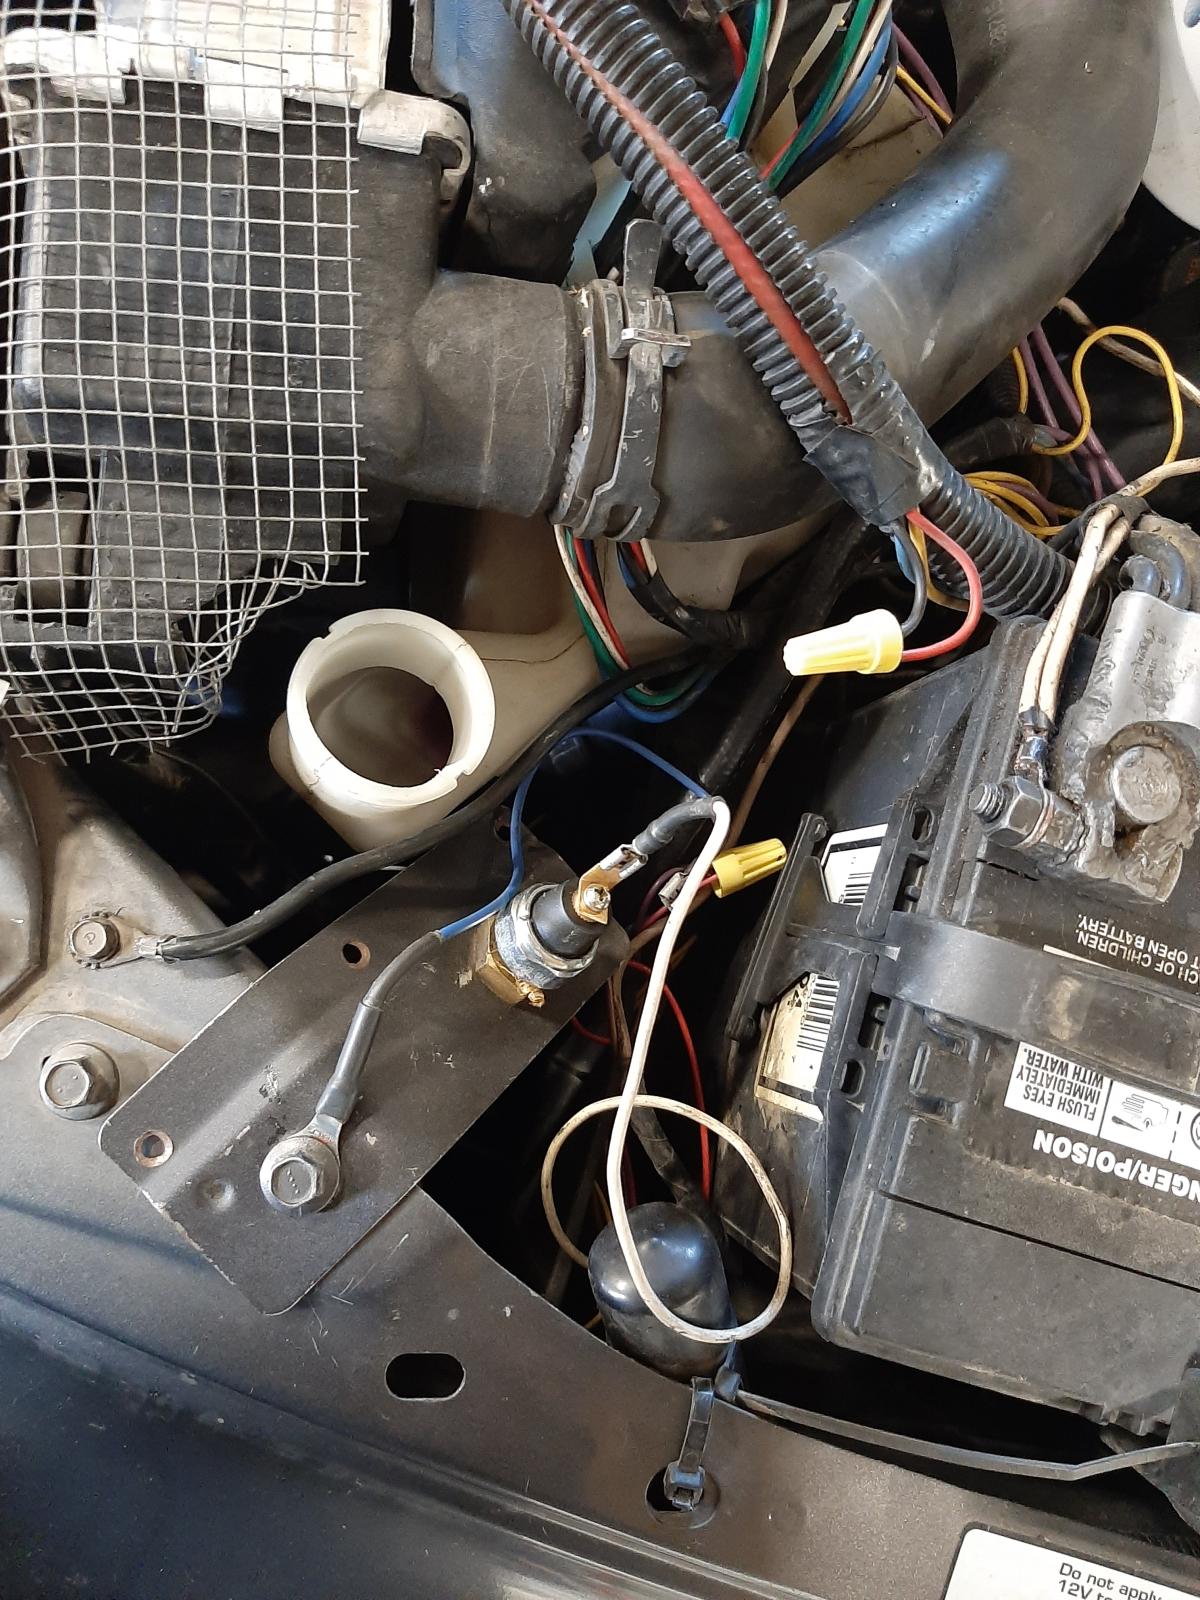
I recommend mounting the pressure switch remotely. Make the connection with an 18" or 24" grease hose (1/8" NPT both ends) in conjunction with a snubber. Use a bulkhead fitting (from Amazon) for the remote location. Make sure there is at least a 90° bend, or make a complete loop with the grease hose. This reduces pressure spikes to the sensor. A remote location gives you easy access for testing fuel pressure or replacing the pressure switch. The photo below shows my earlier installation before I purchased the LEFOO LF20 pressure switch. John
-
Absolutely. Reading the following may help you feel more at ease: I have owned my truck since new and it currently has logged 402,000 miles on the odometer. Odometer 66,000 miles August 2004 - First injection pump set a code P0216 ( a death code for the VP44). Odometer 87,000 miles August 2005 - Injection pump replaced with re-manufactured unit under warranty. Lift pump relocated as an in-tank pump application (also covered under warranty). Just prior to replacing VP44 injection pump, I monitored lift pump pressure because the word back then (similar to what is now) was that if you don't have 14 psi lift pump pressure, you are going to kill the VP44. So, I drove my truck for a week (250 miles) monitoring lift pump pressure. It operated within factory specs flawlessly and maintained 6 psi at wide open throttle at 2500 rpm. After the replacement of the VP44 injection pump and the replacement / relocation of the lift pump as an in-tank lift pump, my new lift pump pressure was 6 psi at idle and 3 psi at wide open throttle - yes, 6 psi and 3 psi! I was not concerned because by then I had learned much about the true operation of the VP44 fuel system. According to all of the diesel forums, I should have mutilated the VP44. But, that didn't happen..., and it still hasn't happened. Odometer 250,000 miles April 2016 - Install Smarty tuner and set for mild tune. Odometer 251,000 miles April 2016 - Replace in-tank lift pump (not because of failure, but to have more readily serviceable frame mounted used FASS lift (65 gph). Note that the re-manufactured VP44 has logged 164,000 miles with maximum fuel pressure at 6 psi. Should be dead now, right? But, alas, it isn't. FASS lift pump - 12 psi at idle, 6 psi WOT at 2,000 rpm Odometer 303,000 miles December 2018 - Replace original injectors with RV 275's Odometer 402,000 miles - November 2025 - Now have logged 315,000 miles on re-manufacture VP44. Should be dead by now - right? But, again, it isn't. I would like to note that this truck has never received fuel additives, nor 2-stroke oil to the fuel. Also, I would like to note that this truck has done lots of work covering thousands of miles at 20,000 lbs gross combined weight crossing lots of mountain passes in hot summer conditions. Hope this helps. John
-
It is true that the overflow valve is regulated at 14 psi. However, this pressure (and the fuel return flow provided) has no correlation to lift pump pressure. Your statement here is misleading. I do agree that the overflow valve will be closed when fuel pressure that the overflow valve senses falls below 14 psi. However, the fuel pressure that the overflow valve senses is provided from the flow of the VP44's internal fixed displacement vane pump, not the lift pump. Consequently, the volume of return fuel through the overflow valve is the same for a given engine rpm and load whether lift pump pressure is 5 psi or 20 psi. The VP44's internal fixed displacement vane pump's flow is regulated to well above 100 psi. This is why the 14 psi overflow valve opens immediately when the engine is started. It never closes until the engine is shut off - regardless of lift pump pressure. Since the lift pump and the VP44's internal fixed displacement vane pump are plumbed in a series circuit, the volume of the the internal vane pump cannot be changed by lift pump pressure. The volume can only be changed by changing engine rpm. In the past I have posted the results of extensive testing by others (using a flow meter in the fuel return circuit) that clearly supports what I am saying here. This testing was performed in April of 2001 (before any of us even owned our trucks) by a few Turbo Diesel Register members. About three years ago I performed similar tests, as well. The results showed that fuel return flow remained the same, even when the lift pump was turned off and bypassed. I post this information in hoping to give a better understanding of the relationship between the lift pump, the internal vane pump, and the overflow valve operation in the overall VP44 fuel pump injection operating system. John
-
Any particular reason you don't want your lift pump to fall below 14 psi? You could plumb in a tee right at the injection pump fitting just for your test gauge. John
-
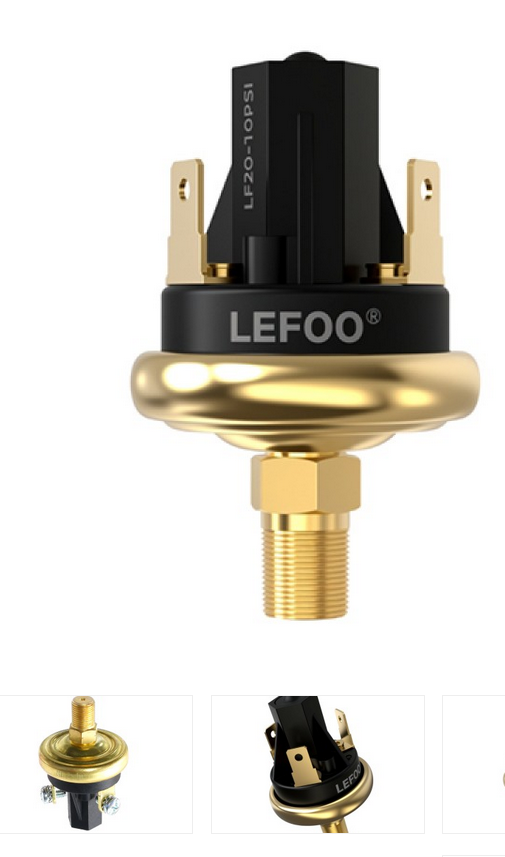
Unless you are absolutely set on having a gauge readout, there is the option of using just using a low pressure warning light. I have used the adjustable LEFOO LF20 pressure switch for years. It is my personal choice because the only thing that matters is that there is always positive fuel pressure at the VP44 inlet. The actual pressure value is unimportant. The activation of a LED warning light will catch your eye more readily than a low reading of a fuel pressure gauge. This particular pressure switch has a range of 0.5-150 psi and comes preset at 10 psi. It is compatible with oils and diesel fuels and it is very easy to adjust to a custom pressure value. The cost is under $40 from a variety of sources, including Amazon. You can easily wire in a LED light at a location of your choice. John
-
But..., before you replace any parts - make sure the transfer case shifter is NOT in neutral. Just sayin'... John
-
@Mopar1973Man , maybe you can assist here. Please review this thread and give us your thoughts. Symptoms are: engine idles fine, or jumps to 1,400 rpm when the throttle is slowly pressed. Engine rpm doesn't change while depressing throttle further. Engine has the following DTC's: P 1693 is a companion code - no concern. P0122 - Accelerator Pedal Position Sensor Signal Voltage Too Low P1689 - No Communication Between ECM & Injection Pump Module ECM and PCM has been checked by Auto Computer Specialists. Scanner show that APPS signal is 0% at idle and ramps smoothly through the throttle application range. @CH123 , please make any corrections if I misstated something. John
-
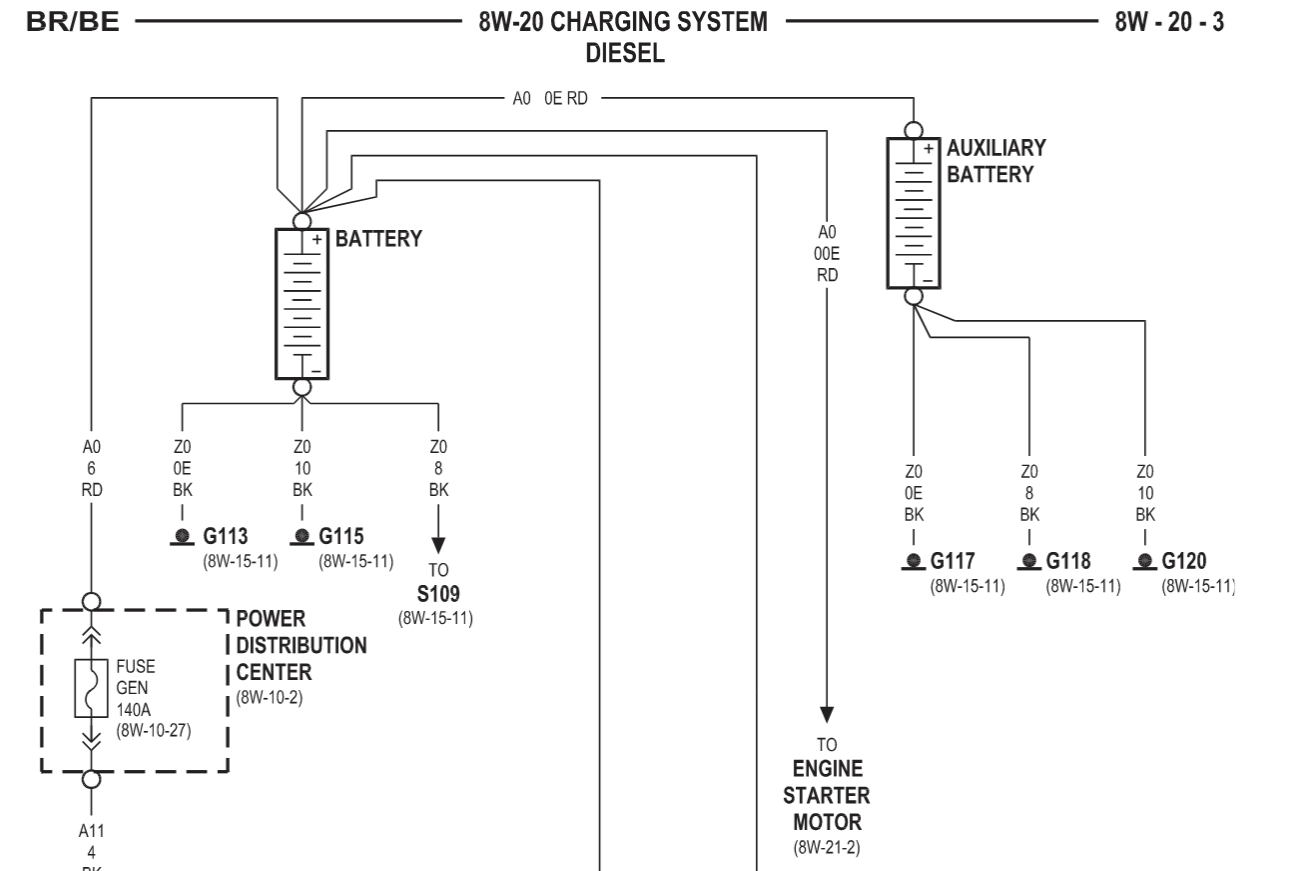
Hope this helps for battery wire sizes. John
-
I watched your video - good video. I noticed that as you depressed the accelerator pedal that the accelerator pedal traveled a more than normal distance to get a change in engine rpm, and that the change was sudden (jumped to 1,400 rpm). The idle validation switch is built into the APPS sensor. It appears to be working as the engine idles as it should. Do you have, or have access to a scanner that can read the APPS signal? If so, this could help diagnose whether or not the per cent of APPS signal follows the travel of the accelerator pedal. It could also show an abrupt signal change that times with the sudden rpm change when depressing the throttle. This test could help to determine if the APPS sensor should be replaced. APPS / ECM circuit is shown below: John
-
The ECM controls engine idle - all other sensors (including the APPS) are out of the loop when the engine is idling. However, you do need to make sure that the APPS is adjusted properly and that the idle validation switch is energized in order for the ECM to command engine idle. Since you have a code for the APPS (signal voltage too low), I would address this circuit first. John
-
If you clear the codes, do they come right back? If so, which ones? P 1693 is a companion code - no concern. P0122 - Accelerator Pedal Position Sensor Signal Voltage Too Low P1689 - No Communication Between ECM & Injection Pump Module P1689 - not good. John
-
No need to insulate lines. The AC system on these truck cool very adequately. Likely, there is something not right with your system. If you install the heater core shutoff valves and the the AC works much better, then you probably have a blend door problem - either with door seal leakage or the blend door is not operating to its full travel limits, thus some of the circulating air is still being passed through the heater core. I have a heater core shutoff valve that I use in the hottest part of the summer. The difference is really unnoticeable when the truck is parked inside and used for the first time on a hot day. However, after being parked in the sun for a couple of hours or more, there is a faster cool down because the heater core has not heat soaked the dash, and when engine is started, there is no hot coolant entering the heater core to conduct into the cabin. This is when there seems to be the best benefit to using a heater core shutoff valve. John
-
Sounds like a good plan. Thanks for the informative response - good information. John
-
Glad to hear that you didn't have the battery connected during the tests. I am referring back to your original post as a starting point. Has anyone checked for codes? If so, what are they? If codes have been checked and there are no codes, there are other things to be checked off the list, such as: Did you fuel the truck just before this incident occurred? (possible water contamination or wrong fuel) Have you verified lift pump pressure? Is the lift pump running? The lift pump should run for 1/4 second with key in Run position. Switch key to Off position and then to Bump Starter position (don't start the engine) and let the key return to Run position. You should hear the lift pump run for about 20 seconds. Be sure to always turn the key to the Off position before repeating a test. Check over the positive and negative battery cables and connections carefully. Don't forget the crossover cable. Use your 99 wiring diagram to find and check grounds - especially for the ECM, PCM, PDC and the VP44. This will be a good start. Let me know what you find. John
-
I am kind of at a standstill here as I don't know what you are trying to accomplish with your tests on Joint Connector #8. Plus, it appears that you are testing for resistance (ohms), but you are breaking all of the rules mentioned in my previous post, such as leaving everything connected and supplying external power). This is from your original post. A previous post by me explained why this would be normal to have continuity through both the door switch and through the ignition switch under these conditions. This is the next part of the same paragraph from your original post. I am thinking there is no faulty short to track down. So, my question is - why are you focused on these particular wires? And, what are you testing for? Hopefully, we can get this part resolved and move on to the real issue - lack of engine power. John
-
I appreciate your explanation. The "diode check" function is used for checking alternator diodes. The meter itself applies a specific voltage value to the diode being tested in the free-flow direction. The meter displays that value in voltage - example: .650 volts for a good diode. Reverse the polarity and the meter would read OL (out of voltage limit). Also, it is worth noting that at least one end of the diode is removed from the circuit during the test, otherwise an erroneous reading or damage to the meter (if external power is supplied) may result. Since you were using your meter's diode test function under various uncontrolled conditions (batteries disconnected, batteries connected, engine running, etc.), you were likely collecting many erroneous readings and also you risked damaging your multimeter. The "resistance" test (Ohms) is used for checking continuity in wiring. The meter applies a specific voltage (similar to the "diode check") and measures the resistance of the circuit being tested. The meter displays the resulting value in Ohms. As in diode testing (and for the same reasons), the wire being tested must have at least one end removed from the circuit being tested and have NO external power applied. Don't rely on the meter's "tone sound" for testing results. Look at the display and note the actual ohm reading. There are three tests that can be performed. One test will check the continuity of wire (should be almost zero ohms). Another test will check for continuity of the wire to a good ground source - a short circuit - (should be OL). The last test will check for continuity of the wire to any adjacent wire of your choice - a short circuit - (should be OL). Prior to performing any continuity testing, always do the following: Set the meter to the lowest ohms scale - do not use the Kilo-ohms or Mega-ohms scale. Do not use auto scaling. Touch and hold your test leads together to prove that the meter and your test leads are performing properly. A reading of zero or near zero ohms is expected. So, hopefully you will re-think how you do your future continuity testing. If you still believe that you have a short-to-ground issue, then be deliberate and test circuits that are relevant to prove whether or not the particular circuit is functioning properly. I'll be happy to help you through that. John
-
I can't answer that question as I don't know the purpose of that connector, or what you were trying to figure out with the method of testing you performed. If you don't know what is on either end of the connector, then any values from electrical tests performed are meaningless. Please answer this question - why do you think you have a short to ground in the wiring on your truck? What is drawing you to this conclusion? You may have a valid reason - I am just not getting it. Also, why are you using the "diode check" function on your meter to check for ground continuity (or shorts to ground) instead of using the resistance / ohms function? If you can clear some of this up, then we can move on to trying to figure out the "no power" situation. John
-
Your meter is set to "diode check" which means that current will flow only one way after it overcomes .6 volt. Current will not flow in the other direction. The continuity will be there with the ignition switch turned on for the same reason the continuity was there when the door was open. All it takes is one circuit to be activated with the ignition switch on to make continuity - for example, instrument panel indicator lamps. This would be normal. Am I missing something here? Why do you think you have a short to ground problem? John
-
Before I can offer any help, I have some questions first. Was your meter on the continuity (ohms) setting? Were the batteries connected or disconnected? If the meter was set for continuity (ohms) and the batteries were disconnected, then it would be normal to have continuity between the positive cable and the ground cable when the door switch was activated. The current would be passing through the dome light and through the switch. If the above paragraph doesn't represent what you observed, pleas let me know. Can you provide more detail as to why you think you have a ground problem John
-
I don't think your truck is burning up crank sensors, I think that the after-market crank sensors are of low quality. Many others have reported the same issue with after-market crank sensors. Good to hear that your are making headway, though. John


