ISX
Unpaid Member
-
Joined
-
Last visited
Everything posted by ISX
-
I decided to run some more scenarios to see if my truck would ever try and overheat. I took the fan and shroud off a while back and nothing changed, still runs at 195F the whole time. It seems I only have to be doing 5-10mph to keep it at that temp.Anyways, I blocked the radiator completely off from behind it (in front of it would surely make it overheat) and the way I was figuring is the air goes in and bounces off the backing plate. Or it doesn't really go in because of the pressure of the plate. Not sure, think I have proven I am not the best at physics lol. I tried it anyways since, why not. Drove into the city to a couple stoplights and back out to my house, totaled about 25 min of drive time. It was 75F out. Can you guys believe that it didn't have any difference to when I was running without the plate? It went up and stayed at 195F the whole time, same as before. The only time I have issues is when idling, for obvious reasons. However, most people think after 5 min it would be puking. So I tested that theory too. I got back home and left it running. When I stopped it was at 193F. 5 min later it was at 200F. 5 min later it had hit 210F. I didn't go any higher. Those times are once again, the same as when the plate wasn't there.Funny thing was my EGT was at about 340F when I turned it off (15 min of sitting), now you guys see why I don't even bother waiting to shut it off lol. Yes I used the crappiest piece of sheet metal I could find :lol:The only thing I see bad about this is that the underhood temps could get hot and maybe do some interesting things, which is why I am taking it back off, might put it back on in the winter. I just wanted to see what it would do.

-
You just see if there is continuity between the normally closed contacts when it isn't energized, and if there is continuity between the normally open contacts when it is energized. By continuity I mean less than 1 ohm. The last relay I got had the usual less than one ohm on the NC contact like it should but on the NO it had 30 ohms. So when I hooked a light up to the NO contact, the light was on but it was dim. The thing should either be less than 1 ohm or no ohms whatsoever.Yes, before the relay. They usually have an amp rating on them. No clue on the last bit.
-
So we can have 2 people staring at it?
-
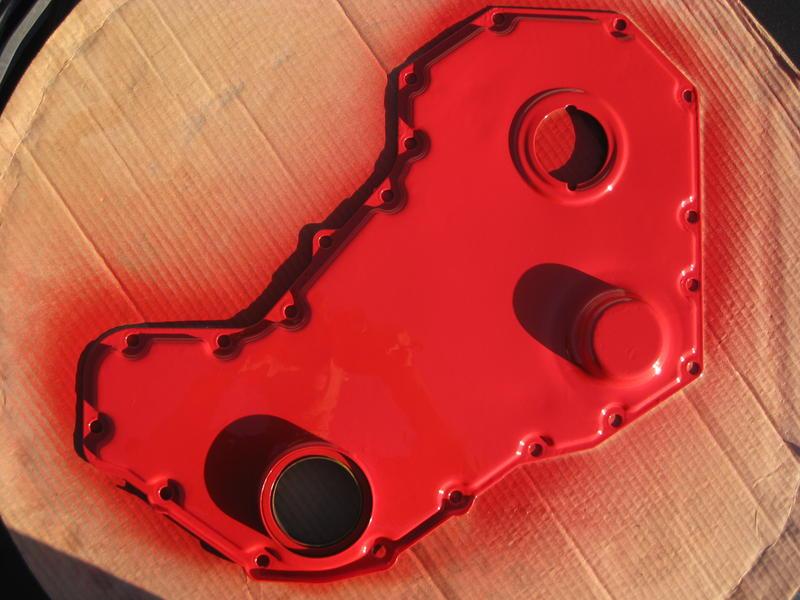
I scratched it up really good with sandpaper. I wanted to prime it but, eh. We'll see if it lasts. I didn't prime my tranny and didn't scuff it up or anything and it only has maybe 4 coats on it and is holding up really good. The reason for 20 coats was to fill in all those damn nicks of black paint that showed the tan underlying paint. They were really deep. I think it will take a week to dry, it wasn't even dry to the touch 12 hours later and it was supposed to be after only an hour. I didn't even drive it because I want it to dry some more. Just leave it in that spot for a week lol.
-
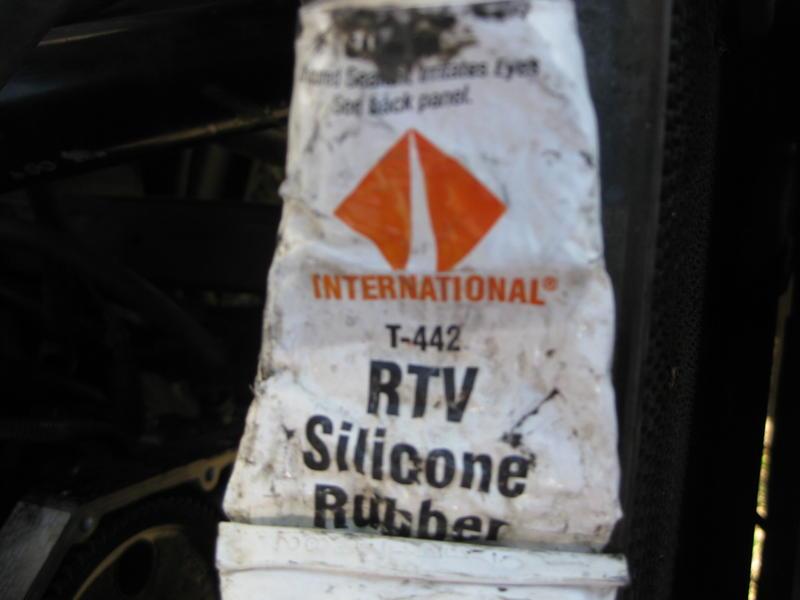
Any trucker place would probably have it. That stuff is just as expensive :banghead: I sucked up to the mechanics enough that he gave me what was left of that tube.
-
The only time I heard it was after some party when everyone got drunk and one guy had to take a leak and whipped it out in front of everyone trying to find the bathroom or something. The next day people were laughing at him saying "I've seen your junk, hahaaa". I wasn't there but I take it god didn't give him much luck in that area. I don't think they would have been saying that if he was better off than they were
-
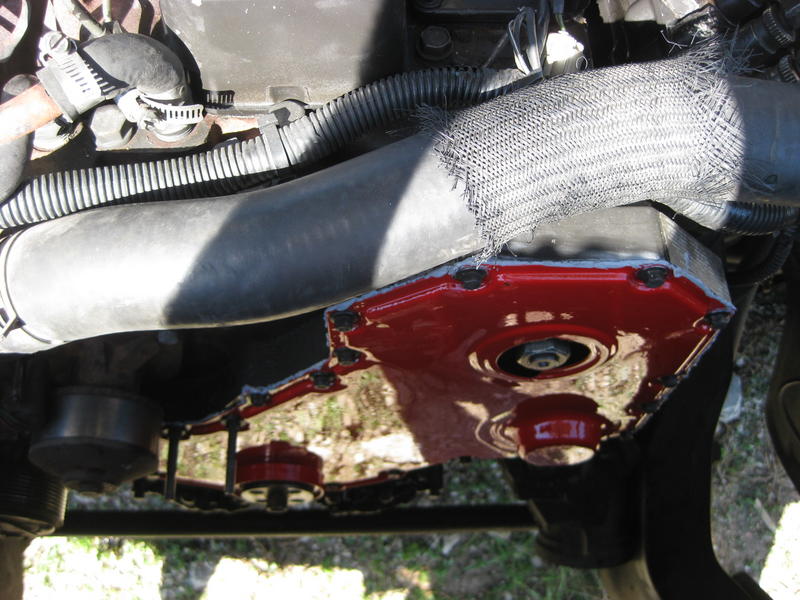
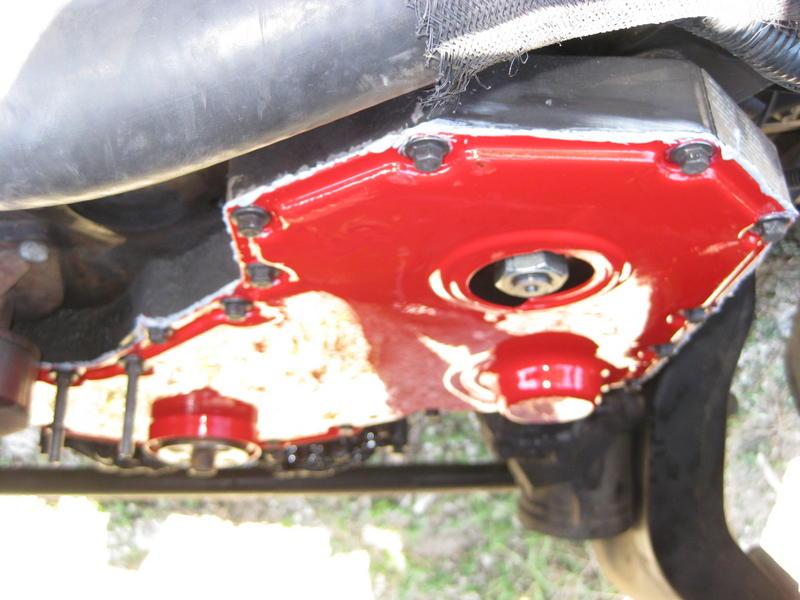
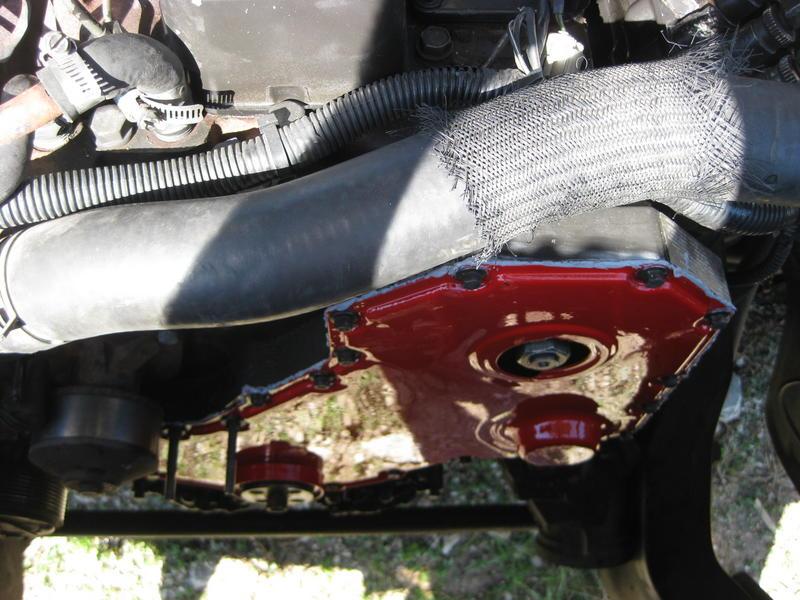
After talking with some guys I told them I was planning on using "The Right Stuff" but they said that would be #2 on their list and number one would be this stuff international makes. They said this is the "for the stuff that loves to leak" stuff. It forms just as fast as the right stuff, not that 24 hour crap. So you put the bead around it and put it on as fast as you can and tighten them all finger tight, wait 5 min, then tighten them all down to torque. I ran a tap through every single bolt hole and wire brushed every single bolt so that the threadlocker would do it's job better. I figure the leaking timing cover is 50/50 between a bad gasket/silicone or loose bolts. They swear it will never leak again using this international stuff, guess we will see. The paint is "universal red" I think. Just the standard 500F stuff you get at NAPA. I power washed it and just took some 200grit sandpaper and roughed it all up. I would use primer on it first if I were you, I am just cheap lol.
-
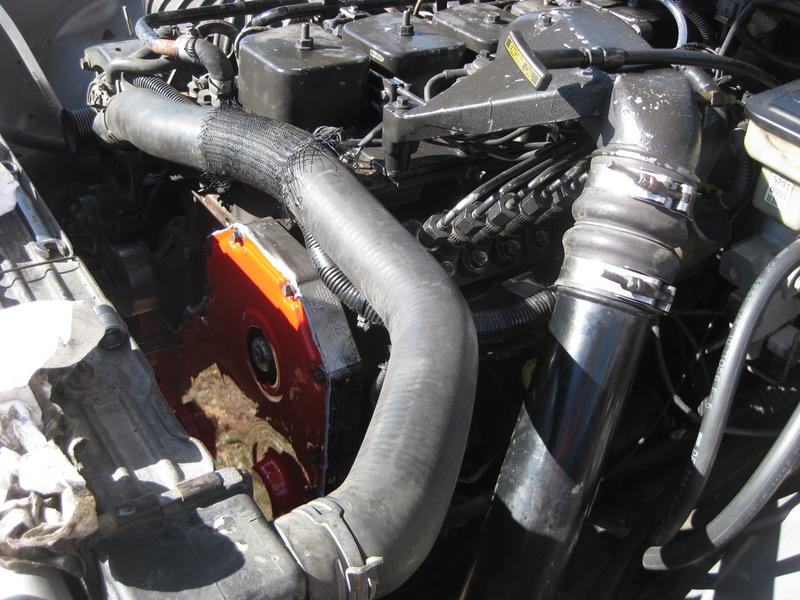
This has got to be the best thing of any part of the engine that you could paint. It is just unreal how it makes the engine look.

-
Does she want fries with that too?
-
I don't see any difference between a crossbow and compound bow. They are both quiet As long as it doesn't make noise, let them shoot it during bow season. I got a bow this year but I haven't shot anything with it. Mainly just shoot targets 60-80 yards away. I don't think I even have anything other than the target practice arrows. I have the bow tightened all the way down which is 80lbs. I can only shoot it 10 times before I can't pull it back any more lol
-
Better not be any imperfections! That thing was perfect last time I looked. The weird spot is just it reflecting things cause it's so shiny lol. I actually am getting a couple articles in one out of this. Kind of anyways. Just throwing in a million tidbits so that the thing will seal good since the timing cover is probably one of the top 5 things that loves to leak oil, if not top 2.
-
I will get to the valve covers eventually. Everyone has red ones and I think its a little too flashy. Thinking of making it a little more dull, like silver maybe. My blow by is at the back of the block where Mikes blowby tube mod is. They are back there stock on 12v's.
-
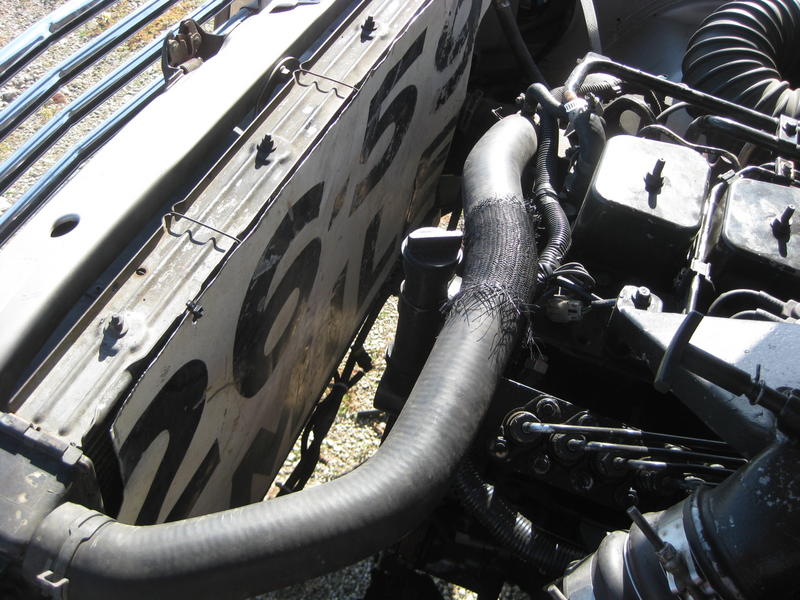
I took the timing cover off to get some pics of the KDP and show everyone how to get down to that point. Before putting the cover back on though, I decided I better do something with that 2 tone piece of crap. I don't know who painted the engine black when the underlying paint is tan. Cummins stock paint color is tan so I think dodge may have just gave it a black coat so we couldn't see oil leaks. Anyhow I had chevy orange here (if you remember my trans) and I almost used it but I knew you all would send me to hell if I posted a pic of that, so I went out and got some red and got it all painted. Theres about 20 coats on it so hopefully it will last I figured I better wait overnight before I touch it because of all the coats so I will put it on tomorrow and get the article done and up. It will be partially on how to keep it from ever leaking again too.
-
Your probably going to shoot me for this, but if you take the oil pan off and can get to it, can you get a few shots like putting your finger where the oil cooler squirters that cool the pistons are, then just as close as you can get to it inside the engine showing them, I know that will be hard so might not be able to do it. Then pull one out and show us. I forgot all about it when I pulled mine and I know there are a lot of people curious about where they are. I spent a long time thinking they were just a tube pointing at the bottom of the piston then finally figured out where they really were and what they looked like.
-
So if you run it out of fuel, you just sit there and crank it after you put more in it?
-
That's different. The injection lines and everything still have fuel in them. If I change my fuel filter and reprime it (same as you are doing with the FASS thing) mine doesn't even notice it had the filter changed.
-
Its not my video, I don't have it yet. Hoping it gets here today.
-
So JohnFak is on the road going from here to Arizona and he said yesterday it was flawless, not even the bucking issue he has talked about. Well today I think he said the bucking is back a bit but his edge juice display module is showing speeds of 60/90/100/120 just bouncing all over the place. Speedometer is reading steady 60mph though. The RPM and throttle % on the EDGE also are steady, so nothing is messing up but the speed it is detecting. He is wondering if he should reset the APPS or something. I am not sure but I think each thing the EDGE monitors has it's own sensor? I remember there was a ton of wires all braided individually. Thought the speedo got its info from the same spot the speedometer on the cluster did. So I was thinking loose wire. What can do you guys think? --- Update to the previous post... He went ahead and did the APPS reset, 30 min battery disconnect thing, and it fixed it. Guess the question now is why it fixed it. Bucking issue is gone, EDGE speedo jumping is gone..
-
I messed with those PITA's in school. He would put us on one and tell us to set the valves but not how to do it, he wanted us to figure out the mess for ourselves. We worked on some big CAT and after messing with all the others that were Intake Exhaust I E I E I E.. that one was I think I E E I I E E I..so he tried to trick everyone with that. We didn't even do anything to the ISX, just hooked it up to a computer and floored it then cut out all the injectors but 2, which it could hold idle on just those 2 which I thought was pretty neat. Then you ran all these other little diagnostic tests and it would either pass or fail them. I guess that setup is good as long as you can easily get to all the sensors when they go bad lol. Now I remember that CAT having those injectors too. You had to tighten them down to exactly the right torque or they would mess up.
-
400 grain! hahaha We have a 300 ultra mag and I can't remember what grain it is. I know the bullets come in 3 power levels but I know it isn't near 400. My dad goes elk hunting all the time, I have never gone with him. He keeps telling me he always shoots them 100 yards away. I shoot things 100 yards away with my open sight 30/30. One of the most fun things I like to do is get the open sight single shot 22 and throw a golf ball 50-75 yards out and shoot it. Single shot means the bullets last longer lol. Anyhow the whole elk at 100 yards just seems like shooting at a barn to me. I shot at a deer that was running full blast 2 years ago and dad thought there was no way I could have hit it. A couple months later we saw the same deers skeleton a little bit into the woods in the direction it had ran I would go elk hunting if I could take the 30/30 but since it doesn't have a scope my dad thinks it is worthless. To each his own I guess lol.
-
Dang! Is that what you go deer hunting with? lol Very nice!
-
Heres a perk of owning a 12V Finally have 1 up on you 24vers haha. When you guys bleed your lines, it takes forever. You have to crack the lines and everything and it still takes a while. I do not run an AFC, I have full fuel if I floor it at idle until the governor kicks me back out at 3000. Well that means I can bleed the injection lines at full fuel if I step on the pedal.. A stock 12V would be in the same boat as a 24V since the AFC keeps it from going to full fuel.I had been telling Mike about this but I finally got it on tape today. The full one is 8 min long if anyone wants to see me take the lines off, blow them out, then put them back on, that way you guys don't think I cheated lol. Otherwise, here is the short short version. Basically I took the lines off, blew them out with an air hose, put them back on and tightened them all down, no bleeding, no nothing. Then got in the truck and floored it and the video shows the aftermath.
-
Will work on anything really. Engines might have different techniques to set the actual valves but every single engine MUST have both valves closed to build compression and build power during the power stroke. As long as you know the running mates, you are good to go. I went out and looked at my 7.3 since I got the heads off to see if the running mate pistons were the same depth and sure enough, they all were. I do this technique because it is more accurate than the one in the book that you set a few on every cylinder, rotate 360 and do the rest. You also have to have a book to know which ones you can do. You can wiggle the valves and figure it out but that really isn't a good idea. Plus you go to a different engine and your lost once again. The way I show is universal.
-
I set my valves today, figured I would show everyone how I do it. As long as you know the firing order and valve lash (which are both on the cummins id tag) you can set the valves. This is called the valve overlap method. Basically the pistons have running mates. Running mates are pistons that go up and down together in exactly the same positions, as in they both hit TDC at the same time. The difference is that one of them is on the compression or power stroke, and the other is on the intake or exhaust stroke. To find the running mate, you simply take the firing order and split it in half. Our cummins' firing order is 153624. So splitting it in half would mean 153-624. If you put the second number under the first, you would have 1/6 5/2 3/4 So 1 is 6's running mate and 5 is 2's, 3 is 4's. Since the running mates are 360 degrees out of phase, when one of the hits TDC compression/power stroke, the other is hitting TDC exhaust/intake stroke. This is perfect for setting valves because you can simply watch the running mate of one piston and it will be on the exhaust stroke with the exhaust valve open, when it hits TDC and transitions to the intake stroke, the intake valve will open. Once you see that intake valve move, stop. This is TDC, or as close to TDC as we need to be. The running mate will be on the very end of the compression stroke and the start of the power stroke and the valves will be on the opposite side of the cam lobe since they must be shut during the compression and power strokes. You can now adjust the running mates valves, intake and exhaust. For example. To do the valves on #1, you would watch #6. The #6 will open and close the exhaust valve and once the exhaust valve closes and the intake starts to open, you stop and now you know it is at TDC. Since 1 is it's running mate, you know 1 is on TDC compression/power so you can do both valves on #1. Now look down the line and you will see that the exhaust valve on #2 will be open. Since 5 is after 1 in the firing order, 5 will be the next valves you adjust, and since you watch 2 because it is 5's running mate, you will watch #2's exhaust valve close and start to open the intake, you stop and do the valve on number 5. Basically you will be turning the engine 120* to do each valve. You will do them in the same order as the firing order. Here is the reference order. Do 1 by watching the valves on 6. Then 5 by watching 2. Then 3 by watching 4. Then 6 by watching 1. Then 2 by watching 5. Then 4 by watching 3. The next one you watch will have the exhaust valve open so that will be a clue that you are doing it in the right order. It is a very fast and bulletproof way of doing it. It works on any engine also. Just split the firing order and stack them and you have your running mates like I showed earlier, it always works.