


Mopar1973Man
Owner
-
Joined
-
Last visited
Everything posted by Mopar1973Man
-
Little update. I'm still here and alive. I did go see my doctor for my post op meeting. Now my chemo might be first or the bladder might be first based on how deep into my bladder muscle the cancer. Either way it's coming out. The nice part my doctor is going to set up my chemo treatments in McCall. Sadly I got home fighting a head cold. Oh fun. First night at home I had many malfunctions with my bags that I had to keep stripping blankets off that got wet. Then changing clothes to back to bed. Bad night and being sick really was rough. Last night I tried a new idea and it worked out great. I can now sleep on my side once again. YEA! What ever side is down remove that bag from my leg and lay the bag on my bed. I've got to leave a lamp on so I remember the bag is there so I don't pull the tubing. I got some good sleep but 1am to 3am struggle with ports being painful. Just even the smallest tension is like burning pain. Nasty. Today I'm bit stronger... but long way from normal yet.
-
Only if I drive all the way to Boise. No supplies up here. Even then I'm just about broke waiting for medicaid to get fired up.
-
Not really now with all my medical stuff I'm forced to travel to Boise for everything. Like my local St. Luke's hospital does not have any of my supplies. Dressing for my back yup all the way to Boise. Need to replace a damaged bag. All the way to Boise. That's the down side. Right now with the crappy weather and Boise street are not plowed. Makes for really interresting travel. Leave Boise get up near Payette the roads are excellent. Then last night I was fighting a head cold and fever. Yeah I got it from Boise of course.
-
You guys are my other family. I can't just fold up and leave you all hanging. I'm committed to keeping M73M.com going. I've done 20 years if wrenching on trucks Dodge, Ford, and Chevy. I might have limitations in my life but I'm going to make it. Doctor already told me no problem on survival just going to be long road of medical to do. Today I'm not feeling great with a sore throat and just tired.
-
Block heater is optional in Southern states just the cord id just left out typically. As for batteries and disconnecting will do nothing. No way to reset any software or data. Just need to turn the key off count to ten. Start again it will be a fresh reboot. So you done the W-T ground wire mod. Double check your work again make sure it working correctly. As for the TQ lock issue you might check the ohms at the PCM plugs for the lock up solenoid for a open connection or possibly a damaged pin? If the solenoid ohm reading is open then track your wiring back and possibly the solenoid in the transmission is bad. Now as for the alternator blue wire will be hot +12V after tach signal is sensed. If there is no power on the blue wire there might not be trigger to turn on the trans power relay.
-
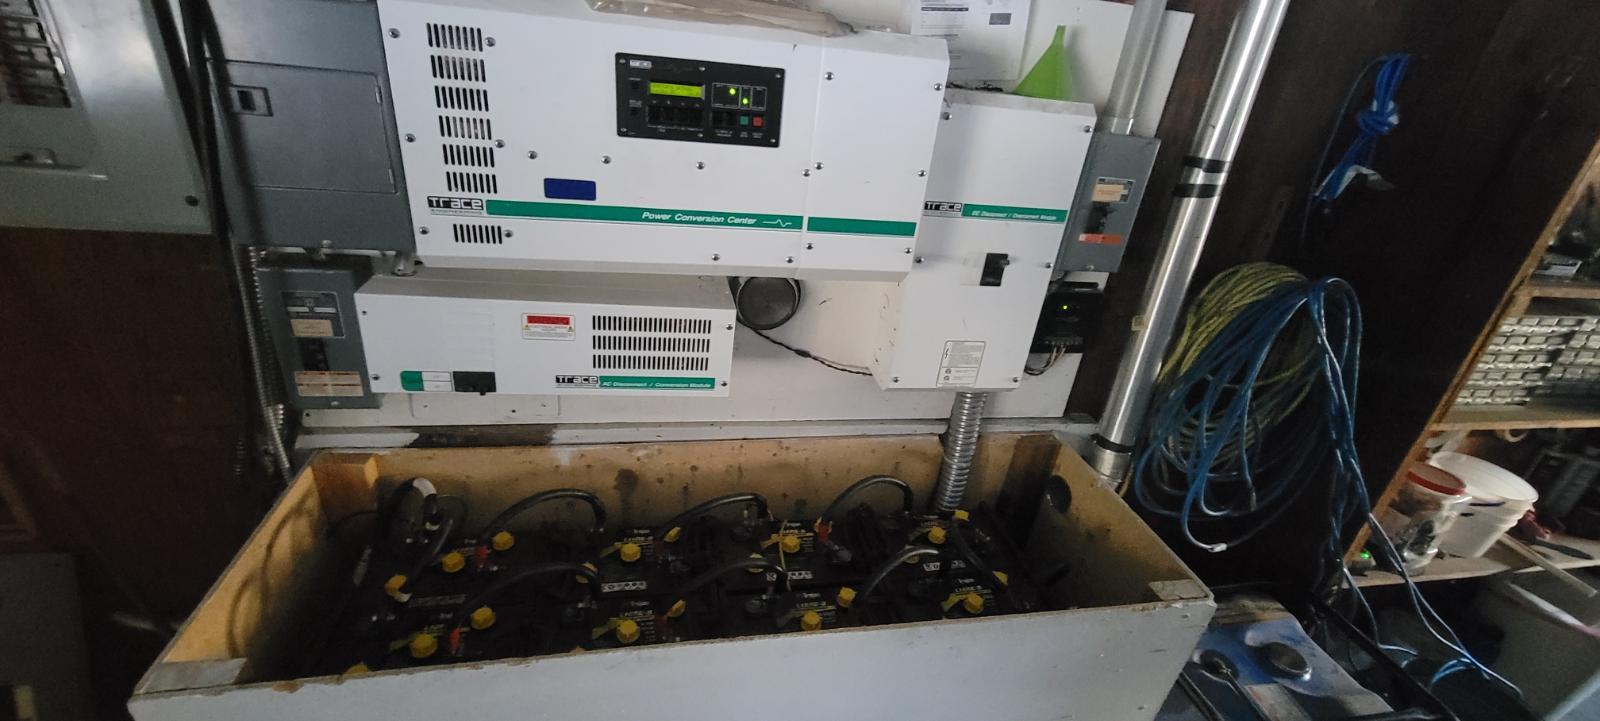
I typically get 10 years from Walmart batteries being is exactly the same manufacture of battery supplied by Dodge dealers. There is only like 3 manufactures for batteries. W-T ground wire mod done? Load test your battery cables on the truck? AC noise test of the alternator and load testing? Some of these thing can damage batteries. Just remember DO NOT equalize charge a AGM battery it will damage the battery. Lead acid batteries need a equalize charge once in a while to deal with plate sulphation and stir the distilled water in. Personally I'd rather stay lead/acid batteries much cheaper and last much longer that most AGMs. That's a 1,000 pounds of lead/acid batteries that power my entire house. I bet you won't believe they are 12 years old and still handling a entire 2 story house 3 bedroom and 2 bath. Seriously stay lead/acid way better option for keeping them alive past 10 years.
-
Oh he will do good it's a fairly common process today for that. @IBMobile will be seeing better in no time and back here reading
-
Ummm according to your diagram it should be 87a that is energized when 85 and 86 have +12V power. 87 will be energized when 85 and 86 are not energized.
-
Post Op appt. More or less discuss what is going to happen to me... Then set up my chemo and its schedule. Then afterwards I've got to do the final surgery which they remove everything.
-
Today is my last day around home then I pack up and travel toward Nampa to Tianne's place she is going to let me camp out at her place. I'm doing OK still rather rough getting sleep and dealing with my bags every 3 hours.
-
I would pull the starter open the solenoid section up and check the copper contacts. There is a starter solenoid fuse and relay in the PDC under the hood. I've seen the starter fuse crack and randomly work and fail. Same with the relay. On my OE starter from factory I've managed to burn out a few windings on the armature that created hard starts or no start conditions. Depending on transmission type... manuals have a clutch slide switch that may or may not provide trigger power to the starter relay. Autos use a different method but could still create starting issues if the column is not adjusted correctly. P0122 code is APPS sensor issue typically. P1693 is a flag code just point to the other computer ECM-> PCM or PCM -> ECM.
-
Dropped another 4 inches last night got up this morning at 5am for a bag draining house was black. Inverter batteries ran out and died at 24.0 Volts. At about 7:30am I wheeled my 6500w generator out used jumper cables to start the generator and plug in the house. I've got internet and cell phones again even though the entire valley is dead. Again I'm not worried I've got back up plans. As for the power outage it's my neighbor again one of his trees broke off and fell into the lines. As I sit here enjoy a hot cup of coffee while everyone else is still waiting for power. Power is still out and went out at about 3:30am.
-
Ohms decrease with wear and eventually vurn out being it reached near zero.
-
We will see. I'm not worried.
-
Sadly I don't have any of the charts. I always wished someone would build an article and provide the information for that. I understand how to set factory timing but custom timing requires special tools. Problem is with no way to retard you always have to balance your timing so you can launch without huge clouds of smoke and still efficient at highway speeds.
-
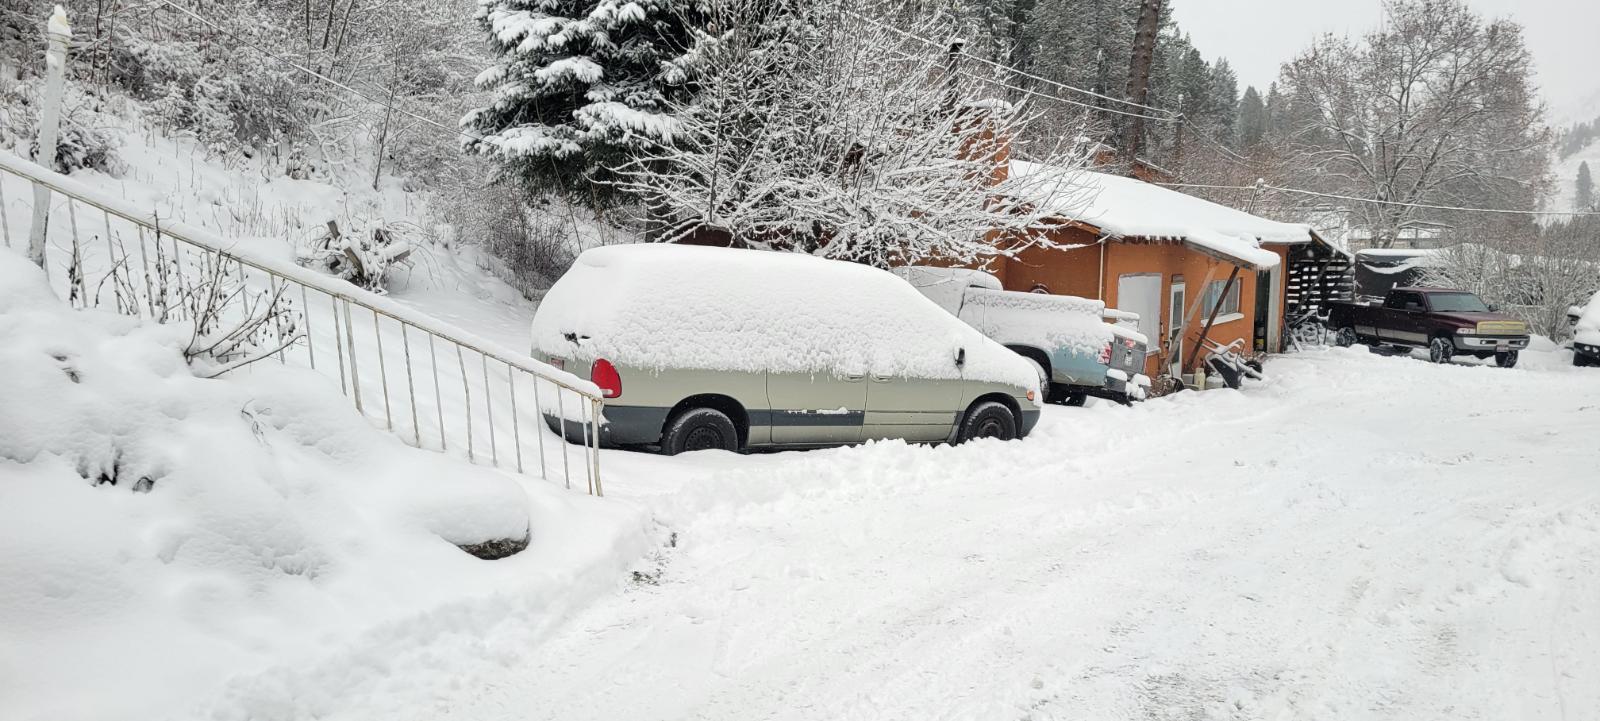
Minnie is starting to get buried where it's parked. Battery is dead and tires are worn out. Like I'm outside doing light work like sweeping the garage floor, Mark is plowing the driveway. Then Jakob is splitting and stacking wood on Beast.
-
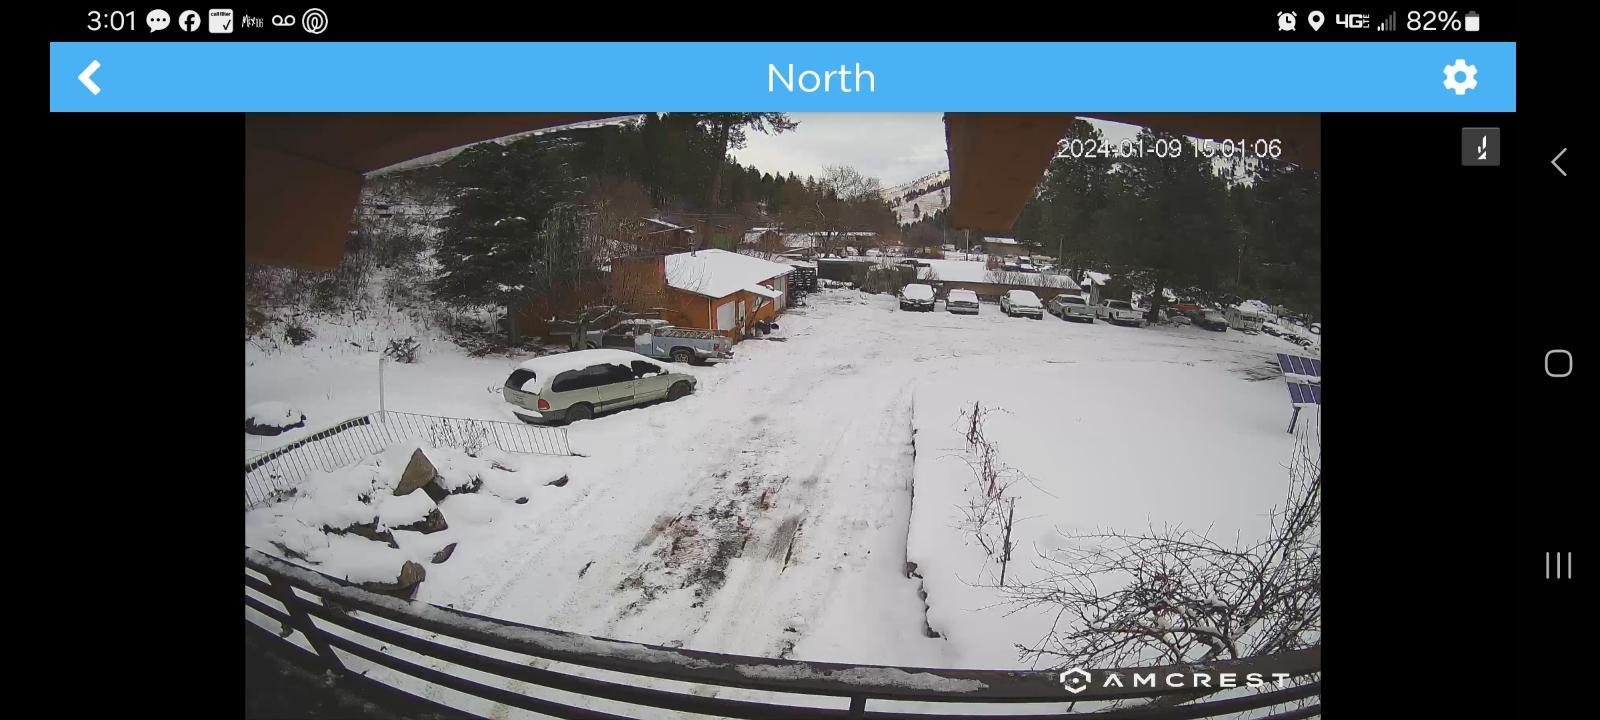
Will this do? I'm up in McCall getting my dressings changed on my back. I fired up the security camera and did a screenshot for you. Ive got 2-3 inches roughly.
-
Either would be good. Sadly after see a Cummins head gasket de-lamination of the fiber material that peeled away from the steel gasket plate. Kind of like I never suggest Cummins thermostat either being Cummins doesn't make those either.
-
Beast is going for the long haul. Beast might need some repairs like my exhaust just fell off the rear tail section. Most of the pipe is rotten after 5 years of salted roads. So for a truck I bought back on my birthday in October 26th 2002 and Beast was 32,000 dollar truck with barely 43 miles on the odometer. I made a promise to my parents that before I did any modifications to this truck I would research everything before doing said modifications. Over all the years I've made a few mistakes but Beast today out performs most 2020's vehicles today. Sadly my family is no longer to witness my knowledge and growth in the diesel world. I have to say Thank you to all you now being I've claimed you as my family. Even with my current medical issues with my return of my cancer I have more faith in Beast to get me where I need to go. Beast might of been towed 3 times in nearly 500k miles but I always brought Beast back to life and always improved when I could. Thank you all and Thank you Beast for taking Mr where I need to go.
-
You'll have to wait for my picture being its dark now. I'll wait and see if I can get a nice morning sunrise photo which is later in the morning than you @Tractorman. I sit in this hole in the ground.
-
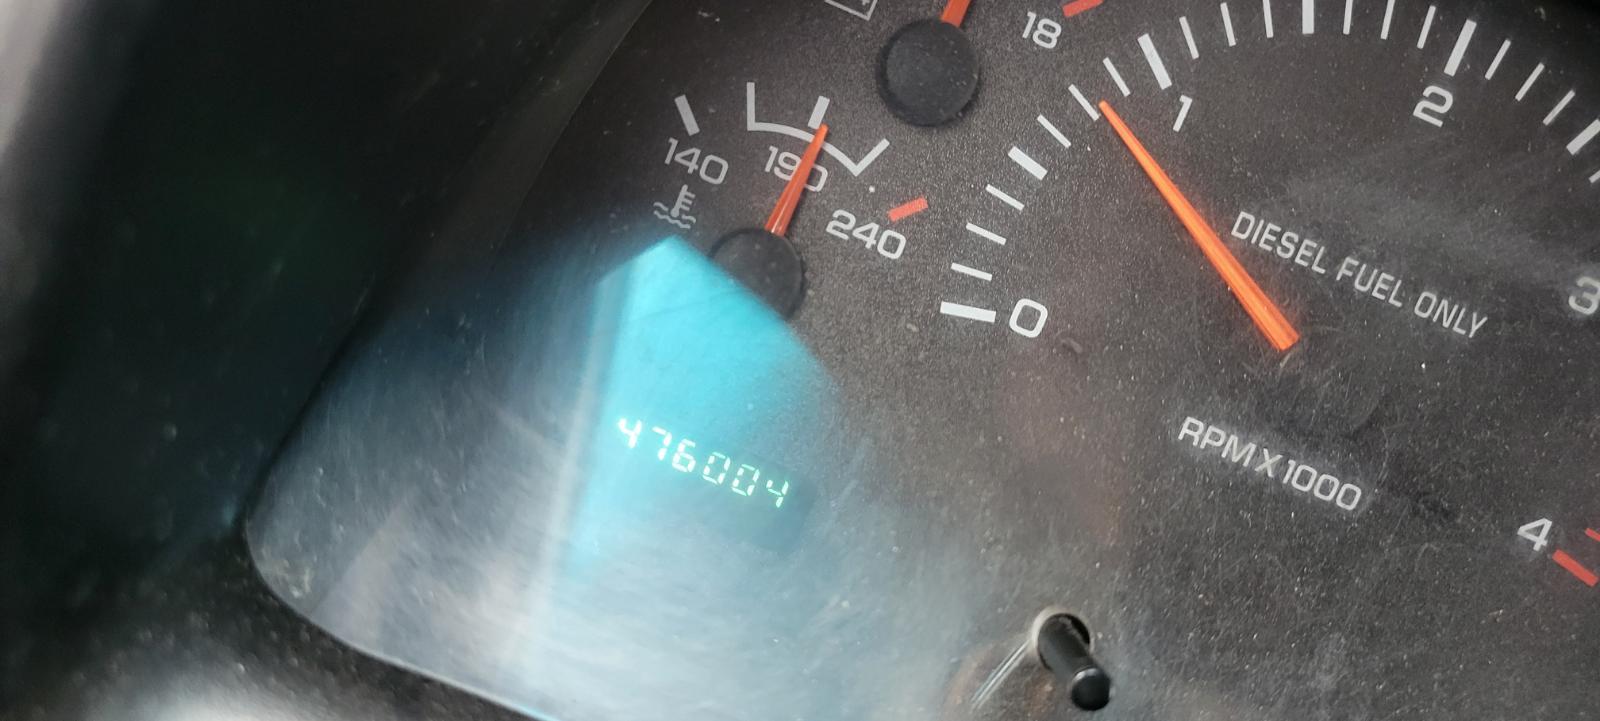
I know the moon is 238,000 miles roughly to the moon. If you double that is 476,000 miles to the moon and back. Now time to load Beast back up and head back to the moon. Again another 238,000 miles.
-
Wider tires tend to float on top of ice and slush. This is my reason I keep going down in size which now pushes the tread face down through the ice and slush. I will admit wider tires in mud and sand work really well. Then again wide tires on snow and ice tend float. Front axle scale weight is 4,440 pounds and the rear axle is 2860 pounds. The truck total weight is 7300 pounds. Best to scale your truck to get these numbers. As for the tires they are Hankook AT2 245/75 R16 tires rated at 3042 pounds at 80 PSI. Front axle 4440 ÷ 2 = 2220 ÷ 3042 = 0.7297830375 × 80 PSI = 58.382643 PSI (60 PSI) Rear Axle 2860 ÷ 2 = 1430 ÷ 3042 = 0.4700854701 × 80 PSI = 37.606837608 PSI (40 PSI) Be aware there is different math for dually rear axles. Truck GVWR limit 8800 pounds if I inflate to 60 PSI all the way around I can carry the full 8800 pounds on the 4 tires never be close to even a blow out.
-
Yeah like my conversation on the phone you need to ohm out the 2 positive terminals to the ground terminal. I know the ohms are super low value like 0.6 ohms on that grid heater. I know as the grid heater ages the ohm value goes down continually till the grid heater is like a dead short. I'm kind of interested to see the grid heater when you pull it off. Did the element crack and open or did something else happen?
-
Kind of like myself I'm not ready for winter driving back and forth for my chemo treatments either. Right now I'm trying to sort out where I can stay down in the Boise valley soon so I can save the travel back and forth. Same token I'm trying to prepare my laptop and devices so I can pack up and be ready for what is coming at me next.
-
Most likely too much timing on the P-Pump. I had to learn with my VP44 and Quadzilla you can't have high timing while building boost. Cylinder pressures rise and the head gasket will fail. You should have a good deep retard on launch and building boost then once cruise state is reached the hop back to high timing. Sadly this is a huge limitation of the P-Pump. Yeah I'm running about 24 to 25 degrees BTDC at 2,000 RPMs in a cruise state. Now squeeze in the throttle and timing drops to 18 BTDC at 2k RPMs. Yeah I'm even running ARP 425 studs but being I miss tuned and was using too much timing while building boost it lifted the head. The other thing after a second Cummins gasket delaminated too I'll never use a Cummins head gasket any longer being Cummins does NOT manufacture the gasket but a company in China called BLK that makes Cummins head gaskets.


