Jump to content
Mopar1973Man.Com LLC
  • Welcome To Mopar1973Man.Com LLC

    We are a privately owned support forum for the Dodge Ram Cummins Diesels. All information is free to read for everyone. To interact or ask questions you must have a subscription plan to enable all other features beyond reading. Please go over to the Subscription Page and pick out a plan that fits you best. At any time you wish to cancel the subscription please go back over to the Subscription Page and hit the Cancel button and your subscription will be stopped. All subscriptions are auto-renewing. 

Any helpful tips on doing injectors / valve lash adjustment?


Recommended Posts

Truck is a 1999 quad cab manual trans with high mileage.  Did my VP44 a couple weeks ago and after its hot it gets a bit of a random miss at idle.  I think there's a good chance one or more of the connector tubes didn't seat back in properly.  Since the injectors have 150K, 200K or even more miles on them I'm going to do new injectors and new connector tubes (I have no record of them ever being done and I've put 100K on it myself and the previous owner didn't ever have them done maybe they are even originals!).  While I'm in there I'll check and adjust valve lash.


I'm not super confident on this.  The only time I've done injectors and valve lash was doing a quick ISX teardown and rebuild with a couple partners in school.  If anybody has any good tips it would be greatly appreciated.  My plan is this:

-Remove injector lines in the two bundles

-Rotate engine to TDC #1 on compression (using balancer bolts since I either have a pay big money for a barring tool or wait a week for delivery for an affordable one)

-Do Injectors #1, 3, 5 (I read somewhere its easier if you take off the exhaust bridge?)

-Do Intake valves on #1, 2, 4 and Exhaust valves on #1,3,5

-Rotate to #6 TDC compression

-Do injectors #2, 4, 6

-Do Intake valves on #3, 5, 6 and Exhaust on #2, 4, 6

-Give the engine a few rotations by hand to make sure everything seems happy

-Leave #1, 3, 4 injectors lines loose for bleeding then torque after bleeding procedure.


Treat me like I know nothing!

I'm guessing I won't have to blow out any fuel lines before getting in there.  How do you guys pull the injectors?  Heel bar? Do you ever have the copper seals get suck in the head? Fish out with a pick? Any nicer ways to rotate the engine?  Some people use nut on Alternator it sounds like?  Big wrench on fan and turn counter-clockwise? I considered using the nut on the VP44 but don't want to accidentally over-torque that, although it has a big torque value from what I remember. Tighten high pressure lines on head end first?  except #1, 3, 4? 


Any and all tips would be super helpful.  I haven't been on here in a long time.  Several jobs and several kids, I don't have a moment to think it seems.  Big shoutout to Michael for getting my account set back up - there was some glitch-craft preventing me from renewing my subscription.


Link to comment
Share on other sites

This link should get you to the procedure for injector R&R.


https://mopar1973man.com/cummins/articles.html/24-valve-2nd-generation_50/51_engine/59_fuel/fuel-injector-install-removal-r5/?do=getLastComment&d=4&id=5


My OEM injectors came out easily - even with 303,000 miles logged on them.  The washers stayed on the injector.  I think I used a flat blade screwdriver to break them loose and then they basically came out by hand.


It is very easy to bar the engine over using the alternator pulley.  I believe a 15/16" socket works well.  


Be careful to not bend any fuel lines.  Loosen or remove fuel line brackets beforehand.


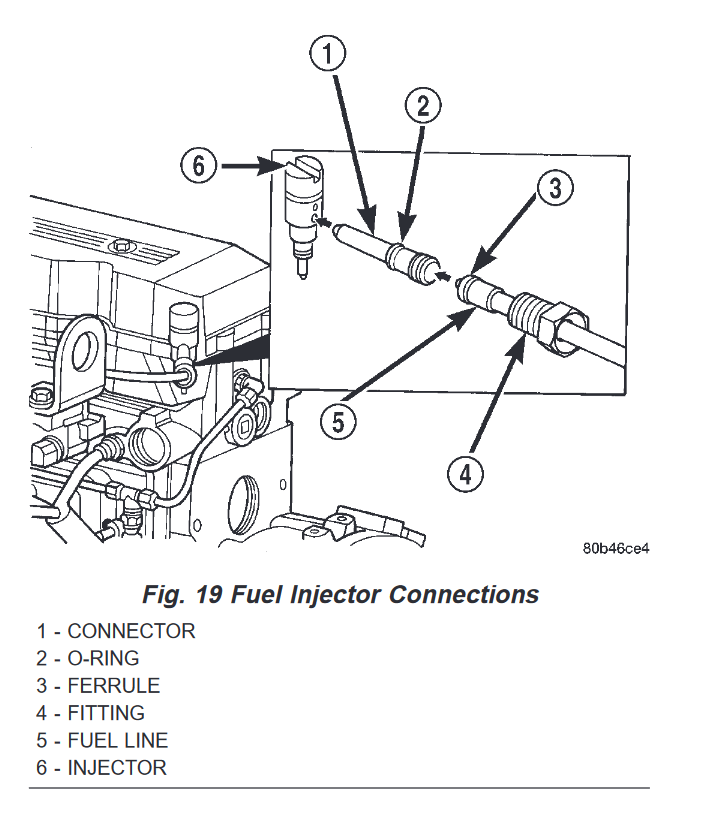
Remove crossovers tubes before lifting out an injector.  The crossover tubes use a steel to steel compression contact that fits into a machined slot in the side of the injector.  If the crossover tubes are not pulled back or removed, the injector will not come out.


When installing the new injector and new / used crossover tube, the  tightening sequence is very important.  Be sure to understand the method, otherwise you are likely to have a high pressure fuel leak.  Basically, install the injector with the fuel entry port aligning to the crossover tube entry.  Slide the crossover tube into its bore and ensure the tip engages into the injector fuel entry port.  Tighten the injector bolts to a low torque value, then install and tighten the associated crossover tube to its torque value.  This will force the injector to rotate and center the compression connection at the injector fuel entry port.  Then perform the final torque on the injector.


Just take your time, so you don't miss any steps.


-  John


  • Like 1
Link to comment
Share on other sites

1 minute ago, Tractorman said:

When installing the new injector and new / used crossover tube, the  tightening sequence is very important.  Be sure to understand the method, otherwise you are likely to have a high pressure fuel leak.  Basically, install the injector with the fuel entry port aligning to the crossover tube entry.  Slide the crossover tube into its bore and ensure the tip engages into the injector fuel entry port.  Tighten the injector bolts to a low torque value, then install and tighten the associated crossover tube to its torque value.  This will force the injector to rotate and center the compression connection at the injector fuel entry port.  Then perform the final torque on the injector.


Just take your time, so you don't miss any steps.


-  John


Thanks a lot! I remember reading something about having the injector hold down bolts finger tight then torque the high pressure line.  On the lines used for bleeding air should I maybe only torque part way? Like 15-20 ft-lbs instead of 28? I read to not torque those until after bleeding somewhere to avoid distorting and not getting a good seal after bleeding. 


Thanks again!

Link to comment
Share on other sites

It has been awhile since that repair, but if I recall correctly,  the nut that is torqued for the fuel line connection is also the same nut that pushes the crossover tube (connector tube) into the injector inlet port, so, yes, it is necessary to torque all of the fuel lines.


image.png.d13d18521c52244817e8de5e68b48a29.png


If there is a leak at a fuel line connection, it is usually because there is a small piece of foreign material or a scratch / burr on the mating surfaces.  This is a fairly common problem, but usually loosening the fitting and slightly moving the tubing as the fitting is retightened usually will stop the leak.  If a leak occurs, it is likely to be just a weep.  Sometimes, the weep will disappear on its own.


- John


  • Like 1
Link to comment
Share on other sites

4 hours ago, Mopar1973Man said:

Always the crossover tube first then the hold down next.

By this you mean torque the HP fuel line to the crossover tube which seals it to the injector and HP fuel line, correct? and then VP44 end of HP fuel line after is my understanding.

Link to comment
Share on other sites

  • Staff

 Yes sir, that's it. Install the injector bolt finger tight at most. Then cross over tube, this way the tube and injector will self align when you torque the cross over nut. 

 I installed all injectors first (again only finger tight) then went back and installed the cross over tubes, torqued them and then torqued the injector hold downs. No leaks.

  • Like 2
Link to comment
Share on other sites

I apologize for any confusion with my instructions.  Please disregard my initial instructions.  As I recall now, I used the method for installing injectors from the service manual for a common rail fuel system.  I have more confidence that this method will provide a more reliable leak-free connection at the intersection of the connector tube and the injector opening. 


The injector hold down torque is the same for both fuel systems.  It's just how you get there is different.

The connector tube nut torque is 28 ft/lb on the VP44 fuel system, versus 37 ft/lb on the common rail fuel system.


While I am writing this, I see that @Doubletroublehas posted.  His explanation works well, too.


From the 2004 FSM (installing injectors):


(a) Install fuel injector holdown clamp (mount-
ing flange) bolts. Do a preliminary tightening
of these bolts to 5 N·m (44 in. lbs.) torque.
This preliminary tightening insures the fuel
injector is seated and centered.


(b) After tightening, relieve bolt torque, but
leave both bolts threaded in place.


(c) Install high-pressure connector and retaining
nut. Do a preliminary tightening to 15 N·m (11 ft.
lbs.) torque.


(d) Alternately tighten injector holdown bolts to
10 N·m (89 in. lbs.) torque.


(e) Do a final tightening of the high-pressure
connector and retaining nut. Tighten to 50 N·m (37
ft. lbs.)
torque (28 ft/lb for VP44 injectors).


- John

Edited by Tractorman
  • Like 2
Link to comment
Share on other sites

Thanks for all the help.  Very appreciated.  Went well I just went slow.  It was nice to get the firing order, valve overlap etc back in my head.  Now I'm continuing my journey of problem solving which will require a new thread.  Thanks everyone.

Link to comment
Share on other sites

×
×
  • Create New...