Jump to content
Looking for Staff Members

Mopar1973Man

Owner

Everything posted by Mopar1973Man

  1. I'm still waiting to see this truck run. Oh it's going to be pretty and a radical oldie.
  2. Cover your grill and you'll make 210°F easy. No your fan will not lock up excessively either.
  3. Shaking my head. If it's a Timbos there is no voltage to set. Just be sure the bellcrank hits the idle contacts.
  4. Could you point out that page for me?
  5. Heck I just did a live video on Tiktok just about an hour ago.
  6. Yeah I need to possibly update my articles.
  7. 200℉ Cummins ThermostatI've been experimenting with hotter coolant temperatures and found for most daily drivers this is a good way to go. The added heat actually will improve the MPG number just slightly and reduce EGT's slightly. Gates - 34212 - 200℉This is direct replacement number. It will fit into your 1998.5 to 2002 Dodge Ram Cummins 5.9L engine without any modifications. ResultsSummer operation floats right around 204 to 210℉ coolant temperatures. With the tuning I've done on Quadzilla the engine oil temperature will stay 30 to 35℉ cooler than coolant. This stays the same for even wintertime operations with no issues so far in one year of operation even towing. In the picture below I'm using the transmission sensor in the oil gallery at the oil filter. Why hotter?Simply put the cooler you make the coolant the more the difference of temperature between the fire in the cylinder and the coolant will attract more heat energy back into the coolant wasting a percentage of power because of thermodynamics. The hotter you make the coolant the more heat energy there is for ignition of the fuel and don't require large amounts of timing to heat the fuel mist to a vapor to make it go bang. Remember liquid fuel doesn't burn till it is heated rapidly by compression and turned to a vapor now it will ignite easily. The other part is the less the expanding gases are cooled by coolant more power can be delivered to the wheels. View full Cummins article
  8. Mopar1973Man posted an Cummins article in Cooling
    200℉ Cummins ThermostatI've been experimenting with hotter coolant temperatures and found for most daily drivers this is a good way to go. The added heat actually will improve the MPG number just slightly and reduce EGT's slightly. Gates - 34212 - 200℉This is direct replacement number. It will fit into your 1998.5 to 2002 Dodge Ram Cummins 5.9L engine without any modifications. ResultsSummer operation floats right around 204 to 210℉ coolant temperatures. With the tuning I've done on Quadzilla the engine oil temperature will stay 30 to 35℉ cooler than coolant. This stays the same for even wintertime operations with no issues so far in one year of operation even towing. In the picture below I'm using the transmission sensor in the oil gallery at the oil filter. Why hotter?Simply put the cooler you make the coolant the more the difference of temperature between the fire in the cylinder and the coolant will attract more heat energy back into the coolant wasting a percentage of power because of thermodynamics. The hotter you make the coolant the more heat energy there is for ignition of the fuel and don't require large amounts of timing to heat the fuel mist to a vapor to make it go bang. Remember liquid fuel doesn't burn till it is heated rapidly by compression and turned to a vapor now it will ignite easily. The other part is the less the expanding gases are cooled by coolant more power can be delivered to the wheels.
  9. This should help others to install common rail injectors properly. More to come!
  10. Both really. It is random depending on how deep the rail drains out. I've left both the lift pump gauge hooked up and typically watch the live data tool. Again numbers vary based on how much the rail drains off. Those are two different run cycles showing the changes from one start cycle to the next. Since this article I've been fighting this..
  11. All your testing are no good. You need a DVM capable of less than 2 volts AC with multiple frequencies, not just 60 hz. A household DVM will do this, which is why your test data is confusing. Look for a DVM like a Fluke or SnapOn DVMs which are very capable of multifrequencies and voltages less than 2 volts. Just look your DVM has a 200 VAC setting too large. Needs to be 2 VAC or less.
  12. Go over to Quadzilla Power website. https://quadzillapower.com/quadzilla-power-high-idle-switch/
  13. Still the logics of the ECM is calling for high return rate possible misaligned injector / crossover tube not seating. This is why the grid heater light and chime. Which also part of loss of prime issue possible all relayed but need to finish and try starting but now wait for mail back and forth.
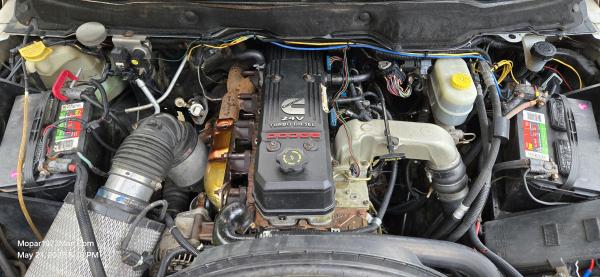
  14. Remove and Replace Fuel Injectors First step you need to have all your tools ready and clean place to layout parts in the assembly order. Make things a bit easier take a moment and disconnect the 2 plugs going to the valve cover. Grab a 10mm wrench or a short socket on a ratchet. There are 6 bolts holding the valve cover in place. You don't need to pull the bolts out of the cover just loosen and leave till you lift the valve cover off. Now you should see this below. You are going to grab a 8mm short socket and ratchet and remove all 12 wires from all 6 injectors. Don't worry about tagging there is no wrong way for those wires. Then just lift the gasket off carefully and watch for snagged nuts. Now you have the spacer to remove. There is 10mm bolts holding the space in place. Be aware there is one bolt at each end right near the gasket. There is 7 bolts in total. The rear most is difficult to see bu the next photo should help. Showing the bolts for the spacer. Now your ready to pull the exhaust rockers of using a 10mm socket and just loosen and lift of each rocker and lay in order on your clean area. Make sure to grab the valve bridges as you go they have to stay paired up with its valve set. If you don't you will have to do a valve lash adjustment afterwards. It should look the same as this with all 6 exhaust rockers removed. Now you have the external stuff to handle. 10mm socket and 11mm socket and remove the single 10mm bolt holding the dipstick to the air horn. Then loosen the 11mm nut on the hose clamp and slip the air tube off the air horn. Then the last 10mm should be 4 holding the air horn to the grid heater and intake. Now grab a 19mm open-end wrench and start loosening all the high-pressure lines from the fuel rail and the crossover tubes. There will be 10mm bolts holding the lines to the manifold. Be aware cylinder 6 you have two 15mm bolts in the hoist ring. The right bolt is a 13mm nut holding the injector line. Use an 8mm wrench and loosen the clamp. Remove the 13mm nut and flip the holder off the stud then you can remove the 15mm bolts to gain access to cylinder 6 line way in the back. Now using a 24mm open end wrench or socket you can remove all 6 crossover tube nuts in the driverside of the head. As for removing the crossover tubes, there is cap tools that aid in the removal of the tube from the heads. I wrap a rag around and gently grab with channel locks in a rocking motion and pulling it will come out without much effort. Just for the backyard mechanic. Now use an 8mm socket and remove all 12 bolts holding the 6 injectors in place. Using a flat-blade screwdriver insert it below the collar and twist the screwdriver to lift the injector out of the bore of the head. Cylinders 1, 2, and 3 Cylinders 4, 5, and 6 Injectors and crossover tubes. INSTALLATION Now I'm going to show you how to install new injectors in your common rail Cummins. Lay out all your injectors. Remove protective caps. Look and see if the copper washer are installed on the nozzle. If not use a small dab of axle grease to hold the washer in place on the injector. Now place the injector in the cylinder head. Please take notice to the crossover tube hole and its location on the injector and make sure it faces the driver's side. You will also notice the one side of the collar is square and the end towards the exhaust valve side is rounded. Install the two 8mm bolts and torque to 44 inch/pounds. After this loosen both bolts. This is only to seat the injector completely in the bore. Now install the crossover tube with the BBs facing up. Then install the collar nut. Then torque to 11 foot/pounds. Now complete the torquing of the injector hold down to 89 inch/pounds. Make sure to do both bolts evenly. Then you can finalize the crossover tube torque to 37 foot/pounds. Install the valve cover spacer and tighten the 10mm bolts. Don't forget the one bolt in back. Install the valve cover gasket and electrical. Torque the electrical nuts to the injectors at 11 inch/pounds. Install the exhaust rockers. Remember these must be in correct order to the cylinder in which it came from. Don't swap rockers to another cylinder you will be forced to do a valve lash adjustment if you do. The torque on the 10mm rocker arm bolt which is 35 foot/pounds. Install the fuel rails to each injector. Torque the line nuts to 37 foot/pounds. This should get all the injectors installed but you'll need to install remaining things like the grid heater and air horn. View full Cummins article
  15. Mopar1973Man posted an Cummins article in Fuel
    Remove and Replace Fuel Injectors First step you need to have all your tools ready and clean place to layout parts in the assembly order. Make things a bit easier take a moment and disconnect the 2 plugs going to the valve cover. Grab a 10mm wrench or a short socket on a ratchet. There are 6 bolts holding the valve cover in place. You don't need to pull the bolts out of the cover just loosen and leave till you lift the valve cover off. Now you should see this below. You are going to grab a 8mm short socket and ratchet and remove all 12 wires from all 6 injectors. Don't worry about tagging there is no wrong way for those wires. Then just lift the gasket off carefully and watch for snagged nuts. Now you have the spacer to remove. There is 10mm bolts holding the space in place. Be aware there is one bolt at each end right near the gasket. There is 7 bolts in total. The rear most is difficult to see bu the next photo should help. Showing the bolts for the spacer. Now your ready to pull the exhaust rockers of using a 10mm socket and just loosen and lift of each rocker and lay in order on your clean area. Make sure to grab the valve bridges as you go they have to stay paired up with its valve set. If you don't you will have to do a valve lash adjustment afterwards. It should look the same as this with all 6 exhaust rockers removed. Now you have the external stuff to handle. 10mm socket and 11mm socket and remove the single 10mm bolt holding the dipstick to the air horn. Then loosen the 11mm nut on the hose clamp and slip the air tube off the air horn. Then the last 10mm should be 4 holding the air horn to the grid heater and intake. Now grab a 19mm open-end wrench and start loosening all the high-pressure lines from the fuel rail and the crossover tubes. There will be 10mm bolts holding the lines to the manifold. Be aware cylinder 6 you have two 15mm bolts in the hoist ring. The right bolt is a 13mm nut holding the injector line. Use an 8mm wrench and loosen the clamp. Remove the 13mm nut and flip the holder off the stud then you can remove the 15mm bolts to gain access to cylinder 6 line way in the back. Now using a 24mm open end wrench or socket you can remove all 6 crossover tube nuts in the driverside of the head. As for removing the crossover tubes, there is cap tools that aid in the removal of the tube from the heads. I wrap a rag around and gently grab with channel locks in a rocking motion and pulling it will come out without much effort. Just for the backyard mechanic. Now use an 8mm socket and remove all 12 bolts holding the 6 injectors in place. Using a flat-blade screwdriver insert it below the collar and twist the screwdriver to lift the injector out of the bore of the head. Cylinders 1, 2, and 3 Cylinders 4, 5, and 6 Injectors and crossover tubes. INSTALLATION Now I'm going to show you how to install new injectors in your common rail Cummins. Lay out all your injectors. Remove protective caps. Look and see if the copper washer are installed on the nozzle. If not use a small dab of axle grease to hold the washer in place on the injector. Now place the injector in the cylinder head. Please take notice to the crossover tube hole and its location on the injector and make sure it faces the driver's side. You will also notice the one side of the collar is square and the end towards the exhaust valve side is rounded. Install the two 8mm bolts and torque to 44 inch/pounds. After this loosen both bolts. This is only to seat the injector completely in the bore. Now install the crossover tube with the BBs facing up. Then install the collar nut. Then torque to 11 foot/pounds. Now complete the torquing of the injector hold down to 89 inch/pounds. Make sure to do both bolts evenly. Then you can finalize the crossover tube torque to 37 foot/pounds. Install the valve cover spacer and tighten the 10mm bolts. Don't forget the one bolt in back. Install the valve cover gasket and electrical. Torque the electrical nuts to the injectors at 11 inch/pounds. Install the exhaust rockers. Remember these must be in correct order to the cylinder in which it came from. Don't swap rockers to another cylinder you will be forced to do a valve lash adjustment if you do. The torque on the 10mm rocker arm bolt which is 35 foot/pounds. Install the fuel rails to each injector. Torque the line nuts to 37 foot/pounds. This should get all the injectors installed but you'll need to install remaining things like the grid heater and air horn.
  16. Even like today I got up and hauled out to the shop to see if I could finish the injector repair. Hit my wall by breaking off a terminal of the injector. Ok. Having been out of service for 1 full year, I'm allowed to make mistakes. Oh well, I'll still get it fixed just delayed repairing one injector. Yesterday I got the injectors out and needed a can of brake clean and scotch brite pads. I got to McCall wearing my split white and black wig and basic black makeup. This older lady in her 60s looked me over and started to chat about my appearance. She enjoyed that I had the spirit to do as I please and be colorful. I went into the store and came back out and she was still there and she started a new conversation with me again. It's to the point I'm getting more people telling me to keep going and don't stop. I've had several people who come up to me to give me a hug from different stores and places. It is very commonplace when I'm dressed as Titanium.
  17. Update... So i pulled all 6 injectors doubled checked the fitting of all parts and made sure all parts were of good condition. Now brake cleaned all parts and mating surfaces to bet sure everything was clean and job is done absolutely right. Now during reassembly I had the terminal post snap off the #1 injector and I'm going to have to send this one out to be serviced and repaired. Sadly I got a delay to fix one injector and already called @dieselautopower and talked to Mitchell and got everything ready to ship out tomorrow. Temporary pause button on Thor for the moment...
  18. Injector inspection. I managed to get all 6 injectors removed. I'm going to town for a scotchbrite pad and brake cleaner.
  19. Here we go. There will be lot more photos and article wrote. 3rd Gen article is building.
  20. Steering wheel radio controls? I'm wondering if the clock spring is making a voltage malfunction in the CTM. Short?
  21. I would start with the key fobs first check batteries and check to see if creating signal. CTM I've not heard of a failure really. Might check wires see if anything is damaged (mice).
  22. Tried calling you this morning but went to voice mail.
  23. Hey could you give me a shout in the morning. 208 315 1470
  24. Well I'm coming back. I'll admit I'm not able to do a lot of jobs. Anything in the heavy lift is over. Currently have Thor stuffed in the house garage and getting ready to go back over the injectors again. Now Thor my 2006 Common rail is my pet project. Like a Phoenix rising from the ashes the new version of me will be going public. Sadly no more wrench time for me. I'll still play with my own rigs. My problem is I've got to consider my stoma and kidneys. So I'll continue my education of the Cummins line. As for my medical issues I'm clean of cancer nearly 6 months. Check up coming. I'm stuck with Stage 3 Cronic Kidney disease this is due to my kidneys being choked by the cancer. The website I'm going to upgrade software and there is a lot of new features coming. Stay tuned in. There is a feature to have live chats again and when the chat ends it will convert the chat unto a forum thread auto-magically. One of many.