outlaw7
Unpaid Member
-
Joined
-
Last visited
Everything posted by outlaw7
-
Well harness is back in my cc'd buss is working again the computers are good to go about the solder comment I guarantee they won't fail trust that for one my harness ain't riding the block no more it's away from it no need to heat soak that thing my mods are great I now have a digital led voltage display on my vp44 power feed and an in cab test ppoint for apps no more guessing my only prob is I've concluded my VP is dieying a slow death o well
-
Ok Dripley n Jag1 yes that was is the bolt and connector I'm talking about in the pic upper right corner black connector and W-T yes I fixed all of them there were 3 places the ground did that I'll be reinstalling today I'm going to open a web store selling cable kits custom harnesses test tools and DC filters stiffining solutions soon
-
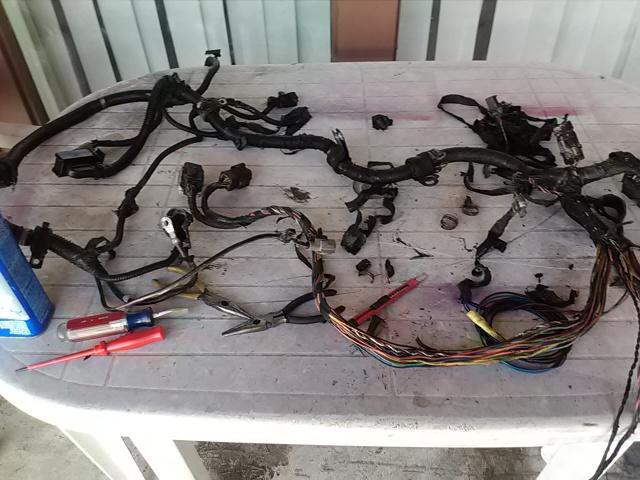
ok folks here it goes....... I found 2 grounds like w-t displayed, including one at the bottom of the ecm that had four 14awg tieed to a 10 awg that deadheads beside the starter on the block the fuel pump +12v is done this way as well as a couple buss sets and and a power set and I redid them all , I removed that big clump of orange wire that was like an extra foot and a half of uselessness, everything was fluxed soldered and heat shrunk to ease my mind.... and that's just the lower engine harness....the upper has only a couple done that way but both are bussing 2 for the +/- buss and two for the can buss protocol . yeah it was a lot of fun best part is I did not repeat not have a single short anywhere anywhen started get kinda pissy at that point. was cruising the web about my dash no bus condition and found two neat things number one is you can initiate a gauge cluster self test by holding in the trip reset and turning key to on position no start then releasing it and it will give you itws own trouble codes and everything....very cool.... and two again whilst bewildered scared and alone I found a true nugget that might save my sorry ***. guy claimed to have same symptoms I do werird codes no pcm coms no buss and dead pedaling issues that act strange he was checking connections and found his power distribution block harness connector ( the one that ties the engine harness to the firewall and power etc ) was NOT ONLY LOSE BUT NASTY HER CLEANED IT UP AND TIGHTENED IT AND BYE BYE CODES AND PROBLEMS ...WELL JUST SO HAPPENS WHEN I WENT TO YANK MINE OFF THE DAM BOLT SPUN FREELY IN MY FINGERS sorry caps lock bomb.... and as an added bonus got the green grimey goo not much but enough and it just happens to be on the buss side on the buss pins and connectors so I am going to walworld for contact cleaner cant get that keg deoxit W-T has so poor boys poor ways ive been gently scarping the female pins to clean them and then back to step hmmmm 8 so this is everything ive done all mods included step 1 remove lower engine harness, better bring your patience meter and some Tylenol 6 big pain in the keister had only two casualties 1 is my lo side ac sensor it was melted to the connector so it got the loraina bobbit treatment. 2 the ground behind the starter bolt was froze solid its 10mm and I said $%^%#$%^ and lopped it off with a note to repair it step 2 remove upper harness much mo easier guys, no problems at all total time for steps one and two 2.75 hours tools needed 10mm wrench and deep and shallows 1/4" drive , needle nose pliers flat blade screwdriver 13mm 3/8" drive and long handle wratchet side cutters and a I think 6mm allen wrench for the ecm connector step 3 clean the harness I first sprayed it with brake kleen and wiped it down then a dose of acetone on a rag step 4 strip the harnesses this was a lot of fun gently cutting and unwrapping everything and of course pictures for refrence took 1 hour and needed two pairs needle nose to spread the harness clamps open and a set of front cuts for zipties and a small razor knife step 5 reclean the harness cause it was nasty........... again acetone and a rag and patience lots of acetone and patience step 6 using a copy of the 3 illistrations for the engine bay harness courtesy of mopar1973man which I spliced together with scissors and tape to make one large continuous map for ease of use I started ohming out every last dam thing total time 3 hours on harness one with notes and 2 hours on upper harness with notes step 7 lower repairswhile I did not find any shorts I did feel the need to fix dodges sloppy handiwork so I repaired thw two ground points located just below the ecm split, the fuel pump buss also below the split and added my custom fuel pump feed for my mid frame setup as well to the ground and fuel pump, the big mass of orange wire all tied together whicg there is 18" extra nopt needed that got shortened up its listed as a switch supply at the ecm I also repaired the ground mess further up near the alternator as well as another power related one red with white stripe that was done the same way. additions were as follows....a I taped a small blue wire on to the pump 12 v+ supply for the vp44 which will go to the cab to a 12v led indicator for full time pump power notification and a orange 22awg wire to the apps sensor feed which again wikll go to the cab to a test banna point for quik check and monitor of my apps voltage via old skool analog meter these both have their own wetpack m/f connector at the point the lower ties into the upper and at the firewall where they leave going to the cab. upper the only repairs made were for the 2 can buss and the 2 buss points done the same way as the others solder and heat shrink, then I added my thermos couple feed for my gauge two 22 awg wires, 3 wires for my dc amps volts meter setup, 2 wires for the vp44 and apps test points and 4 wires 16awg for switching remotes on auxillary systems lights compressor etc, then I stripped and crimped all of my wet pack pins made an add on schematic for future refrence on pins and *** embled all my extra connectors together step 8 tapeing every 8 to 10 " for ease in relooming then adding loom and then taping the harness front to back and at at all joints total time about 5 hours tools solder iron solder sm phillips screwdriver all kinds of crimpers and strippers and other soldering based tools step 9 ohm out new additions time 15 minutes step 10 apply dielectric grease to all connectors everywhere and crimp on a new ring terminal for the ground by starter which I used 10b awg hi strand for that ground step 11 reattach the harness clamps took about 10 minutes but set them loosely cause theygotta be movable step 12 will be to install it now I removed the alternator feed because it was whimpy and I'm wantin hefty plus I'm installing my ripple filter beta test 001 for further evaluation . I'm installing 2 awg cable on its own route so that's what ive done so far
-
Well I chased all my busses out last night right into the dash and I don't have a short or anything and it's starting to piss me off I've got 7 different cuts and gouges on my hands and arms , half my truck systems on the ground grrrrrr grrrrrr. Gotta work for a church this am then starting rewrapping the harnesses while integrating some extra features , gauge wiring and test points etc gonna be a long *** night I'll post pics as I go
-
2.5 hours to remove it another hour to strip and clean it, it was nasty oil soaked and filthy . most of the flex and friction tape was garbage . the alternator feed cable is a joke for a 140 amp output unit so its going bye bye

-
That meter also comes in 750 and 1000 amp ranges as well I'm gonna work up a plug n play kit that is 52mm gauge pod based for ease of mounting
-
Well I'm scared now I'm pulling my harness this weekend for sure I got a buss bad anyway but that that's not natural
-
During my research onac ripple I came across an interesting bit in an unlikely place. The big stereo crowd has a saying called the big 3 , basicly if your gonna run a lot of amps replace the batteries cables and alternator with stouter stuff which thinking back you couldn't buy a 240 or 320 amp alternator back in 01 and you can now he'll my dad's 16 f350 has like a 240 amp alt on it just think maybe that's part of what needs done
-
Man I've got a 96 k2500 w an aftermarket alt been on since 12 it's pumping .21vac at idle it's my test bed for my filter deal and I have solved that problem but I need to prove it before I go further but it's just newer stuff in the reman world sucks and yes maybe Dodge is more sensitive idk not enough input for data
-
That's my point. Newer electronics are made in China including diodes so tolerance is ****
-
Howdy thought I'd chime in ,Jag1 the reason your having trouble soldering is the copper wire is drawing the heat away take a small gator clip and clip it on the insulation side like a heat sink in reverse also use flux and I've solved the actual ripple deal I'm just waiting on my oscilloscope to arrive for hard evidence I don't trust meters for this. As soon as I can post my proof I will and it does work I'm running a setup on my suburban right now the alt is way out spitting .21vac at idle and I'm filtering down to .0012 and I've solved the grid heater prob as well
-
$$$$$$$$$$$$
-
YES Diesel future orangeberg thaats the stuff god what deal huh?
-
best pipe ever was a tar paper wrap deal I tore it up with a snake spent two days on a shovel and replaced over a hundred feet of sewer line on not just our rent house but some other guys house that our line ran into to hit the street all in 30 degree and lower temps gotta love the 40S and their interesting plumbing moves
-
methanol keeps air lines brake chambers etc from icing over in cold temps believe me from experience it aint no fun to have a trailor or your whole rig freeze up due to ice because your preety well screwed unless you have more brakeline antifreeze or a warm shop or a shitload of patience. ive actually thawed a 30 ft dump wagon out once by preesureing up and then fanning down the brakes to the low psi warning and rebuilding psi in the tanks. it takes a while but the fresh hot compressed air from the compressor head slowly warms the system up finally my thing about your nylon airline is a... it came from an air bag kit, which ive used the same stuffits pretty cheap most of the time and b you don't really know the composition of it most of the time on the small bag kits especially and as for the dc type heat tape ....there aint no such bird........yet hmmmmmm I smell another project in the air gotta finish one before the other but how cool what that be... the other idea ive had which ive mixed feelings on is encasing the fuel line into essentially an airduct say 1 1/2" pipe thin wall and hooking to its own lil heater, problem is great in winter and temp spikes the rest of the time and who really wants to install and uninstall that every year....not me so the tape thing sounds more logical and really I wonder if of the shelf stuff like smaller lengths with less wattage might not be convertible to 12vdc or maybe a stepper power supply up to like 48 from 12vdc its real simple to do that idk have to play with it some time
-
IYeah I had my mind elsewhere, he mentioned checking the relays and I was thinking truck off relays dead so jumper the relay fuse to feed terminals thereby supplying a connection that would normally require the power to be on but it's parasitic so that was dumb on my part sorry guys unless it's a relay stuck
-
Ummm not be Mr obvious here but even dot grade airline won't handle fuel for long I've been thinking bout heat tape but DC type
-
Use ajumper wire and test at the fuse like Mopar said . You'll be jumping the power to the device
-
Buy a good DC ammeter or a cheap DC amp gauge though the ones I've seen only go-to 60amps hook it in line on your old toaster just one cycle it then do the same for the other then go online and find the original oem draw spec for a new toaster. I think alot of what we're seeing with alternators both higher ripple and failure is due to the fact that the parts that are available just aren't near as good as what they used to be guys. Take the new silver solder standard what else has been changed in the last 20 years ten even five. With manufacturing of electronic parts primarily coming from China now not even Korea or Thailand it's little wonder we have problems And don't forget that old wiring your drawing through Hey Mopar I tried calling last night but no answer
-
Yep that's the guy pirate jack
-
I tow hauled new trailers for 5 years I ran what Walmart carries for 10$ each with no problems since 2006 up to you but I'm into savings a buck where the quality is egual and the price ain't I just can't see another ten and twenty goin out the door for what ten does just fine
-
I ran into this last summer. The hydro boost on my 01 cab n chassis is different than like 80 percent of the rest of them most cost around 250 reman at the parts house, mine is only available thru Dodge and it's 800$ .mine took to leaking bad . I saw a kit from pirate 4x4 that advertised universal hydroboost rebuild. I tried it and be dam if 50 dollar kit didn't fix me right up. No more leaks lol thought I'd mention this one
-
See that's why I'm working on this lil project cause that's what I'm thinking too. I noticed something yesterday when I peeledy ecm off the side of the block too. The only ground it has is the block, my pcm had a 12awg ground connected that jumpered to the firewall, again unimpressed so I'm gonna run a new ground that ties to an event bolt and link the pcm over to my alternator ground. Yep I put a 6awg ground from the alternator bracket to battery two I think my truck is getting old enough that the grounds are getting old and intermittent so it's time to build a grounding system to tie it all together
-
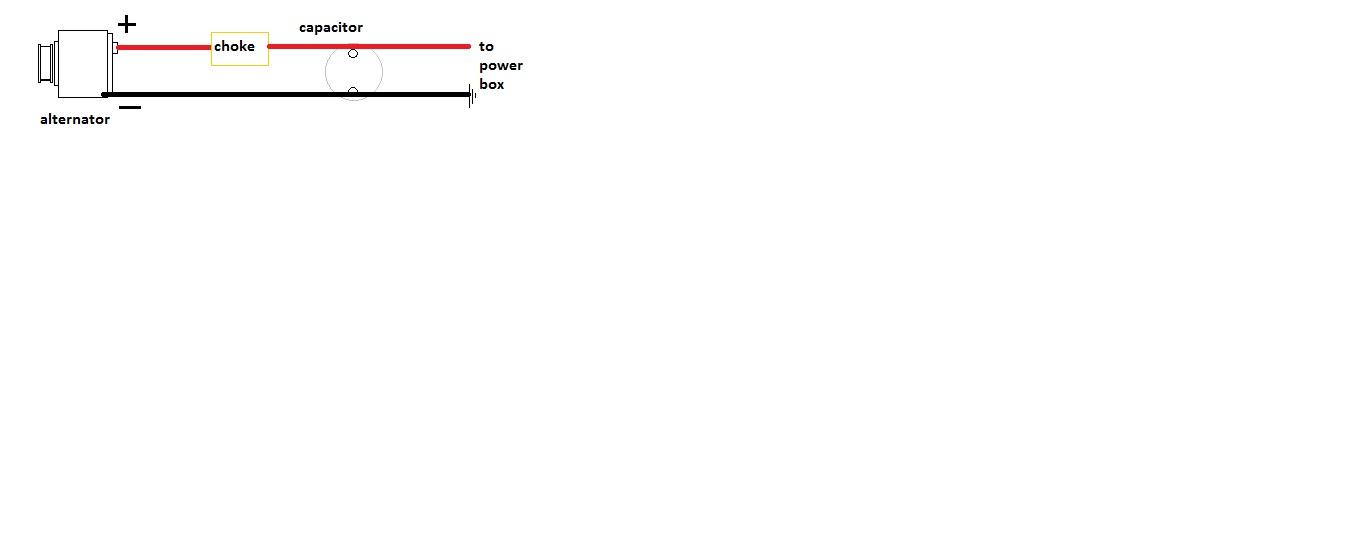
so here is what ive got guys . after some series web sahreddin and a lot of reading there are three modern and accepted ways to defeat ac ripple on dc output number one involves a resister and a capacitor which is neither energy efficient or economical if even physically possible for this number two by far a more reasonable and doable approach is the age old choke a wire wrapped around a magnetic core that removes ac from the circuit now obviously your gona lose alittle with this but the key word is a little not a lot some where in the neighborhood of 2 to 3% in voltage drop and the samr for amperage output which is acceptable considering the benefits. number three is the good ole capacitor which removes ac by simpoly stiffening the power supply a capacitor at base works like a storage battery.... a very fast storage battery. when voltage across the capacitors + terminal is higher than the rated discharge of the capacitor itself the capacitor either takes on dc voltage , ie charge state or it sits idle doing absolutely nothing. now once say you hit the key and the toasters light off or once voltage traveling across the + terminal of the capacitor is lower than the rated discharge of the capacitor in this case 12 volts dc then the capacitor discharges suppling voltage to make up for the sudden dip in voltage on the system. so now what used to really harm the alternator and batterys has all the juice it needs to do its job without ever dropping below a set threshold which is exactly what our trucks need. s an after thought because of this constant voltage supply reservoir ac ripple is numerically reduced because a capacitor also limits or stops the flow of ac while permit dc to flow freely so its two problems or birds with one stone right something for nothing.... whats the down side first and foremost capacitors are dangerous..... let me put that another way.......if not properly handled they can and will kill you period dead......... let that sink in........................... these liul pups discharge theyre whole reservoir to ground when possible ie touch it with your pinky while standing on terra firma... little caps will just sting big capacitors like the 4 to 8 farad designs that will be necessary to do the job on our trucks will kill you. which is probably why current oem engineers don't employ them to much lawsuit risk. now with that sai capacitors can be your bestest buddy ever . 1 rock solid ac ripple less straight dc power all day every day with no delay 2 brighter lights 3 no bouncycomputer stuff 4 wont buy you beer well cant have it all what you need to know any time you are going to service the dc systm you need to discharge the capacitorsfirst on my project I'm building I will include a discharge or service switch that will safely and completely discharge the caps allowing service of the system now number 4 , and this is where the plotthickens, is the combination of methods two and threein aseries parallel arrangement tbc..........gotta run a kid home and were back...... as I was previously discoursing the combination of the two components if calculateded correctly should yield as close to a 0 ac ripple as is possible. which is why I'm considering both units now it is quite possible that the large 4 to 8 farad capacitor alone will do the job and it is the first device I'm going to play with but there is possibility even if the cap doesn't pull it all the crappy paint picture above shows a basic layoput of the components in thir respecticve locations they work as follows the alternator generates current 13.6vdc to be exact it flows out over the red cable into the choke coil which is available in amperages upto 600 amps @ 12vdc so theres lots of choices . the choke tames ac ripple via magnetic field generation as the voltage moves through the coil there is a slight fee in both voltage and current but its negligible like 2 to 3%which most of you lose more than that with your nasty corroded battery cables so no big deal. next with a greatly reduced ac ripple current thje voltage moves on to the capacitor which again stops ac current while passing on dc. as a bonus the capacitor acts like a tank for current how much of a reservoir is deteremined by the farad rating or capacitance ( hence the term capacitor) the benefits which I described earlier are 10 fold in terms of dc system health and performance. sky highyes you did sir AC/DC (power) Capacitors Voltage Physics of Everyday Life Electricity Electronics Electrical Engineering How does a capacitor or an inductor filter out the AC ripple in a rectifier to give a pure DC voltage? UpdateCancel Answer Wiki 7 Answers Mahesh Sapre, "Loves to play with electrons" Answered Jan 30, 2016 · Author has 142 answers and 139.9k answer views The basic property of a capacitor is to prevent any sudden change in the voltage. A capacitor does this by absorbing the excess of voltage and supplying it whenever it is required. This accounts for several charging and discharging cycles occurring in the capacitor. Thus, this leads to clearing off the ripples by making the output waveform quite smooth. In fact the capacitor bypasses the AC component and makes it flow into the Aditya SundarAnalog Design Engineer @ Texas Instruments, BITSGian, Biomedical engineer Studied at Baldwin Boys High School Lives in Mumbai, Maharashtra, India 284.8k answer views4.5k this month Aditya Sundar, Analog Design Engineer @ Texas Instruments, BITSGian, Biomedical engineer Answered Feb 19, 2015 · Author has 168 answers and 284.8k answer views Capacitors offer low impedance to AC signals and high impedance to DC. Hence a capacitor connected in parallel would basically send the AC ripple to the ground and allow on DC to pass. Ref- Z(w)= 1/jWC An inductor offers high impedance to Ac signals and 0 to DC signals. Hence connecting it in series to the ripple will allow only DC to pass and not AC signals. Ref- Z(w)=jWL.

-
from what I saw in the article of the device itself theyre tring to use solid state electronics like they do currently in just about all computer based electronics its actually old tech the r3eal trick is the average computer power supply might throw 4 amps 1@ 12vdc and a couple 5vdc feeds for peripherals and such so to adapt it to an alternators evel of amperage output will require a whole new spec and class of solid state components that just aren't out there yet... believe me ive been looking. I think once they get it alldown pat eventually they will iterally faze out diode rectifier bridges in favor of these more sophisticated i.e. expensive fet setups but once that occurs they will be adaptable to ny alternator setup. the real factor for older units will simply be 1 what the actual market for say an alternator for a 2001 dodge cummins is 2 how much profit can be culled and most importantly 3 that some individual will endeavor to make it a reality. Thank you for the article , great stuff