


Me78569
Unpaid Member
-
Joined
-
Last visited
Everything posted by Me78569
-
Mike are you sure that wiretap raises line pressure on vp44 trucks? I was always under the thinking that it held the fueling solenoid open longer, thus increasing duration not pressure. The injector's pop pressure is what dictates the pressure in the injection system. As soon as pop pressure is reached the pressure will hold there until all of the fuel in that stroke has been moved. If your duration is longer you will inject more fuel. i'll be the first to admit that power would likely be reduced, but driveablity is what I would be looking at. A good example of what you could control, again if the maps are opened up, is 1/2 power mode.
-
you can only get so much duration from the pump yes, but bigger holes with the same duration will make more power. What I am saying is you could run bigger injectors and tune the maps to make it more DD friendly than any other box. This would not be for the guys that want big power, but for me say I would run a smarty and 200 hp injectors ( vs my current 100 hp injectors and a wiretap) and be perfectly happy. Of course it is completely dependent on how much of the ECM you are able to edit. You would have to have access to most of the fueling and timing tables to make it work. It might not make the same power as a wiretap, but I would take a hit in HP to be able to move the boost / fueling tables up some to reduce smoke.
-
A dyno.
-
agree'd maybe rather than 7 hole you go with 8 hole or something to keep hole size down.
-
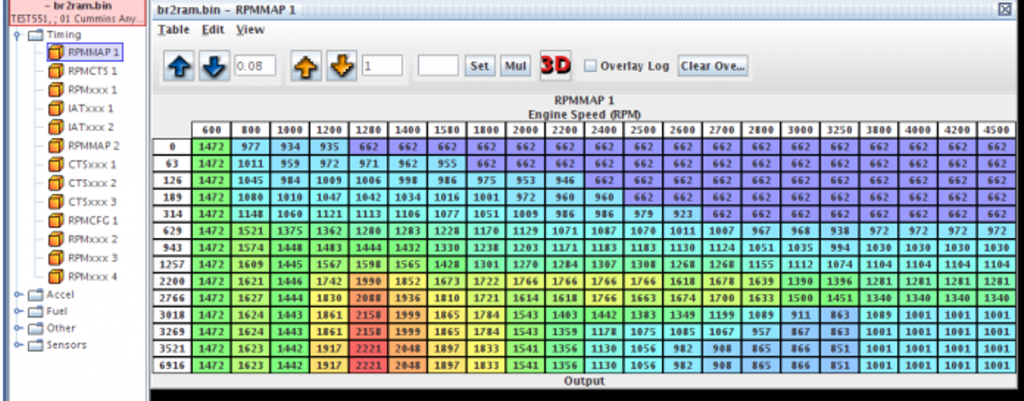
Get out of the mindset of pulling your power from a tuner. Pull your power from injectors and adjust how the injectors act using the smarty via custom tuning. Forgot about tuner hp numbers. the tuner is strictly to control how the ECM handles the larger injectors. The 65 limit is in the psg on the vp44. Bosch coded that limit. Want 4500 rpm, here is a table for it.
-
There is no reason it can't Jdonoghue on CF ( who ed was working with) was flashing all the tables I am talking about on the fly when he moved on to other stuff. He was able to edit timing tables, Low boost fueling tables, duration tables, requested torque tables, boost tables, boost limit tables, etc etc etc. Our ecms may be old, but they are still updateable on the fly if you know the right commands and protocols.
-
The UDC pro is much more advanced than the standard UDC from what I have seen. there are significantly more tables that are open to adjustment. When they release the udc pro for the 5.9 CR guys we will know if they added more tables to that release also. Time will tell, and not going to hold my breath.
-
That's why I always test wires for resistance now if I have an issue like this. It is VERY easy to miss a busted wire.
-
We can't tune our trans via canbus. The point isn't how much power the tuner would give as I am sure it is only 65 hp still, unless they sold their souls to bosch for the info needed to recalibrate the pump, the point is tuning how the ecm behaves. In theory you could have a cleaner driving, smoother driving, non warranty killing truck with large power using injectors to supply the fuel rather than wiretap. If they did a full UDC you could control and extend timing tables, fueling tables, boost tables, and rpm tables to 40 psi or 50 psi or 4000 rpm or 4800 rpm. you could write tunes that got rid of smoke on heavy take off, you could write tunes that worked for MPG on the fly that limited boost to sub 5 psi. Think of the ecm / tuner as a drive style adjuster and injectors as the power makers. EFI's strong hold is not due to how much power it will give you but rather how much control of tuning it gives you. The amount of power will vary from year to year, but we can always add injectors to make up for it. I love my quadzilla,but the custom tuning really just changes a select few things in the base tune.
-
Auto exhaust brakes are less plug and play than manual. I have my lockup switch built into my gear selector for easy use. At some point I am going to 3rd print a new shifter that includes buttons for lockup and EB and maybe other functions.
-
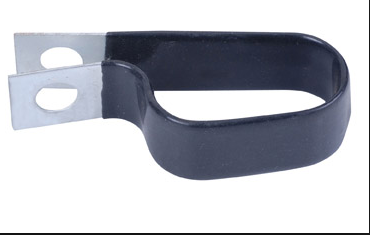
There are 3 hoses in the kit. You will only have 4 connectors on the kit, 2 for the trans 2 for the heat exchanger, the cooler up front just uses hose clamps. The clamps we recommend are We don't tell you were to mount them though as there are too many configurations for us to try and predict. You can attach it in multiple areas under the truck. I have mine attached via the TC inspection cover bolt then I have a couple good areas around the subframe.
-
What nothing nice to say about my POS? Wait. Mean truck hahahaha. Yea been good to shoot the **** with csm.
-
Remember shifting is directly link to throttle input. The tuner will alter how much throttle you are using to get to speed.
-
Do you know what your fuel pressure is going into the vp44? If not get a gauge and figure it out first thing. 2 stroke will not resolve your poor mileage issue. I would look to resolve the root of the issue. The intank pump is junk also so I would highly recommend you get an aftermarket fuel system.
-
Not arguing that, but if they give us the tools to change that in the ecm itself then I am listening.... How about revs? the ecm is what limits revs. the VP44 can spin at 2400 rpm and still fuel according to bosch, so in theory you could turn over 4800 rpm if the fueling maps in the ecm allowed for it....... pipedream? maybe but I am curious.
-
I am not arguing that the hp from the tuner itself is really not impressive, but being able to tune the ecm maps with larger injectors would likely give you the same results as a wire tap, without voiding warranties, smoother power, and less smoke. Again this all depends %100 on how much the smarty can do for our trucks, if it is just a on the fly of what the smart does right now, then not worth it. If it opens up the maps like Ed was working on then it would be %100 worth it. After all of that would it be worth it for the cost to do all of that? No idea, I am curious without a doubt. If they can truly on the fly write values to our ecm then that is pretty cool and that opens up a world of things in the future.
-
It will still be limited to 65 hp, but but but if we have the ability to actually custom tune there is no reason to not just run 200 hp injectors and the smarty vs 50 hp injectors and a wiretap. You should be able to make it more smoke free and better to drive. Really it all depends on how much tuning is open to us. Like I said on the phone the pro stuff really looks VERY similar to the stuff Ed was working on. If that is the case, hopefully, again not holding my breath, we will have access to timing and fueling tables.
-
I won't be holding my breath, but I can say that smarty has made a huge step towards the "new big thing for vp guys" before there was no proof that they could do any of that, However this pro working for the new truck means they have done most of the leg work to make this happen across the board. look at the last couple months, Smarty touch ( same unit across the board), now this. It is create they were working towards something. as for how much of the ecm will be unlocked, time will only tell.
-
I've been watching the pro stuff for awhile now. Interesting to say the least. Might be worth going with a smarty and larger injectors to make up for the lack of wiretap.
-
Yea, I think I just drilled a hole for the 1/8 in NPT threaded section, then just used a joint on the backside to hold it in place. I used a simple oring on the backside in the same manner. Pretty simple and it doesn't leak.
-
ooo, for that I used....something... I forgot, what though. The bung is so you can drain the fluid from the pan wihtout dropping the pan.
-
No idea, I just drilled a hole, inserted the hollow threaded section, put the washer on the backside and installed the nut. install the plug and bam you are done.
-
Here is the NP241DHD transfer case. The R&R for the LD transfer case should be very similar. Here is the Parts Blow-out for the NP241DHD You can find any of the part numbers for the transfer case using the part number lookup tool. The link below will take you to the transfer case section for a 2nd gen Dodge Ram Truck. https://mopar1973man.com/external-media/pdf/2000Ramparts.pdf#view=FitB&page=546 Ensure you get a good quality Rebuild kit. I used BK241C, you can find that on ebay for ~$125 EBAY LINK Dissemble Pull from the truck and ensure you drain the fluid. You will need, -Snap ring pylers - 13mm - 15mm - 17mm - Hammer - Adjustable channel locks - flat head - dental pick ( not needed but handy) - RTV - Brake Cleaner - Paper towels - Blind Hole Bearing Puller. Remove the 4 bolts that hold the tail shaft snout on. The snout will not be able to be removed until you open the snap ring that holds the rear main bearing in place. The rear main bearing is what holds the position of the main shaft so be sure to inspect the bearing and snap ring for damage. This image shows you the rear snout with the rear seal removed. Item 1. in the image above. Remove the rubber cover that covers the snap ring for the rear main bearing. Use snap ring pylers to remove the snap ring from the groove on the rear main shaft bearing. This will take some wiggling and a 2nd pair of hands helps. Open the snap ring, then when it is fully expanded wiggle the snout cover off of the rear main bearing. Once the snout is removed you can see the rear main bearing, it is held in place by 2 snap rings. Remove the rear snap ring, pointed out by the arrow, then remove the bearing. Next remove the snap ring that is behind the bearing. You should replace both of these rings as they often get damaged. PN # 04883597AA they are $3.50 a piece from Dodge and typically not included in the rebuild kit. Next remove the bolts that hold the case together, There are some alignment dowels so you will have to wiggle the case apart, take your time. The oil pump will come out with the case, clean it with brake cleaner and set aside. Next you will see the roller bearing in the cover. you may need a Blind Hole Bearing Puller. I was able to remove mine without one by carefully denting in the edge of the bearing to create space enough to pull it out. I don't recommend doing that but it worked for me. Find the Right bearing and reinsert it. I used a hammer and 2 x 4 cut to size to get it installed. Take you time and ensure you get it installed flush and not cockeyed. Once that is done, set the cover aside for reassembly. Here is the inside of the case with the oil pump on the main shaft. With the oil pump removed you will notice the chain is held in place by a snap ring holding the sprocket in place. sprocket and snap ring on the 4wd side. remove the snap ring. Once that snap ring is removed you can wiggle the whole chain and sprocket off as a unit. Clean and set aside. Notice how the large fork and dowel slides out with the chain. Replace the plastic fork guides with new ones from the kit. Items 49 & 50 from the blow out. Here you can see the rooster comb inside the case that sets the position of the case. Notice the spring in my case was wrapped up in the comb causing my issues. You can typically remove the spring by undoing the brass plug on the outside of the transfercase. pay attention to the order you remove it in as you need to put it back in correctly. Now you should see the range select fork. Wiggle the fork out of position, use the rooster comb position to aid in giving you remove to remove the fork. In order to remove the planetary gears you must remove the input shaft cover and snap ring which holds the main input bearing in place. NP241dhd input cover, remove the 4 bolts that hold it on. Clean, remove and replace the shaft seal, item 42 from above blow out, and set aside. Once the cover is removed you will see the main input bearing and the snap ring that holds the planetary gears in place. Remove the inner snap ring, then remove the planetary gears. Once the Planetary gear is removed, remove the outer snap ring and use a hammer to tap out the input bearing. Reinstall the bearing with the new one from the kit with some lube to ensure it goes in straight. Once the bearing is in place, reinstall the snap ring that sets its position. You should now have an empty case, you can see the input bearing in the case reinstalled. Remove the rooster comb and replace the orings on the shift select shaft with new ones from the kit, items 66 and 67 from the parts blow out. Take apart the planetary gear set by removing the snap ring on the back holding the 4wd collar in place. There is a snap ring that holds the collar and shims in place. Remove the steel cover, item 78, then the plastic shim, item 37, then the collar then at the bottom you will see another plastic shim. Once the inside collar is removed you will see another needle bearing at the bottom. I used a deep well socket to knock it out of place. You will have to set the collar, item 38, gear side down and insert the socket into the bottom and tap out the needle bearing. Red is the needle bearing Here is the needle bearing removed. Reinstall the new needle bearing, with lube and ensure it is straight. Reassembly the planetary gear with the new shims in reverse order. plastic shim ->input collar -> plastic shim->steel plate -> snap ring, Reinstall the planetary back into the case and put the inner snap ring back on the input shaft. The planetary will be held in place by that snap ring. Clean the surface of the input shaft mating face and apply RTV, reinstall the cover with the new seal onto the shaft and re tighten the bolts that hold the cover in place. Reinstall the range select shift fork, ensure you replace the plastic guides with new ones. Now Move over to the 4wd output side. Remove the output flange and the flange seal Next pull the shaft out from inside the case and replace the 4wd output bearing and seal with new ones from the kit. Reinstall the 4wd output shaft, and flange seal and bolt on the flange to the correct torque of 130 - 200 ft/lb Reinstall the chain and sprocket a long with the 4wd engage fork reinstall the snap ring that holds the sprocket on to the 4wd output shaft. Install the oil pump and pickup on the shaft and in the case cover and get ready to put the case back together. Button the case back together, ensure the mating surfaces are clean and apply the directed amount of RTV to one face of the case. Ensure the Shift select guide rod slides into the hole in the case. Ensure you have installed the spring on the guide rod before putting it back together. Ensure the oil pickup tube is seated into the pump and the pump is sitting on the outside race of the case. Install the new output snout seal. Reinstall the rear main shaft bearing and snap rings, one before and after the bearing. Reinstall the snout and ensure the snap ring is in the output bearing groove There you go you should have the NP241dhd rebuilt. Here is a assembled part diagram All torque specs are in the FSM for the dodge ram. you can find the FSM files i the download section of the site. https://mopar1973man.com/files/category/8-factory-service-manuals/
- 1 comment
- 2 reviews
-
-

- 2
-
-
http://www.oreillyauto.com/site/c/detail/DAG0/65241/N0268.oap?ck=Search_N0268_-1_-1&pt=N0268&ppt=C0142
-
I used rubber hose with clamps to fix a couple pin holes I had, it worked for some time, but as with everything the got worse and worse, so just keep an eye on them. The port for trans temp is for 1/8" sensor, but you could use any sensor as there are various brass fittings out there to adapt. DAP vulcan etc should all have what you need. Also you can install a bung in the oem pan for just a couple dollars. I think oriellyes had one for $4, just drill and hole, install the fittings and gasket and you are done.
