
Dynamic
Unpaid Member
-
Joined
-
Last visited
Everything posted by Dynamic
-
Thanks for the kind words, guys! I get to do something for a living that I really enjoy, so that makes it easier to pour my heart and soul into it. Like they say, "find something that you enjoy doing, and you'll never work a day in your life!"
-
It's pretty much impossible to have a 3-4 flare unless there's something wrong with the OD roller clutch... During a 3-4 shift, the OD piston on the back of the "main" case pushes against the OD hub. The hub, being forced against the spring pressure of the large OD spring, will slide on the OD sun gear toward the rear of the transmission, immediately releasing the OD direct clutch (which has been carry engaged in all gears up to this point). After forcing the release of the OD direct clutch, and during the time that the OD piston is traveling the distance necessary to engage the OD brake (which will hold the OD sun gear stationary), neither clutch in the OD is engaged, and the torque load transfers to OD roller clutch. Once the OD brake clutch engages at the end of the shift, the sun gear is held stationary, causing the OD planetary set to overdrive the output shaft. At this point, the OD roller clutch simply "free wheels" in there. If the OD roller clutch is not working, the transmission will effectively be in neutral until the OD brake comes on, giving a flare during the shift...
-
If a torque converter is too tight (or even defective), no amount of valve body work is going to fix that. It sounds like the converter that you put in there is either way too tight for your application, or it was defective from the get-go. None of the things that you describe should be happening with a properly built and properly configured converter. While a good towing valve body is a good idea in ANY application, it will not fix your converter issues and, yes, the increased line pressure at idle will likely cause increased harshness when shifting into gear from neutral (or park). But, like I said, this should not be the case with a good converter. All aspects of shift calibration and pressure control are done in the valve body. A properly built valve body will have a modified line pressure curve (higher pressure) and reconfigured shift calibrations. There are several things that control the feel of a shift, and line pressure is a BIG one. All things being equal, simply increasing the line pressure during a shift will increase its firmness a great deal. A couple of other things that come into play are shift orifice sizing and accumulator function. These are generally changed around in a recalibrated valve body as well. Increased line pressure will also hold your friction elements (bands, clutches) tighter when they are engaged as well. This is actually the main purpose for a recalibrated valve body. Again, none of this should be occurring. A properly configured converter will drive little different than stock, other than having a much more efficient fluid coupling and requiring less rpm to move the truck because of it.
-
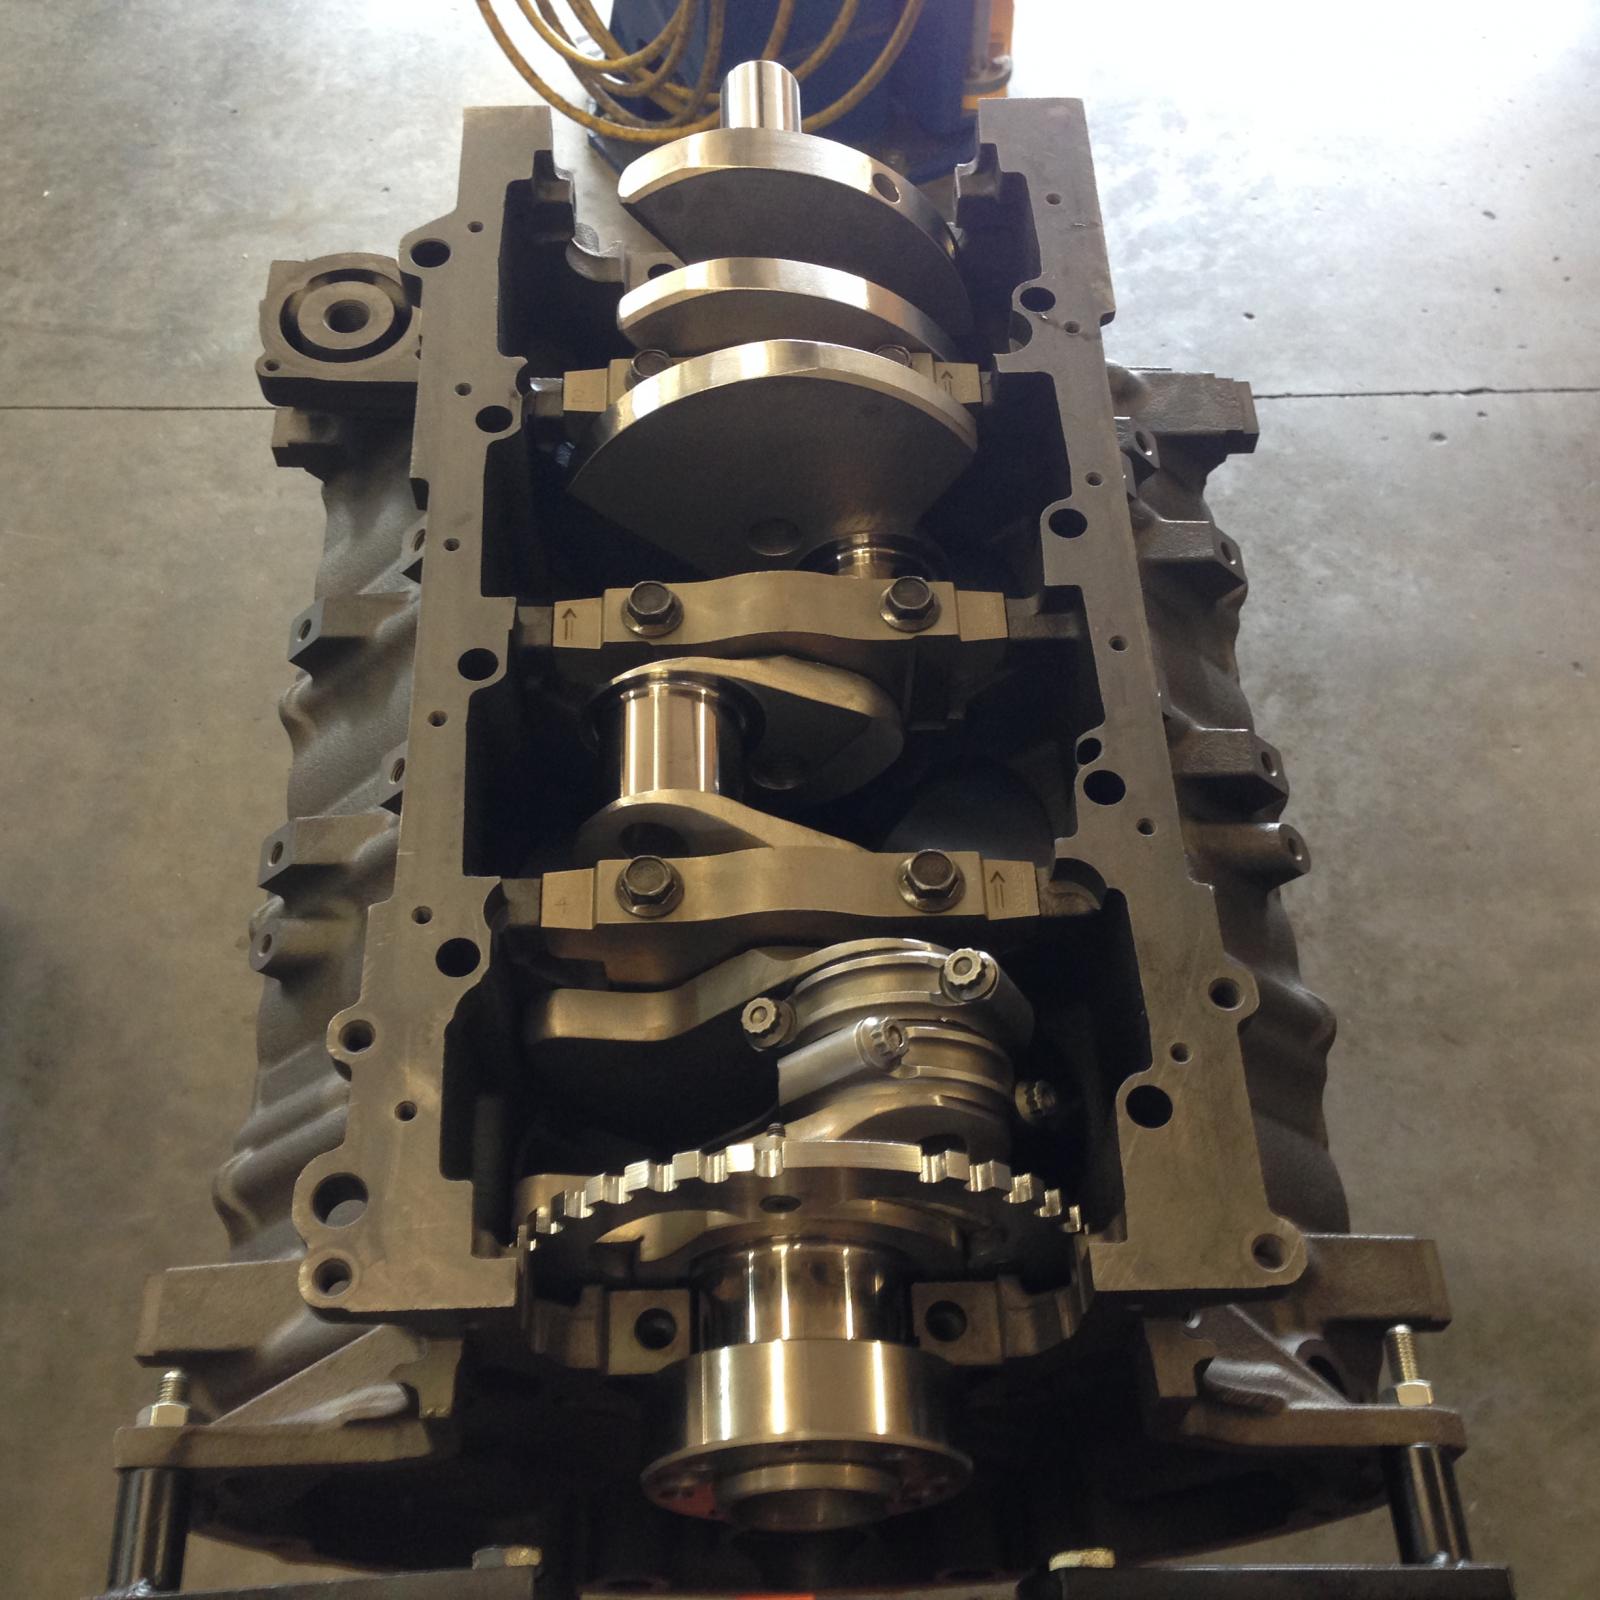
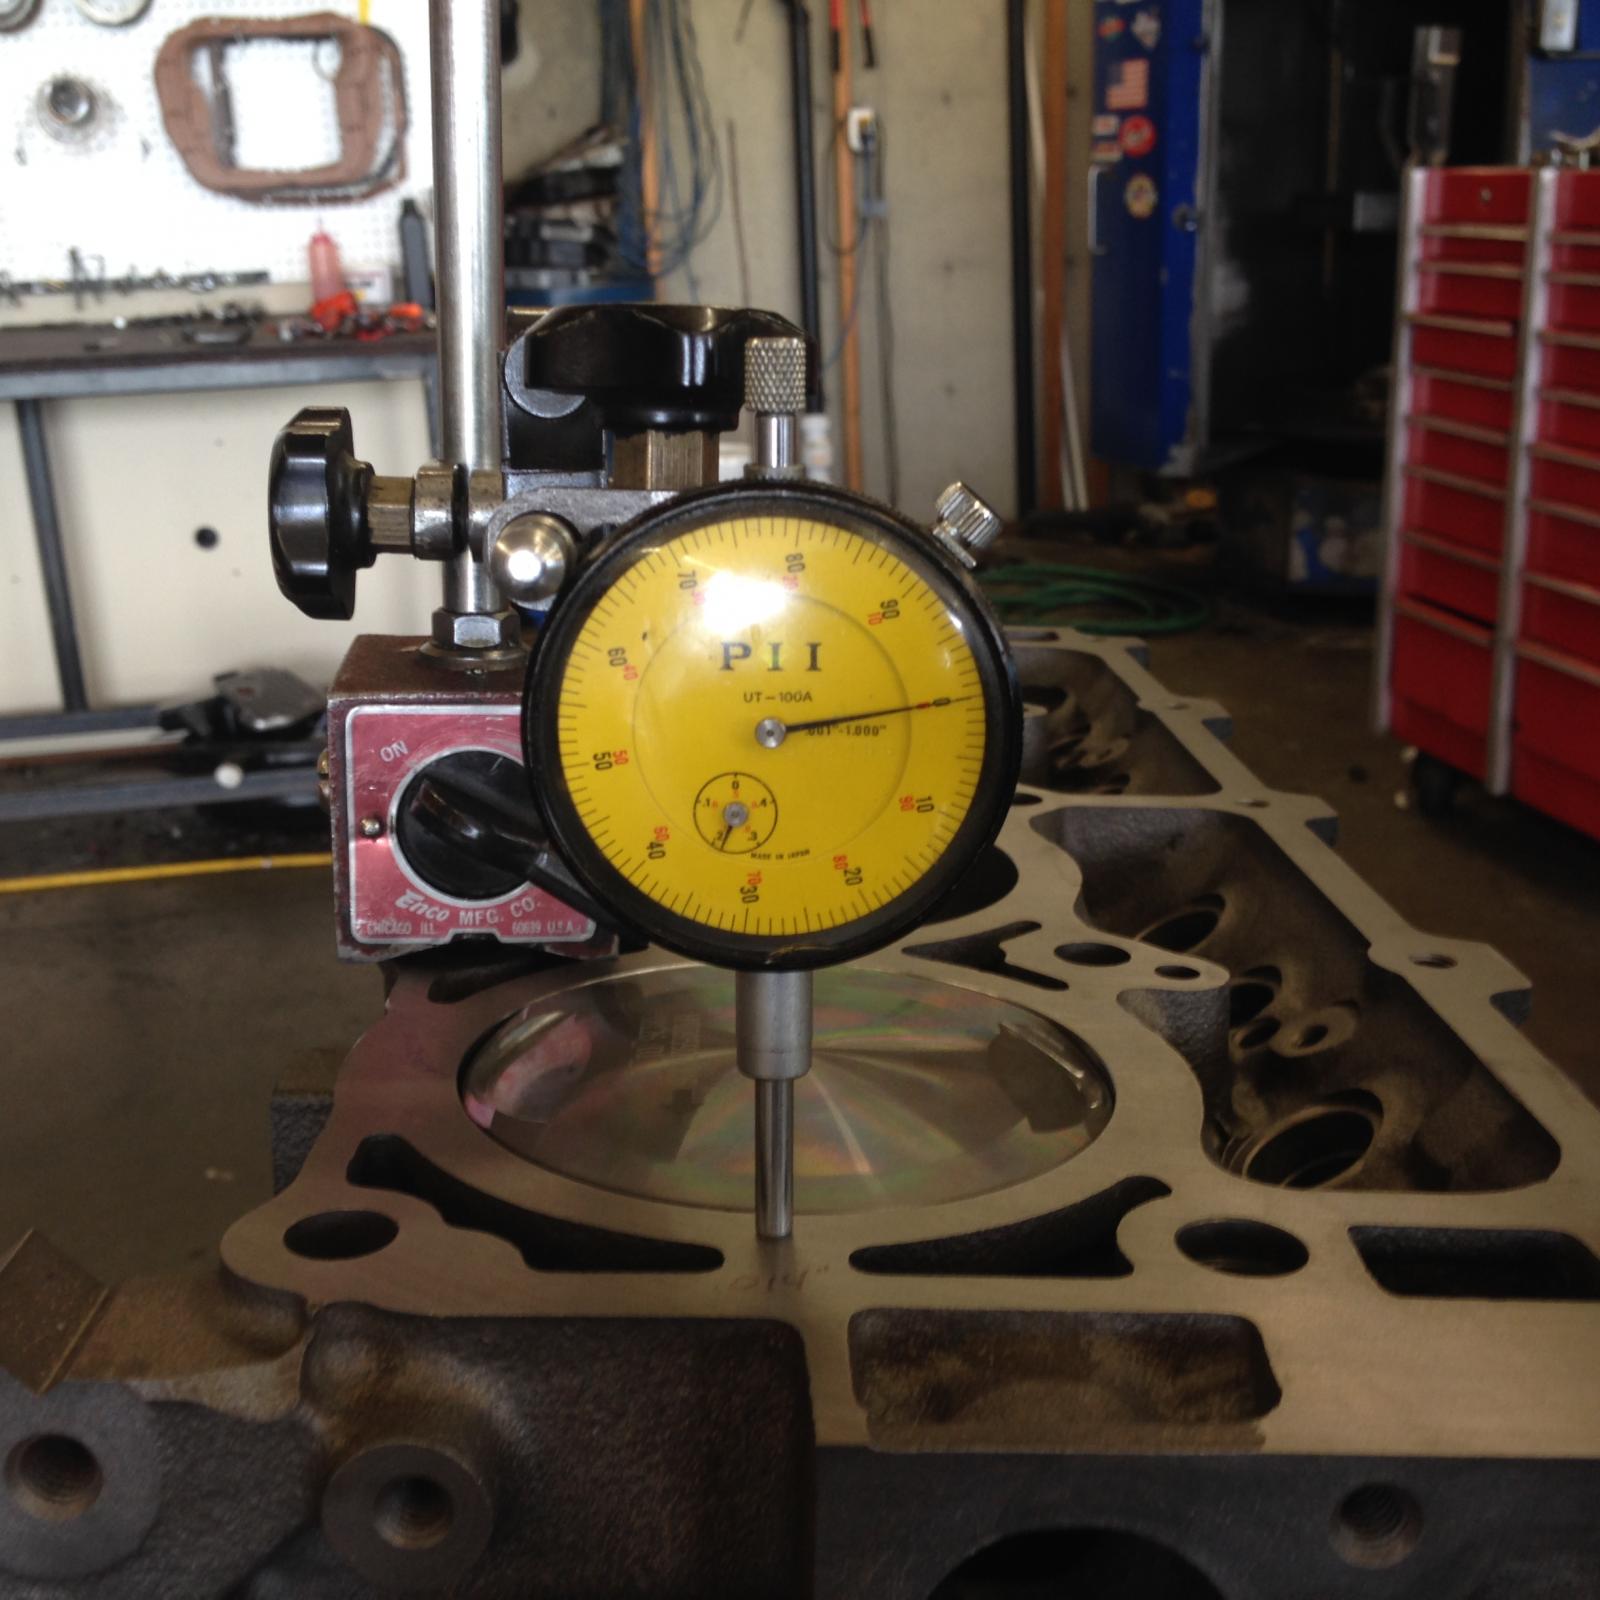
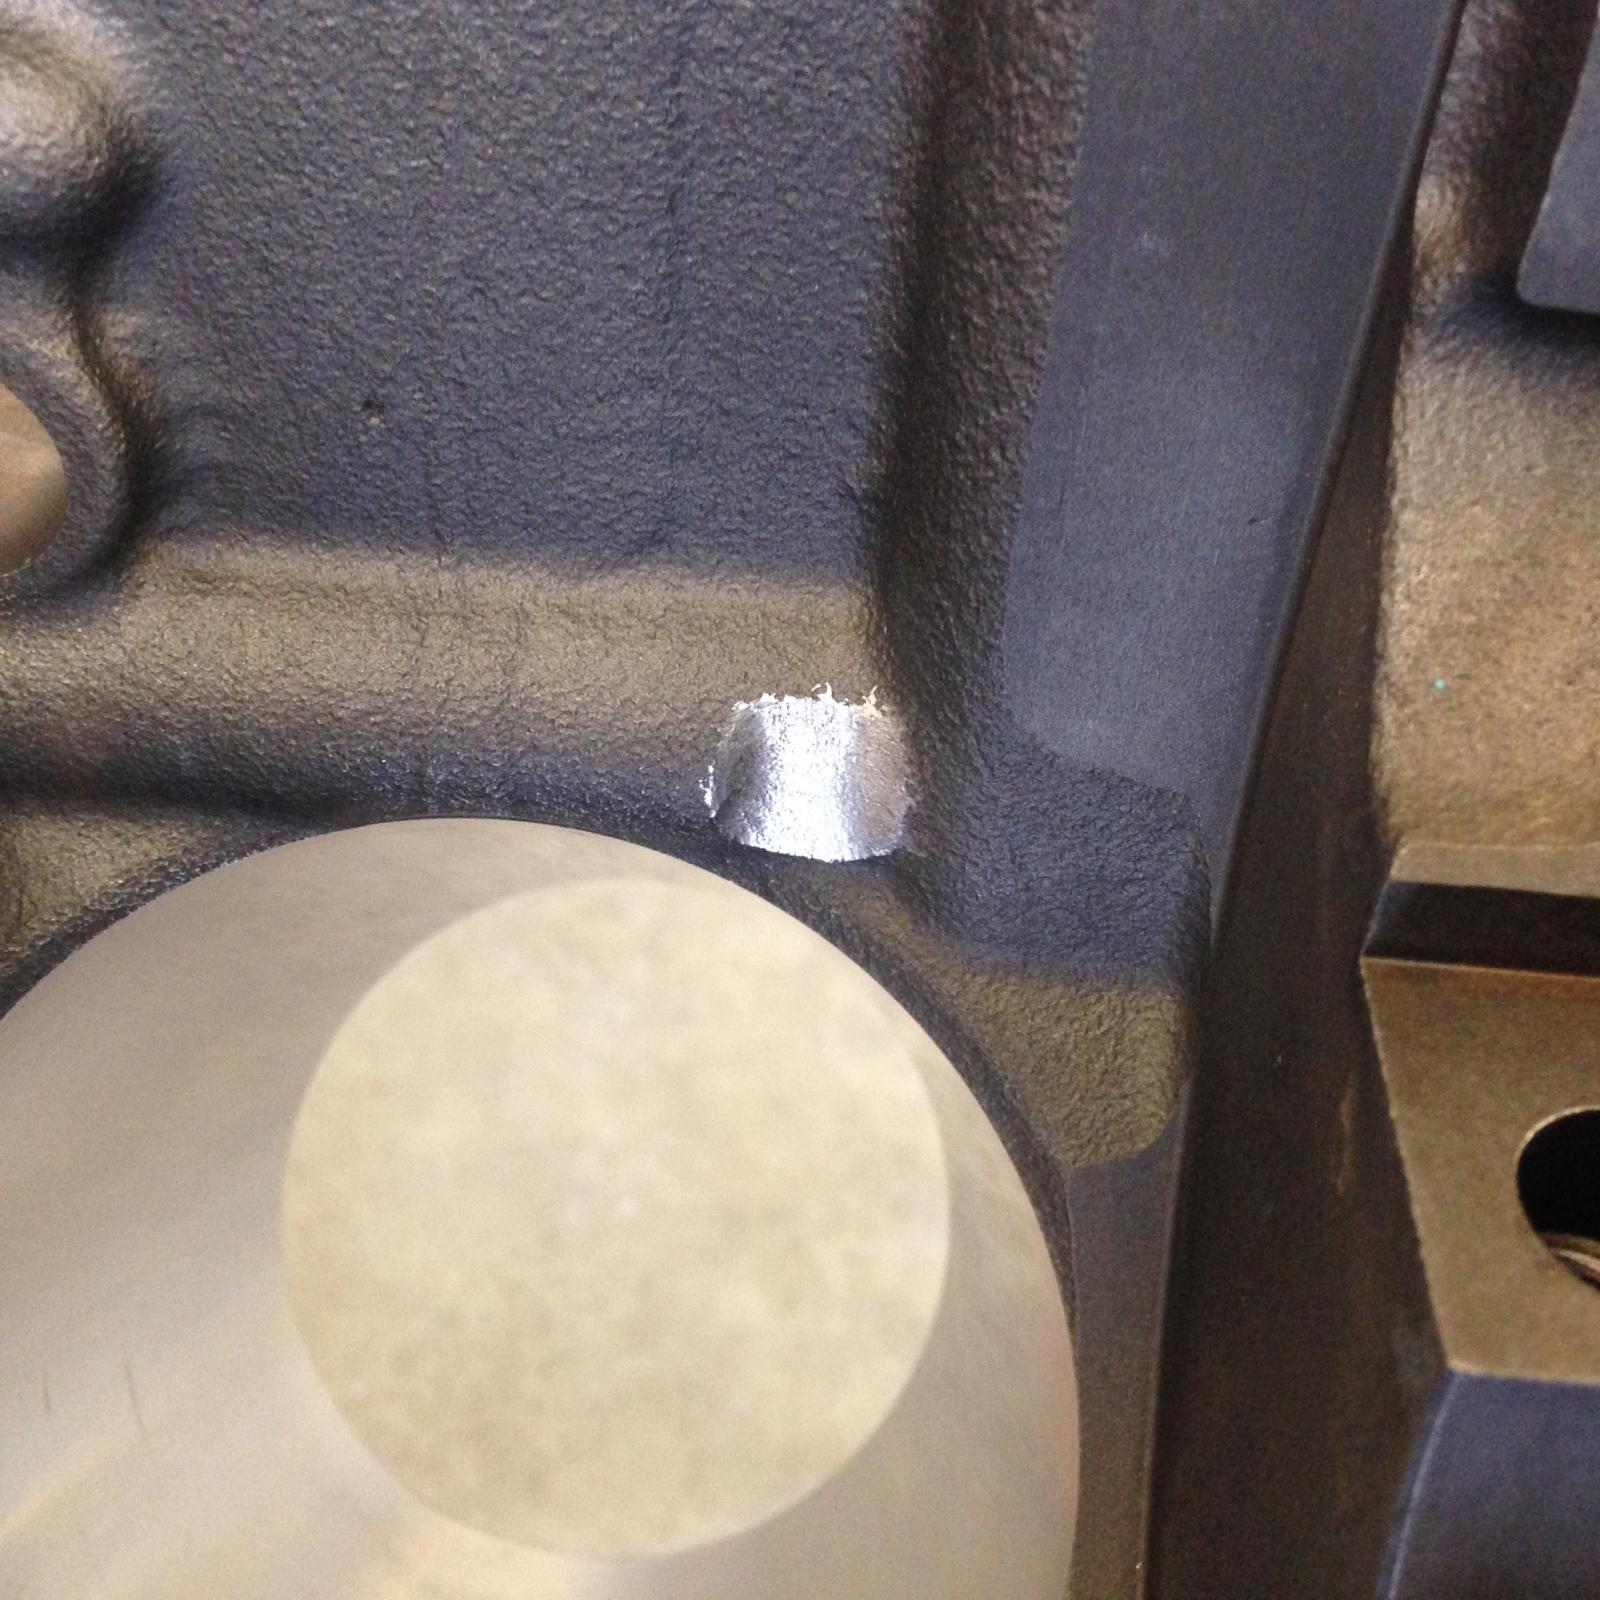
Thank you! It has been fun so far. It will be going into a 2004 Durango. I'm still waiting on the machine shop to finish up with the last of the machine work. We had a little trouble getting the deck height exactly where I wanted it, but finally got it set. I'm a huge believer in running a VERY tight quench on the engines that I build. (The quench distance is the distance between the top of the piston and the bottom of the flat, or quench, area of the head when the piston is at the top of its stroke.) I like to run the quench at around .036-.038" on an engine that will see speeds of mainly 6,000 rpm and below. Higher sustained engine speeds require things to be a bit looser, but this engine will rarely even see 6K, so I'm setting it tight. In order to set the quench, the engine needs to be mock assembled, and several measurements made. The Hemi combustion chamber is a bit different than a "wedge" style chamber, so there are a couple of other measurements that need to be accounted for in the head as well. You're basically measuring three things: the top of the piston relative to the deck of the block, the head gasket thickness and, in the case of the Hemi, the distance between the cylinder head gasket surface and the "quench pads" in the combustion chamber. The starting measurements that this engine had from the factory were: .003" piston protrusion (piston tops .003" higher than the deck of the block at TDC), .035" thick head gaskets, and .050" between the head deck and the quench pads. This calculates out to a .082" quench distance, which is typical of a production engine. When I mocked up the engine with the new crankshaft, rods and pistons, the uncut deck height was at .000", or "zero deck". We ended up cutting .012" off of the block deck (piston is now .012" out-of-the-hole at TDC), and .030" off of the cylinder head surface (bringing the distance from the head surface to the quench pads to .020"), and I'll be using a .029" thick head gasket. This all calculates out to an assembled quench distance of .037"...perfect. All of these gyrations are time consuming, but well worth the effort in that the tighter quench distance forces the incoming fuel/air mixture up into the combustion chamber much more aggressively as the piston reaches TDC on the compression stroke. This gives you an engine that MUCH more detonation resistant, which allows you to run a higher static compression ratio and more timing advance for a given amount of fuel octane than the same engine with a larger quench distance. Here is the crankshaft mocked up in the block and a rod and piston in each of the corner bores (cylinders 1, 2, 7 and 8) in order to measure deck height. Here is a picture of measuring the piston height relative to the deck. The deck had been rough cut to square up the block in this picture. This crankshaft has a HUGE stroke! It all fits in the block, but just barely. Here is one spot that I had to grind clearance for one of the rod bolts. More to come. Soon, I hope...!
-
With a larger than stock turbo, I'd stay at or near the stock stall speed. It will be an a smoky pig if you don't. But you'll definitely want a more efficient converter than the stock one. The stock converter is terrible... Most people also choose a converter that is too tight for their application. An efficient converter with a stall speed of 250-300 rpm less than stock is perfect for most people's setups.
-
Waiting...on...machine...work...!!!
-
The valve body is not thicker, the pan is shallower on the early ones. Why he would have changed to an early shallow pan is beyond me... It makes me wonder just exactly what he built you! Something in there is definitely coming apart and making metal, and lots of it (duh...!). It sounds like it's slipping in several gears, and if you can put your finger between the servo pin and band lever after recently adjusting the band, your band (and likely your direct drum) is toast. At this point, it is really going to need to come apart, including the valve body, to find where the metal is coming from, and why it failed.
-
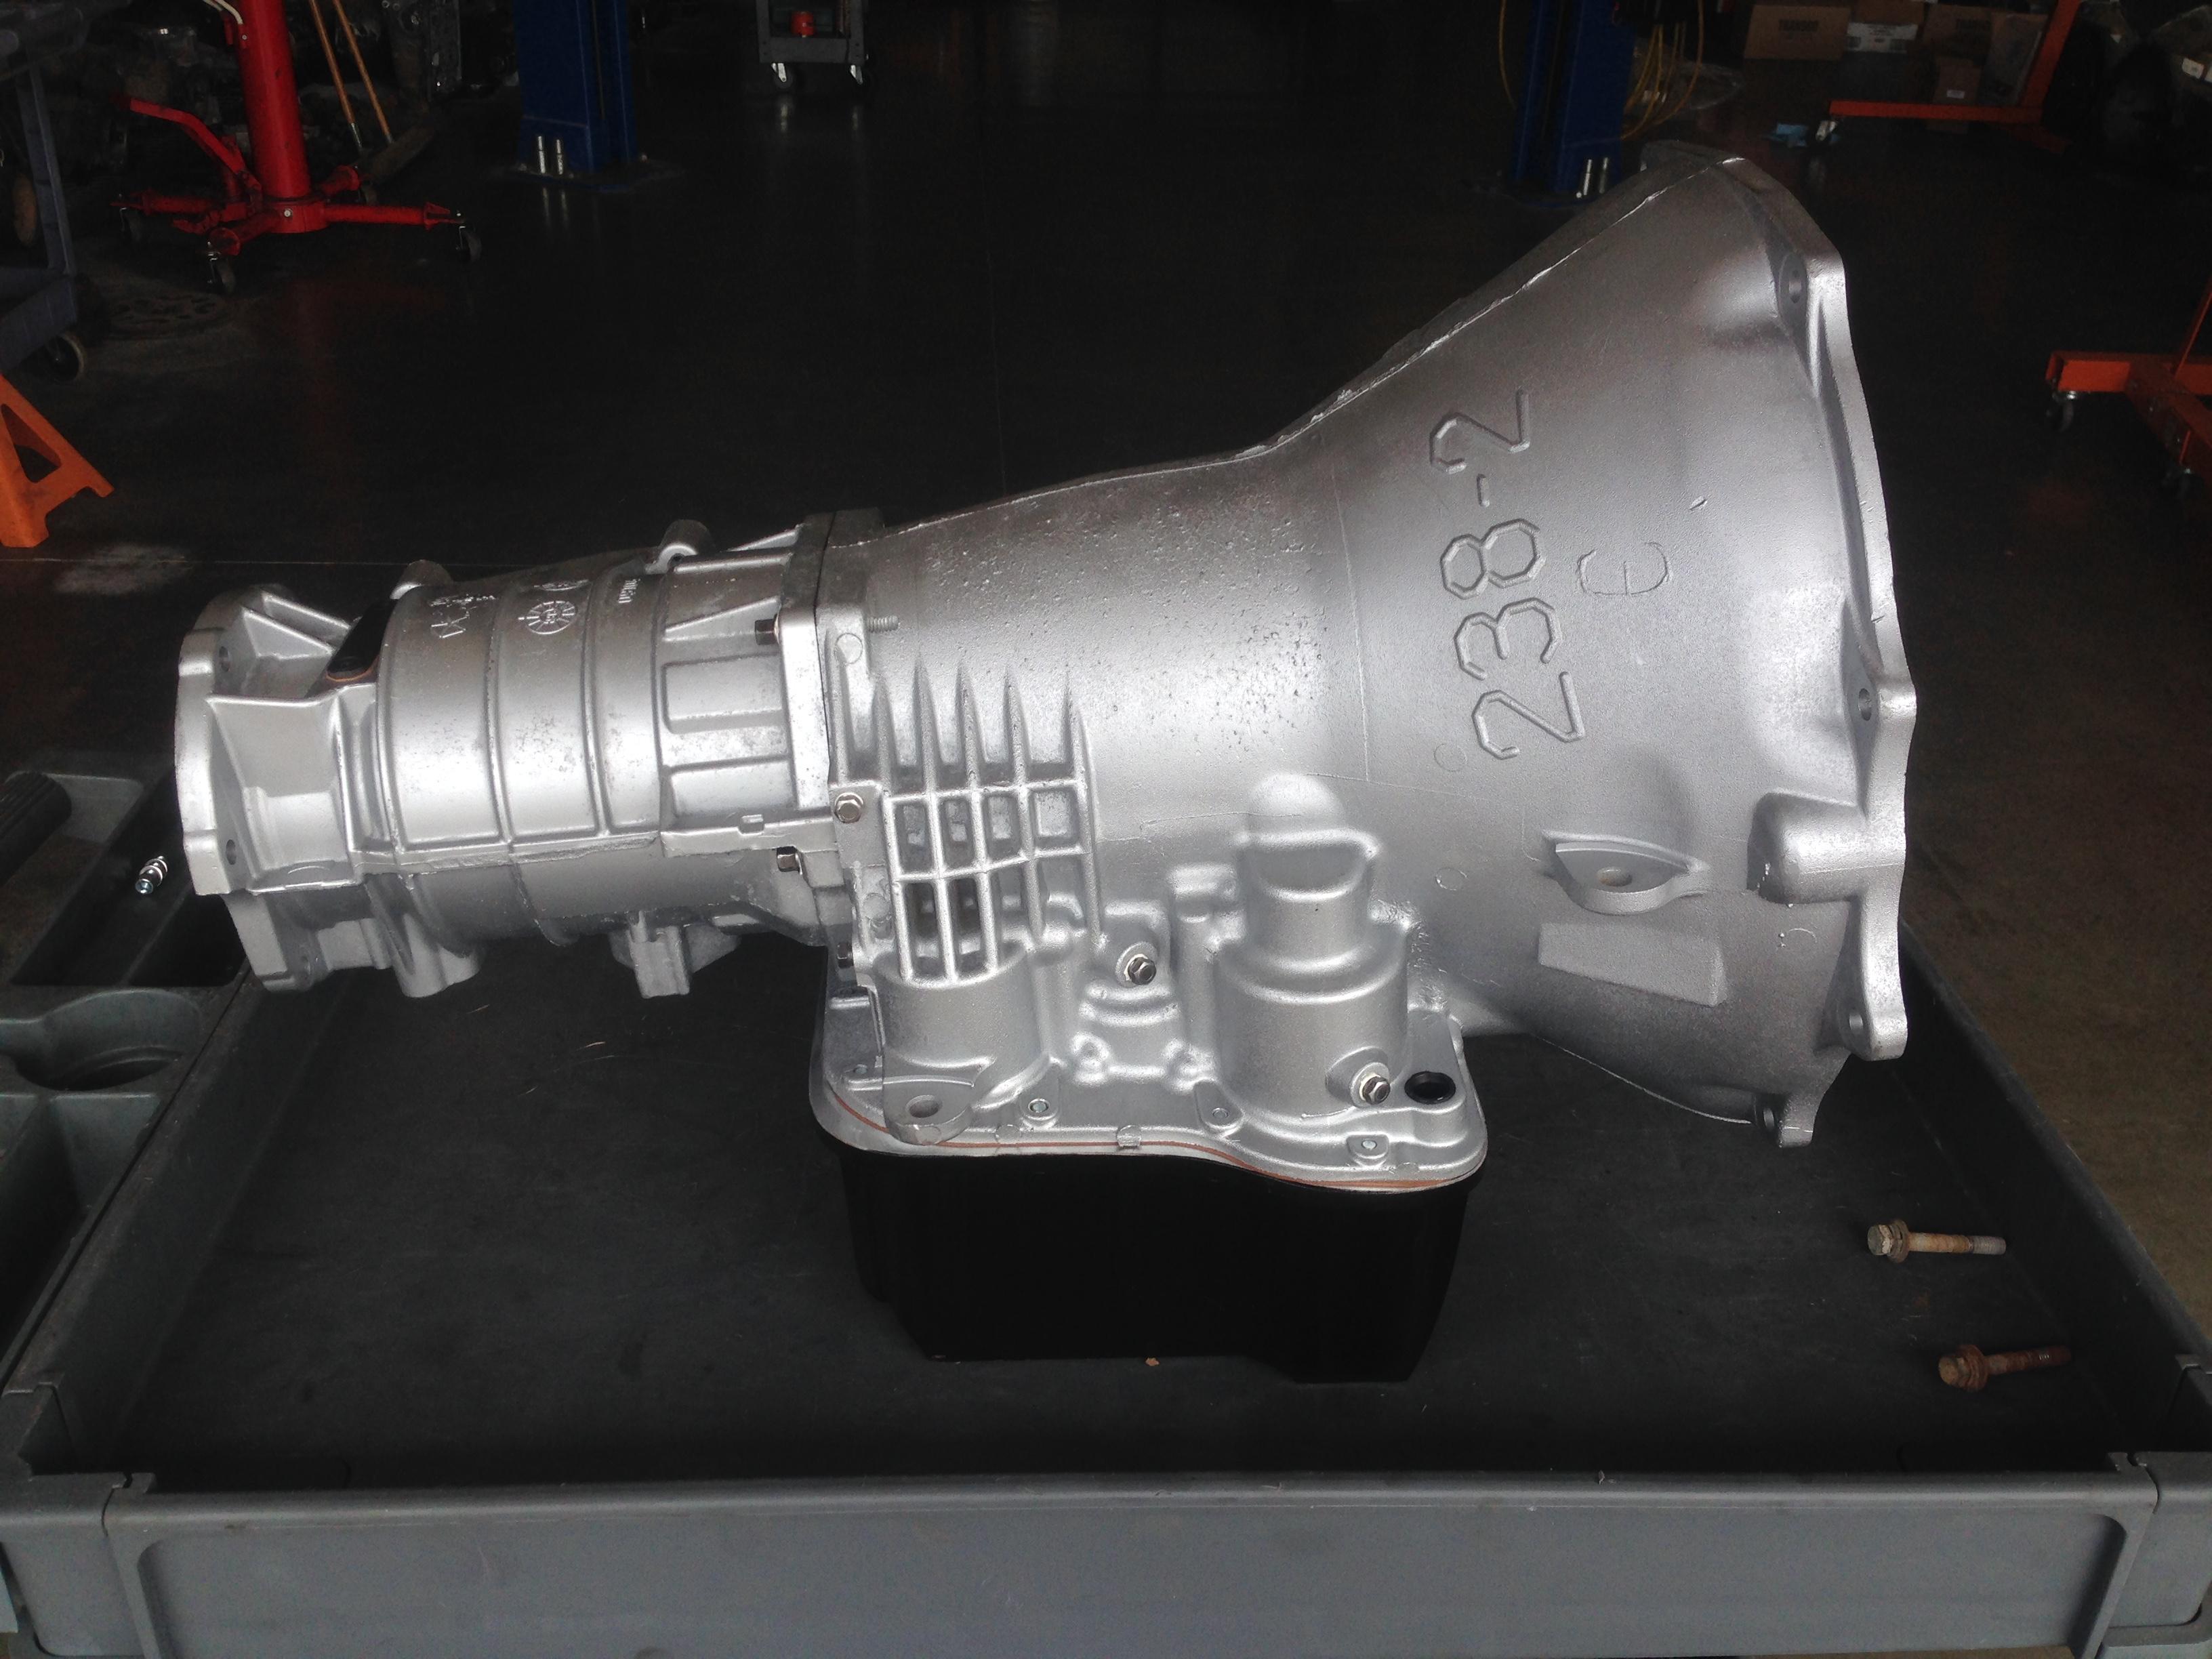
The fun stuff is yet to come. As soon as the machine work is finished, final cleaning and assembly begins. Haha... My wife's Durango runs pretty good, but she doesn't really care. As long as it runs and gets her around in reliable comfort...! The Gen 2 Durangos are an AWD drivetrain with the 545RFE 5 speed automatic, so, yes, basically full-time 4WD. I was going to pull the transmission down and build it, but it looks like there was some transmission work done already at some point in its not-too-distant past, and the fluid looks brand new. I think I'll just put a little bit looser (2600 rpm) torque converter on the front of it, do some valve body work on the bottom, and run it like it is. If I break it...oh well, I'll just build one for it then. The transfer case and the rest of the drivetrain will be fine. I don't plan on doing any drag racing with it or anything like that. It's just a daily driver...with a little more muscle.
-
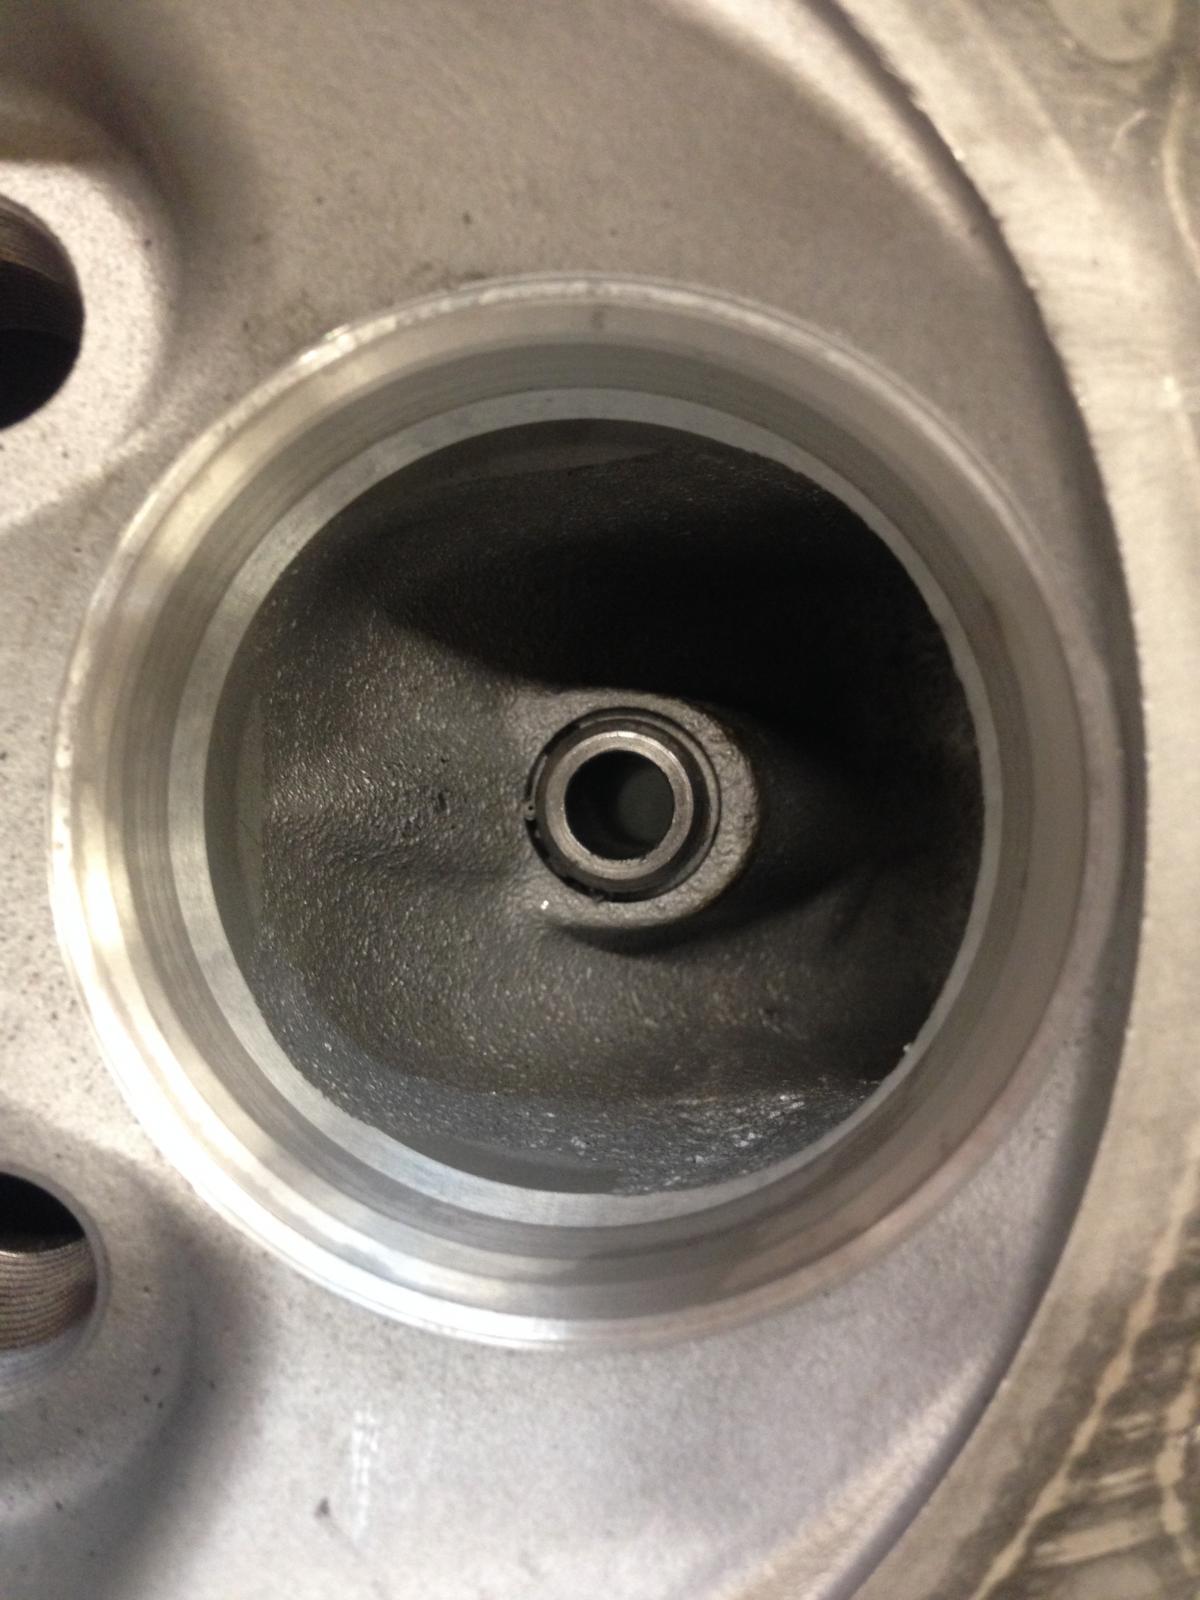
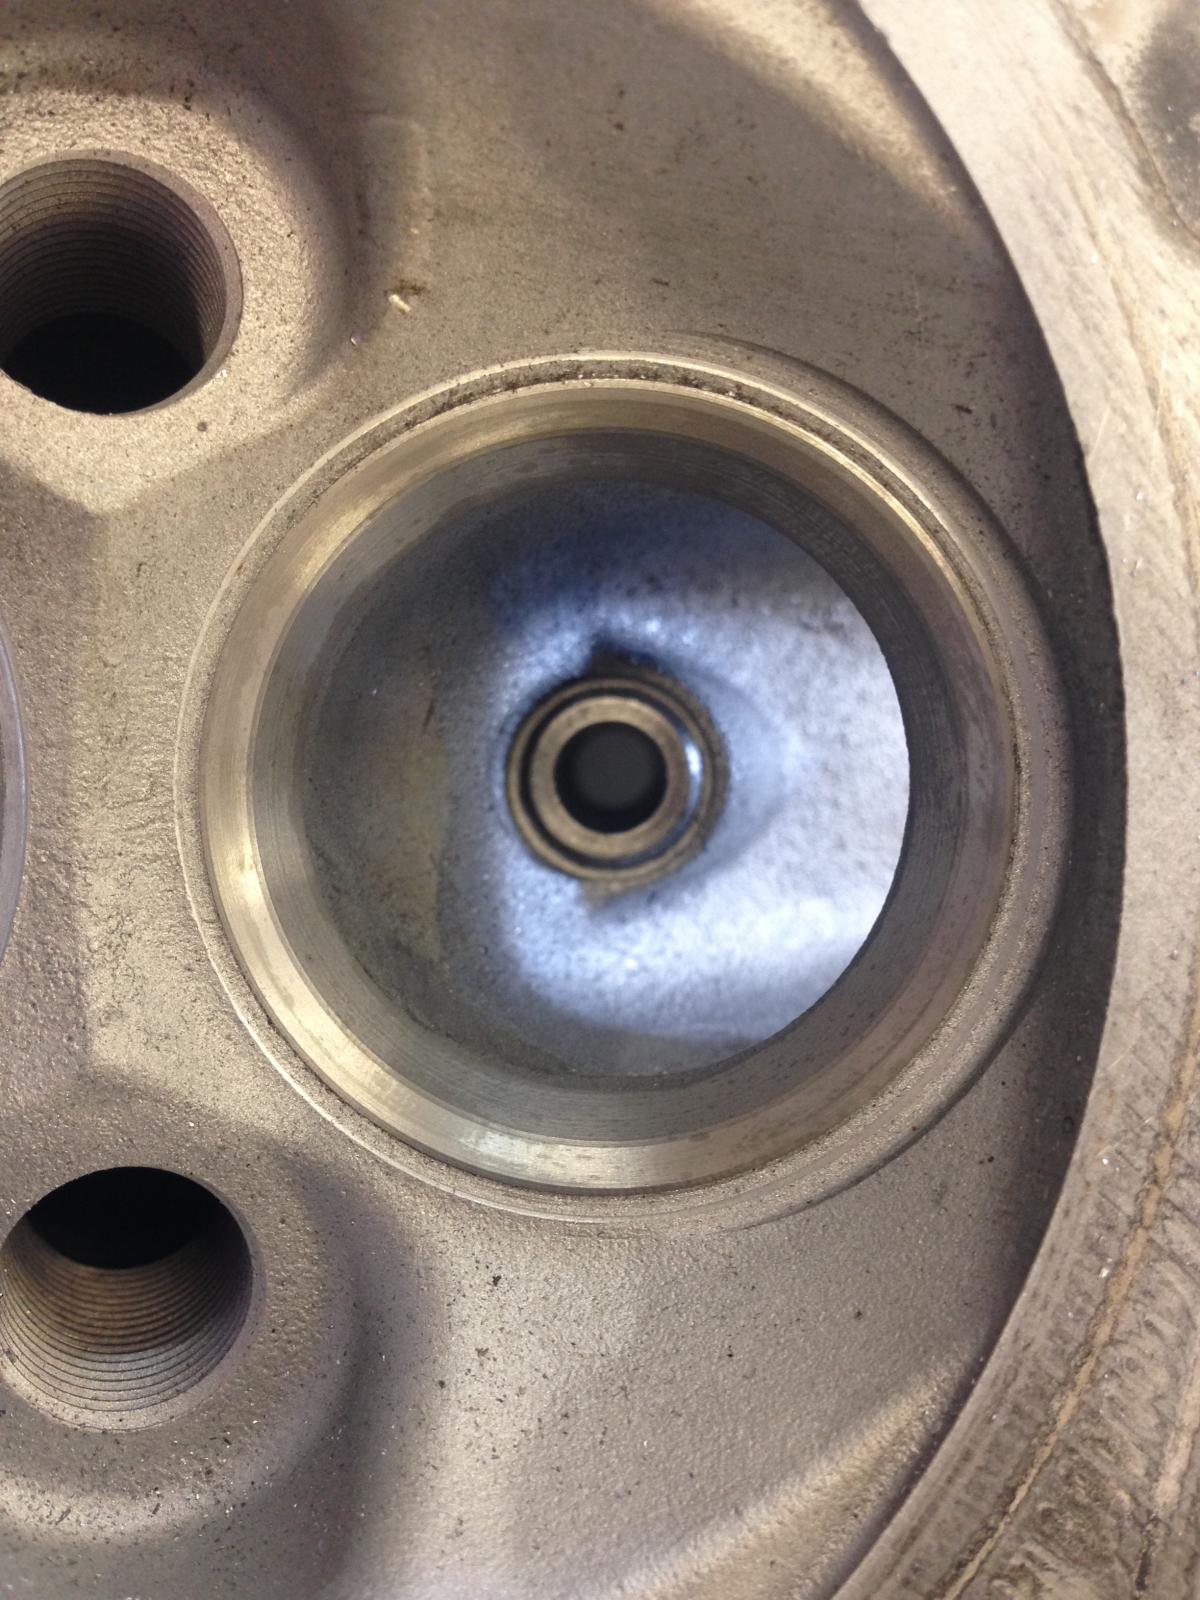
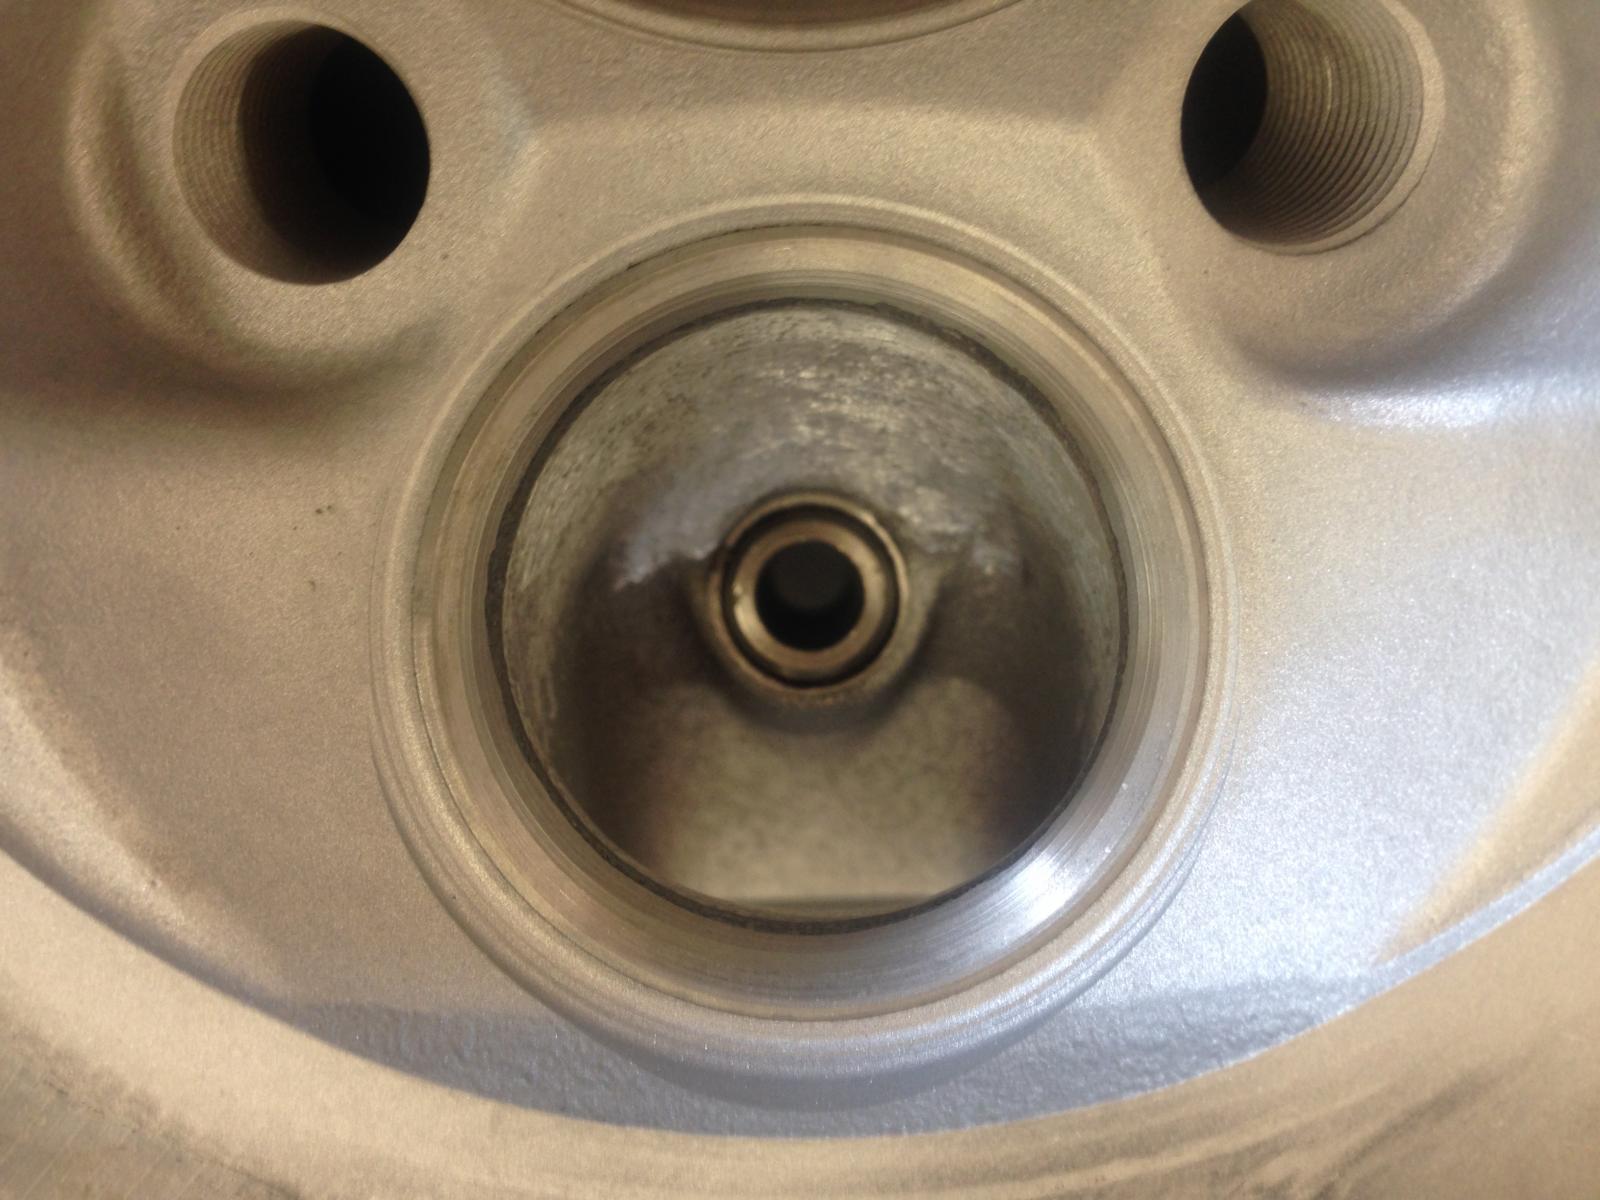
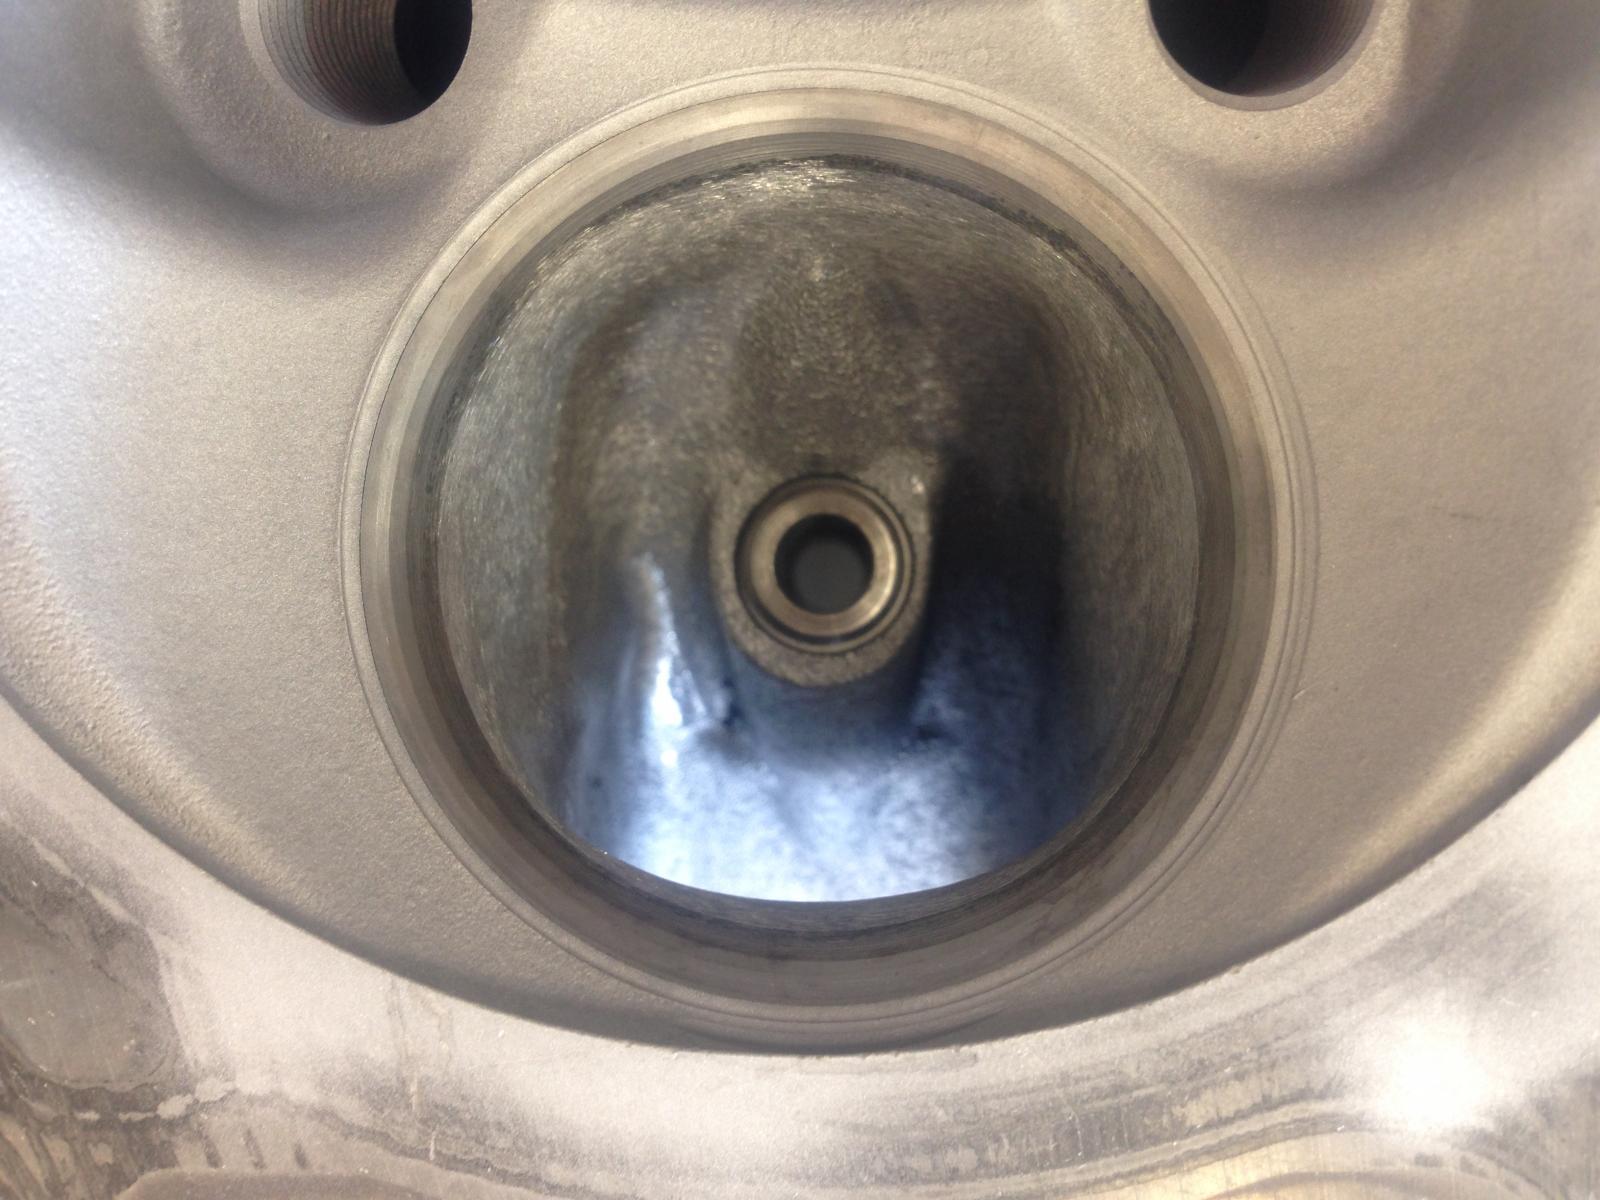
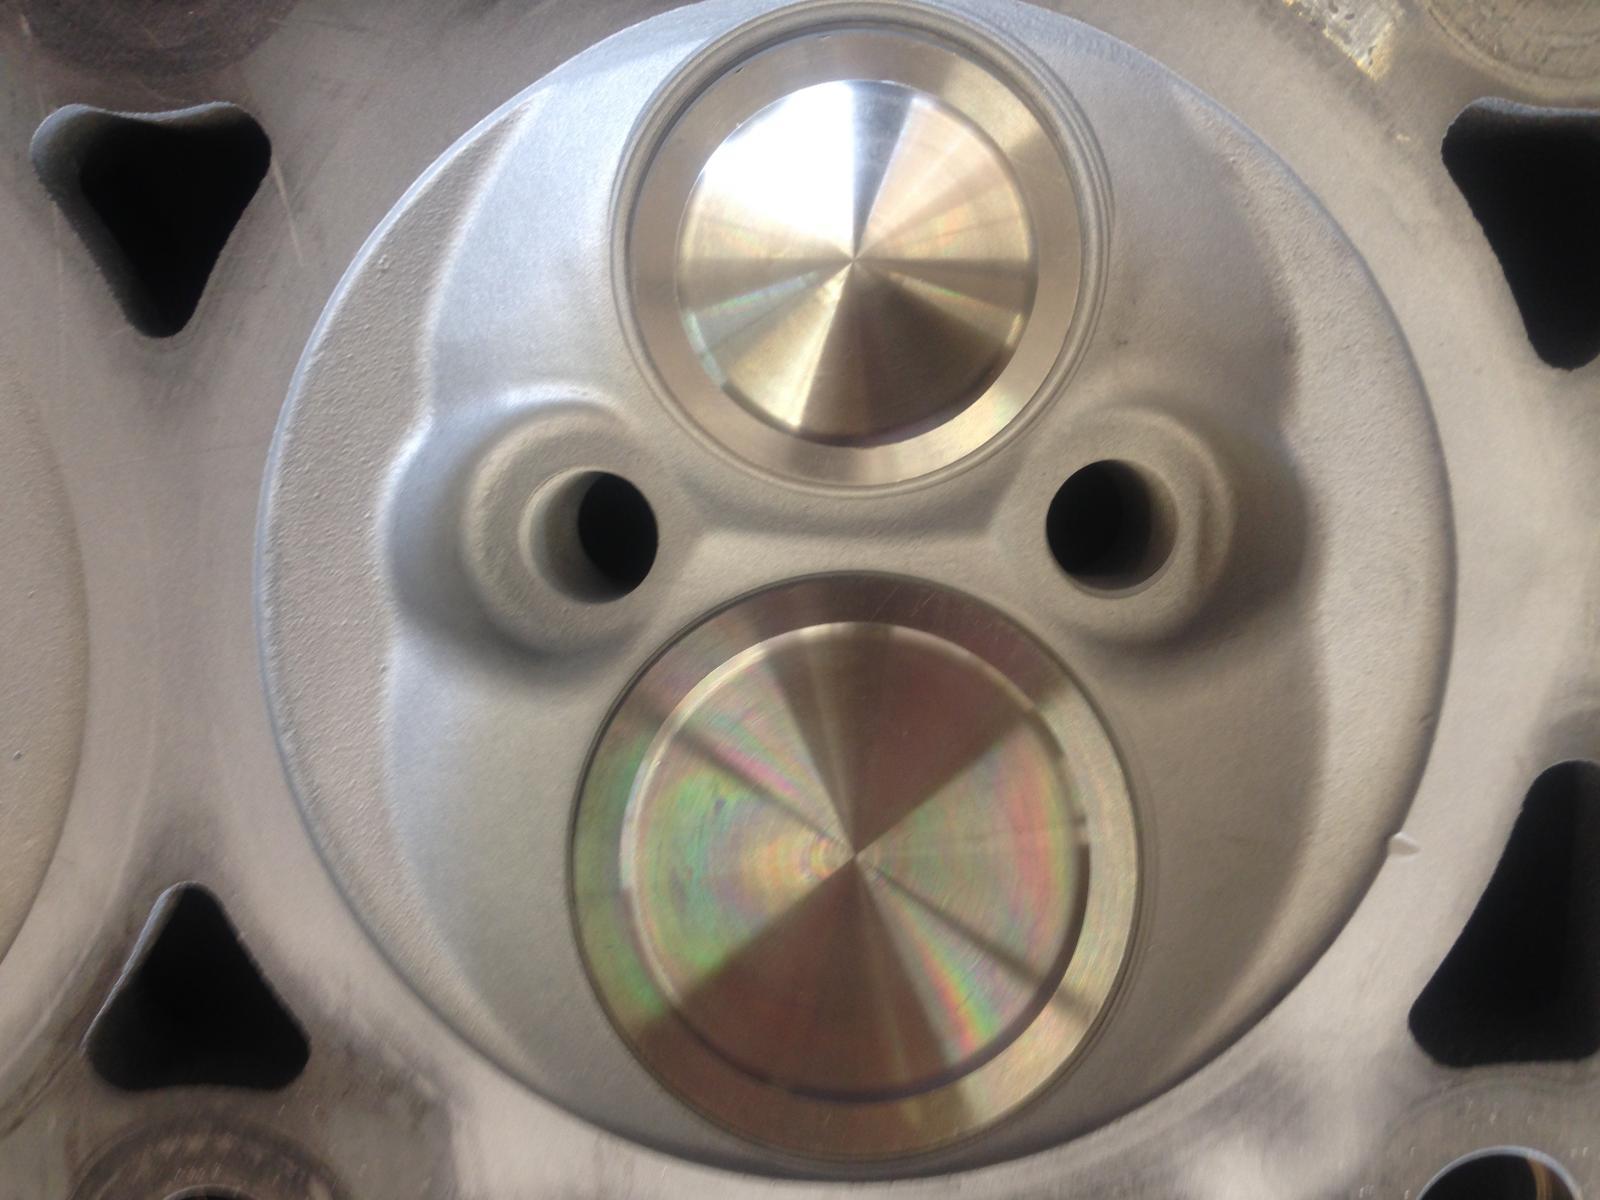
Here are a few photos of the port work today. Since the valves I'm using are quite a bit larger than the stock valves, I had larger seats installed in the heads; both intake and exhaust. After the large seats were installed, I had to get in there and match the bowl area of the port to the larger seats. The port work is not top shelf, but I was just trying to get the seats blended, not a full-on port job here. The Hemi heads already flow like crazy, so fancy port work and polishing was not my goal on these heads. Just by installing the larger valves and seat, and then blending the seats to the bowl area, port flow will increase dramatically over a stock port. The heads are now ready to be final surfaced, and final assembled. Intake seat before (I'm not sure why this photo is rotated 90 degrees, but it is.): Intake seat after: Exhaust seat before (Again, rotated 90 degrees.): Exhaust seat after: Both valves on their seats. (For those concerned, the nick at about the 4 o'clock position on the outer edge of the chamber will be cut out of there when I final surface the heads. I will be cutting .030" off of the head surface.)


-
Thanks! It's fun stuff to me. I enjoy it...except for paying for all this stuff.
-
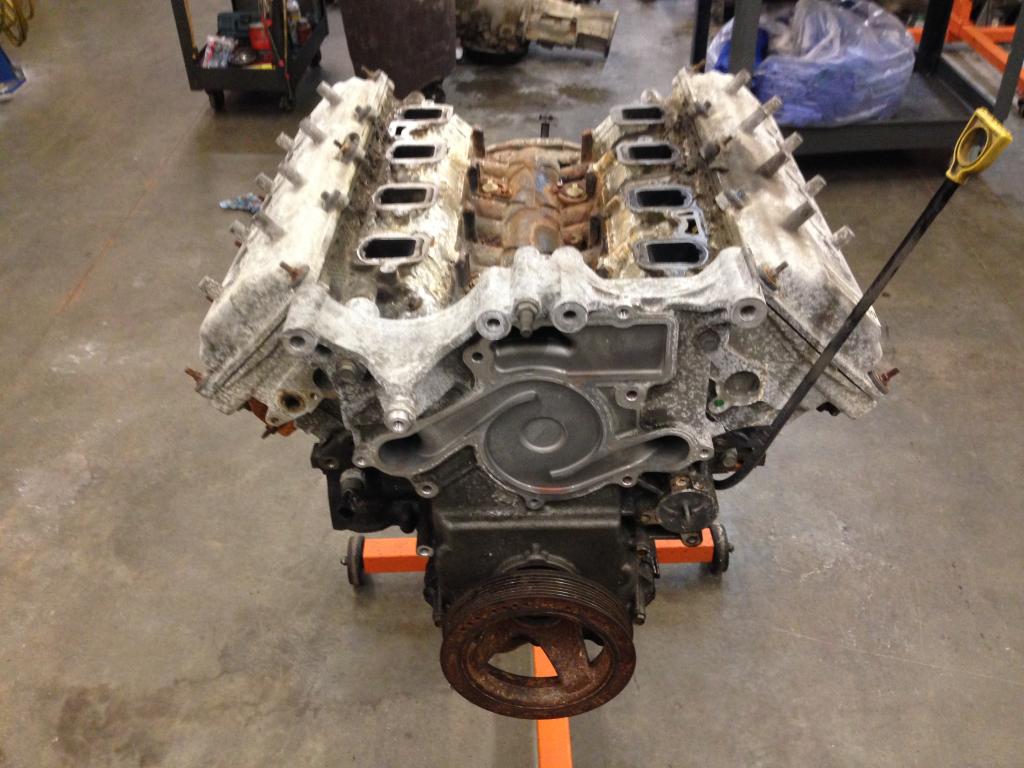
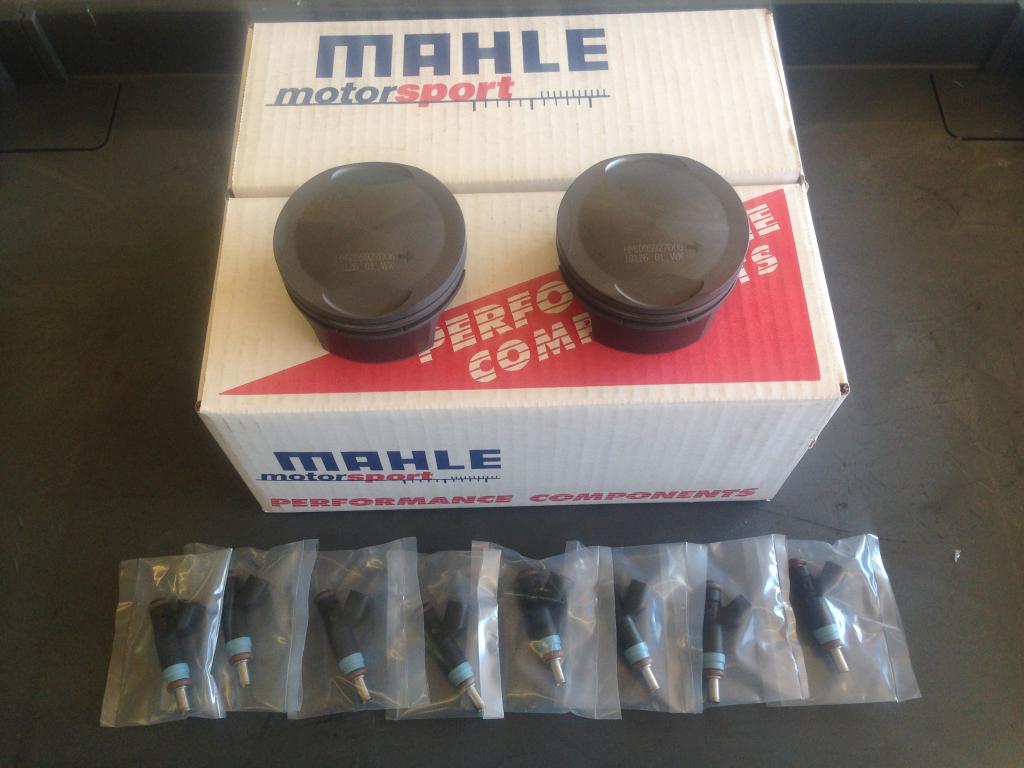
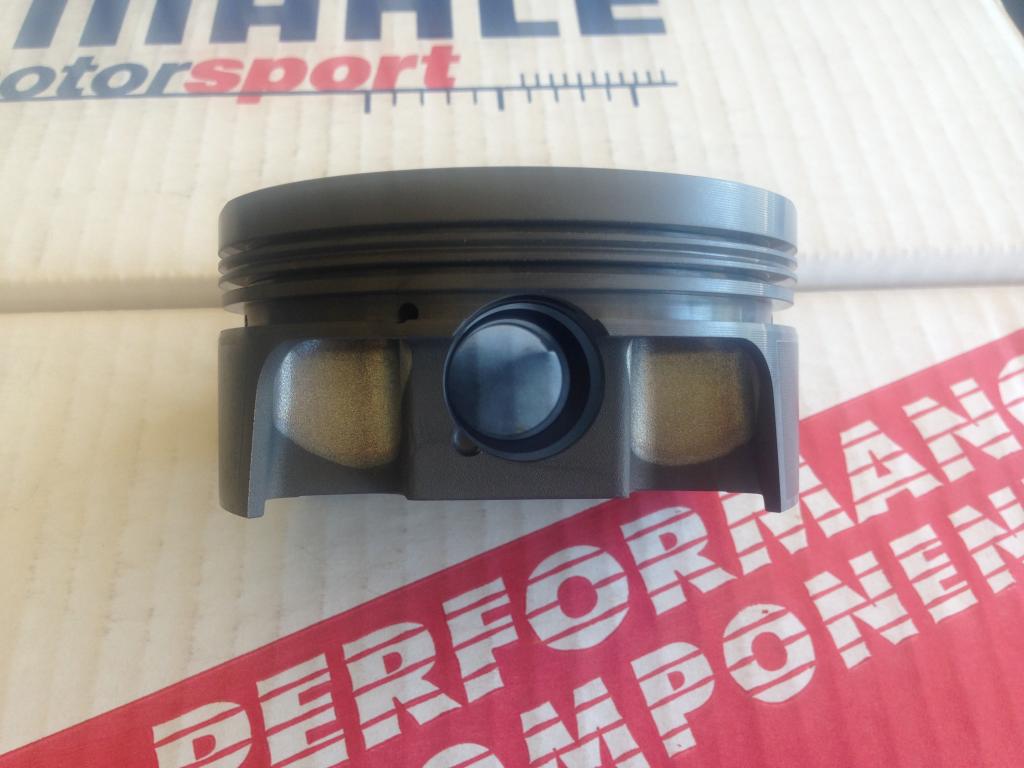
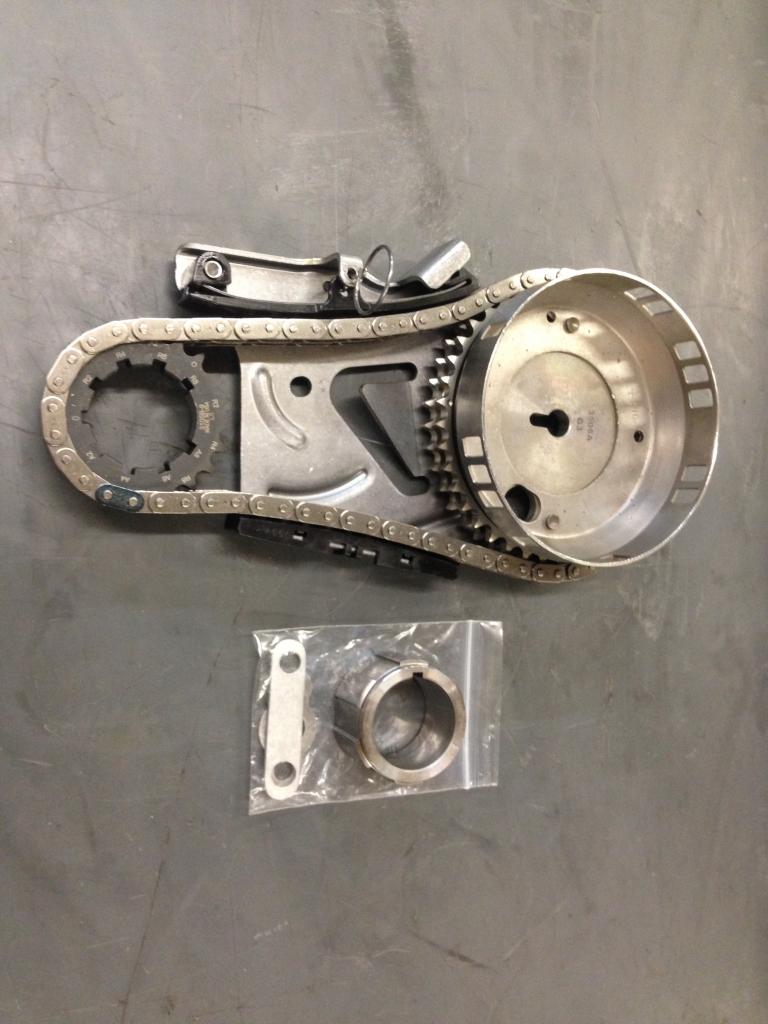
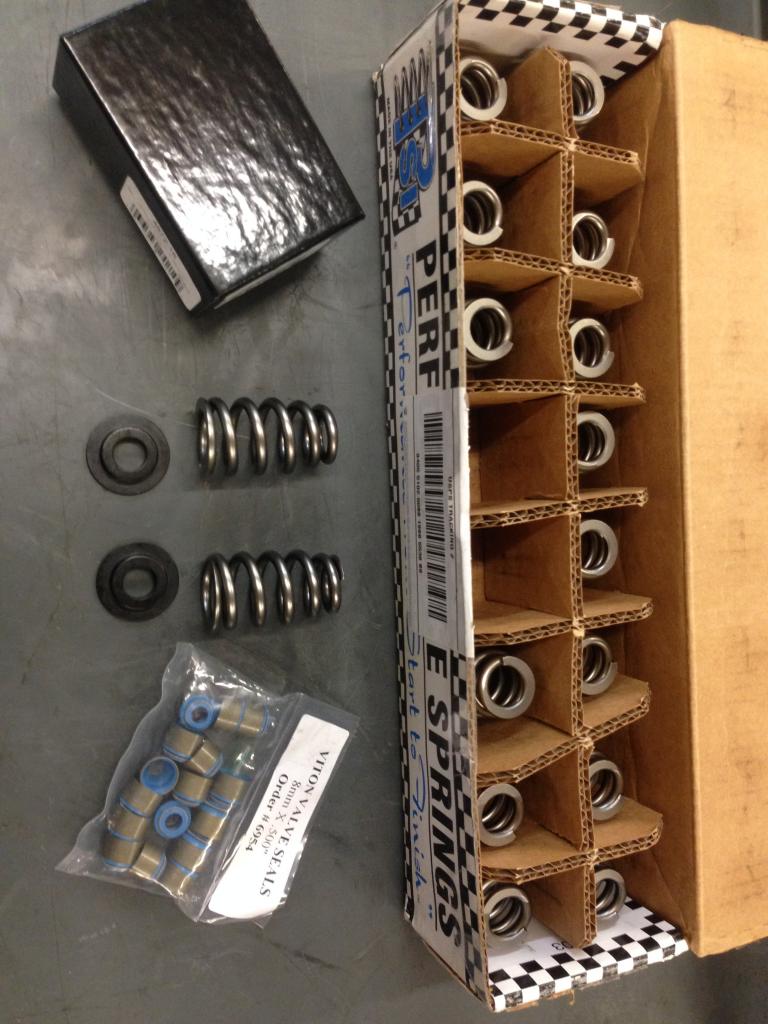
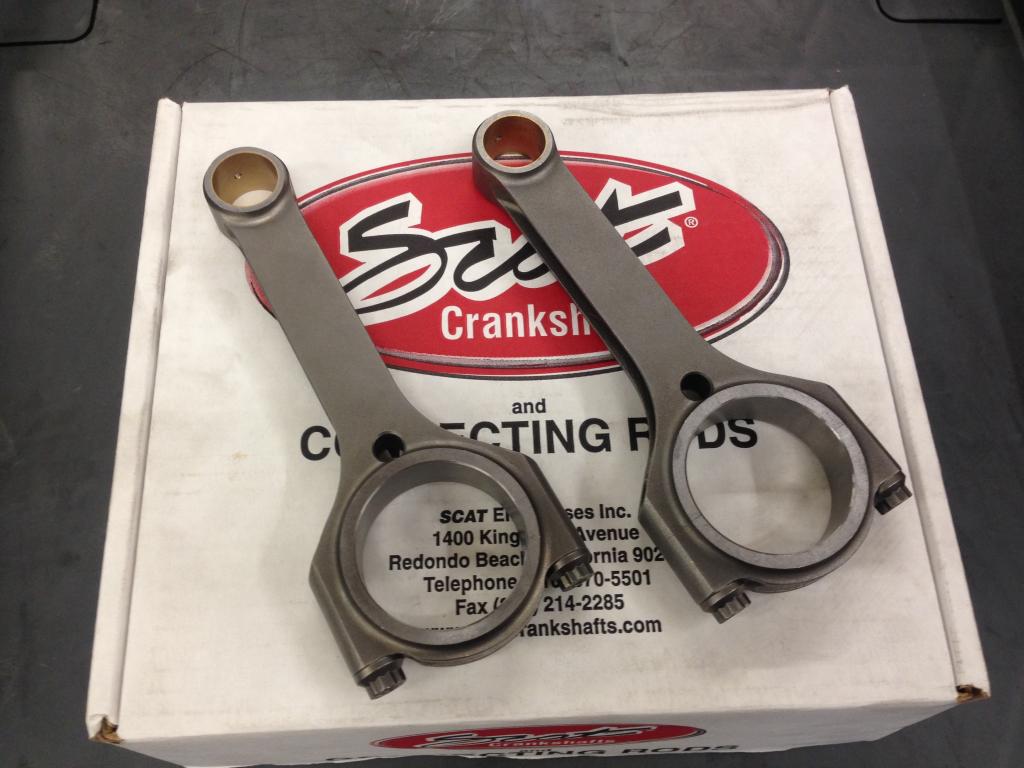
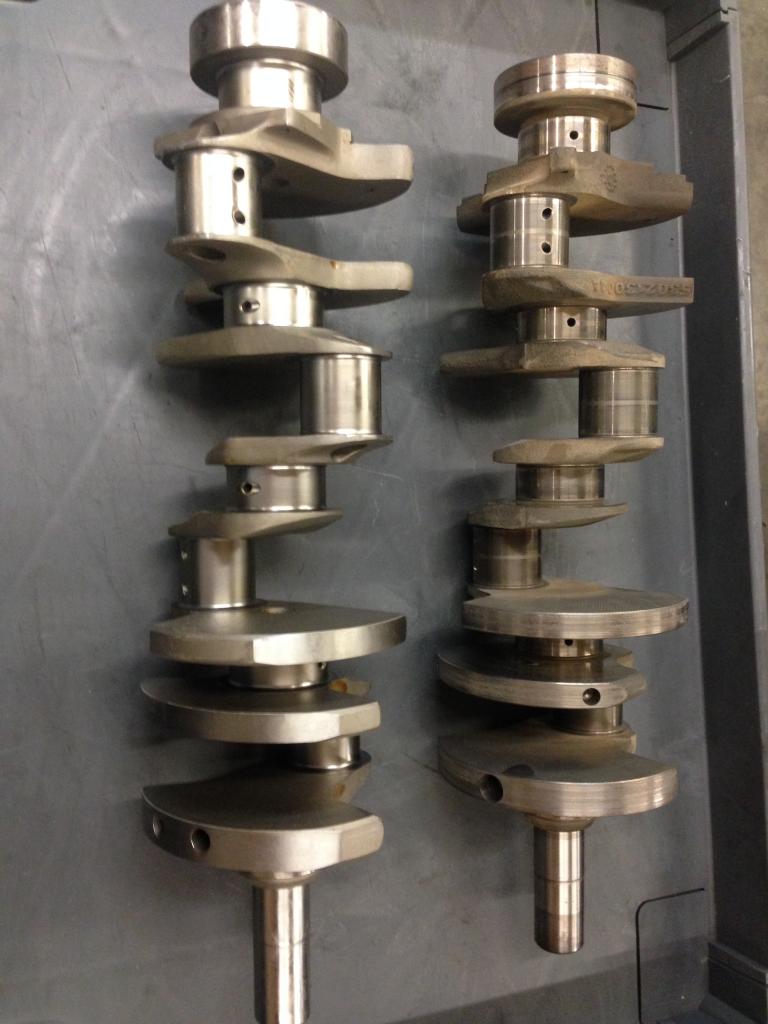
So, here are a few photos to start with... First...a "before" picture. Here is the 5.7 as it came out of the Durango, with its heavily ventilated block (broken rod punched through the block in several places). Here are the pistons I'm using. They're Mahle forged pistons with 6cc domes and a very short compression height (pin is well up into the oil ring groove). Also pictured are the OEM 6.4L Hemi injectors that I will be using. Here are the rods I'm using. They are Scat 6.125", small rod journal (2.0") small block Chevy H-Beam rods. The Mahle pistons use a .927" small block Chevy-sized wrist pin, and the Scat crank uses a 2.0" small block Chevy-sized rod journal. This makes the rods cheaper, and MUCH lighter... Here is the crankshaft. The crank on the right of the picture is the OEM 5.7 crank, which is a cast iron crankshaft. The crank on the left is the 4.05" stroke Scat forged steel crankshaft that I'll be using in the 392. Here is a picture of the camshaft that I had ground. Again, the specs on the cam are 221/227, .575"/.585", 115 LSA.Of course, it's a hydraulic roller camshaft. Here is the double roller timing set that I'll be using. The 9 position crank sprocket makes it relatively easy to degree the cam. I'll be setting this cam up on a 112 degree intake center line (ICL). Below the timing set is the oil pump drive and oil pump spacers necessary for it to clear the double roller chain Here are the LS 1511 valve springs I'll be using, as well as the Comp Cams spring locators for the base of the springs. At the bottom are the .500" Viton valve seals that I will be using. Cylinder head pictures to come...

-
Several guys have expressed interest in a thread about the 392 stroker Hemi that I'm building. I figured I'd go ahead and chronicle everything the best I can. I'm still waiting for some parts to show up, but here's the basics of what I'm doing. The stock Dodge 5.7 Hemi has a bore of 3.917", and a stroke of 3.58", for a total displacement of 345 cubic inches...or 5.7 liters. I am having a little fun with this one, so I'm boring it .010" just to clean up the bore. I'll be using Mahle forged pistons specifically designed for the crankshaft and rods that I'm using. Speaking of crankshafts, that's where all of the fun will come from on this particular engine. Several manufacturers make a crankshaft for both the 5.7 Hemi as well as the 6.1 liter Hemi (they share the same stroke) with a stroke of 4.05". Why 4.05"...? That's kind of an arbitrary number, isn't it? Well, with a 5.7L block, bored .010" over, and a 4.05" stroke, the engine displaces exactly 392 cubic inches, and the same crank in a 6.1L block (also bored .010" over), yields a displacement of exactly 426 cubic inches... Both of these numbers are throwbacks to the Hemis of old...the old elephant engines. Up top, I'm keeping the 5.7 heads, but I'm installing the larger stainless valves from the 6.1L's. Replacing the intake seats is something you'll want to do on ANY Hemi engine that you build because they are notorious for dropping them even when mildly overheated. There is not much of a press-fit from the factory, and they drop right out when they get hot enough. So, since I was having the seat replaced anyway, I had larger seats installed in both the intake and exhausts to accommodate the larger 6.1L valves. The OEM 5.7L valves measure 2.0" inches on the intake side, and 1.55" on the exhaust. The OEM 6.1L valves are 2.08" on the intake, and 1.6" on the exhaust. Plus, the 6.1L valves are much lighter due to the hollow stem on the intake valve, and the exhaust stems are sodium filled for better heat transfer away from the combustion chamber. I am using PSI LS1511 valve springs with Comp Cams spring locators to keep them in place at the bottom. These were both made for the GM LS engines, but work great in the Hemi after machining the top of the valve guide down to .510". Valve spring installed height is set at 1.8". These springs have exactly 135 lbs of pressure on the seat at 1.8" installed height. Perfect... As far as the camshaft goes, the stock 5.7L cam is VERY small...! In the last Hemi I built (in my wife's Durango), I used a 6.1L SRT8 camshaft, which is quite a bit "larger", and runs very nice. On this build, I'm taking things a step further and had a camshaft ground with 221 degrees of duration (at .050") on the intake, and 227 degrees on the exhaust side. Lift is .575" on the intake, and .585" on the exhaust, and the lobe centers (LSA) are pretty wide at 115 degrees. This will help it play nice with the computer at idle. So, that's what I'm building...a 392 cubic inch "stroker" Gen III Hemi engine with ported big-valve heads and a custom ground camshaft for an '04 Durango that I bought. Pictures to come...
-
I'm glad you got it sorted out! Yes, the TV cable plays a HUGE role in the way the transmission functions. I'm sorry I wasn't much help on this one as I've been absolutely buried in the shop between customer work and a couple of my own projects...
-
The most common cause for this is a failed torque converter clutch, but on rare occasion, I do see a stuck switch valve in the valve body. If the transmission upshifts and downshifts normally (aside from the governor solenoid/transducer issues), it's a good indication that the converter clutch has failed. You likely won't see any codes unless it is an electrical failure.
-
Yes, we need more information... At moderate throttle, I like to see both the 1-2 and 2-3 shifts at about 2000 rpm. They should both be pretty equal as long as your throttle setting doesn't change. Your TCC lockup and 3-4 shift are simply commands from the PCM, so their shift points are going to be determined electronically and the TV cable has nothing to do with them, other than determining the amount of line pressure at the time of their commanded engagement. A good starting point for TV cable adjustment is to set it so that the end of the cable is exactly lined up with the ball on the lever arm at the transmission. Make sure that the spring is in place and the arm is all the way forward.
-
This is quite common. With any kind of elevated line pressure, the OEM lockup calibrations will make a triple disc a miserable experience, especially at light throttle. Backing off those calibrations is not as straightforward as you'd think because you need to make the exhaust slot in the separator plate narrower to control the release of fluid from the converter; ie. different separator plate.
-
I'm not sure if I read this right, but if you're driving your truck around with the TV cable disconnected...DON'T...!! Aside from it stacking the shifts, you're getting no line pressure boost. This will burn up a transmission in short order. I typically set up the 24 valves to shift at about 2100-2200 rpm at moderate throttle, and 12 valves slightly earlier (100-150 rpm or so). It's not an exact science, and is somewhat subjective, but that should get you close.
-
Yes, in really cold weather, the PCM will leave the converter unlocked until the fluid warms up a bit.
-
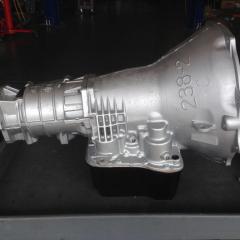
Sorry it has taken so long to respond here. I've had a HUGE project in the shop that is finally coming to an end, so I can come out of the "cave", so-to-speak... It really depends upon how built up you want it, and how complete of a package you're looking for. Our Stage 2 build starts at $1699 for the transmission itself. It is a complete build, with an extra disc in the direct clutch (5 disc stack), and also an extra disc in the OD brake clutch (6 disc stack). It also comes with a billet accumulator piston, Sonnax intermediate servo cover, Superior reinforced band strut, Sonnax billet low/reverse piston, and the HD/Towing valve body, calibrated to your preferences, and includes all electronics. The Stage 2 retains the OEM input shaft, and the valve body is calibrated accordingly. If you want a bundled combo package with the Stage 2 transmission, a torque converter, and deep pan, we do the same build with either a Cascade or DPC triple disc converter and Mag-Hytek double deep pan for $3399. The Stage 3 build starts with everything in the Stage 2 build, and then adds a billet input shaft (TCS), full billet servo set with billet band anchor (TCS), and extra disc in the forward clutch (5 disc stack), and billet OD piston retainer. Pressures are turned up a bit more in the valve body, and shift calibrations a bit firmer. The Stage 3 transmission itself runs $2899, and the bundled combo comes with the double deep pan, a Goerend billet flexplate, and your choice of Cascade, Goerend or DPC billet triple disc torque converter for $4499. These are our two most popular packages, by far. You'er also welcome to give me a call with questions or specifics.
-
Very common on those.
-
You'll have to pull the transmission to change the intermediate band lever, but the rest of what you listed off is a good plan.
-
I just reread your original post, this time including the last paragraph about you talking to Lavon (which I had somehow glossed over the first time...). Everything that Lavon said is exactly what I was going to post... A 1-2 shuttle shift is generally fixed with a good governor solenoid. I strongly recommend the Borg Warner HD, and also recommend replacing the solenoid and transducer as a pair. It is possible that your filter is becoming restricted. This is not uncommon after a build due to normal break-in debris, plus anything that you may have gotten back from the cooler making its way into the filter. I have all of my customers run their new transmission for 1500 miles and then change the filter and readjust both bands... Yeah, Idaho Falls is a hike from here, but I'm glad to help however I can...
-
I run a Smarty and 100 hp injectors, and really like the combo. BUT, I also have my valve body set up for the low end fueling of the Smarty. To elaborate on Mike's point, one of the problems with the Smarty coupled with a stock valve body is the fact that the Smarty will fuel the engine very aggressively at what amounts to very small amounts of throttle pedal travel. This is great for driveability and "feel", but that same small amount of throttle pedal travel also equates to a very small amount of TV cable pull at the transmission. So you are only getting small amounts of TV pressure increase and it's resulting boost in line pressure. What this means is that you're making a lot more power than you will have line pressure to support in many cases. The fix is to have your valve body set up not only with increased base line pressure, but also so that your line pressure increases more aggressively right off the bottom to handle the increased power with minimal TV increase. A really good line pressure curve is beyond the scope of your basic "shift kit".
-
Haha... I hear ya. But, luckily for both of us, I do...
-
Behind a 5.9, I assume? It has given you all it had... The 46RE's behind the 5.9 (360) really need a 4th disc in the direct. The 5.2 (318) weren't quite as bad, but it's an easy mod, so why not...? You can set the 46RE up with a 4 disc direct (like a stock 47RE), and a 5 disc OD brake (again, same as a stock 47RE), and some valve body mods and you'll have a real nice transmission.