
IBMobile
Staff
-
Joined
-
Last visited
Everything posted by IBMobile
-
I had a 50' roll of 1/4" hose so I ran a line into the cab from the turbo to the controller and back out to the waste gate so I could adjust it on the fly. I made several wide open runs to set it. I tried to set it with air pressure from the compressor but it the valve didn't seam to want to open.
-
Try not to park the truck in the same place every night. Rodents remember where food and a warm place to nest is and will keep coming back to the same place.
-
My trip to South Dakota is now complete.

-
In north San Diego County there are 5 Napa stores owned by the same person. If you need a part they can get it usually the same day but their prices are higher on most things than anyone else and the quality is about the same. There are a lot of wholesale and commercial part suppliers here I'd rather deal with.
-
I'll be checking the above out before we drive into the Badlands National Park today.
-
Today getting on I-90 at Chamberlaind, SD after having lunch, the torque convertor would not lock up. I tried to lock it up with the mystery switch but no luck. The trans temp climbing to 190°F, then the convertor locks up. What the heck! No check engine light. I'm thinking either poor connection at transmission, problem with the lock up solenoid, problem in valve body, or problem in the torque convertor.
-
The morning sky in front of the Iowa state capital 4/25/18

-
Your socket is going bad. If it was something, like the 'hotwire' red/tan 16 gauge wire going to the plug, grounding the fuse would blow with out anything in the socket.Yes, that wire from the positive terminal of the left battery to the PDC is where all the power to run the electrical components, except the starter motor, comes through.I disconnected the grid heaters just before this trip and the coldest start was in Wiggins, CO at 32°F. The engine started up, some white smoke and loopy idle for 20 seconds then every thing was fine.I don't know . I've never tried that. It would be great if you could an amp meter in line with it and test it that way. It would have to be a meter rated for that big of a load. What is the amp/watt rating of those backup lights?It was before his beak grew out.From page 8R-12 of the factory service manual REMOVAL (1) Unlatch and open the hood. (2) Lift the wiper arm far enough to raise the wiper blade off of the glass and permit the wiper arm latch plate to be pulled out to its holding position, then release the arm (Fig. 5). The wiper arm and blade will remain off the glass with the latch in this position. CAUTION: The use of a screwdriver or other prying tool to remove a wiper arm may distort it. This distortion could allow the arm to come off of the wiper pivot during wiper operation, regardless of how carefully it is reinstalled. (3) Using a slight rocking motion, remove the wiper arm pivot end from the wiper pivot
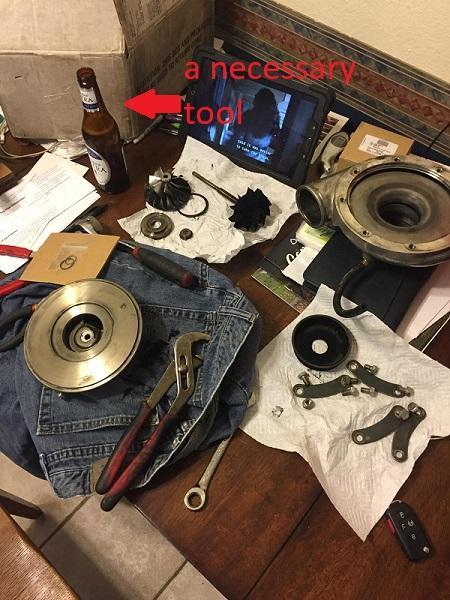
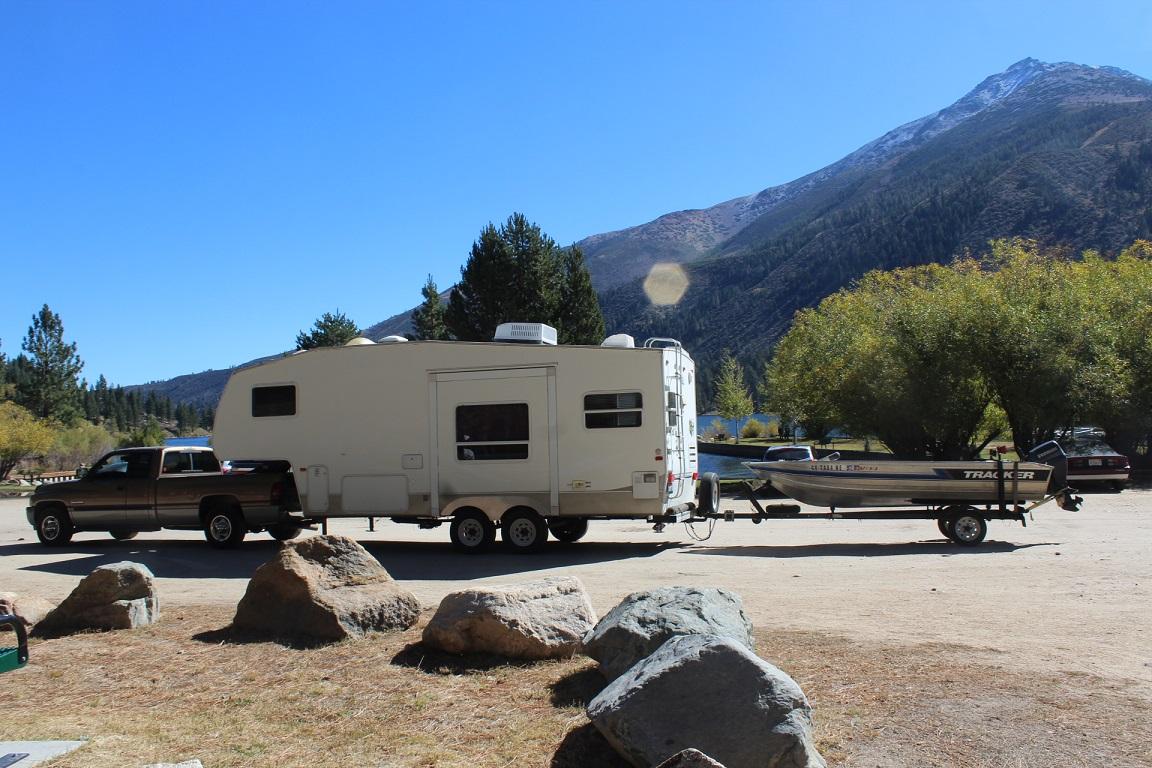
.jpg.75b669a299b3be25dcdc378ae56756c3.jpg) Yes @dripley right about the DBRIII being a dealer item but a good OBDII code reader with live data capability will work along with your volt ohm multimeter .NO, it can't be that. Haven't you been keeping up with current meteorological trends. It's climate change.See if this helps. You don't have a DRBIII(R) , your multimeter (VMO) will work. Be careful not to distort the connector terminals when putting pins into them that's why they say to back probe them.Thank you. It's nice to know there is a helping hand out there if needed. We will be heading north on I-35 then west on I-90 in Minnesota when we leave here.Drive around as much as you can with no trailer on and check the fuse regularly to see if it popped. I know it's a PIA but intermittent electrical problems are just that, a major PIA. You'll need to check the fuse before and after hooking up the trailer.We'll be go right by your house some time around the end of the first or beginning of the second week in May. Right now we're in a beautiful state camp ground in Iowa and should be here for four nights. What a difference towing. With the RV 275 injectors and the manual boost controller there is more than enough power. No more need to floor board the skinny pedal to get on the freeway.You probably have an intermittent dead short to ground on that circuit for a fuse, especially 40 amp, to blow. Was the trailer connected to the truck when you replaced the battery on the trailer, If it was and the positive cable touched the frame of the trailer that would have done it.Yes , "tool". Another typo.Last Saturday night my wife and I started a five week camping trip in our fifth wheel trailer. Tuesday morning we pulled in to Capital Reef National Park, dropped the trailer and did some sight seeing. The road in the park is only about 10 miles and took us 8 hours to see the sights. The next morning we set of for Moab, Utah to see both Arches and Canyonland National Parks. We get to the camp grounds and as I'm unhooking the trailer the check engine light comes on. What the heck! With code reader in hand I find P0336 crankshaft position sensor signal. OK, I had replaced it about 50,000 miles ago and the truck just turned 102,000 miles so my be the life expectancy of that part is 50,000mi so call around and find on at O'Reilly's. Great, I have an account with them. I get it, drop the starter, install it. put everything back together and road test all while the wind is blowing and the temp is 44°F. Everything is great and the next two days are spent touring the National Parks. Friday morning and it's time to leave for Des Moines, IA. I find a water leak in the "basement" of the trailer. What the heck! Lucky for me it's just a drip and it has been collecting in an old dishpan. It's the cold water hose fitting for the out side shower which we never use. I empty the pan then Google RV parts and supply. A few come up in Grand Junction, CO. Great, we're going that way. A few hours later and we pull into Centennial RV. They had the part that I needed and in a few minutes the leak was stopped and we're on the road again. Friday night we pull into Wiggins, CO. and the left propane tank is empty so switch over to the right and every thing is nice. Wake up Saturday morn and it's 42°F in the trailer, 32°F and snowing outside, so turn on the heater. What the heck! NO HEAT. The light on the fridge saying it's not working either. I go out side and check the right gas bottle and it's full so it must be a bad gas regulator. Google RV parts and supply and one come up in Sterling, CO. Great we're going that way. We call Sterling RV Center and yes they have just what we need. One hour later we pull in and there is a new duel tank with auto switch over propane gas regulator waiting for us. I buy it and go down the road to the local Home Depot parking lot and install it. Yes we have heat, hot water, and the fridge is working again. Life is good once more and we're on the road again. Now we're in a truck stop for the night just outside of Lincoln, Nebraska. I wonder if we'll have another what the heck day. With four more weeks to go on this trip I'm sure there will be. IBMobile Capital Reef National Park, Utah
Yes @dripley right about the DBRIII being a dealer item but a good OBDII code reader with live data capability will work along with your volt ohm multimeter .NO, it can't be that. Haven't you been keeping up with current meteorological trends. It's climate change.See if this helps. You don't have a DRBIII(R) , your multimeter (VMO) will work. Be careful not to distort the connector terminals when putting pins into them that's why they say to back probe them.Thank you. It's nice to know there is a helping hand out there if needed. We will be heading north on I-35 then west on I-90 in Minnesota when we leave here.Drive around as much as you can with no trailer on and check the fuse regularly to see if it popped. I know it's a PIA but intermittent electrical problems are just that, a major PIA. You'll need to check the fuse before and after hooking up the trailer.We'll be go right by your house some time around the end of the first or beginning of the second week in May. Right now we're in a beautiful state camp ground in Iowa and should be here for four nights. What a difference towing. With the RV 275 injectors and the manual boost controller there is more than enough power. No more need to floor board the skinny pedal to get on the freeway.You probably have an intermittent dead short to ground on that circuit for a fuse, especially 40 amp, to blow. Was the trailer connected to the truck when you replaced the battery on the trailer, If it was and the positive cable touched the frame of the trailer that would have done it.Yes , "tool". Another typo.Last Saturday night my wife and I started a five week camping trip in our fifth wheel trailer. Tuesday morning we pulled in to Capital Reef National Park, dropped the trailer and did some sight seeing. The road in the park is only about 10 miles and took us 8 hours to see the sights. The next morning we set of for Moab, Utah to see both Arches and Canyonland National Parks. We get to the camp grounds and as I'm unhooking the trailer the check engine light comes on. What the heck! With code reader in hand I find P0336 crankshaft position sensor signal. OK, I had replaced it about 50,000 miles ago and the truck just turned 102,000 miles so my be the life expectancy of that part is 50,000mi so call around and find on at O'Reilly's. Great, I have an account with them. I get it, drop the starter, install it. put everything back together and road test all while the wind is blowing and the temp is 44°F. Everything is great and the next two days are spent touring the National Parks. Friday morning and it's time to leave for Des Moines, IA. I find a water leak in the "basement" of the trailer. What the heck! Lucky for me it's just a drip and it has been collecting in an old dishpan. It's the cold water hose fitting for the out side shower which we never use. I empty the pan then Google RV parts and supply. A few come up in Grand Junction, CO. Great, we're going that way. A few hours later and we pull into Centennial RV. They had the part that I needed and in a few minutes the leak was stopped and we're on the road again. Friday night we pull into Wiggins, CO. and the left propane tank is empty so switch over to the right and every thing is nice. Wake up Saturday morn and it's 42°F in the trailer, 32°F and snowing outside, so turn on the heater. What the heck! NO HEAT. The light on the fridge saying it's not working either. I go out side and check the right gas bottle and it's full so it must be a bad gas regulator. Google RV parts and supply and one come up in Sterling, CO. Great we're going that way. We call Sterling RV Center and yes they have just what we need. One hour later we pull in and there is a new duel tank with auto switch over propane gas regulator waiting for us. I buy it and go down the road to the local Home Depot parking lot and install it. Yes we have heat, hot water, and the fridge is working again. Life is good once more and we're on the road again. Now we're in a truck stop for the night just outside of Lincoln, Nebraska. I wonder if we'll have another what the heck day. With four more weeks to go on this trip I'm sure there will be. IBMobile Capital Reef National Park, Utah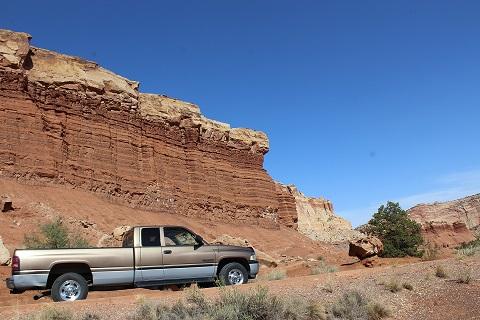 @dripleyis right about the evaporator having a tendency to leak, that's why it's a good idea to replace it when doing a heater core replacement. The front compressor seal is another place to look at for sure but I think you need a special to replace it. When replacing any component on a vehicle this old it's a good idea to replace all the O-rings in the system too. As for using a rebuilt or new compressor for a few dollars more I've all ways have gone with a new one. This may help https://mopar1973man.com/cummins/articles.html/24-valve-2nd-generation_50/54_cab-interior/basic-air-condition-repair-r485/I'm going to keep it as a spare. My tire size is LT 245/75R16 so I'll be fine.