
Texas CTD
Unpaid Member
-
Joined
-
Last visited
Everything posted by Texas CTD
-
New video from today: https://www.youtube.com/watch?v=1FEBzUmipqI&feature=youtu.be Old videos: https://www.youtube.com/watch?v=Zwe-Li9NjJc https://www.youtube.com/watch?v=yg212nA1KMY https://www.youtube.com/watch?v=1HLM7whCQfY
-
Man that really sucks. A built auto would be fun. I know, I wouldn't sacrifice the ability to shift my own gears either.
-
Thank you! Sometime soon, the intake horn will be as shiny as the pipes... Next step is to rebuild the Getrag and throw a clutch in it, which may take a while, since I daily drive the truck, so I will have to work that out somehow. I've never rebuilt a trans, so I know it's going to take me a while. I still need a piston lift pump, and then I'll be ready for some more fuel and air.
-
Finished up the powerstroke inter cooler install last weekend. Testing for leaks: New intake and "hot" I/C pipe: "Cold" pipe and 24V intake horn:
-
This video clip was played during our good Friday night of worship, at the Church I attend. Kinda hit me like a ton of bricks.
-
Little update. Truck dumped all it's coolant while on the way to work last week, and had to tow it home. Water inlet seal in the block was toast. While waiting on a seal to show up, I'm doing some "stuff." Changing the crank seal, and working on getting a powerstroke intercooler put in, with all new 3" plumbing from the turbo, to a 24V intake horn.
-
So did you dyno?
-
Talk about planning ahead! Maybe even I can make this one... 2,000 mile one way drive for me.
-
My very first step was to install the draw straw. To do so, either the bed has to be lifted off of the truck, or the fuel tank has to be removed; I chose to remove the fuel tank. If you do not know how to install a draw straw, here is a write up on draw straw installation: http://www.cumminsforum.com/articles/articles/35/1/Vulcan-Draw-Straw-Installation/Page1.html After the draw straw is installed, and the proper fittings installed on the straw, get the fuel tank into position to be reinstalled. Next, it is time to mount the crank hub. This step is much easier to accomplish with two people. One person to keep the engine from turning over, while the other person loosens the 4 bolts that hold the harmonic balancer in place. Remove the bolts, and install the crank hub. Reinstall all 4 balancer bolts. After that, you can go ahead and install the crank pulley. (pic1) Next comes the pump mounting bracket. Remove the oil pan bolts at the very front and center of the oil pan. (oil will not come out) Install the mounting bracket using the (2) supplied allen head bolts. (pic2) Next, install the proper fittings to the pump itself. Minus the fuel line, your pump plumbing should be setup similar to this: (pic3) Now you can bolt the pump to the bracket. Now it's time to measure your fuel lines. Start with the pickup line at the draw straw, and follow the stock lines on the frame rail, and then go above the starter, under the VP44, over the steering box, and over to the Assassin. Be careful where you place your lines, and make sure steering linkage cannot harm the lines. Once that line is installed, now measure the other part of your feed line. From the "out" side of the Assassin, route your line back over the steering box and under the VP44, and go up to the filter housing. There you will connect your line to the supplied tee. Now remove the stock banjo bolt on the fuel line coming from the stock lift pump, going into the filter housing. Install the supplied male to male webber fitting in place of the banjo bolt, and then attach your 6AN 3/8" 90* fitting to the webber fitting, like pictured below: (pic4) Now comes the tee on the feed line, The feed line coming from the Assassin ends at a straight female push-loc hose fitting. That fitting attaches to the tee, and you have another female straight push-loc on the side of the tee, and then use a short piece of fuel line to connect the tee to the 90* push-loc on the fuel filter housing. The end of the tee is female, and the male regulator threads right in. On the end of the regulator you will attach the return line using a straight female push-loc fitting, and then the return line goes down to the frame rail. This picture was taken beside the VP44, facing toward the firewall: (pic5) The next step is collecting the return fuel, and returning it to the fuel tank. There are two ways to do this - I'll explain how mine is setup first. The return line begins at the back of the regulator, and comes down the firewall and then to the frame rail. On the frame I have a tee that the return line connects to, and the return fuel coming from the Assassin run straight through the tee. Now, up near the head, there is a factory tee that collects return fuel from the VP44, and the injector return. I cut the hard line right below that factory tee, and slipped a piece of 3/8" hose over it and clamped it. That 3/8" hose connects to the tee on the frame rail, and ties the VP/injector return with the Assassin return, and all the fuel goes back to the tank in one return line. Line 1 is the Assassin return; line 2 is stock return. (pic6) Here you can see where I tied into the stock return, and ran it into the tee: (pic7) (pic8) Option #2 for a return line setup: The draw straw has 3 ports on it - 1 for pickup, 2 for return. So you can run one return line for the Assassin only, and run a separate return line for stock return fuel. I have a suspicion that running a single return line puts some back pressure on the system, and causes slightly higher fuel pressure while under throttle. I might upgrade my return lines to option #2, and see if it brings down my top-end fuel pressure, but both setups work fine. Also, a threaded plug is included in the kit to plug the 3rd port on the draw straw if you decide to go with return line option #1. Once the fuel lines are completed, the fuel tank can be reinstalled. As far as disabling the stock lift pump, I just unplugged it, and left it there. Now it's time to prime. I used an electric drill, and the belt on the lift pump pulley to spin the pump and prime the system. (be sure you spin the pump the right way, so you're pulling fuel) I also pressurized the fuel tank with air, and after a few minutes of using the drill, fuel should reach the VP44, and then make sure the lines are buttoned up, install the belt properly, (crank pulley to lift pump pulley) and crank the truck until it starts. Sometimes this process takes an extra helper to either bleed the line at the VP44 while you're cranking the truck, and the injector lines might need bled. (pic9) (pic10) I will point out the one possible negative about installing this system. After taking out the oil pan bolts, and reinstalling them, a small oil leak has been created. Some people have trouble with that, and others don't have any trouble with oil leaking. But honestly, I'm not worried about it. This pump has been installed for 8 months, and has about 1,200 miles on it, and I think I lose more oil when I wipe the dipstick off, so it's not that big of a deal. I'm sure some good quality sealant, and properly torquing the pan bolts could fix the problem. Be sure there are no leaks, and the fuel system will stay primed, and the truck will start just as fast, if not faster than with an electric lift pump.
-
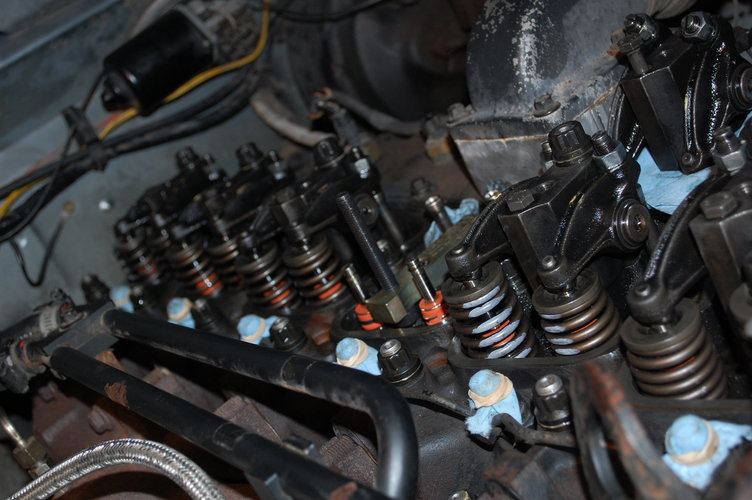
While I was changing valve springs, I also changed the valve seals while I was in there. I took some pictures along the way. (sideways)
-
I've already got all my pump work taken care of. A few posts up I mentioned my pump mods. I've already turned my power screw, and got a Hungry Diesel fuel pin. Denny T's are smokey pigs, and notice that deep cut... It allows the slide pin past the o-ring, and causes a fuel leak in the AFC. That deep cut also gives a lot of fuel down low, making it hot and smokey. Eric over at The Hungry Diesel designed his own pin, with a much smoother ramp, and is great for daily driving. For a while, the BD pin was "the best" for moderate power and good daily driving. Here's Eric's pin next the BD pin. http://www.cumminsforum.com/forum/89-93-performance-parts-discussion/1768089-thd-vs-bd-fuel-pin-side-side.html
-
Truck now has head studs and +60lb valve springs... I'm doing this build backwards... Power first, then all the other stuff later. The power bug bit me... I am going to try to build power the right way, and getting the necessary supporting mods done first. Currently putting 40+ miles a day on the truck, driving to work.
-
Awesome! Hopefully you get to jump on. Very curious to see what it makes with the same sticks.
-
I think it would be interesting to see a current dyno number. You made 500 twice, and the only major difference as far as power goes, would be the compounds. You did upgrade the TST though, so that might change it a little. Just to see how much more power it makes with more air, and then dyno again with new injectors.
-
I paid $1.93 on Wednesday, for diesel.
-
Don't mention CFM... I think he has you beat.
-
I'm a little late to the party, But........ Do you have any leftovers? Congratulations!
-
That smile though...
-
All 12 valves had the individual covers, including the '98 12 valves which still had the P7100. '98.5 is when they started using the 24V with the VP44, which had a single cover.
-
https://www.youtube.com/watch?v=oE2NbW4ADhU https://www.youtube.com/watch?v=plEEwp5OUq4 https://www.youtube.com/watch?v=8V8ec_0ET8k https://www.youtube.com/watch?v=dObRZK5ZKX4
-
I hear Trump wants to keep Obamacare...
-
Just poking my head in on this side of the fence... I been fallowing this on CF.
-
Wow, no updates in forever. Almost a year!! Last winter, I had a major facepalm, and somehow when I bought the truck, I overlooked the fact that the ..... Frame was bent, pretty bad. It was bent near the exhaust downpipe where there is a "natural" bend in the frame rail. During spring, I was either going to do a frame swap, or see if I could have it straightened for cheap, or scrap it and buy another. A shop was recommended to me, and I heard good things. Trailered it 2 hours to the shop. Truck sat there for 3 weeks, with nearly 20 phone calls asking for updates --- they couldn't fix it, and they told me to scrap it. (didn't charge me anything) I was lower than a snake's belly in a wagon rut. Co-worker told me about a shop about 45 minutes away. Went and talked, and let him look at the truck. The old gentlemen who had been in the frame business for 45 years told me if someone tells you it can't be fixed, they're not a real frame shop. That was during the summer, and $750 later, the frame was straight. Had to go back and have the trans cross member straighten, and new trans mount put in. $150. During all that time, I was still daily driving the truck to work, and it held the road better than a brand new truck, even with the bent frame. Very odd, but I was thankful. Throughout spring and summer, I started tweaking the VE. It now has: Pump tuned, The Hungry Diesel Fuel Pin, 3,200 RPM gov spring, Timing bump, HX35 turbo, BHAF, fuel pressure, boost and pyro on the pillar. I also killed the KDP. It now has a stock front bumper Recently took a 500 mile trip, and averaged 22.5 MPG. Just a quick update - I'll add pics and more details later.
-
Sorry I've been absent for a while. Guess I was just lazy... I'm computer dumb, and fought adblock for a while, but finally figured it out, but I was hanging out on Cummins Forum too, and never took the time to hop over here. I missed the family-friendly atmosphere.
-
Yes, the parts store (O'reilly) has all sizes, plugs and seals. I bought a package of seals from 12mm to 20mm, with nylon seals, and some kind of fiber seal. It's grey colored, and the parts guy recommended that over the nylon one. (they tend to snap if over tightened.