Jump to content
  • Welcome To Mopar1973Man.Com LLC

    We are a privately owned support forum for the Dodge Ram Cummins Diesels. All information is free to read for everyone. To interact or ask questions you must have a subscription plan to enable all other features beyond reading. Please go over to the Subscription Page and pick out a plan that fits you best. At any time you wish to cancel the subscription please go back over to the Subscription Page and hit the Cancel button and your subscription will be stopped. All subscriptions are auto-renewing. 

Heat Shield for the BHAF


Recommended Posts

  • Owner

In stock form without any injectors, tuners or fuel mods I was able to measure 1,400*F EGT's towing up a 7% grade. It was just a Chey 3/4 ton pickup on the trailer. Cruise set for 60 MPH.  When I noticed the temp I backed out and dropped a gear and kicked the RPM's up and it settled at 1,200*F the rest of the way. 


Yeah the factory air box is plastic...

Edited by Mopar1973Man
Link to comment
Share on other sites

Just now, Mopar1973Man said:

In stock form without any injectors, tuners or fuel mods I was able to measure 1,400*F EGT's towing up a 7% grade. It was just a Chey 3/4 ton pickup on the trailer. Cruise set for 60 MPH.  When I noticed the temp I backed out and dropped a gear and kicked the RPM's up and it settled at 1,200*F the rest of the way. 

So is that measuring the temp in inside the housing or outside?  I guess what would be good to know is if the temp of the actual housing there or the air inside of it.  I have a pyrometer for tires perhaps I can measure the turbo housing when it's all nice and hot.  Not sure how high it goes I'll have to see about that.


Link to comment
Share on other sites

  • Owner

Pyrometer typically is measuring the flame temperature inside. You could use a normal outdoor thermometer and measure the temperature around the BHAF. I know ISX did this long time again and typically without a heat shield, the temp was much more than +10*F over outside temp while rolling. Bein this is old information it might be worth testing again and seeing what you get for measurements as well.

  • Like 1
Link to comment
Share on other sites

39 minutes ago, Mopar1973Man said:

Pyrometer typically is measuring the flame temperature inside. You could use a normal outdoor thermometer and measure the temperature around the BHAF. I know ISX did this long time again and typically without a heat shield, the temp was much more than +10*F over outside temp while rolling. Bein this is old information it might be worth testing again and seeing what you get for measurements as well.

This is the one I have.  I think it goes up to 199 degrees but it doesn't say weather or not that's F or C so I sent them a inquiry to find out.


https://www.joesracing.com/i-21092094-joes-deluxe-racing-pyrometer.html


I'll look into measuring it somehow.  I like to measure stuff LOL


Edited by leety
Link to comment
Share on other sites

Just now, dripley said:

The description says it measures in C and F.

Correct, it does, I'm just not sure if the limit is in C or F based on the.


In the 4th detail tab the info is as follows:


DETAIL

OVERLOAD DISPLAY

The digital display will indicate 1 when the input exceeds the measurement range selected. A damaged probe will indicate 1 on the display.

If measuring above 199.9°  <<<<-----NOT SURE IF THIS IS F or C???

  • Thanks 1
Link to comment
Share on other sites

  • Staff

I made my heat shield setup from heat shield material used between the catalytic converter and car underside of MBZ I found in the salvage yard .  Cut it with a cutting wheel on an angle grinder, bent and screwed in to shape.  I drilled and mounted it to the studs that hold the air box in.IMG_5131.JPG.f2f33bb0a7a33f3ae2ccf797eb60c323.JPG  

  • Like 1
Link to comment
Share on other sites

1 minute ago, IBMobile said:

I made my heat shield setup from heat shield material used between the catalytic converter and car underside of MBZ I found in the salvage yard .  Cut it with a cutting wheel on an angle grinder, bent and screwed in to shape.  I drilled and mounted it to the studs that hold the air box in.IMG_5131.JPG.f2f33bb0a7a33f3ae2ccf797eb60c323.JPG  

Cool!  I think I saw that pix earlier while looking around here but I could never get back to it.  I was wondering what the build was on that.  Is that the stock air intake tube?  I have a K & N that's too long and I can't cut it becuase I have to put the K&N Costume back on to pass smog later :-) so I have to leave all those parts in tact so I can do the quick costume swap when smog time comes again.  California requires some trickery sometimes.  

Link to comment
Share on other sites

8 hours ago, leety said:

Correct, it does, I'm just not sure if the limit is in C or F based on the.


In the 4th detail tab the info is as follows:


DETAIL

OVERLOAD DISPLAY

The digital display will indicate 1 when the input exceeds the measurement range selected. A damaged probe will indicate 1 on the display.

If measuring above 199.9°  <<<<-----NOT SURE IF THIS IS F or C???

Ahh, I see. I just gave a quick look and saw the C and F. It says alot about measuring tire temp. I wonder how well it reads air temp? 

 Speaking for @IBMobile and myself, that is the stock intake tube. I have the same set up only without the heat sheild. Mine is not as pretty as the brand new.post-338-0-88651000-1441636017_thumb.jpg

  • Like 2
Link to comment
Share on other sites

1 hour ago, dripley said:

Ahh, I see. I just gave a quick look and saw the C and F. It says alot about measuring tire temp. I wonder how well it reads air temp? 

 Speaking for @IBMobile and myself, that is the stock intake tube. I have the same set up only without the heat sheild. Mine is not as pretty as the brand new.post-338-0-88651000-1441636017_thumb.jpg

I like that support widgit good idea.

Link to comment
Share on other sites

  • Owner
1 hour ago, dripley said:

Ahh, I see. I just gave a quick look and saw the C and F. It says alot about measuring tire temp. I wonder how well it reads air temp? 

 Speaking for @IBMobile and myself, that is the stock intake tube. I have the same set up only without the heat sheild. Mine is not as pretty as the brand new.post-338-0-88651000-1441636017_thumb.jpg


Looks like someone is due for filter change getting rather dirty looking...

  • Like 2
Link to comment
Share on other sites

1 minute ago, Mopar1973Man said:


Looks like someone is due for filter change getting rather dirty looking...

Yeah it has been in there for near three years. The white does not last long on mine. Hooked it up to good size shop vac a couple weeks ago to see if I could blow anything out of it and it still free flowed what ever air the vac was putting out. Like it was not on there. Still about time for another. The engine pulls a little more air than that vac puts out. Sarcasm intended.

  • Like 2
Link to comment
Share on other sites

  • 4 weeks later...

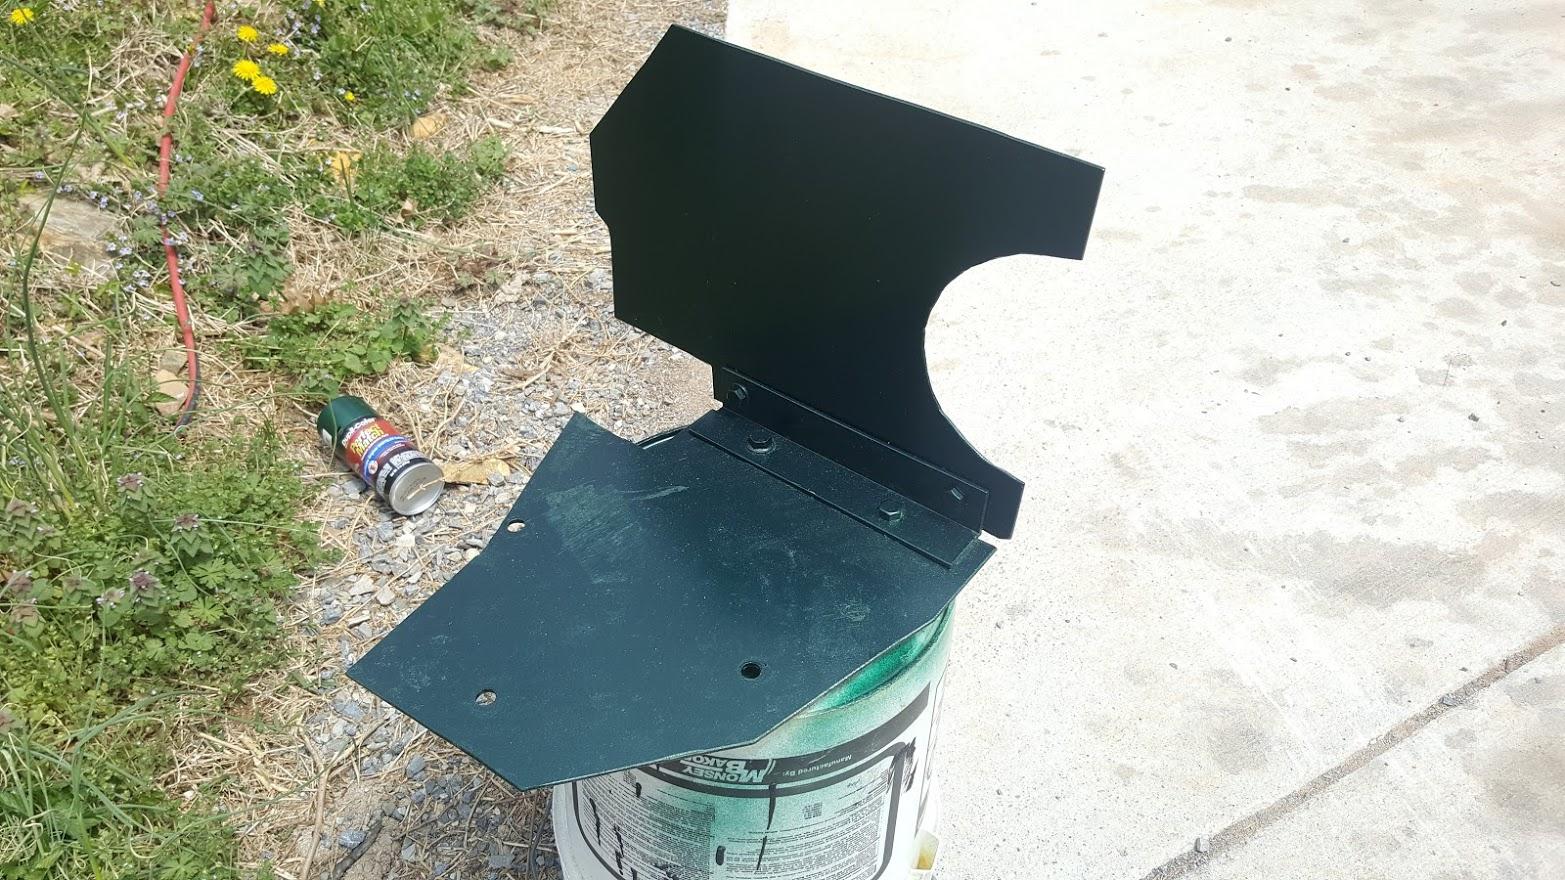
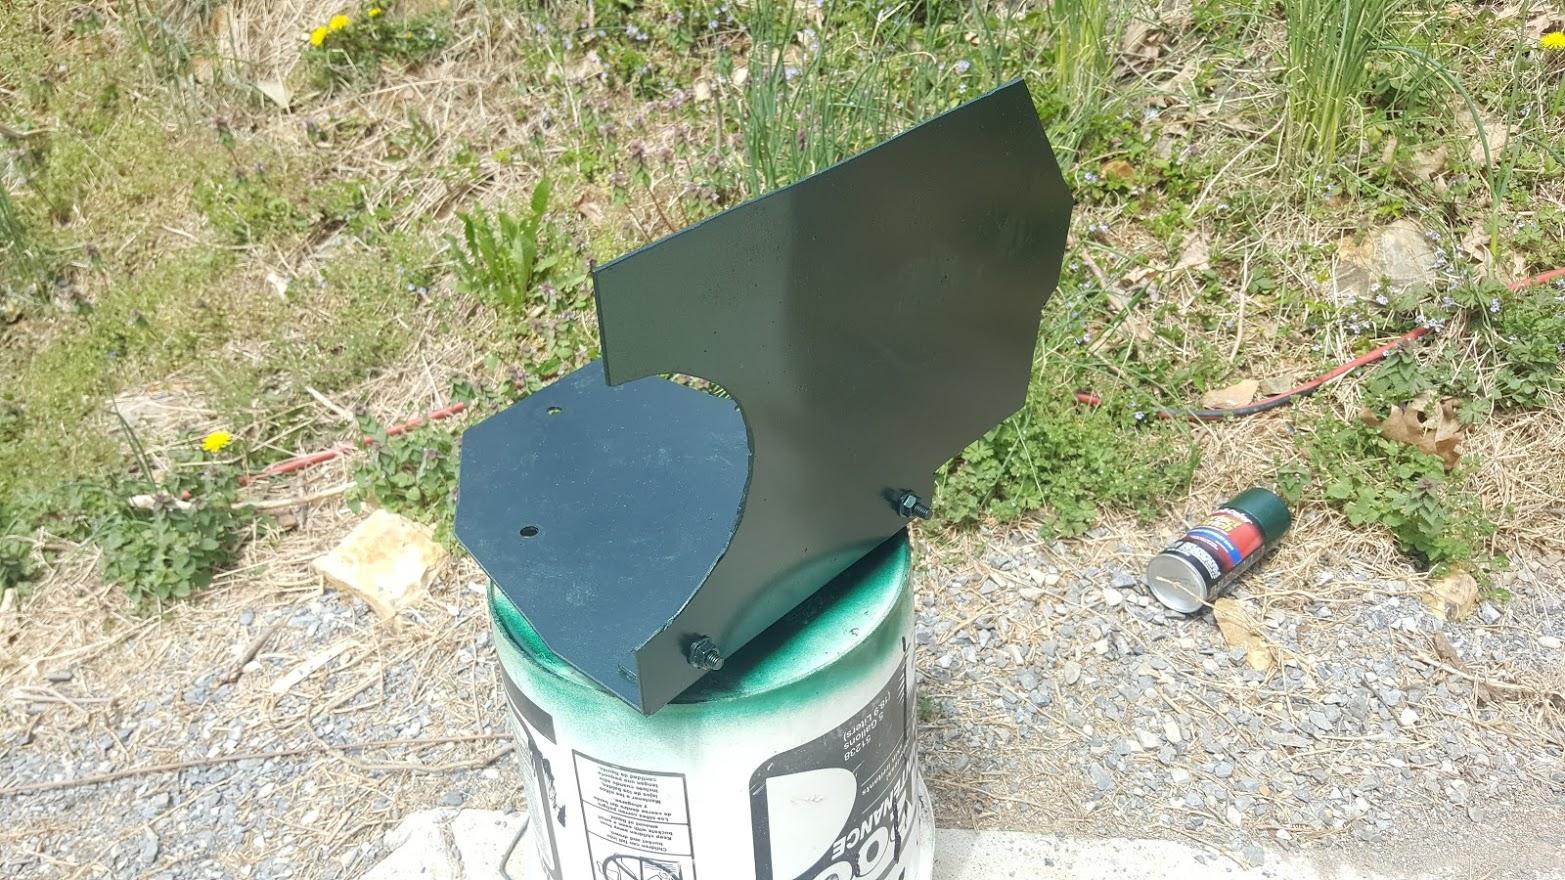
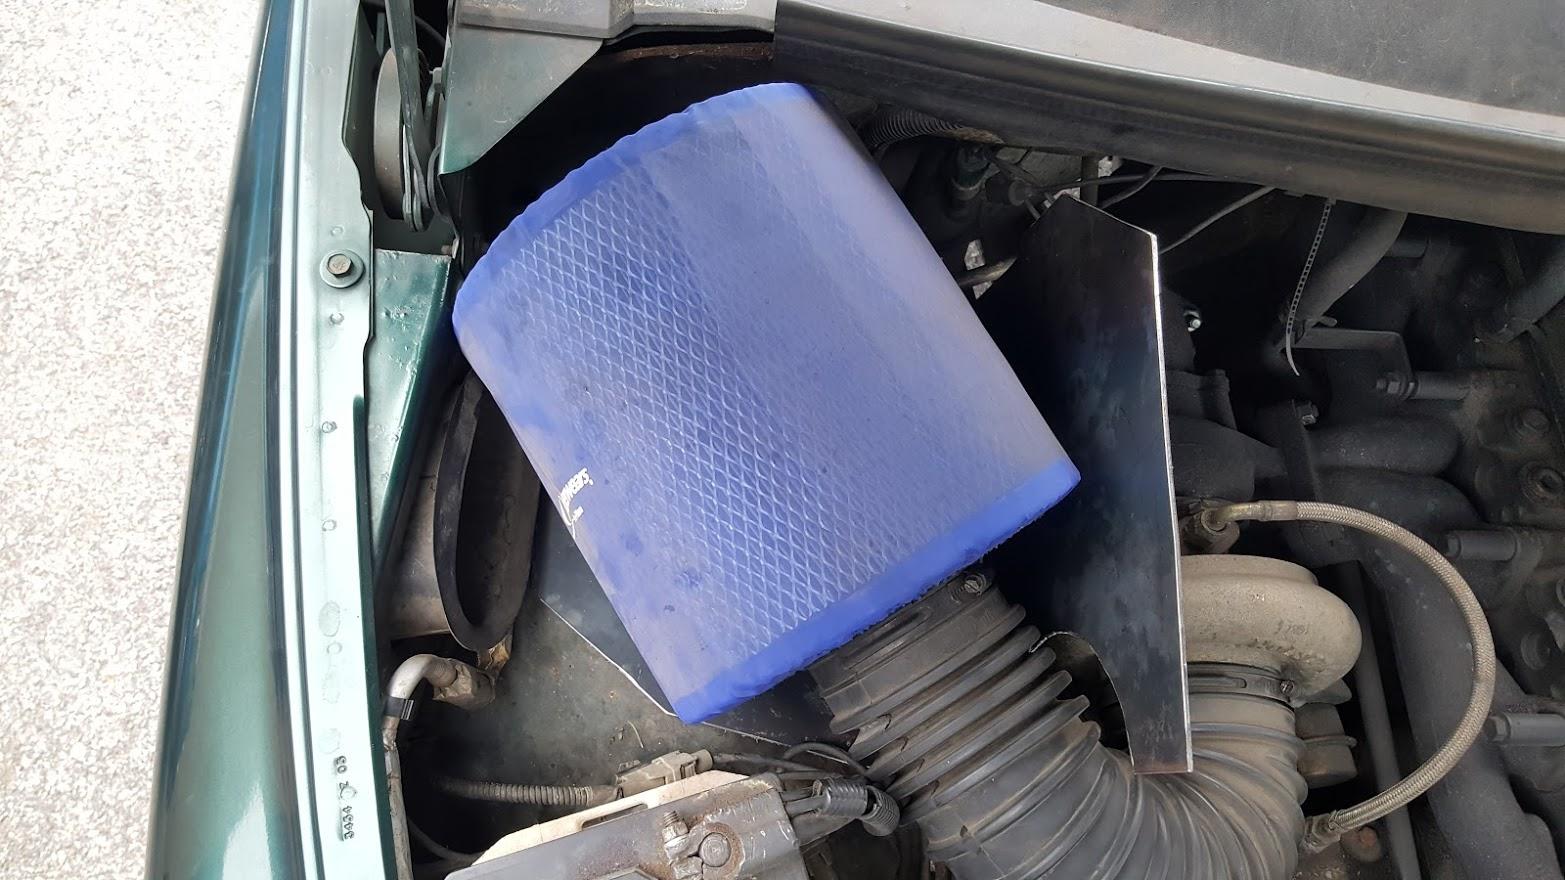
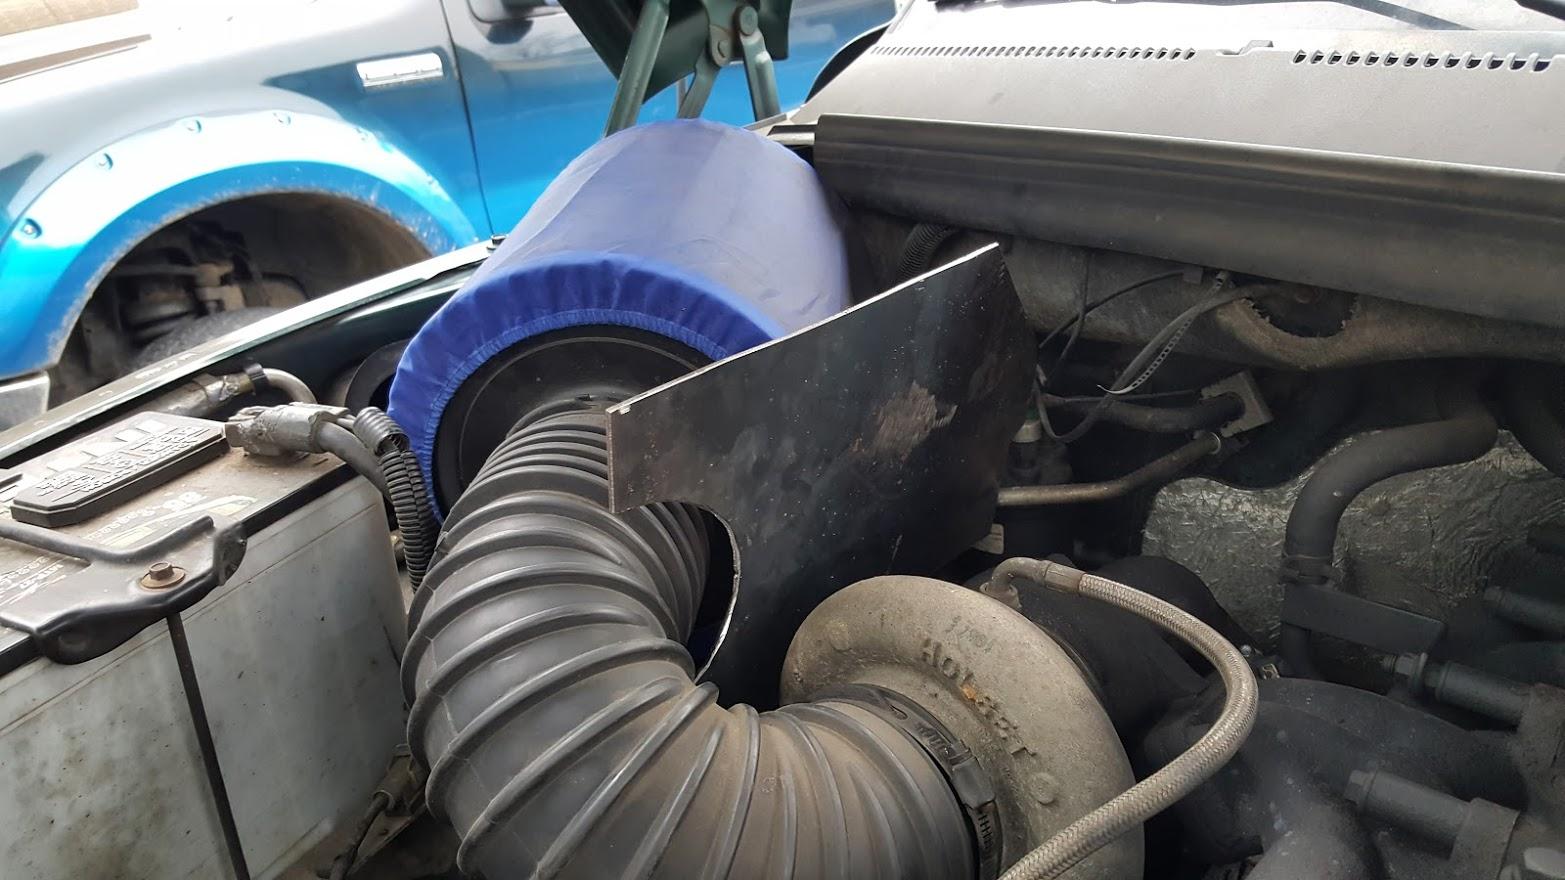
I have a first draft of this idea in place.  I'll probably redo it at some point this is a good start point for an experiment.  So far so good.


Any and all comments and/or suggestions on ways to improve this are more than welcome.


I need to swap out the bottom plate with a better piece.  This was just some stuff had around that I folded in half and taped up around the end for the test run.  If I use a larger trash can and make it taller I can but a rubber seal on the top of it.  I may use a larger trash can next time.  The fun thing about this fire resistant trash can is it won't light on fire with an open flame or react at all.  No blistering or any of that.  Just carbon from the flame built up on it an that just came right off with a paper towel.

IMG_7752.JPG

IMG_7753.JPG

IMG_7754.JPG

IMG_7755.JPG

IMG_7756.JPG

Edited by leety
  • Like 2
Link to comment
Share on other sites

14 hours ago, leety said:

I have a first draft of this idea in place.  I'll probably redo it at some point this is a good start point for an experiment.  So far so good.


Any and all comments and/or suggestions on ways to improve this are more than welcome.


I need to swap out the bottom plate with a better piece.  This was just some stuff had around that I folded in half and taped up around the end for the test run.  If I use a larger trash can and make it taller I can but a rubber seal on the top of it.  I may use a larger trash can next time.  The fun thing about this fire resistant trash can is it won't light on fire with an open flame or react at all.  No blistering or any of that.  Just carbon from the flame built up on it an that just came right off with a paper towel.

IMG_7752.JPG

IMG_7753.JPG

IMG_7754.JPG

IMG_7755.JPG

IMG_7756.JPG


Looks great Leety!!!!!


I like that idea!


The fire resistant can plus aluminum heat shield on it and I would say you're good to go. 


My sled has aluminum heat tape on the inside of the belly pan by the exhuast and that keeps it from melting. 


I installed my BHAF wednesday. I just put it in and didn't worry about a heat shield yet. 


A little note. 


The mounting fasteners off the stock air box make great mounting points for the filter. 


Ripped the box out (literally). Sawzalled the pucks off the bottom of the airbox. Put those and the inside part over the fender screws. Ta da. 


  • Like 1
Link to comment
Share on other sites

3 hours ago, Ben said:


Looks great Leety!!!!!


I like that idea!


The fire resistant can plus aluminum heat shield on it and I would say you're good to go. 


My sled has aluminum heat tape on the inside of the belly pan by the exhuast and that keeps it from melting. 


I installed my BHAF wednesday. I just put it in and didn't worry about a heat shield yet. 


A little note. 


The mounting fasteners off the stock air box make great mounting points for the filter. 


Ripped the box out (literally). Sawzalled the pucks off the bottom of the airbox. Put those and the inside part over the fender screws. Ta da. 


Yea the stock air box was not in the truck when I got it.  I have a little rubber cap over an acorn nut on the nut closest to the battery.  The's already a small dent in the metal cage.  I'll have to do something about that soon.  Probably just an aluminum strap to cover the nut or something like that.  There needs to be more surface area on that contact point for sure.  The bottom plate will at some point be replaced with a thicker piece of aluminum as well, that gorilla tape is annoying me.

Link to comment
Share on other sites

I agree Leety. 


The stock studs are no go for resting the filter on. 


The original air box grommets were just a touch bigger than the metal on the outside of the filter. 


On my old truck when I ran an Amsoil filter for a bit I made a filter frame out of aluminum stock like @dripleydid. 


Edited by Ben
  • Like 1
Link to comment
Share on other sites

1 minute ago, Ben said:

I agree Leety. 


The stock studs are no go for resting the filter on. 


The original air box grommets were just a touch bigger than the metal on the outside of the filter. 


On my old truck when I ran an Amsoil filter for a bit I made a filter frame out of aluminum stock like @dripleydid. 


No doubt that's gonna happen soon. I have the strip of aluminum waiting.  I just have to get to fabbing it and having a nice spot for the filter to rest.  That's on the short list.

  • Like 1
Link to comment
Share on other sites

2 hours ago, leety said:

No doubt that's gonna happen soon. I have the strip of aluminum waiting.  I just have to get to fabbing it and having a nice spot for the filter to rest.  That's on the short list.

I want to see your widget, in the most polite way you can show it.

  • Haha 1
Link to comment
Share on other sites

×
×
  • Create New...