Jump to content
  • Welcome To Mopar1973Man.Com LLC

    We are a privately owned support forum for the Dodge Ram Cummins Diesels. All information is free to read for everyone. To interact or ask questions you must have a subscription plan to enable all other features beyond reading. Please go over to the Subscription Page and pick out a plan that fits you best. At any time you wish to cancel the subscription please go back over to the Subscription Page and hit the Cancel button and your subscription will be stopped. All subscriptions are auto-renewing. 

mystery wire


Recommended Posts

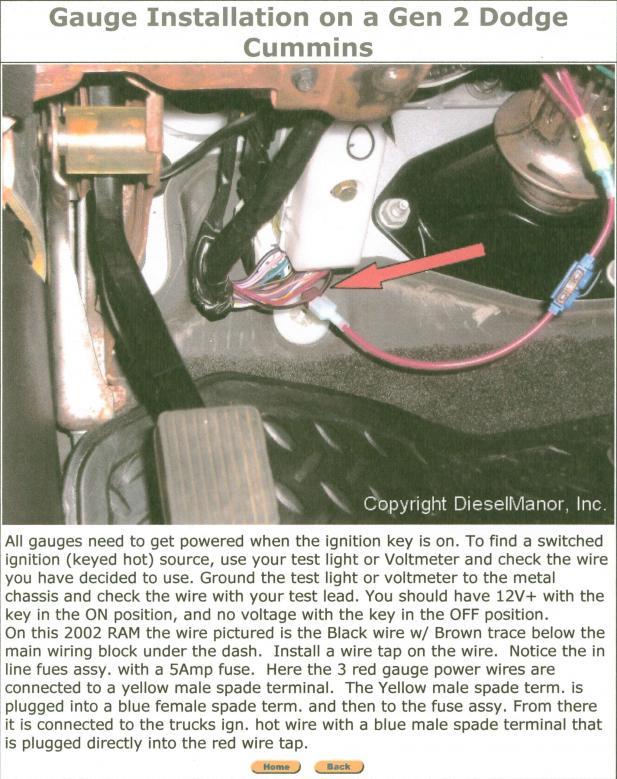
Hi guys newbie here,My pyrometer gauge stopped working and through my check I found the wire I tapped according to diesel manor install instructions lost power.All fuses check out O.K. Everything appears to work also.But I'm concerned this wire does something somewhere and I don't want a problem.According to the wiring diagram in the manual I downloaded from this site the wire is black/red but the wire is clearly black and tan.Any help with this would be appreciated.I'll attach a picture from the install instruction.post-11336-138698181082_thumb.jpg

Link to comment
Share on other sites

So that black and tan wire no longer has power but it did before? What does that wire go to? Did you check before you hooked your pyro to it? If not then you definitely should have since just because a wire is a hot lead does not mean its capable of sustaining any more load than it currently is set for. The correct way to hook up your gauges is to run leads into the fuse box on the left of the dash and then locate a strong hot lead which gets little to no use like the 12 volt power point or the cigarette lighter. I believe both of those are 20 amp fuse hot leads. Also using wire taps like you have pictured are garbage and can easily result in a loss in connection. You only find them in kits because they're easy. So I'd suggest you make sure your grounds are fine, your connections are fine, and see where that wire leads.....or if its no longer hot then find out whats no longer working because you overloaded the wire and possibly popped a fuse.

Link to comment
Share on other sites

No I did not check where it went to I trusted the diagram as shown by the reputable company diesel manor and there suggested way to hook up that particular gauge.If I knew where that wire went to I wouldn't be posting "mystery wire" and asking for help on what it does.I didn't run the wire taps as shown I soldered them in, that picture is the one from diesel manors website on gauge installation.Your last sentence is exactly what I'm asking I can't find anything not working and I was hoping someone ran into this issue.I purchased autometer gauges and installed as per instructed.I didn't go out on a limb and search for a hot wire.p.s.I was an industrial electrician apprentice before I got my millwright ticket.

Link to comment
Share on other sites

No I did not check where it went to I trusted the diagram as shown by the reputable company diesel manor and there suggested way to hook up that particular gauge.If I knew where that wire went to I wouldn't be posting "mystery wire" and asking for help on what it does.I didn't run the wire taps as shown I soldered them in, that picture is the one from diesel manors website on gauge installation.Your last sentence is exactly what I'm asking I can't find anything not working and I was hoping someone ran into this issue.I purchased autometer gauges and installed as per instructed.I didn't go out on a limb and search for a hot wire. p.s.I was an industrial electrician apprentice before I got my millwright ticket.

Sorry to sound offensive if that's how I came across. Its not only difficult to send the right expression through the Internet but its also more common than not that someone isn't an electrician apprentice and is looking for one line answers for their lack of knowledge. I'm sure I thought you were less than skilled since you called yourself a newbie. :) But it clearly sounds like you have enough smarts to get through this. If you're positive that there is no longer power running though that black and tan wire then, have you checked every fuse in both the dash panel and the underhood fuse box? It could be something stupid like your horn wire since it also has a 20a fuse. And did the instructions say black/red and you used black/tan only because you couldn't find a black/red? What aftermarket manufacture gave you the instructions? I'd like to see if there's an online version.
Link to comment
Share on other sites

The diagram on the original post is from the diesel manor website under gauge install instructions if you click the diagram it gets large enough to read they wanted it installed on the black and tan wire.I traced the wire in the manual wiring diagram right down to tha actual plug under the dash and the manual says that particular wire in that location should be black and red.If you go to www.dieselmanor.com you can see the original install diagram along with many other installs on common diesel upgrades too.Reasonable prices and good to deal with also. I just went out and checked the horn for curiousity sake and it worked.I took a test light originally before first post and went through every fuse all appears ok. Being a switched power I'm curious if my ignition is starting to fail as I read occasional posts on this. I did find the black and red wire in the manual wiring diagram at that location was for "premium sound system" thats all it says.I believe I have that but everything still works. Thanks for your reply and your interest.I apoligize for being on high defense.

Link to comment
Share on other sites

OK..... I read what I could find on the website regarding your gauge installation and this is what I got out of it. These two links below are probably what you read too since one looks exactly like your posted picture. And if you read them again, you'll see that they are very general in the sense that they aren't telling you anything "specific" except that you need to find a ignition switchable 12v source. On the 2002 pictured, the wire THEY chose just happens to be a black/brown. They're never indicating that you HAVE to use that specific wire, so as per the instructions we know nothing about that wire or where it goes but only that its a keyed source. Its not terribly uncommon for wire colors to not match others of the same year and model. So that brings us back to your problem. We know nothing about your wire and you may have chosen a wire that isn't capable of any additional load or that you simply have a bad connection. If you cant find ANYTHING that no longer works and you're positive that the dash wire no longer has power running through it then I'm not sure what to tell you. Just grasping for possibles here but maybe your ground isn't as good as you think? Not sure but I'd think that back tracing with a test light would eventually lead you to the problem. And, I didn't think you were being defensive either. :)http://www.dieselmanor.com/diy/CMS-G2gauges/G2image20.htm http://www.dieselmanor.com/diy/CMS-G2gauges/G2image19.htm

Link to comment
Share on other sites

Today was a little cooler than normal.My truck wouldn't just start right up as usual.I noticed on the intake heater there are black and tan on the solenoids that activate the fuel heater.It might have just been a flook but I'll know soon.Food for thought.When I probe the black and tan reverse polarity meaning positive on the clip of the test light and probe the wire I get a dim light.This means either its grounding out or going through a coil or solenoid or something.

Link to comment
Share on other sites

Today was a little cooler than normal.My truck wouldn't just start right up as usual.I noticed on the intake heater there are black and tan on the solenoids that activate the fuel heater.It might have just been a flook but I'll know soon. Food for thought.When I probe the black and tan reverse polarity meaning positive on the clip of the test light and probe the wire I get a dim light.This means either its grounding out or going through a coil or solenoid or something.

If you think you have grid heater issues then take a look at this link: http://dodgeram.org/tech/dsl/troubleshooting/Maniford_htr.htm#basics
  • Like 1
Link to comment
Share on other sites

Problems again starting this morning,Check grid heater all okay.Found fuel line leak fuel pressure won't hold.Before the lift pump must be sucking air.Time for a raptor 100.I see you have one.Do they all come with the big line kit?Easy instal?Are you happy with it?I figure if Im gonna do fuel lines I might as well do the pump Iwas gettin do.My fuel pressure was around 11 at cruise and I couldn't tromp on it because it could go down below 7psi.Then I can get back to my wiring issue.

Link to comment
Share on other sites

Here are my :2cents:.
Dothey all come with the big line kit? NO. Purchase it from a Diesel shop. Better warranty than if you purchase off of EBAY. If you purchase off of EBAY it is usually just the pump. When you say "big line kit" if your talking about the line from the vp to the fuel filter that is extra! Easy instal? Install is easy. Easy to follow instructions. Are you happy with it? I am with mine!

  • Like 1
Link to comment
Share on other sites

I purchased my Raptor directly from Pureflow but any reputable vendor will have the same kit.....or should. The "big line kit" and the big fuel line are two different things. The kit should come with a 1/2" or 3/8" fuel line (depending on what you prefer) which will supply you with all the fuel line you need from the tank to the fuel filter. The kits will NOT include anything to run from the fuel filter to the VP. If you want (and you should) to have ALL fuel lines and fittings match from tank to VP then you need to purchase the "big line kit" which I think is around $40. That kit will include more fuel line and the necessary JIC fittings between fuel filter and VP. The 100 kit will also come with the OEM fuel tank module quick connect fitting. Just know ahead of time that this fitting is very difficult to get to and can be the biggest pain in the whole installation process. Word of advice though.....DO NOT cut, tug, jam, rip, tear, or any such action when trying to get this fitting to disconnect the OEM fuel line from the fuel module. If you mess up the fuel module fitting then you will guarantee a leak. I actually loosened my tank straps and lowered it about 6" and was able to squeeze up along side it, next to the driveshaft and get a better look. It will come apart, if you're patient. :)

  • Like 1
Link to comment
Share on other sites

thats the kinda info that people need to know.When I talked to thoroughbred today he had the raptor on his own truck but didn't have the line going from filter to vp didn't dwell on it either. Thanx

I'm not sure why more people dont understand why its necessary to have the "big line kit" too. Just using the most basic rule of thumb for flow and volume..... Air or fluid can not flow anymore than the smallest or most restrictive portion of whatever its traveling though. This means that, yes, the supply line is gaining the advantage of the 1/2" aftermarket fuel line volume but is then being restricted again by the OEM banjo fittings and 5/16" metal fuel line from the fuel filter to the VP. Then some will say that as long as you leave the OEM quick connect fitting at the tank then its all a mute point. Well not so because that fitting is pre the fuel pump and as long as the fuel pump is capable of fully supplying the 1/2" line during the demand of the engine without a significant pressure drop then the 1/2" line will contain enough volume to offset that difference. This is why, if your fuel pressure drop from idle to WOT is to great and you have full 1/2" line from the tank to the VP then you need to upgrade to a drawstraw which will equalize the pickup size and the fuel line. If you're still having issues then you need to upgrade to higher volume fuel pump, but since the 100 is capable of sustaining 500 HP, most guys "should" be just fine.
Link to comment
Share on other sites

if you install the full AD or fass they come with fuel filters and alot of folks do by pass the oe fuel cansiter and connect straight to the vp. that is how my intsructions told me to do it. some may install a raptor and a fuel filter head and by pass it also. i for one installed the ADII and went thru the oe canster but did install the big line kit from vulcan.i tapped my fp gauge into this line. i also wanted to keep a tap open at the vp so i could hook up my test gague in case there was any question as to the accuracy of my fp gauge. not saying this is the best way to go. i am just saying there is more than one way to skin a cat or in this case feed a vp.

Link to comment
Share on other sites

  • Owner

thats the kinda info that people need to know.When I talked to thoroughbred today he had the raptor on his own truck but didn't have the line going from filter to vp didn't dwell on it either. Thanx

Here is a article from RamForum that I did for Dave. http://www.ramforum.com/f69/fuel-psi-10066/ Before...

Idle is 20psi cruising 17-18psi Now WOT 9-10 .. WTF ?

After...

Big line kit is on ... now 1/2 inch lines are all complete . WOT drops 1-2psi , not the 5-6 and I installed a needle valve off the VP to the PSI sensor on my display so it does not hammer .

Link to comment
Share on other sites

×
×
  • Create New...