
Mace
Monthly Subscription
-
Joined
-
Last visited
Everything posted by Mace
-
Well I think I’ll remove it and see if I can find a similar one from maybe a later model Ram and see if I can make it work. If I do I’ll post which one I used. Yes, it’s held on with 1 screw, easy. There’s a harness coming out of my latch on the driver buckle. 2 wire with a connector.
-
I’ve been killing some gremlins in my truck lately and this is the last one. I’ve had the 3 horn honk when unlocking the door with my fob for the last 15 years that I solved by wrapping the ctm in foil tape…this blows my mind. $6 from Home Depot. Unbelievable. The last is my driver side seatbelt latch switch is i think the issue. The dash light stays on but if I wiggle the latch just right it stays off. I think the switch contacts inside is worn out. Has anyone found a seatbelt latch that’ll work (they’re discontinued) or is the switch serviceable?
-
If you want to refill coolant properly use a vacuum tool such as Snap-On sells. If your cooling system is in a vacuum coolant will enter every crevice where the vacuum is, hence no air pockets. This is the only way we do it at Freightliner as air pockets can develop (such like in a egr cooler) that don’t necessarily burp out right away.
-
You betcha!
-
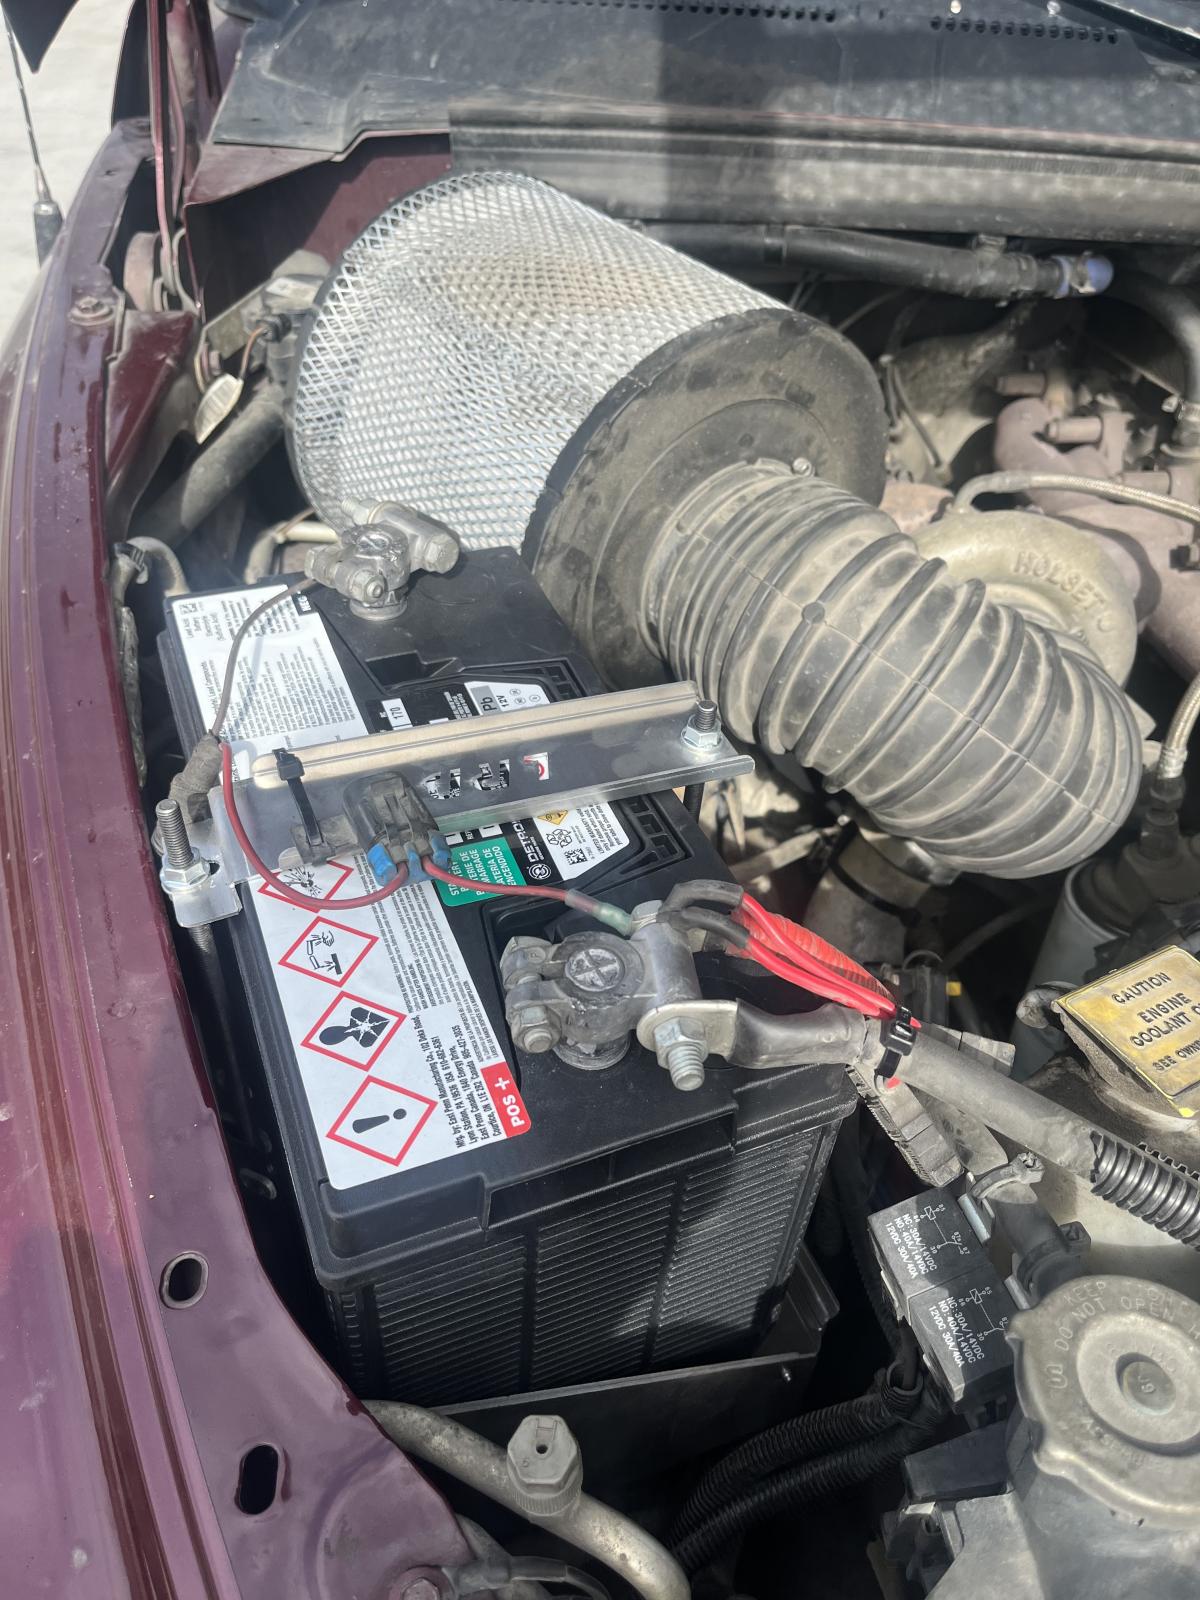
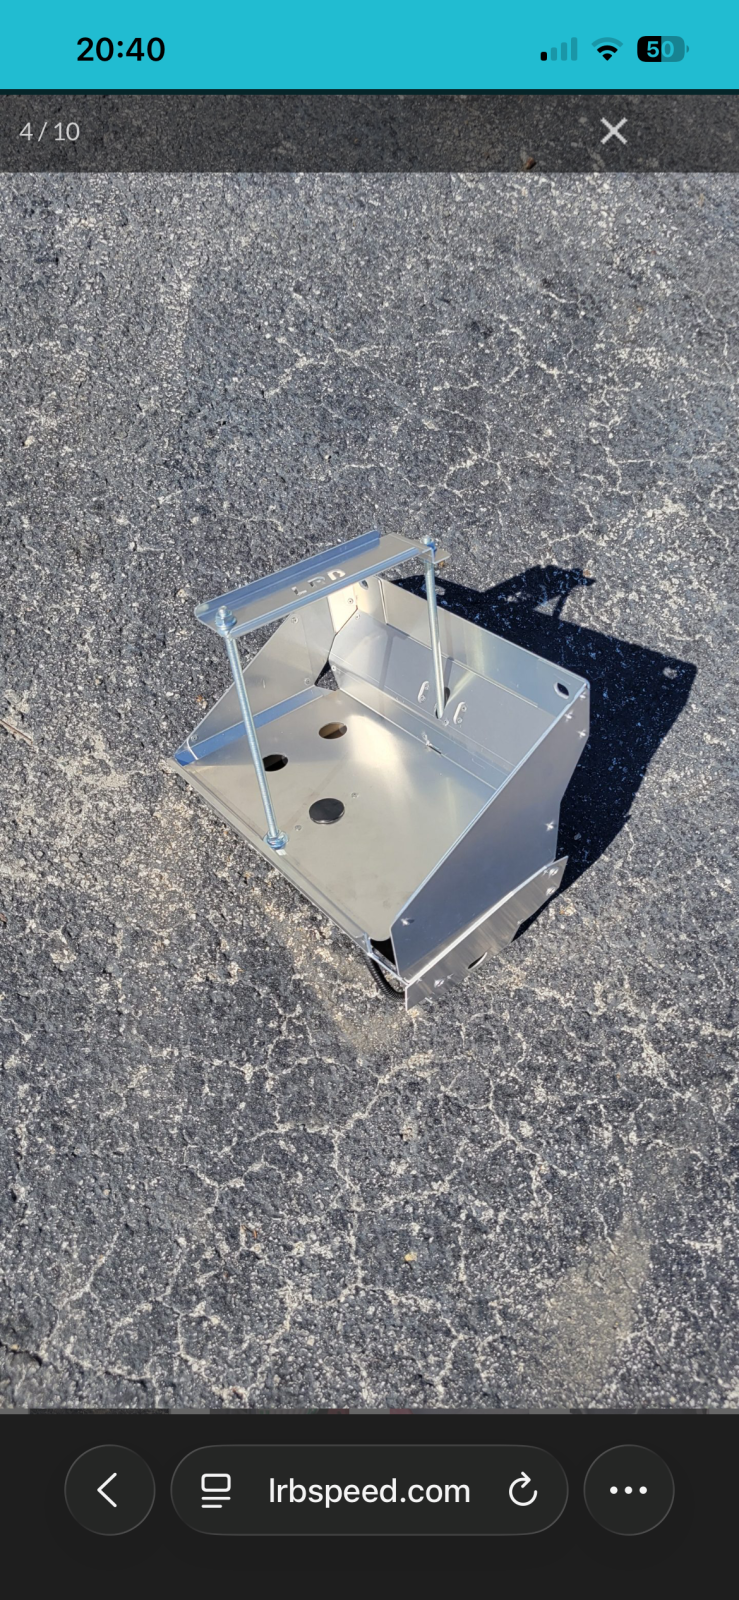
I read an article here about modifying our existing battery trays to accommodate 31’s. I pondered it but I decided to go another, more expensive route for some reason. LRB Speed makes “put together yourself” aluminum ones for $400. I run 925 CCA Detroit Diesel batteries (from my work) and I’m pretty happy. They’re made well and even a proper spot for the temp sensor on the driver side tray. I had to relocate my horns but other then that they fit and lined up great. With my Nations 180 amp alternator I feel it’s a good combo. My old 27’s were 750 CCA if I remember correctly. This will help with running my Webasto coolant heater I have as well running in cold mornings. Enjoy!
-
I’m absolutely gonna get a air ride hitch and convert the trailer for gooseneck. When I do tow it I’m gonna convert the back to dually as it will put less stress on just two tires. That’s why I want 3 axle not 2. Distribute the weight better.
-
I think it’s 3k pin weight. I’ve seen one truck the same as mine (still a dually) do it from La to NC. It’s doable. I have a trailer brake controller, exhaust brake, 3rd gen brakes and a 6 spd. That’s just the trailer. I’ll never haul it loaded with water or anything. It’ll be overweight for sure but a Dana 80 can do it. That’s the only thing I think is somewhat weak on our trucks is the frame. If I could sit my cab on a F450 frame I’d be so happy.
-
I have the 6 spd so I’m not changing anything that way. I’m buying a new 3 axle toyhauler that’s about 44’ long and 16k lbs. I’m gonna buy some extended Synergy rear sway bar links and the Timbrens as well just to make it as bullet proof as possible. I actually ended up reusing the oem blocks so I could use Timbrens, the taper is too excessive and no matter how you install it the pinion angle is too far off. That’s a mistake on my end I though it would correct this. The oem blocks made everything perfect again. Most likely crack the frame but the springs should be fine :)
-
And this is why I went to a flange.
-
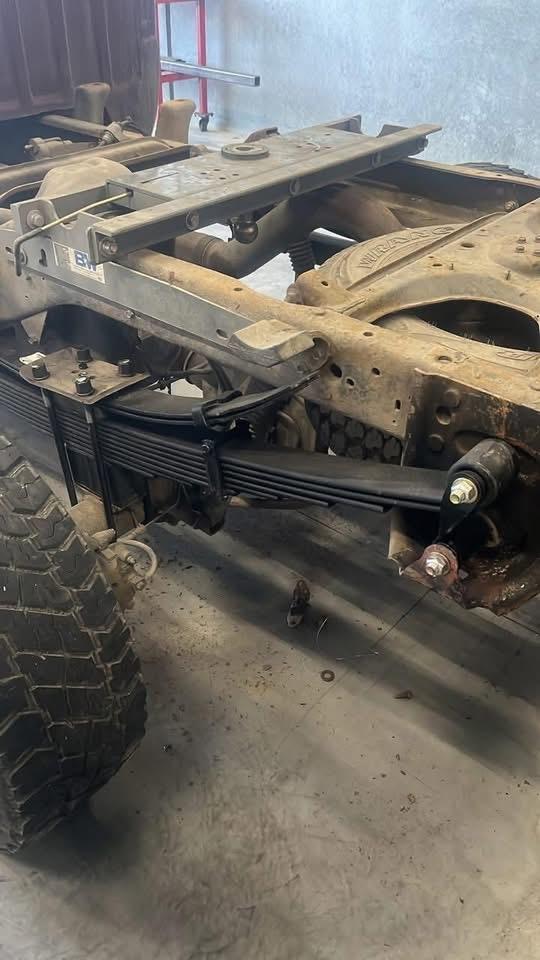
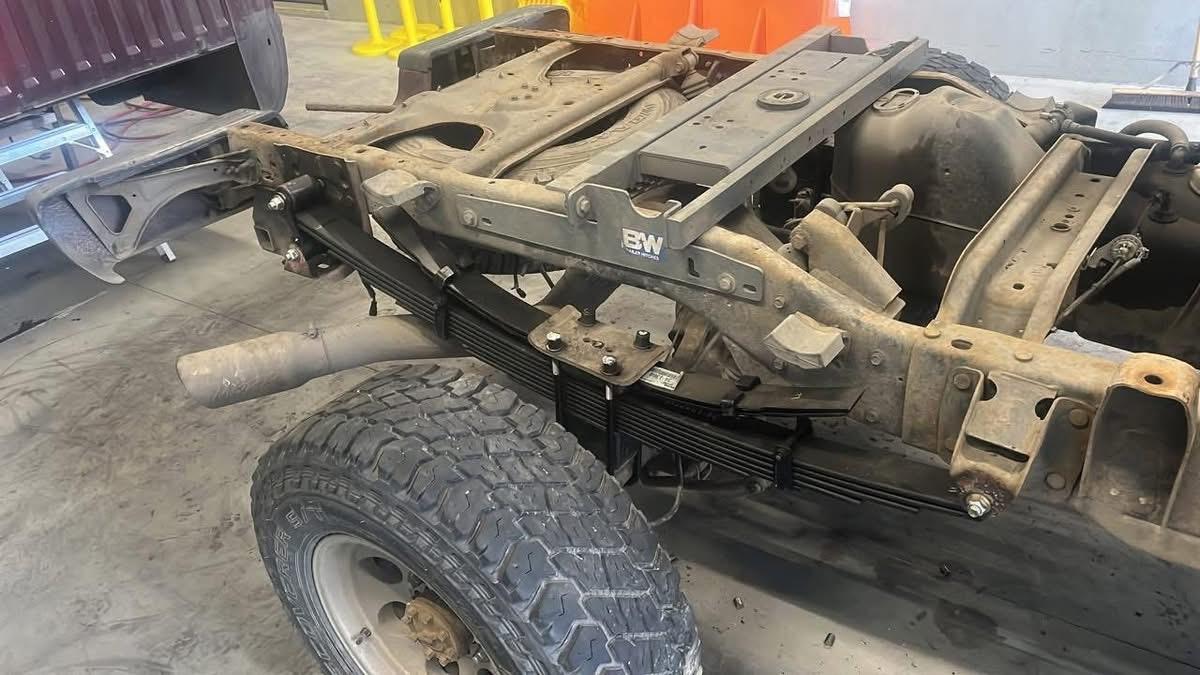
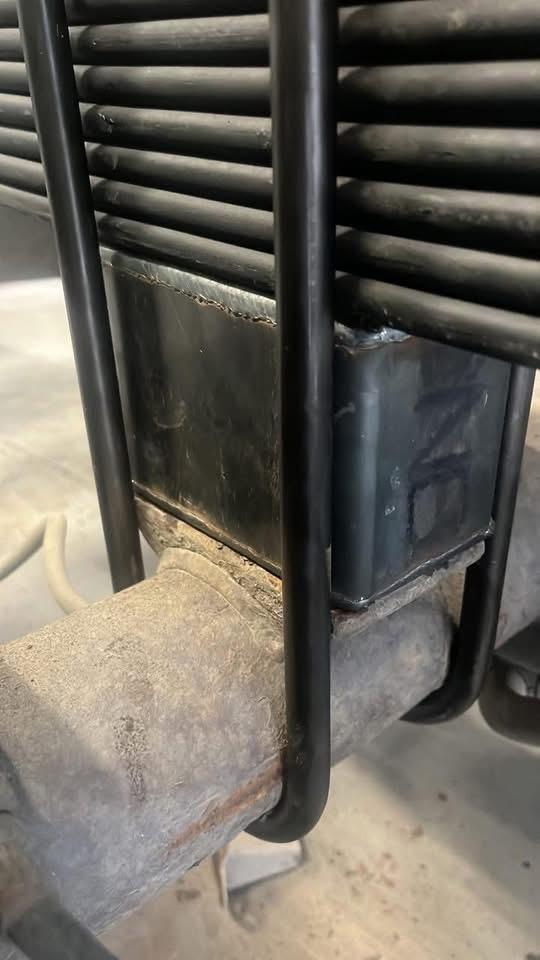
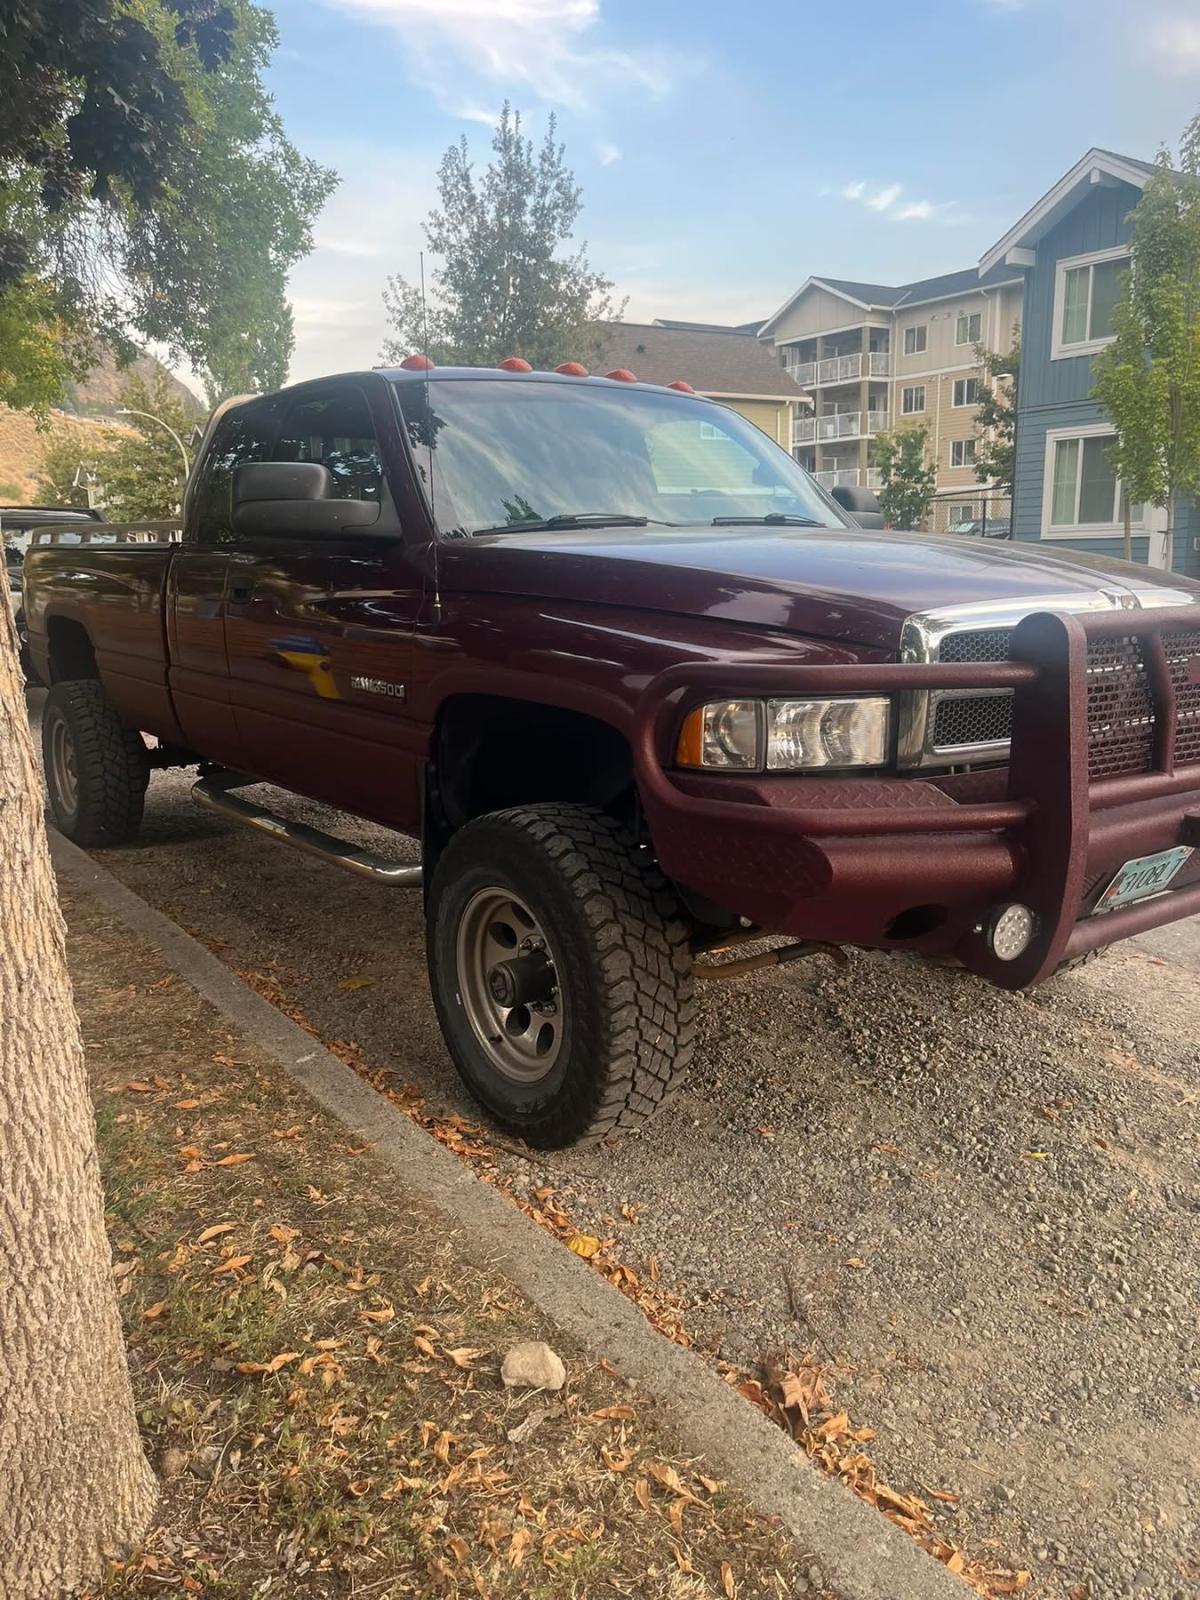
It’s time to “spring” into action! 8 leaf 4000 lb pack 2 leaf 1150 lb overloads New shackles (All from Rockauto) I used 4” blocks from ProForm Fabrication (they’re also tapered to get the pinion angle straight too). I didn’t want the *** end to sit up super duper high so to compensate for the thicker pack I used slightly shorter blocks (my oem blocks are 4.5” tall). Old leaf pack is 2” thick and the new ones are 3-9/16“. The bolt by the fuel tank is not really an issue. Just cut it off flush with the hanger and you can drive it all the way in without hitting the tank. You can fish it out with a magnet and then put the new bolt in from the outside. I used locally made 5/8” ubolts and my old Barnes4wd top plates to keep the flip. For the eyelets I used 5/8”x 5” fine thread bolts with stover nuts. Removed the old bump stops since they do nothing now. My truck is a 2001, so it’s time for new springs. I can’t use airbags because unless it’s the c&c kit my gooseneck hitch interferes with the mounting plates. Also the c&c kit sits on the oem block pedestals and I don’t have those anymore now. Next up: Rebuilt NV5600 & clutch from LRG. Enjoy!
-
Timbo is a repackaged Williams Control. WC 131973/133284 is what they actually are.
-
Then I may be interested. If you know a tune that’ll make it run better I’m all ears.
-
I’m sure there’s a lot of trucks with more miles than me. I’m pretty happy with 25 years. Even if it dies tomorrow I’m pleased it went this long. I’m also sure things like the VP are built better today then when they came out.
-
I had the oem lift pump (in conjunction with the GDP Fuel Boss) until my ecm failed earlier this year. Now I’m rocking just an Airdog 100. I’m too nervous to program my truck just in the case the tuner fails and takes something else out. Although I’m curious to see it “woken up”. New trucks leave me in the dust and I’ve accepted it haha.
-
Luck mostly. We didn’t actually have to change over to ULSD for a couple years when it was introduced. When it was finally forced I ran used 15w40 (just the stuff from my oil changes) with every fill up (switched to 2 stroke oil after reading your article on it). Also, I never had the Carter lift pump fail like so many did in the beginning. By the time I switch it to the GDP Fuel Boss it just wouldn’t die. Also I have never run a tune either. I have Bosch 40 hp injectors but power wise it’s stock. That’s the key thing. P7100 are oil lubed and VP’s are with fuel. So mostly just luck.
-
I’m on my original rad @ 442k km. I change the coolant every 2 years with Cummins ELC. I wish these engines had a spin on water filter head like the 8.3 has (built into the engine). I’m also on my original VP44…ask me the secret to that ;)
-
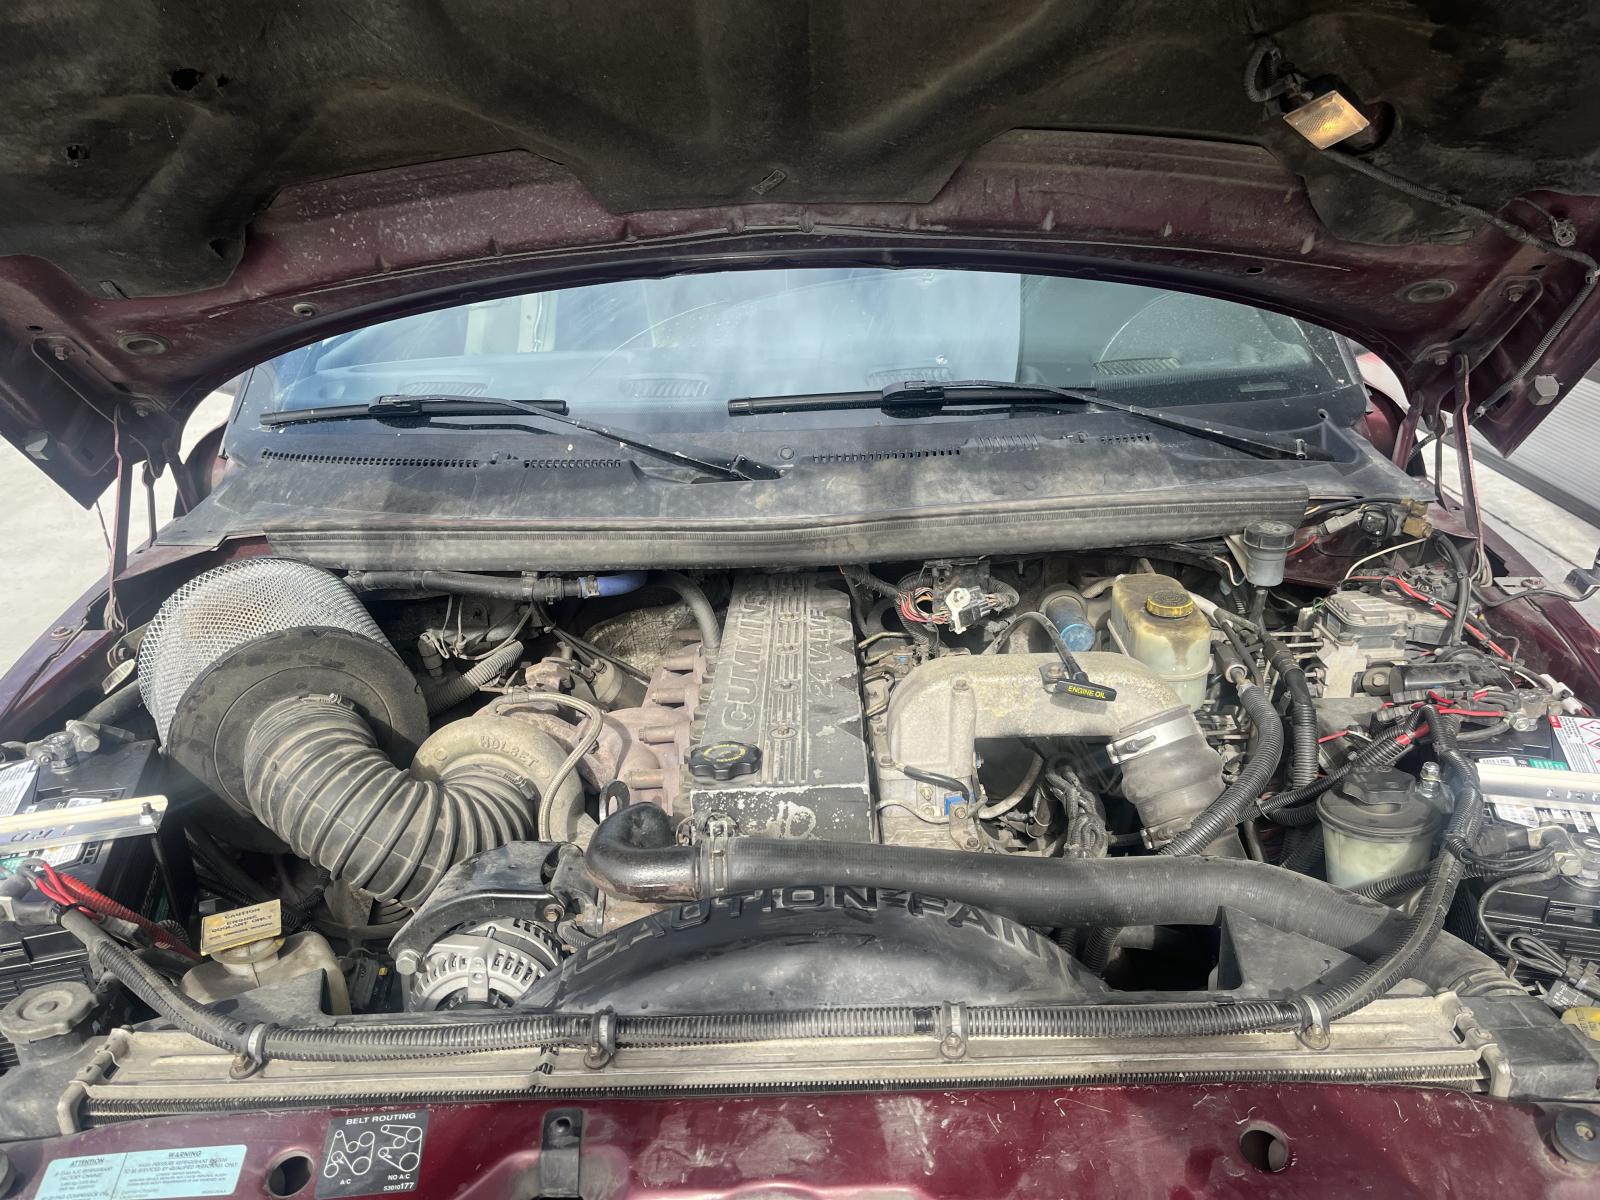
Electric Vacuum Pump Conversion: I have deleted my OEM vacuum and power steering pump(s). Instead, I have modified it by replacing it with a midrange setup for steering assist; however, I still need vacuum in order to activate the HVAC controls and to activate my exhaust brake. Although the OEM factory pump never gave me any issues and supplied all the vacuum I needed to work, such as the HVAC and the exhaust brake, the OEM Power Steering did. I have replaced the OEM Power Steering Pump multiple times. In all cases, the pump would not maintain enough pressure and turning the wheels at a stop during idle was almost impossible. Compound that with the inevitable oil leak between both pumps, I figured there was a better system. So, this is where the "midrange" setup comes into play. The 24V ISB was used in multiple applications (not just Dodge). Even though they were not used in another pickup, they were used in midrange sized trucks like Freightliner FL60 &FL80, Ford 650 & 750, Kenworth 370, motor homes, bread trucks, etc, etc. It was the engine of its era. Trucks with vacuum controlled cruise should work also. This particular modification applies to my setup only; (the midrange setup for steering assist). My cruise is ECM controlled. I have the non CAD front axle, so my vacuum demand is limited. On SD applications, they use it to lock the front hubs and HVAC on their trucks. So I feel it should work on any of our vehicles. I used the same pump from the SuperDuty and 3rd Gen RAMS (same pump). I picked it up from Rock Auto along with a Mating Connector. I drilled 3 holes and mounted it on the fuse box cover, in an easy to service spot. For plumbing, it goes to a control manifold for the EB, and tees off into the OEM vacuum line on the firewall. I do not use a reservoir like FORD uses, but you could run one if you desire it. For power, it gets fused voltage from the PDC power stud, which is also the relay supply power (pin 30). The relay trigger is controlled by a fuse tap in one of the PDC fuses, that is hot only when the key is on, so it does not run all the time. The pump has an internal governor, so when it reaches its vacuum threshhold, it shuts off. If it is always running, you most likely have a leak that you need to repair first.
- 2 comments
- 1 review
-
-

-

- 3
-
-
Electric Vacuum Pump Conversion: I have deleted my OEM vacuum and power steering pump(s). Instead, I have modified it by replacing it with a midrange setup for steering assist; however, I still need vacuum in order to activate the HVAC controls and to activate my exhaust brake. Although the OEM factory pump never gave me any issues and supplied all the vacuum I needed to work, such as the HVAC and the exhaust brake, the OEM Power Steering did. I have replaced the OEM Power Steering Pump multiple times. In all cases, the pump would not maintain enough pressure and turning the wheels at a stop during idle was almost impossible. Compound that with the inevitable oil leak between both pumps, I figured there was a better system. So, this is where the "midrange" setup comes into play. The 24V ISB was used in multiple applications (not just Dodge). Even though they were not used in another pickup, they were used in midrange sized trucks like Freightliner FL60 &FL80, Ford 650 & 750, Kenworth 370, motor homes, bread trucks, etc, etc. It was the engine of its era. Trucks with vacuum controlled cruise should work also. This particular modification applies to my setup only; (the midrange setup for steering assist). My cruise is ECM controlled. I have the non CAD front axle, so my vacuum demand is limited. On SD applications, they use it to lock the front hubs and HVAC on their trucks. So I feel it should work on any of our vehicles. I used the same pump from the SuperDuty and 3rd Gen RAMS (same pump). I picked it up from Rock Auto along with a Mating Connector. I drilled 3 holes and mounted it on the fuse box cover, in an easy to service spot. For plumbing, it goes to a control manifold for the EB, and tees off into the OEM vacuum line on the firewall. I do not use a reservoir like FORD uses, but you could run one if you desire it. For power, it gets fused voltage from the PDC power stud, which is also the relay supply power (pin 30). The relay trigger is controlled by a fuse tap in one of the PDC fuses, that is hot only when the key is on, so it does not run all the time. The pump has an internal governor, so when it reaches its vacuum threshhold, it shuts off. If it is always running, you most likely have a leak that you need to repair first. View full Cummins article
-
Absolutely
-
It does well. I run my hvac and exhaust brake on it and it hasn’t let me down…yet. I just run the Dorman one too.
-
Yes, it’s on the other side. The splines are coated in Teflon but I’ll stay atop of it.

-
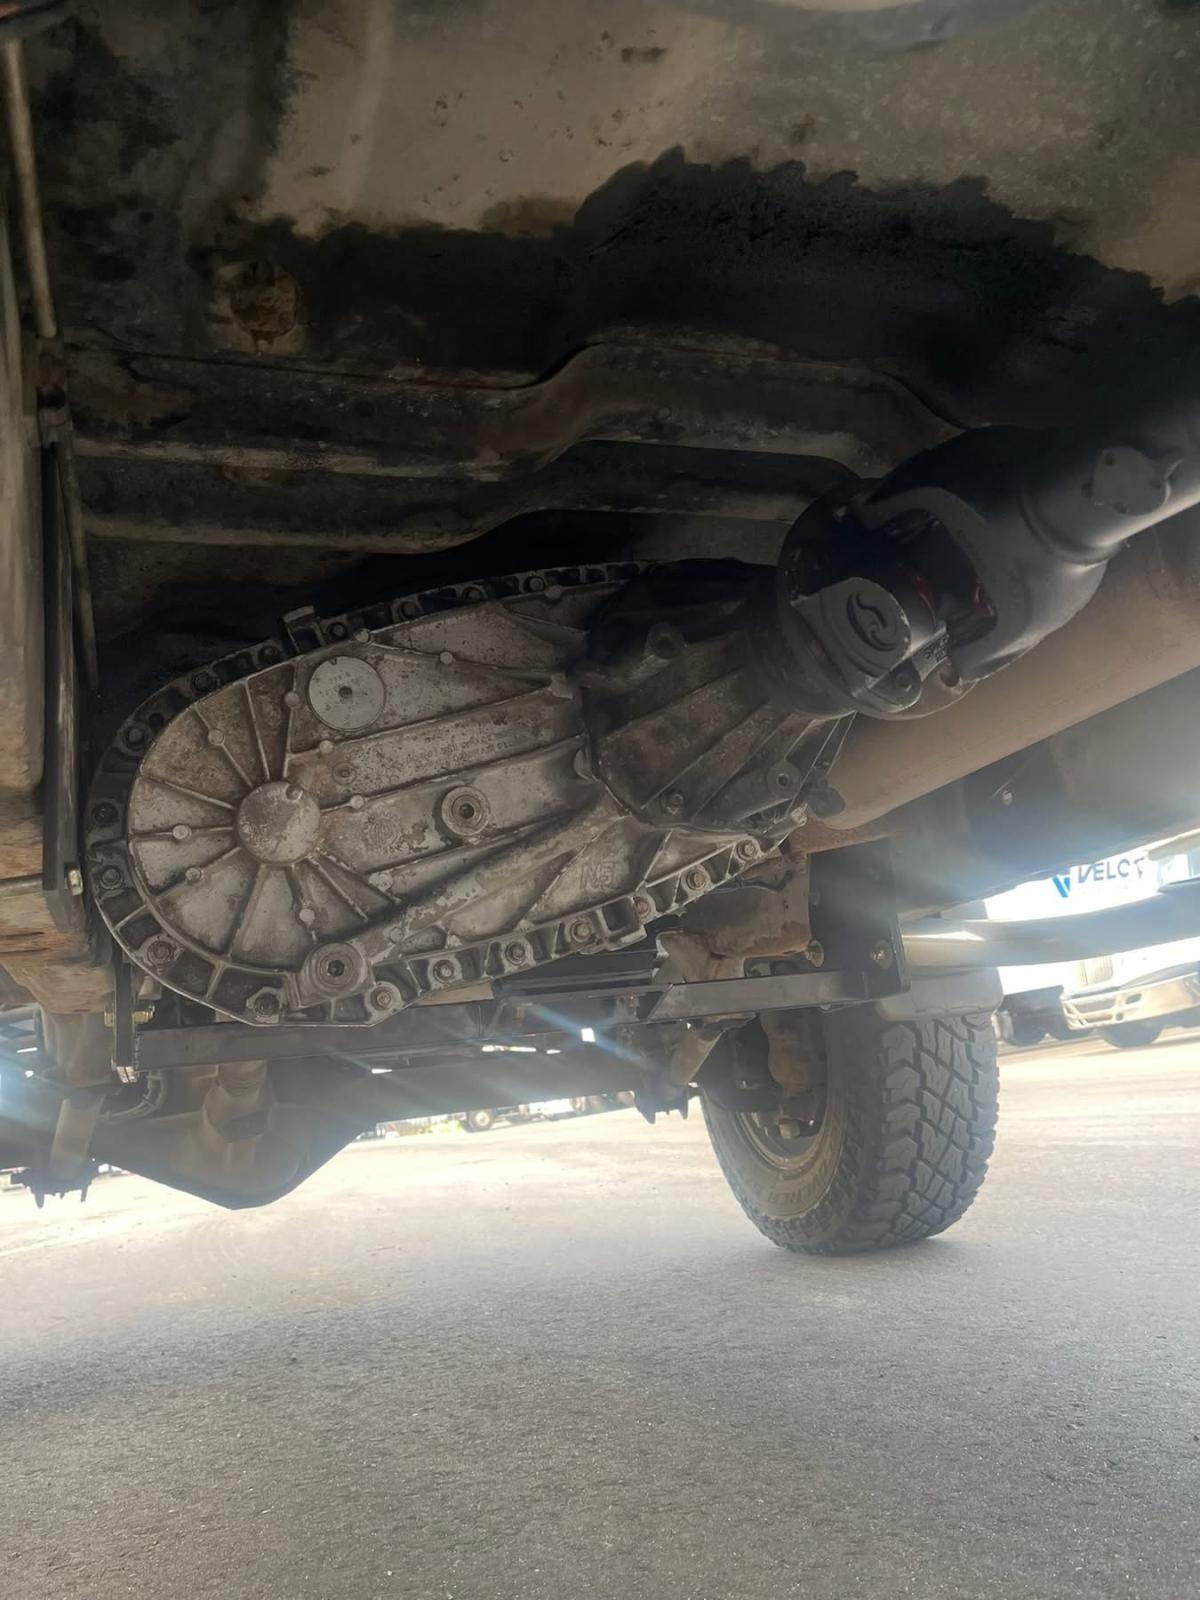
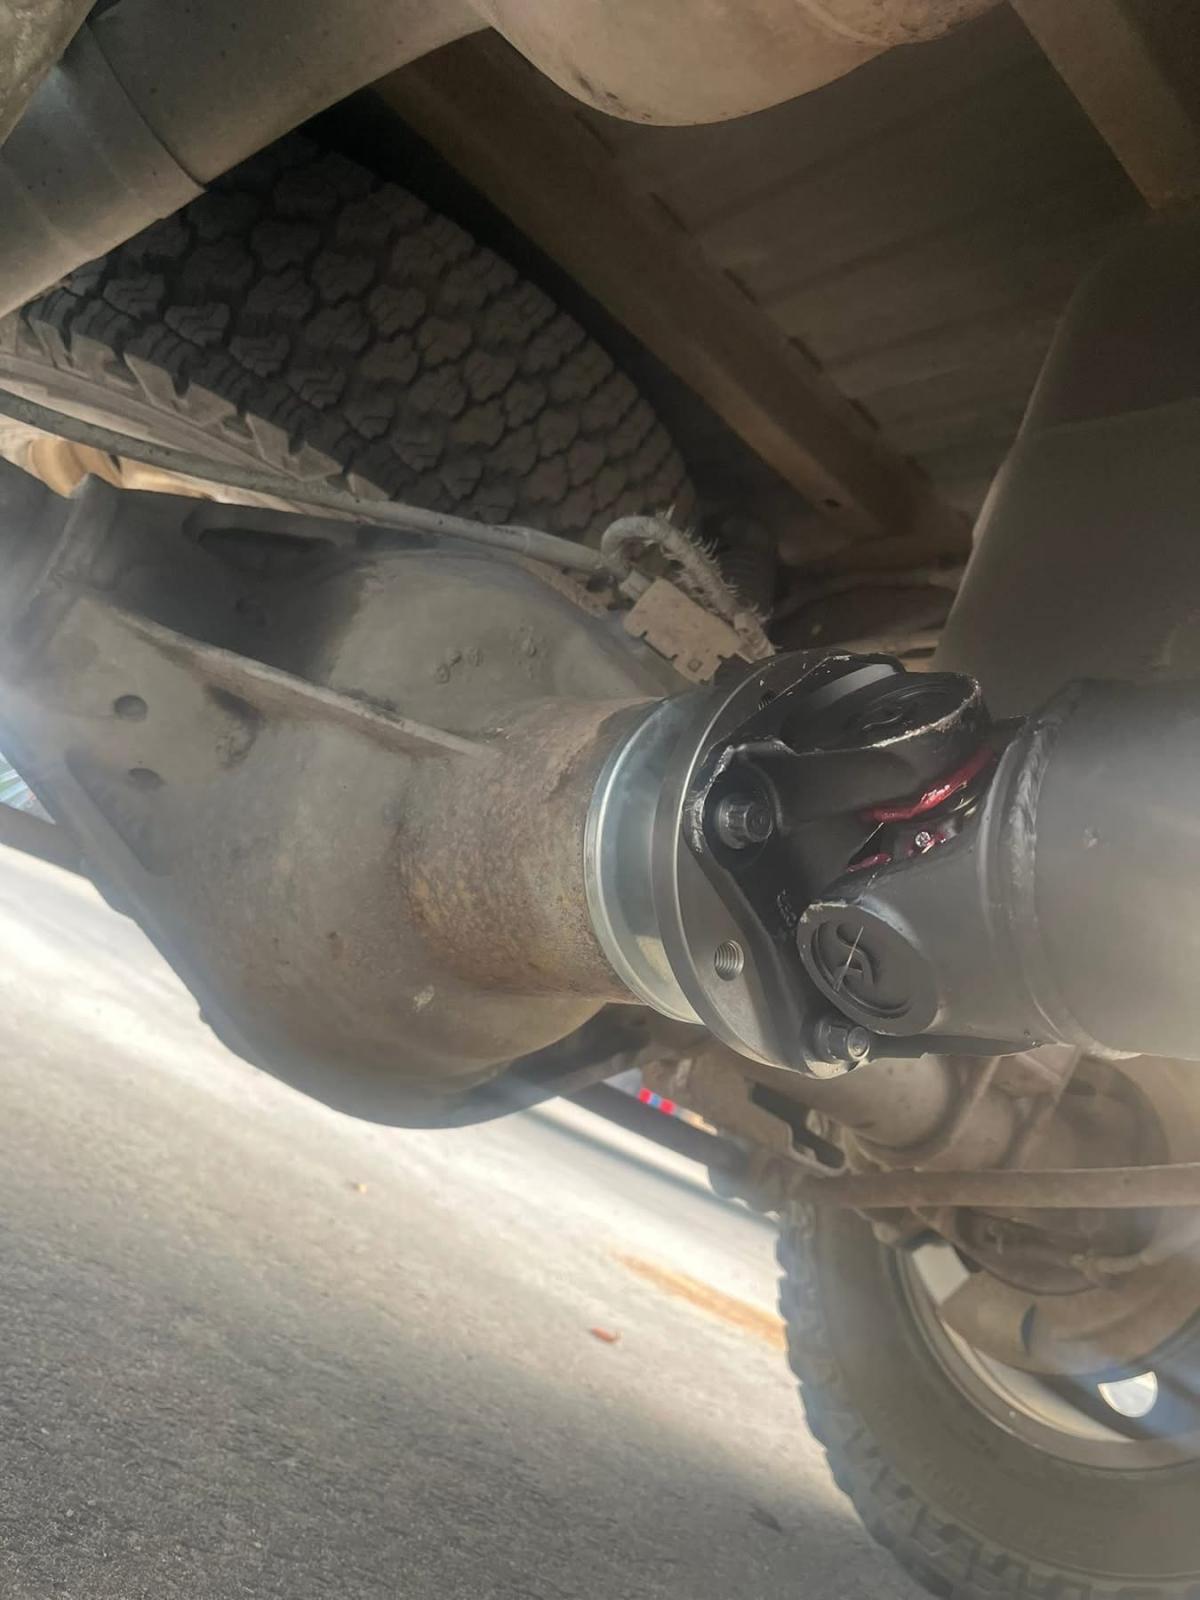
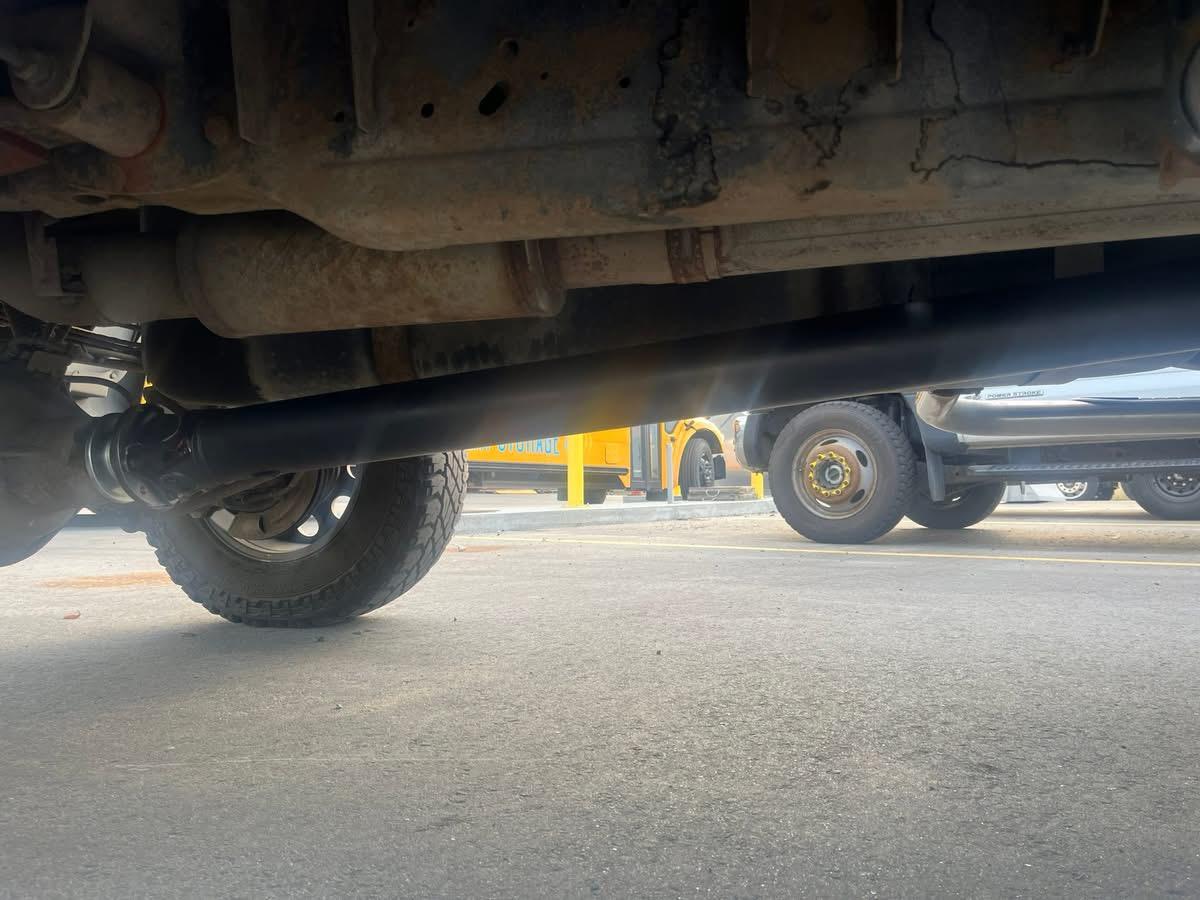
I thought I’d share my recent drivetrain upgrade I put in my 01’ 3500 (SRW converted) 6 spd. On transfer case side of things swapping a NP271D in is pretty common for a 2nd gen. I wanted to take it one step farther. It took some trial & error finding what parts will work and what doesn’t. It’s pretty much a modified Ford design. I found a used 08’ NP271D and rebuilt/modified it. Eliminated the leaky Dodge slip yoke tail housing and utilized the rear fixed flange yoke setup from a 06’ NP273F. I bought the rebuild kit, some updated parts & specific seal installers from TorqueKing4x4. I also installed the Ford style companion flange on my Dana 80 along with a new washer, nut & seal. ***Snap-On # M3586 is the correct thin walled 1-7/8” socket if you ever need it.*** Initially had a 5” aluminum driveshaft but the Sonax slip yoke kit is quite expensive so I had a 4” steel one locally made and upsized it to 1480 greasable ujoints (OEM are 1410). T/case fits perfectly. There’s 1/8” of clearance at the frame and no contact at bottom of cab. The 2nd Gen linkage rod (11”) is a tad short so even set at max travel the shifter will be off just a touch. So I replaced it with the 3rd Gen 16” one and now it’s perfect. I don’t have the cad Dana 60 so the momentary ball switch from the old NP241D-HD just swaps over to make the 4wd light come on. I have the LRG trans crossmember so I didn’t have any interference with the front driveshaft. APPS delete ✅ Midrange power steering ✅ Electric vacuum pump ✅ Next project: Dynatrac high pinion 35 spline Dana 60 3.73 gears with an electric locker… Enjoy!
-
It’s because of the grille and release handle sit lower then the chrome one, so it hits the bumper unless you want to notch it out.
-
01-02 all have their crank sensors on the timing case by the VP44. My 01 does and has a blank plug in the old spot by the starter. If you don’t have any crank sensor hooked up whether old style or new style your gonna have a problem. The ecm needs to see engine timing. Once that is figured out all you need to do is take your truck to a dealership and have them program the ecm/pcm against the vin so it’ll act like it originally intended.
-
This is a tech article regarding those who (like me) think the oem spot for the apps is not ideal. Exposed to outside elements, heat, vibration and potential corrosion, moving it inside was most practical. Non Dodge/ midrange applications of Cummins 5.9 24V ISB’s all have their TPS/APPS inside the cab, mounted on the pedal assembly. So nothing is changing on the apps operation, just moving it. This mod does not works on trucks that are auto/use vacuum for cruise. The auto trans kickdown cable is attached to the bellcrank assembly. As with the vacuum solenoid setup too so if you can live without them then it will work. Parts needed: 699-5101 pedal assembly (2x) 6 pin Duetsch connectors kits Zip ties Grommet 6’ of 6 wire harness Tools needed: Duetsch connector terminal pliers Wire strippers Making the mount will be up to you. I can show you pictures on how I made mine but it’s just a one off. Either way you need to mount it inside. First, disconnect the 6 pin Duetsch connector from the apps, remove the bellcrank assembly from the cylinder head. Cut off the cable and discard. The oem pedal assembly will need to be removed and the oem mount has a pivot pin on the bottom that’ll twist out with some channel lock pliers. Once you mount your new pedal to the mount and it’s installed all that is needed is how to control via ecm. So a 6 wire jumper harness is needed. I would HIGHLY recommend removing and tossing the apps that comes supplied with the new pedal and install your current one in its place. I can’t guarantee its quality. If you need an apps, a Williams Control 131973 or 133284 will work perfectly (Timbo is just a repackaged WC). Available from any oem truck dealer (I.e. Kenworth or Freightliner). On your engine side of your harness you need to make a 6 pin male Duetsch connector. Ensure you new connector kits have the locks in them, some kits do not come with them for some reason. YouTube or Google can provide a video on how to use Duetsch connector pliers, they’re super easy to use. Using the hole in firewall that the original pull cable went through install a grommet to prevent rubbing and feed your harness through. If you prefer to drill a hole the same size of the connector body you’ll need a 7/8” drill bit. **It’s easier to make the harness, THEN crimp the new terminals on after feeding it through the oem firewall hole for a cleaner look.** Cut your 6 wire harness to length and crimp on the terminals, install the connector body and plug it in. Theoretically the engine doesn’t know where the apps is so it will work. Make sure you mate up each wire in its proper spot on each connector, if you mess them up a CEL will come on/non functionality of the apps. Secure the harness to various points with zip ties so it’s rigid. This provides a clean look and more room in the engine compartment for future servicing. Start the engine and test. Throttle response should be crisp since there is no cable anymore that has slack as it wore.