
Rogan
Retired Staff
-
Joined
-
Last visited
Everything posted by Rogan
-
so I got the new Hayden trans cooler installed friday afternoon, as I had to tow the big trailer to Burlington, WV (about 1.5hrs west, across 2 mountain ridges. I mounted the new (big) trans cooler on the drivers side bumper bracket, just forward of the LF wheel-well liner. I'll get a picture in a little bit, as it's raining now. Here's what I got: (Hayden) 226110 Imperial 10" Electric Fan (2.6"D x 11"H x 11.375"W) - $56.29 (Hayden) 243012 Imperial Maxi-Cool XL Transmission cooler (Size: 3/4" x 11" x 11-5/8") - $64.69 (Hayden) 226206 Imperial Thermostatic Fan Control - Preset 185*F - $27.69 I retained the other (inferior) tube & fin front cooler in the cooling circuit, as well, and it is secondary in the series. The trans temp sensor is mounted in the line just before the big (bar & plate style), in the outlet line from the trans. The fan is currently wired to run as long as the ignition is on, as I tried two seperate (NEW) thermostatic switches that are 'supposed' to turn on at 195*F and off at 185*F. Guess what? Neither did. Testing them in a pan of hot water proved the switches to 'close the circuit' at ~225*F. Yes, the water was boiling.. ( need to source a better way to trip the fan on/off.) No stock exchanger (right side of the block) is in the system, curently; it developed a serious leak at the -AN fitting area a week or so ago. Anyway, several of the grades were NINE percent, and ranged from 1/2 mi to 1 mi. in length. It was dusk as I left, and the ambient temp was cooler than usual (about 60*F.) I've towed in this temp before, and cruising 60-65mph on flat highwat carries about 165-170*F. Slower speed with grade would take it up to 200+. AS I started working my way through town, temps were not registering on the gauge initially, then slowly worked their way up to about 150-155*F. That's the highest I saw the entire trip! Once I got out of town and started my trip, cruised about 50-55mph.. temps dropped to 140. About 45 minutes into the trip, I was seeing 130*F temps.. They hovered around 130-135*F, even on the 9% climbs. I think the highest it got on a climb (OD off, TCC locked, 40mph pull) was like 138*. On the way home, the trip took place from 9:35pm-12:10am. Ambient temp was about 55%, and a lot of moisture in the air, with a heavy dew. Temps stayed sub 130*F the entire way. Saturday, I installed a new thermo-switch (they've all been the kind that pushes through the core fins) and guess what?? Same crap.. It never turns the fan on. I drove it today to run a couple of town errands (no fan) and the temp spiked to about 200*F at one time. This usually occurs if I sit at a light in D or N for any extended period of time. It can be around 200*F, and I can leave the light, get up to about 30 in 3rd, no OD, and then lock the TC, and the temps will fall to sub 180*F in about a minute. The fan would keep this from happening. Any ideas on a better option for a thermostatic fan switch? Here's the review I wrote on AdvanceAutoParts.com website, concerning PN 226206:
-
I'm under mine working on trans stuff so I looked. My 97 is boxed until it reaches the fuel tank. From the Galaxy S3
-
Are these two, the 'same' process? Or slightly different? Is the 'flushed fluid' coming out of the t-stat housing? How are you catching it? Or is it hitting the ground (along with every other engine part between the housing and the ground)?
-
I've been properly schooled, now, on the 'search' functionality..
-
mine took about 3 tanks to start getting close. 4th tank, it was getting very close.. Then I got rid of the truck..
-
at least yours works.. LOL
-
one word of advice: Patience.It'll take several tankfuls to get true and accurate readings. make sure you follow the calibration steps TO THE LETTER..
-
How best to flush these thirsty coolant systems, for those that do it often?
-
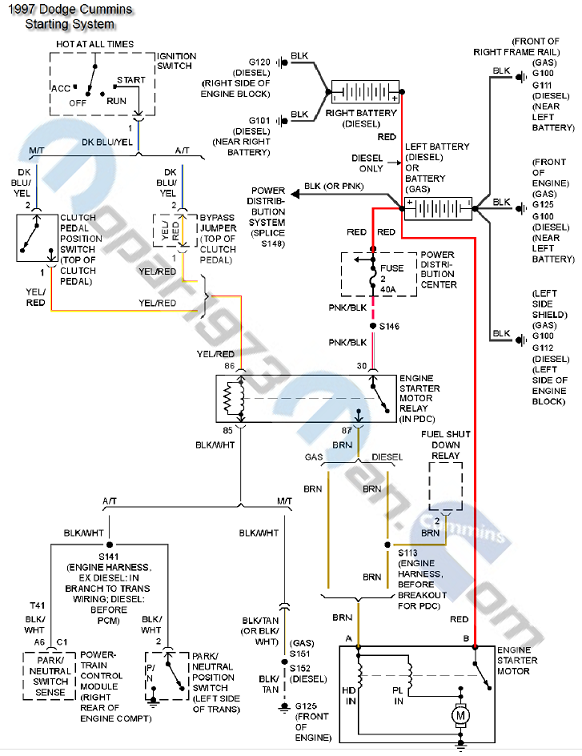
In a general scenario, the relay is a 12V "gate". It only takes 500mA, or 1A of DC current to flip the relay. It doesn't carry high current. If it did, then the wires and terminals would require much more "meat"... The starter's solenoid takes the brunt of the high-current job. The small amperage voltage (from the relay) runs down the wire to the solenoid, engaging the solenoid's "gate" or "contact", closing that circuit. That's where the heavy gauge wire from the battery is connected to the starter motor. http://forum.mopar1973man.com/attachment.php?attachmentid=4523&d=1349364867

-
Does the G56 'fit'? I.E. input shaft, etc., the same size? I've got a SB DD 3850# clutch set in the garage.
-
My '96 gained like 2-3mpg city and about 6mph highway, when going from the OE 47RE to the NV4500.. I'm contemplating putting my '97 DRW back to a 5spd (prev. owner swapped it to auto... )
-
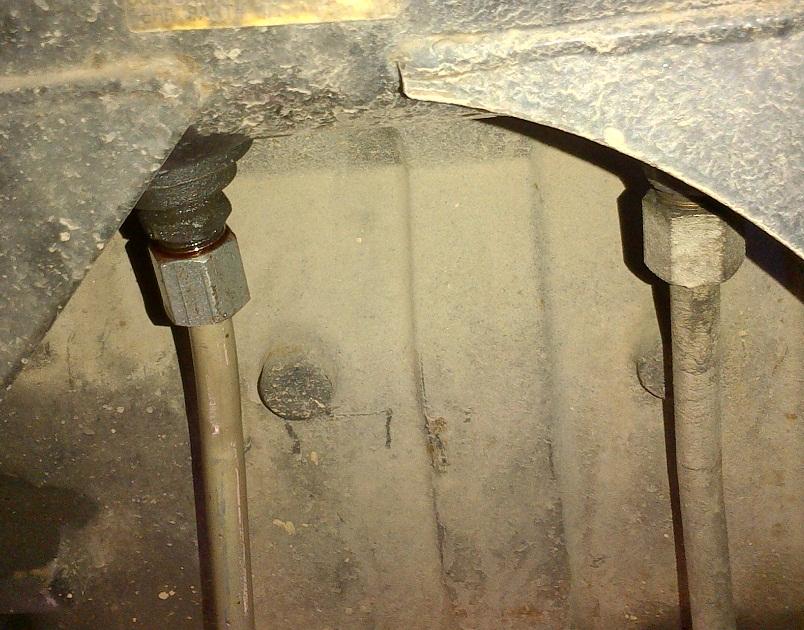
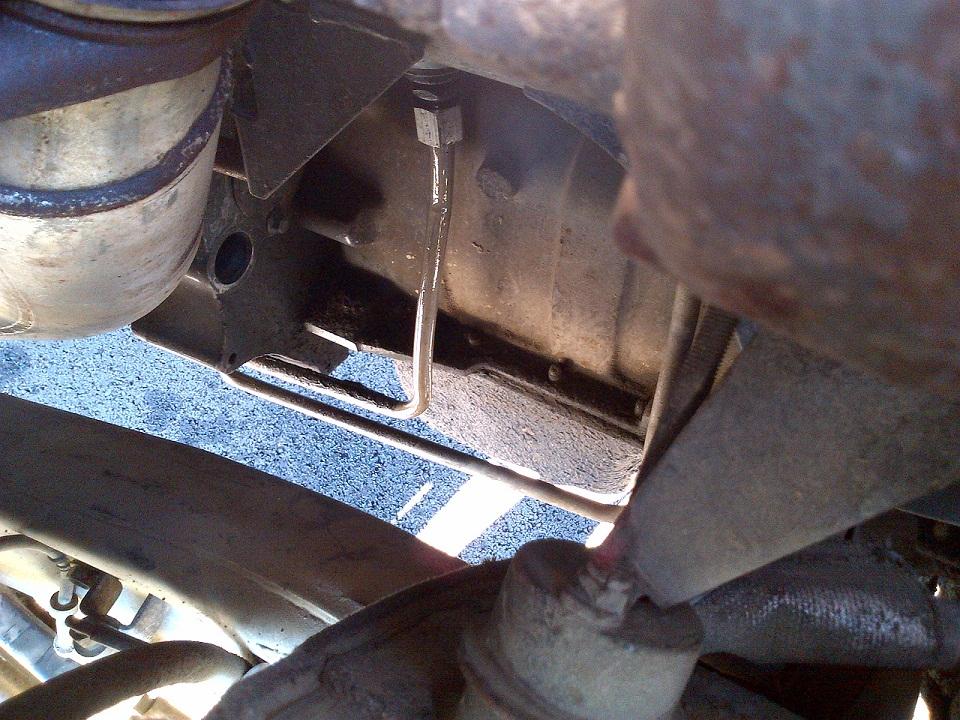
No problemo..I was researching some trans stuff, ran across that, and thought it'd possibly be beneficial here.I got this from tactransman @ dodgetalk.. http://www.dodgetalk.com/forums/showthread.php?t=197157 DIAGNOSIS CHARTS The diagnosis charts provide additional reference when diagnosing a transmission fault. The charts provide general information on a variety of transmission, overdrive unit and converter clutch fault conditions. Diagnosis Charts CONDITION ................. POSSIBLE CAUSES................... CORRECTION HARSH ENGAGEMENT (FROM NEUTRAL TO DRIVE OR REVERSE) 1. Fluid Level Low. 1. Add Fluid 2. Throttle Linkage Mis-adjusted. 2. Adjust linkage - setting may be too long. 3. Mount and Driveline Bolts Loose. 3. Check engine mount, transmission mount, propeller shaft, rear spring to body bolts, rear control arms, crossmember and axle bolt torque. Tighten loose bolts and replace missing bolts. 4. U-Joint Worn/Broken. 4. Remove propeller shaft and replace U-Joint. 5. Axle Backlash Incorrect. 5. Check per Service Manual. Correct as needed. 6. Hydraulic Pressure Incorrect. 6. Check pressure. Remove, overhaul or adjust valve body as needed. 7. Band Mis-adjusted. 7. Adjust rear band. 8. Valve Body Check Balls Missing. 8. Inspect valve body for proper check ball installation. 9. Axle Pinion Flange Loose. 9. Replace nut and check pinion threads before installing new nut. Replace pinion gear if threads are damaged. 10. Clutch, band or planetary component damaged. 10. Remove, disassemble and repair transmission as necessary. 11. Converter Clutch Faulty. 11. Replace converter and flush cooler and line before installing new converter. DELAYED ENGAGEMENT (FROM NEUTRAL TO DRIVE OR REVERSE) 1. Fluid Level Low. 1. Correct level and check for leaks. 2. Filter Clogged. 2. Change filter. 3. Gearshift Linkage Mis-adjusted. 3. Adjust linkage and repair linkage if worn or damaged. 4. Torque Converter Drain Back (Oil drains from torque converter into transmission sump). 4. If vehicle moves normally after 5 seconds after shifting into gear, no repair is necessary. If longer, inspect pump bushing for wear. Replace pump house. 5. Rear Band Mis-adjusted. 5. Adjust band. 6. Valve Body Filter Plugged. 6. Replace fluid and filter. If oil pan and old fluid were full of clutch disc material and/or metal particles, overhaul will be necessary. 7. Oil Pump Gears Worn/Damaged. 7. Remove transmission and replace oil pump. 8. Governor Circuit and Solenoid Valve Electrical Fault. 8. Test with DRB® scan tool and repair as required. 9. Hydraulic Pressure Incorrect. 9. Perform pressure test, remove transmission and repair as needed. 10. Reaction Shaft Seal Rings Worn/Broken. 10. Remove transmission, remove oil pump and replace seal rings. 11. Rear Clutch/Input Shaft, Rear Clutch Seal Rings Damaged. 11. Remove and disassemble transmission and repair as necessary. 12. Regulator Valve Stuck. 12. Clean. 13. Cooler Plugged. 13. Transfer case failure can plug cooler. NO DRIVE RANGE (REVERSE OK) 1. Fluid Level Low. 1. Add fluid and check for leaks if drive is restored. 2. Gearshift Linkage/Cable Loose/Misadjusted. 2. Repair or replace linkage components. 3. Rear Clutch Burnt. 3. Remove and disassemble transmission and rear clutch and seals. Repair/replace worn or damaged parts as needed. 4. Valve Body Malfunction. 4. Remove and disassemble valve body. Replace assembly if any valves or bores are damaged. 5. Transmission Overrunning Clutch Broken. 5. Remove and disassemble transmission. Replace overrunning clutch. 6. Input Shaft Seal Rings Worn/Damaged. 6. Remove and disassemble transmission. Replace seal rings and any other worn or damaged parts. 7. Front Planetary Failed Broken. 7. Remove and repair. NO DRIVE OR REVERSE (VEHICLE WILL NOT MOVE) 1. Fluid Level Low. 1. Add fluid and check for leaks if drive is restored. 2. Gearshift Linkage/Cable Loose/Misadjusted. 2. Inspect, adjust and reassemble linkage as needed. Replace worn/damaged parts. 3. U-Joint/Axle/Transfer Case Broken. 3. Perform preliminary inspection procedure for vehicle that will not move. Refer to procedure in diagnosis section. 4. Filter Plugged. 4. Remove and disassemble transmission. Repair or replace failed components as needed. Replace filter. If filter and fluid contained clutch material or metal particles, an overhaul may be necessary. Perform lube flow test. Flush oil. Replace cooler as necessary. 5. Oil Pump Damaged. 5. Perform pressure test to confirm low pressure. Replace pump body assembly if necessary. 6. Valve Body Malfunctioned. 6. Check and inspect valve body. Replace valve body (as assembly) if any valve or bore is damaged. Clean and reassemble correctly if all parts are in good condition. 7. Transmission Internal Component Damaged. 7. Remove and disassemble transmission. Repair or replace failed components as needed. 8. Park Sprag not Releasing - Check Stall Speed, Worn/Damaged/Stuck. 8. Remove, disassemble, repair. 9. Torque Converter Damage. 9. Inspect and replace as required. SHIFTS DELAYED OR ERRATIC (SHIFTS ALSO HARSH AT TIMES) 1. Fluid Level Low/High. 1. Correct fluid level and check for leaks if low. 2. Fluid Filter Clogged. 2. Replace filter. If filter and fluid contained clutch material or metal particles, an overhaul may be necessary. Perform lube flow test. 3. Throttle Linkage Mis-adjusted. 3. Adjust linkage as described in service section. 4. Throttle Linkage Binding. 4. Check cable for binding. Check for return to closed throttle at transmission. 5. Gearshift Linkage/Cable Mis-adjusted. 5. Adjust linkage/cable as described in service section. 6. Clutch or Servo Failure. 6. Remove valve body and air test clutch, and band servo operation. Disassemble and repair transmission as needed. 7. Governor Circuit Electrical Fault. 7. Test using DRB® scan tool and repair as required. 8. Front Band Mis-adjusted. 8. Adjust band. 9. Pump Suction Passage Leak. 9. Check for excessive foam on dipstick after normal driving. Check for loose pump bolts, defective gasket. Replace pump assembly if needed. NO REVERSE (D RANGES OK) 1. Gearshift Linkage/Cable Mis-adjusted/Damaged. 1. Repair or replace linkage parts as needed. 2. Park Sprag Sticking. 2. Replace overdrive annulus gear. 3. Rear Band Mis-adjusted/Worn. 3. Adjust band; replace. 4. Valve Body Malfunction. 4. Remove and service valve body. Replace valve body if any valves or valve bores are worn or damaged. 5. Rear Servo Malfunction. 5. Remove and disassemble transmission. Replace worn/damaged servo parts as necessary. 6. Direct Clutch in Overdrive Worn. 6. Disassemble overdrive. Replace worn or damaged parts. 7. Front Clutch Burnt. 7. Remove and disassemble transmission. Replace worn, damaged clutch parts as required. HAS FIRST/REVERSE ONLY (NO 1-2 OR 2-3 UPSHIFT) 1. Governor Circuit Electrical Fault. 1. Test using DRB® scan tool and repair as required. 2. Valve Body Malfunction. 2. Repair stuck 1-2 shift valve or governor plug. 3. Front Servo/Kickdown Band Damaged/Burned. 3. Repair/replace. MOVES IN 2ND OR 3RD GEAR, ABRUPTLY DOWNSHIFTS TO LOW 1. Valve Body Malfunction. 1. Remove, clean and inspect. Look for stuck 1-2 valve or governor plug. NO LOW GEAR (MOVES IN 2ND OR 3RD GEAR ONLY) 1. Governor Circuit Electrical Fault. 1. Test with DRB® scan tool and repair as required. 2. Valve Body Malfunction. 2. Remove, clean and inspect. Look for sticking 1-2 shift valve, 2-3 shift valve, governor plug or broken springs. 3. Front Servo Piston Cocked in Bore. 3. Inspect servo and repair as required. 4. Front Band Linkage Malfunction 4. Inspect linkage and look for bind in linkage. NO KICKDOWN OR NORMAL DOWNSHIFT 1. Throttle Linkage Mis-adjusted. 1. Adjust linkage. 2. Accelerator Pedal Travel Restricted. 2. Verify floor mat is not under pedal, repair worn accelerator cable or bent brackets. 3. Valve Body Hydraulic Pressures Too High or Too Low Due to Valve Body Malfunction or Incorrect Hydraulic Control Pressure Adjustments. 3. Perform hydraulic pressure tests to determine cause and repair as required. Correct valve body pressure adjustments as required. 4. Governor Circuit Electrical Fault. 4. Test with DRB® scan tool and repair as required. 5. Valve Body Malfunction. 5. Perform hydraulic pressure tests to determine cause and repair as required. Correct valve body pressure adjustments as required. 6. TPS Malfunction. 6. Replace sensor, check with DRB® scan tool. 7. PCM Malfunction. 7. Check with DRB® scan tool and replace if required. 8. Valve Body Malfunction. 8. Repair sticking 1-2, 2-3 shift valves, governor plugs, 3-4 solenoid, 3-4 shift valve, 3-4 timing valve. STUCK IN LOW GEAR (WILL NOT UPSHIFT) 1. Throttle Linkage Mis-adjusted/Stuck. 1. Adjust linkage and repair linkage if worn or damaged. Check for binding cable or missing return spring. 2. Gearshift Linkage Mis-adjusted. 2. Adjust linkage and repair linkage if worn or damaged. 3. Governor Component Electrical Fault. 3. Check operating pressures and test with DRB® scan tool, repair faulty component. 4. Front Band Out of Adjustment. 4. Adjust Band. 5. Clutch or Servo Malfunction. 5. Air pressure check operation of clutches and bands. Repair faulty component. CREEPS IN NEUTRAL 1. Gearshift Linkage Mis-adjusted. 1. Adjust linkage. 2. Rear Clutch Dragging/Warped. 2. Disassemble and repair. 3. Valve Body Malfunction. 3. Perform hydraulic pressure test to determine cause and repair as required. BUZZING NOISE 1. Fluid Level Low 1. Add fluid and check for leaks. 2. Shift Cable Mis-assembled. 2. Route cable away from engine and bell housing. 3. Valve Body Mis-assembled. 3. Remove, disassemble, inspect valve body. Reassemble correctly if necessary. Replace assembly if valves or springs are damaged. Check for loose bolts or screws. 4. Pump Passages Leaking. 4. Check pump for porous casting, scores on mating surfaces and excess rotor clearance. Repair as required. Loose pump bolts. 5. Cooling System Cooler Plugged. 5. Flow check cooler circuit. Repair as needed. 6. Overrunning Clutch Damaged. 6. Replace clutch. SLIPS IN REVERSE ONLY 1. Fluid Level Low. 1. Add fluid and check for leaks. 2. Gearshift Linkage Mis-adjusted. 2. Adjust linkage. 3. Rear Band Mis-adjusted. 3. Adjust band. 4. Rear Band Worn. 4. Replace as required. 5. Overdrive Direct Clutch Worn. 5. Disassemble overdrive. Repair as needed. 6. Hydraulic Pressure Too Low. 6. Perform hydraulic pressure tests to determine cause. 7. Rear Servo Leaking. 7. Air pressure check clutch-servo operation and repair as required. 8. Band Linkage Binding. 8. Inspect and repair as required. SLIPS IN FORWARD DRIVE RANGES 1. Fluid Level Low. 1. Add fluid and check for leaks. 2. Fluid Foaming. 2. Check for high oil level, bad pump gasket or seals, dirt between pump halves and loose pump bolts. Replace pump if necessary. 3. Throttle Linkage Mis-adjusted. 3. Adjust linkage. 4. Gearshift Linkage Mis-adjusted. 4. Adjust linkage. 5. Rear Clutch Worn. 5. Inspect and replace as needed. 6. Low Hydraulic Pressure Due to Worn Pump, Incorrect Control Pressure Adjustments, Valve Body Warpage or Malfunction, Sticking, Leaking Seal Rings, Clutch Seals Leaking, Servo Leaks, Clogged Filter or Cooler Lines. 6. Perform hydraulic and air pressure tests to determine cause. 7. Rear Clutch Malfunction, Leaking Seals or Worn Plates. 7. Air pressure check clutch-servo operation and repair as required. 8. Overrunning Clutch Worn, Not Holding (Slips in 1 Only). 8. Replace Clutch. SLIPS IN LOW GEAR "D" ONLY, BUT NOT IN MANUAL 1 POSITION Overrunning Clutch Faulty. Replace overrunning clutch. GROWLING, GRATING OR SCRAPING NOISES 1. Drive Plate Broken. 1. Replace. 2. Torque Converter Bolts Hitting Dust Shield. 2. Dust shield bent. Replace or repair. 3. Planetary Gear Set Broken/Seized. 3. Check for debris in oil pan and repair as required. 4. Overrunning Clutch Worn/Broken. 4. Inspect and check for debris in oil pan. Repair as required. 5. Oil Pump Components Scored/Binding. 5. Remove, inspect and repair as required. 6. Output Shaft Bearing or Bushing Damaged. 6. Remove, inspect and repair as required. 7. Clutch Operation Faulty. 7. Perform air pressure check and repair as required. 8. Front and Rear Bands Mis-adjusted. 8. Adjust bands. DRAGS OR LOCKS UP 1. Fluid Level Low. 1. Check and adjust level. 2. Clutch Dragging/Failed 2. Air pressure check clutch operation and repair as required. 3. Front or Rear Band Mis-adjusted. 3. Adjust bands. 4. Case Leaks Internally. 4. Check for leakage between passages in case. 5. Servo Band or Linkage Malfunction. 5. Air pressure check servo operation and repair as required. 6. Overrunning Clutch Worn. 6. Remove and inspect clutch. Repair as required. 7. Planetary Gears Broken. 7. Remove, inspect and repair as required (look for debris in oil pan). 8. Converter Clutch Dragging. 8. Check for plugged cooler. Perform flow check. Inspect pump for excessive side clearance. Replace pump as required. NO 4-3 DOWNSHIFT 1. Circuit Wiring and/or Connectors Shorted. 1. Test wiring and connectors with test lamp and volt/ohmmeter. Repair wiring as necessary. Replace connectors and/or harnesses as required. 2. PCM Malfunction. 2. Check PCM operation with DRB® scan tool. Replace PCM only if faulty. 3. TPS Malfunction 3. Check TPS with DRB® scan tool at PCM. 4. Lockup Solenoid Not Venting. 4. Remove valve body and replace solenoid assembly if plugged or shorted. 5. Overdrive Solenoid Not Venting. 5. Remove valve body and replace solenoid if plugged or shorted. 6. Valve Body Valve Sticking. 6. Repair stuck 3-4 shift valve or lockup timing valve. NO 4-3 DOWNSHIFT WHEN CONTROL SWITCH IS TURNED OFF 1. Control Switch Open/Shorted. 1. Test and replace switch if faulty. 2. Overdrive Solenoid Connector Shorted. 2. Test solenoids and replace if seized or shorted. 3. PCM Malfunction. 3. Test with DRB® scan tool. Replace PCM if faulty. 4. Valve Body Stuck Valves. 4. Repair stuck 3-4, lockup or lockup timing valve. CLUNK NOISE FROM DRIVELINE ON CLOSED THROTTLE 4-3 DOWNSHIFT 1. Transmission Fluid Low. 1. Add Fluid. 2. Throttle Cable Mis-adjusted. 2. Adjust cable. 3. Overdrive Clutch Select Spacer Wrong Spacer. 3. Replace overdrive piston thrust plate spacer. 3-4 UPSHIFT OCCURS IMMEDIATELY AFTER 2-3 SHIFT 1. Overdrive Solenoid Connector or Wiring Shorted. 1. Test connector and wiring for loose connections, shorts or ground and repair as needed. 2. TPS Malfunction. 2. Test TPS and replace as necessary. Check with DRB® scan tool. 3. PCM Malfunction. 3. Test PCM with DRB® scan tool and replace controller if faulty. 4. Overdrive Solenoid Malfunction. 4. Replace solenoid. 5. Valve Body Malfunction. 5. Remove, disassemble, clean and inspect valve body components. Make sure all valves and plugs slide freely in bores. Polish valves with crocus cloth if needed. WHINE/NOISE RELATED TO ENGINE SPEED 1. Fluid Level Low. 1. Add fluid and check for leaks. 2. Shift Cable Incorrect Routing. 2. Check shift cable for correct routing. Should not touch engine or bell housing. NO 3-4 UPSHIFT 1. O/D Switch In OFF Position. 1. Turn control switch to ON position. 2. Overdrive Circuit Fuse Blown. 2. Replace fuse. Determine why fuse failed and repair as necessary (i.e., shorts or grounds in circuit). 3. O/D Switch Wire Shorted/Open Cut. 3. Check wires/connections with 12V test lamp and voltmeter. Repair damaged or loose wire/connection as necessary. 4. Distance or Coolant Sensor Malfunction. 4. Check with DRB® scan tool and repair or replace as necessary. 5. TPS Malfunction. 5. Check with DRB® scan tool and replace if necessary. 6. Neutral Sense to PCM Wire Shorted/Cut. 6. Test switch/sensor as described in service section and replace if necessary. Engine no start. 7. PCM Malfunction. 7. Check with DRB® scan tool and replace if necessary. 8. Overdrive Solenoid Shorted/Open. 8. Replace solenoid if shorted or open and repair loose or damaged wires (DRB® scan tool). 9. Solenoid Feed Orifice in Valve Body Blocked. 9. Remove, disassemble, and clean valve body thoroughly. Check feed orifice. 10. Overdrive Clutch Failed. 10. Disassemble overdrive and repair as needed. 11. Hydraulic Pressure Low. 11. Pressure test transmission to determine cause. 12. Valve Body Valve Stuck. 12. Repair stuck 3-4 shift valve, 3-4 timing valve. 13. O/D Piston Incorrect Spacer. 13. Remove unit, check end play and install correct spacer. 14. Overdrive Piston Seal Failure. 14. Replace both seals. 15. O/D Check Valve/Orifice Failed. 15. Check for free movement and secure assembly (in piston retainer). Check ball bleed orifice. SLIPS IN OVERDRIVE FOURTH GEAR 1. Fluid Level Low. 1. Add fluid and check for leaks. 2. Overdrive Clutch Pack Worn. 2. Remove overdrive unit and rebuild clutch pack. 3. Overdrive Piston Retainer Bleed Orifice Blown Out. 3. Disassemble transmission, remove retainer and replace orifice. 4. Overdrive Piston or Seal Malfunction. 4. Remove overdrive unit. Replace seals if worn. Replace piston if damaged. If piston retainer is damaged, remove and disassemble the transmission. 5. 3-4 Shift Valve, Timing Valve or Accumulator Malfunction. 5. Remove and overhaul valve body. Replace accumulator seals. Make sure all valves operate freely in bores and do not bind or stick. Make sure valve body screws are correctly tightened and separator plates are properly positioned. 6. Overdrive Unit Thrust Bearing Failure. 6. Disassemble overdrive unit and replace thrust bearing (NO. 1 thrust bearing is between overdrive piston and clutch hub; NO. 2 thrust bearing is between the planetary gear and the direct clutch spring plate; NO. 3 thrust bearing is between overrunning clutch hub and output shaft). 7. O/D Check Valve/Bleed Orifice Failure. 7. Check for function/secure orifice insert in O/D piston retainer. DELAYED 3-4 UPSHIFT (SLOW TO ENGAGE) 1. Fluid Level Low. 1. Add fluid and check for leaks. 2. Throttle Valve Cable Mis-adjusted. 2. Adjust throttle valve cable. 3. Overdrive Clutch Pack Worn/Burnt. 3. Remove unit and rebuild clutch pack. 4. TPS Faulty. 4. Test with DRB® scan tool and replace as necessary 5. Overdrive Clutch Bleed Orifice Plugged. 5. Disassemble transmission and replace orifice. 6. Overdrive Solenoid or Wiring Shorted/Open. 6. Test solenoid and check wiring for loose/corroded connections or shorts/grounds. Replace solenoid if faulty and repair wiring if necessary. 7. Overdrive Excess Clearance. 7. Remove unit. Measure end play and select proper spacer. 8. O/D Check Valve Missing or Stuck. 8. Check for presence of check valve. Repair or replace as required . TORQUE CONVERTER LOCKS UP IN SECOND AND/OR THIRD GEAR Lockup Solenoid, Relay or Wiring Shorted/Open. Test solenoid, relay and wiring for continuity, shorts or grounds. Replace solenoid and relay if faulty. Repair wiring and connectors as necessary. HARSH 1-2, 2-3, 3-4 OR 3-2 SHIFTS Lockup Solenoid Malfunction. Remove valve body and replace solenoid assembly. NO START IN PARK OR NEUTRAL 1. Gearshift Linkage/Cable Mis-adjusted. 1. Adjust linkage/cable. 2. Neutral Sense Wire Open/Cut. 2. Check continuity with test lamp. Repair as required. 3. Park/Neutral Switch, or Transmission Range Sensor Faulty. 3. Refer to service section for test and replacement procedure. 4. Park/Neutral Switch, or Transmission Range Sensor Connection Faulty. 4. Connectors spread open. Repair. 5. Valve Body Manual Lever Assembly Bent/Worn/Broken. 5. Inspect lever assembly and replace if damaged. NO REVERSE (OR SLIPS IN REVERSE) 1. Direct Clutch Pack (front clutch) Worn. 1. Disassemble unit and rebuild clutch pack. 2. Rear Band Mis-adjusted. 2. Adjust band. 3. Front Clutch Malfunctioned/Burned. 3. Air-pressure test clutch operation. Remove and rebuild if necessary. 4. Overdrive Thrust Bearing Failure. 4. Disassemble geartrain and replace bearings. 5. Direct Clutch Spring Collapsed/Broken. 5. Remove and disassemble unit. Check clutch position and replace spring. OIL LEAKS. 1. Fluid Lines and Fittings Loose/Leaks/Damaged. 1. Tighten fittings. If leaks persist, replace fittings and lines if necessary. 2. Fill Tube (where tube enters case) Leaks/Damaged. 2. Replace tube seal. Inspect tube for cracks in fill tube. 3. Pressure Port Plug Loose Loose/Damaged. 3. Tighten to correct torque. Replace plug or reseal if leak persists. 4. Pan Gasket Leaks. 4. Tighten pan screws (150 in. lbs.). If leaks persist, replace gasket. 5. Valve Body Manual Lever Shaft Seal Leaks/Worn. 5. Replace shaft seal. 6. Rear Bearing Access Plate Leaks. 6. Replace gasket. Tighten screws. 7. Gasket Damaged or Bolts are Loose. 7. Replace bolts or gasket or tighten both. 8. Adapter/Extension Gasket Damaged Leaks/Damaged. 8. Replace gasket. 9. Park/Neutral Switch, or Transmission Range Sensor Leaks/Damaged. 9. Replace switch and gasket. 10. Converter Housing Area Leaks. 10. Check for leaks at seal caused by worn seal or burr on converter hub (cutting seal), worn bushing, missing oil return, oil in front pump housing or hole plugged. Check for leaks past O-ring seal on pump or past pump-to-case bolts; pump housing porous, oil coming out vent due to overfill or leak past front band shaft access plug. 11. Pump Seal Leaks/Worn/Damaged. 11. Replace seal. 12. Torque Converter Weld Leak/Cracked Hub. 12. Replace converter. 13. Case Porosity Leaks. 13. Replace case. NOISY OPERATION IN FOURTH GEAR ONLY 1. Overdrive Clutch Discs, Plates or Snap Rings Damaged. 1. Remove unit and rebuild clutch pack. 2. Overdrive Piston or Planetary Thrust Bearing Damaged. 2. Remove and disassemble unit. Replace either thrust bearing if damaged. 3. Output Shaft Bearings Scored/Damaged. 3. Remove and disassemble unit. Replace either bearing if damaged. 4. Planetary Gears Worn/Chipped. 4. Remove and overhaul overdrive unit. 5. Overdrive Unit Overrunning Clutch Rollers Worn/Scored. 5. Remove and overhaul overdrive unit.Yeah.. all I know is I need to figure this issue out sooner than laterMine, too, is low-stall. Slipping it into Neutral doesn't seem to help, as the pump is still engaged in neutral. Park stops the pump, at least from what I can tell. It can sit forever, idling in park, and the temps hardly move. Put it in neutral, or gear, and sit.. Different story..Yeah, I see wide temp fluctuations in mine, as well.. Generally, with 60*F ambient temps, stock pan, I have my temp sensor in the outlet line.. 160-170*F cruising (towing). sitting at light, in drive, it'll climb rapidly to >200*F (in N, D, 2, or 1). Sitting in P, it'll drop some.. Start moving again, and it'll drop to the 180-ish mark..Apparently, by-passing the block-mounted heat exchanger was a bad idea.. Trans temps skyrocket at low speeds and especially sitting at stoplights.A 2 minute stoplight wait will cause the temps to go from 180*F to 210-230*F rapidly.The front-mount trans cooler is a Hayden tube & fin style and is apparently very inefficient. I mounted a 10" fan on it, and it doesn't seem to help. I just don't think the tube & fin style cooler exchanges heat well enough.I bought a new Hayden 11"x11.5" HD trans cooler (supposedly 33% more efficient) but I can't seem to find a pace to fit it. There's a round 'boss' on the driver's side of the intercooler tank that sticks out about 1-1.25" that restricts a front-mount placement. I'd rather not mount it in front of the AC condenser if I can at all get away with it.Ideas?well, we dip in to the single digits sometimes in winter, but not often. I'll cross that bridge when I get there, I suppose. ;)Amazing how hard it is to find 1/2" transmission hose... I used a piece of heater hose in the interim, until i find trans hose that big. Hopefully by the weekend. Otherwise, the truck was inoperable, as the leak was that bad!Update: So, I towed all weekend.. This morning, before work, I went out to disconnect the trailer. Walking out into the street, I noticed this trail of big drops of fluid down the street.. Following them visually, they went straight into my driveway (where I was backed in, yesterday) to a big puddly wet spot.. I then looked under the truck on the street and BAM! Big puddle.. Went to unhook the trailer and noticed the front of the trailer, the tongue, chains, and back of the truck were all covered in trans fluid (initial inspection.) I made a couple trips/deliveries, one being 118mi round trip. Sunday morning, I checked the hitch, chains, etc., before setting off and all was dry/dusty. So something happened over the course of yesterday, in making a second 118mi round trip and a couple short local ones.. I'll have to get under there and clean everything off so I can see where it's coming from... :banghead: - - - Updated - - - UPDATE: found the leak... http://forum.mopar1973man.com/attachment.php?attachmentid=4506&d=1348536821 However, I can't seem to stop the leak. I've removed the fitting, checked it and the pipe. I don't see or feel any burrs or anything.. I reinstalled the line and tightened the hell out of it.. Still leaks.. So, tomorrow, I'm gonna have to bypass this block-mounted cooler.. Anyone (with an auto trans) ever bypass the block-mounted cooler and only run a front-mount trans cooler? Suggestions on doing so?
 Be safe, mike. and keep your hair tucked in your hat. I'd hate to see your lockes go up in smoke!LMFAO!Bear in mind, ryan.. I've broken my neck and had 3 vertibrae fused back together. I've also no feeling in my hands due to nerve damage.. so, on one side of the coin, I can't hardly feel what I'm doing.On the other side, High muscular strain causes severe pain throughout my neck. If not the awkwardness of getting to the actual sensor doesn't hurt, the yanking/pulling on the ratchet definitely does ;)My wife & I did the heater core in our '98 Grand Cherokee Ltd in an afternoon. Totally removed the dash in it's entirety. Disconnect batteries.Just dropped the steering column and let it lay on the seat.It's a Mr. Gasket #12D diesel pump. It doesn't produce much pressure, but it definitely raised my fuel pressure to nominal levels until I could replace the lift pump.I've seen them at Pep Boys, Advance Auto Parts, and Auto Zone, usually on the shelf.It is by no means a replacement lift pump, but it does do a great job in aiding a weak OE-style lift.Now, I use it as a transfer pump for draining fuel tanks if needed.Ok, here's what I did when I was in your shoes with my 2001.. I installed one of these inline with the weak stock lift pump.. I'm not saying this is an alternative to a legitimate pump, but for $50-60 buck, it'll buy you some time..