Haggar
Unpaid Member
-
Joined
-
Last visited
Everything posted by Haggar
-
leather, Don't be afraid of it. It is a very nice simple mechanical system, easy to understand when you get it apart. I don't have the cable yet, but I have converted mine to mechanical. (I just go through the wheel well and push my pin in to lock it, and have tie wire to hold it. yeah very back yard, but works for me ) The total travel is only about 3/4" to 7/8" travel from fully locked to fully unlocked. I begin locking BEFORE my light comes on, so If I get a flicker it is still engaged. I think you are engaged too. Take a peek and adjust it properly. You will know then. HTH Hag
-
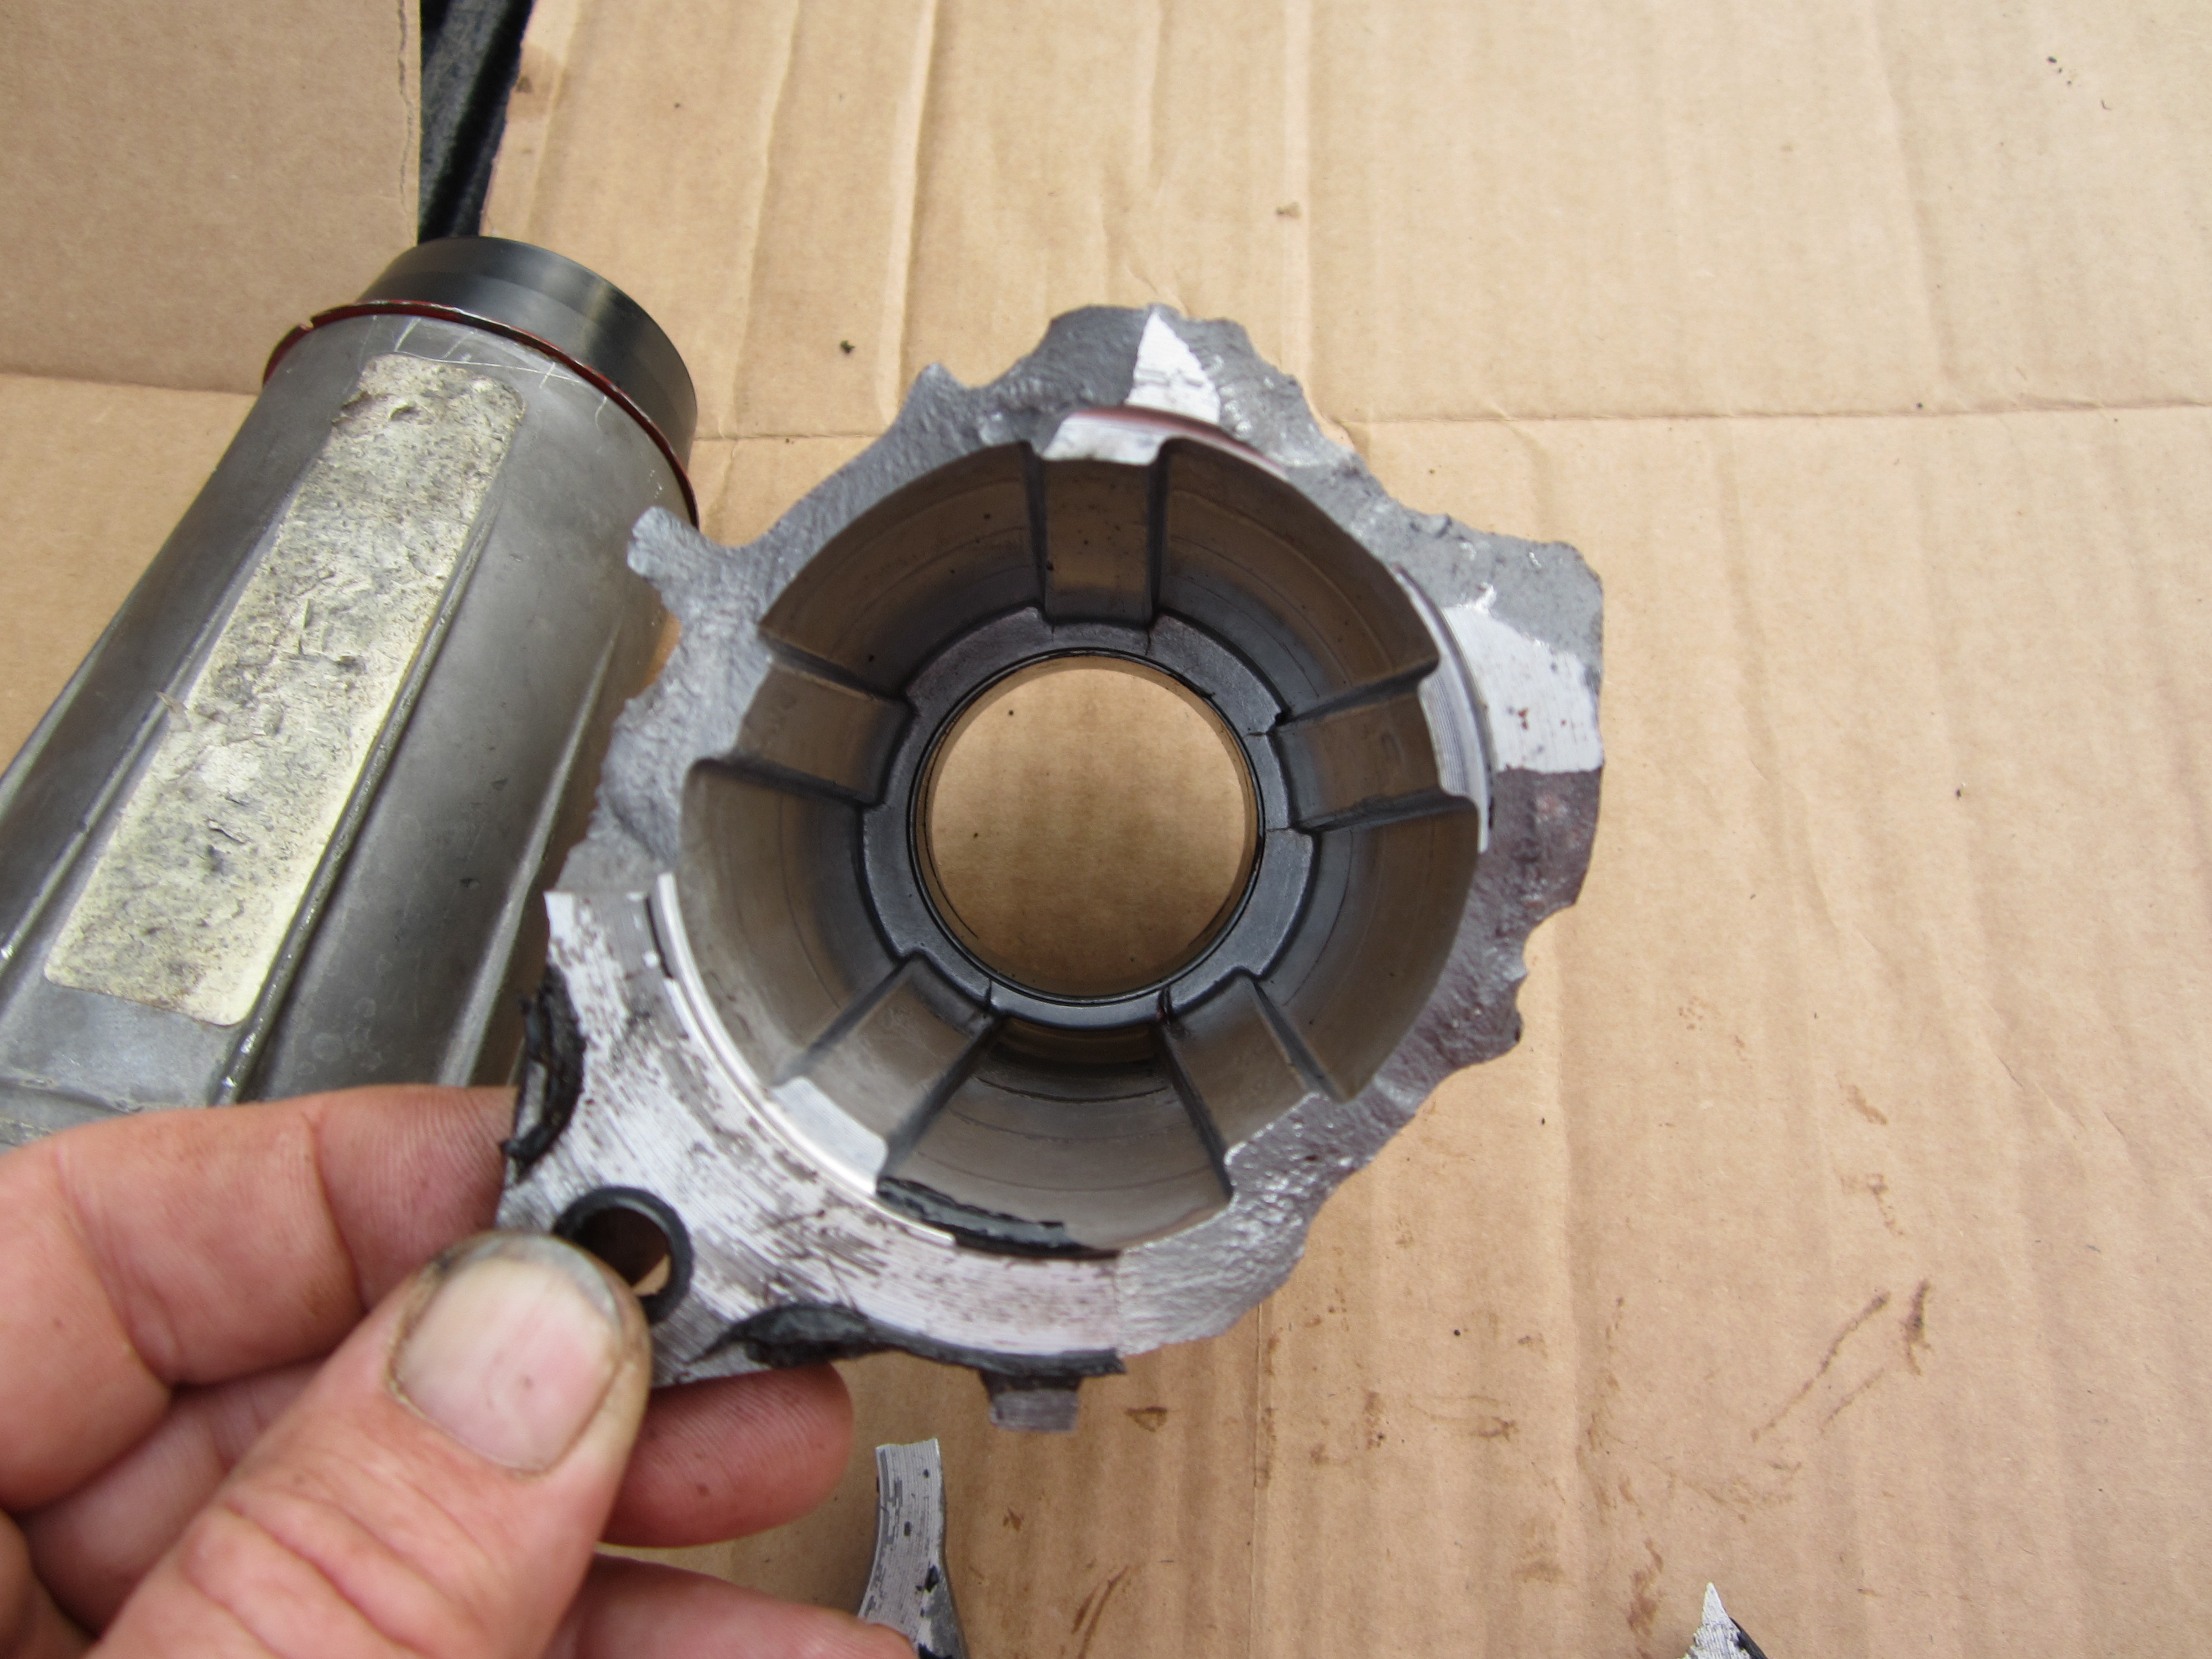
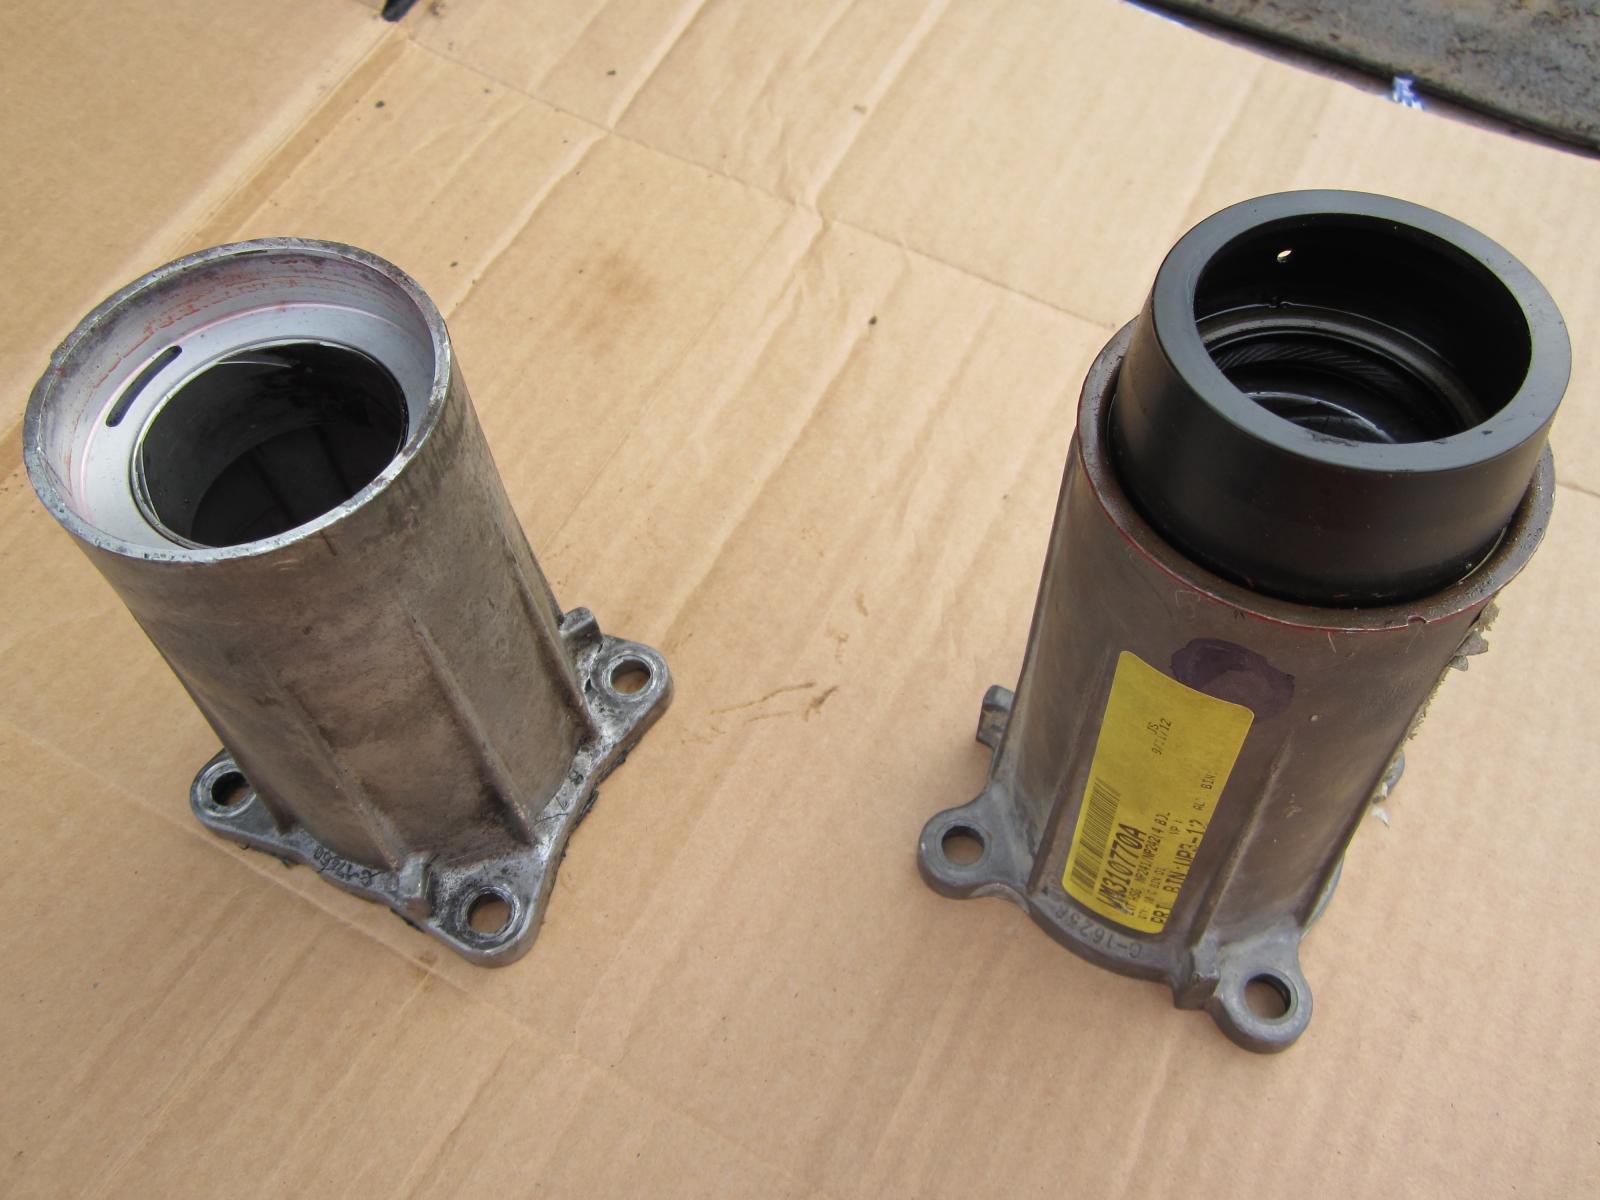
Burnt, I hated to give you a part number... I couldn't find exactly what bushing I used, and there seems to be some discussion on what is really the right one. Here are a couple pictures. There was some question when I was looking for my replacement, as to whether two casting numbers were use-able. (C-16258 and C-17460) They are interchangeable. The earlier design had the fluid return machined in, and the later it was just cast in. No real functional difference. Yoke to bushing actual clearance numbers seem to elude everyone... It looks like New should be 0.003"-0.004" worn out is in the 0.008"-0.009" range. Hope this helps! Hag


-
Arrg, Sorry burnt! Missed this, was gone all weekend! Hope you get it straight! What I surmised my problems to be, with the tailshaft bushing going, the splines are designed to transmit torque, NOT center the yoke. (The bushing is supposed to center it, the output shaft of the TC is almost "free" in that direction) So the shaft can move eccentrically. I am not sure why this shows up worse on some vehicles and others not at all.... I have had trouble with the "location" of the carrier bearing... like the slop in the holes makes a difference.... on an early S10, The driveshaft would vibrate unless you had the carrier put back in JUST the right spot.... I never could explain it. (I have a center post lift, so I could never see what happened easily while it was loaded, so maybe something moved funny.) Hag
-
Burnt, You can do either. Depends on if you have a press, and feel like making a tool to put it in (also removal can be a pain long thin drifts or make a long tool to just catch it...) On my dodge, I was able to get a "rebuilt" tail shaft housing, but it was more because mine was cracked and leaking. After thinking about welding the aluminum (and the success rate there with oil soaked metal) , I just bought one. I was able to press one out and in in my Suburban, but I had to make drift to put the new one in. No it is not dealer only. You can try drivetrain.com, or quad 4x4 or randy's ring and pinion maybe. (I can't tell if you have a 2wd or 4x4, but the parts are similar, but not the same.) here is the bushing on quad 4x4 for the nv241dld transfer case. http://www.quad4x4.com/qu10130.html The only trick to getting it in is: make a pusher that will support the id and only have a small shoulder to push the bushing in place. A good transmission shop should be able to do it for you reasonably also. (if you take them the tail shaft.) they should have all the drifts and such needed. GL! Hag
-
bruiser, If the high mount (third) brake light is out, fuse 5 (in the PDC) is bad or the brake light switch is bad. Joint connector number 6 gives the brake light switch signal to the hazard (multi-function) switch. The hazards utilize Fuse 4 in the PDC to provide their power. If this fuse is good, then it looks to be a bad brake light switch. HTH Hag
-
Tom, That does not look bad. If it is really new parts. That seems to be in the right neighborhood for remans from everyone else. If you want to do some comparisons, I like DTS (drive train specialists) and Drivetrain.com you could see how they compare. But that does not seem to be an outrageous price at all. Looking at his feedback, I would trust him. It looks like the only trouble is some shipping/delivery issues on his higher volume items. And it looks like phone is better than email to him. He is showing more than 10 in stock, so looks like it should ship right out. HTH Hag
-
Mike and everyone else, I looked into the fuel boss yesterday. (thanks for bringing that up!!!!) I noticed that they went to a bit of trouble keeping the (or a) electric pump in the system. I don't think this is from a self priming aspect.... Most positive displacement gear pumps have a good Net Positive Suction Head number (NPSH) The ones I was looking at had easily more than 2' of lift. BUT.... That is at rated speed..... While cranking we don't have proper operational speed. So probably poor lift and poor initial flow rate. The Fuel Boss designers wanted/ needed that bit of pressure right during starting, because the mechanical pump cannot perform there. I think this is even more evident based on where the check valve(s) are located. The only check valve is to keep the electric lift pump flooded with fuel (edit see a bit later in thoughts...). They do not try and protect either pump from the fact that the other one is on. (the electric is "shut off" so it doesn't just sit and dead head while the real pump is doing the work.) (The check valve also prevent "flow" of fuel from the Fuel Boss from running the electric pump backwards when it is off. I bet this is more the reason for it than keeping the electric pump flooded.....) So the fuel boss is coming on as the engine starts, working against the pressure of the running electric pump. This upstream pressure could actually reduce the available NPSH, but the gear pump is strong enough to blow right through that. (Mike this is where it could help with priming if that were necessary, but I don't think it is.) I hope this made sense... I was still fleshing it out as I wrote that. I think the guys who originally designed it didn't want to have to use the electric pump. But the mechanical pump, by itself, could be troublesome on some systems that allowed a little bit of air in. The delay in fuel flow and pressure to the VP during long crank times etc, was just too long for some people (or it caused other problems, again the VP acting as a positive displacement pump has to pull its volume from somewhere.... if air is easy to get that is what it would rather have), so it was easier to use a "jockey" pump (hey it was already there) to cover the low flow and pressures needed during starting, and then bring the big boy on line for the real work. I kinda like it... It is an interesting alternative. the Jockey pump COULD be a mechanical fuel pump like the older vehicles had....(run from a lobe on the camshaft)(with proper check valves and routing) or just about anything else.. (accumulator?) hmmmmm Hag
-
Glad you got it! (sorry I led you astray....) There should be ZERO binding in a proper cardan joint. Something is bad in there. Also take apart the oetiker clamps. (if you are careful you can reuse them, but sometimes you have to cut them apart) so you can clean and lubricate the splines. As your axle articulates, the drive shaft has to be able to easily displace or the cardan joints will be damaged from longitudinal loading. (or the bearings for the pinion or TC output.) Have a good one! Hag
-
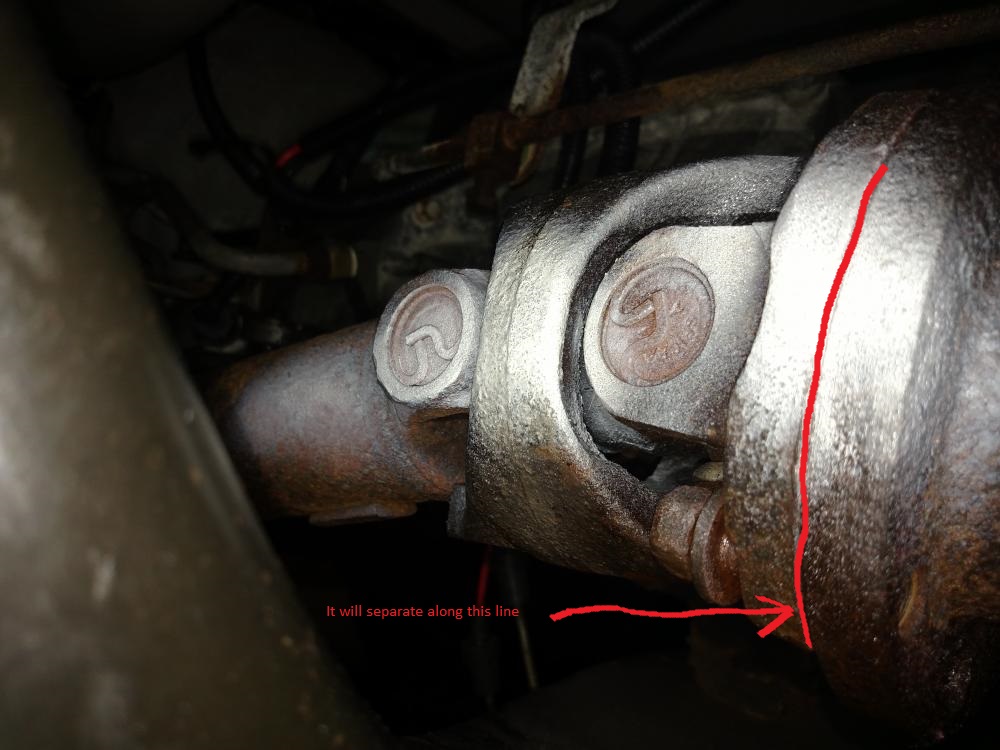
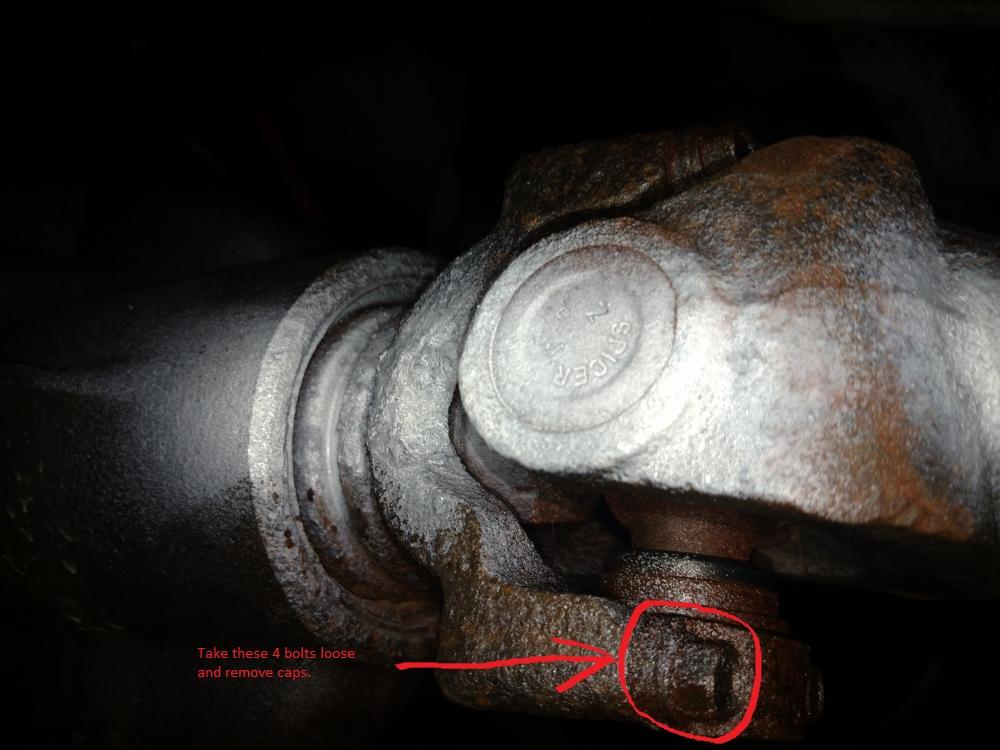
Tom, Here is a page from the FSM right where the circle 2 arrow is, the shaft will get shorter under that boot allowing you the room to get it out. HTH 2001 FSM Ram 3-2 half page.pdf
-
Tom, Sorry, I gave you the rear shaft removal procedure. alas you are working on the front....(sorry) The bungies are for the long rear. The front you won't need them. Get all the bolts loose then, the mating flange can be separated, and the bolts removed successfully. (the bolt with the most room is the one you can't feel very well. the one closest to the floor board and closest to the TC.) Your mating flanges will be rusted and harder to remove. You "can" try to drive a wedge between, but you will need to file off any damage you do to the flanges. (there is a pilot on one flange so you cannot "slide" them to the side etc, it has to come straight forward. The front, remove the two straps (4 nuts) take the straps out. compress the front drive shaft. (push it toward the TC) There are splines in the middle (supposedly under a rubber boot). It could be very tight (there is usually a grease nipple to lubricate those splines, but no one ever does...) It should compress and get short enough to come out of the front yoke, and then you can pull the whole assembly out. GL HTH Hag

-
Tom, In my truck, all you have to do to get the drive shaft out is: 1) remove rear ears (yoke bolts?) at rear differential. Pry shaft a bit toward front of truck to get it out of the yoke on rear end. (can be stuck sometimes from rust). Put electrical tape around universal cups to keep them from going somewhere. 2) hang drive shaft with some bungies to bottom of truck. (I support the rear near differential. and near carrier bearing, but towards rear of truck.) 3) MARK LOCATION OF CARRIER BEARING MOUNT WITH PAINT MARKER!!! remove 2 bolts from carrier bearing mounting bracket. (yes they are hard to get to, but not impossible) (you want to put the carrier bearing back in as close to the same place as it came out, unless its location is part of the vibration.... which does happen...) 4) Be ready for fluid to come out of tail shaft. 5) Pull driveshaft from rear of TC. Protect TC end of driveshaft with rag or bag. you don't want dirt in there or scratches. 6) If you need to drive the truck, you need to cover the hole at rear of TC. I was able to find a cap from a liquid detergent bottle that slipped right into the seal, but didn't touch the output shaft. Duct taped it in place and drove for days like that. I can't remember if our TC have a pump, but the GM's do, so if you try to drive it without covering it, you won't loose just splash, but pump it right out in no time. I hope that helps and I didn't miss anything. Hag
-
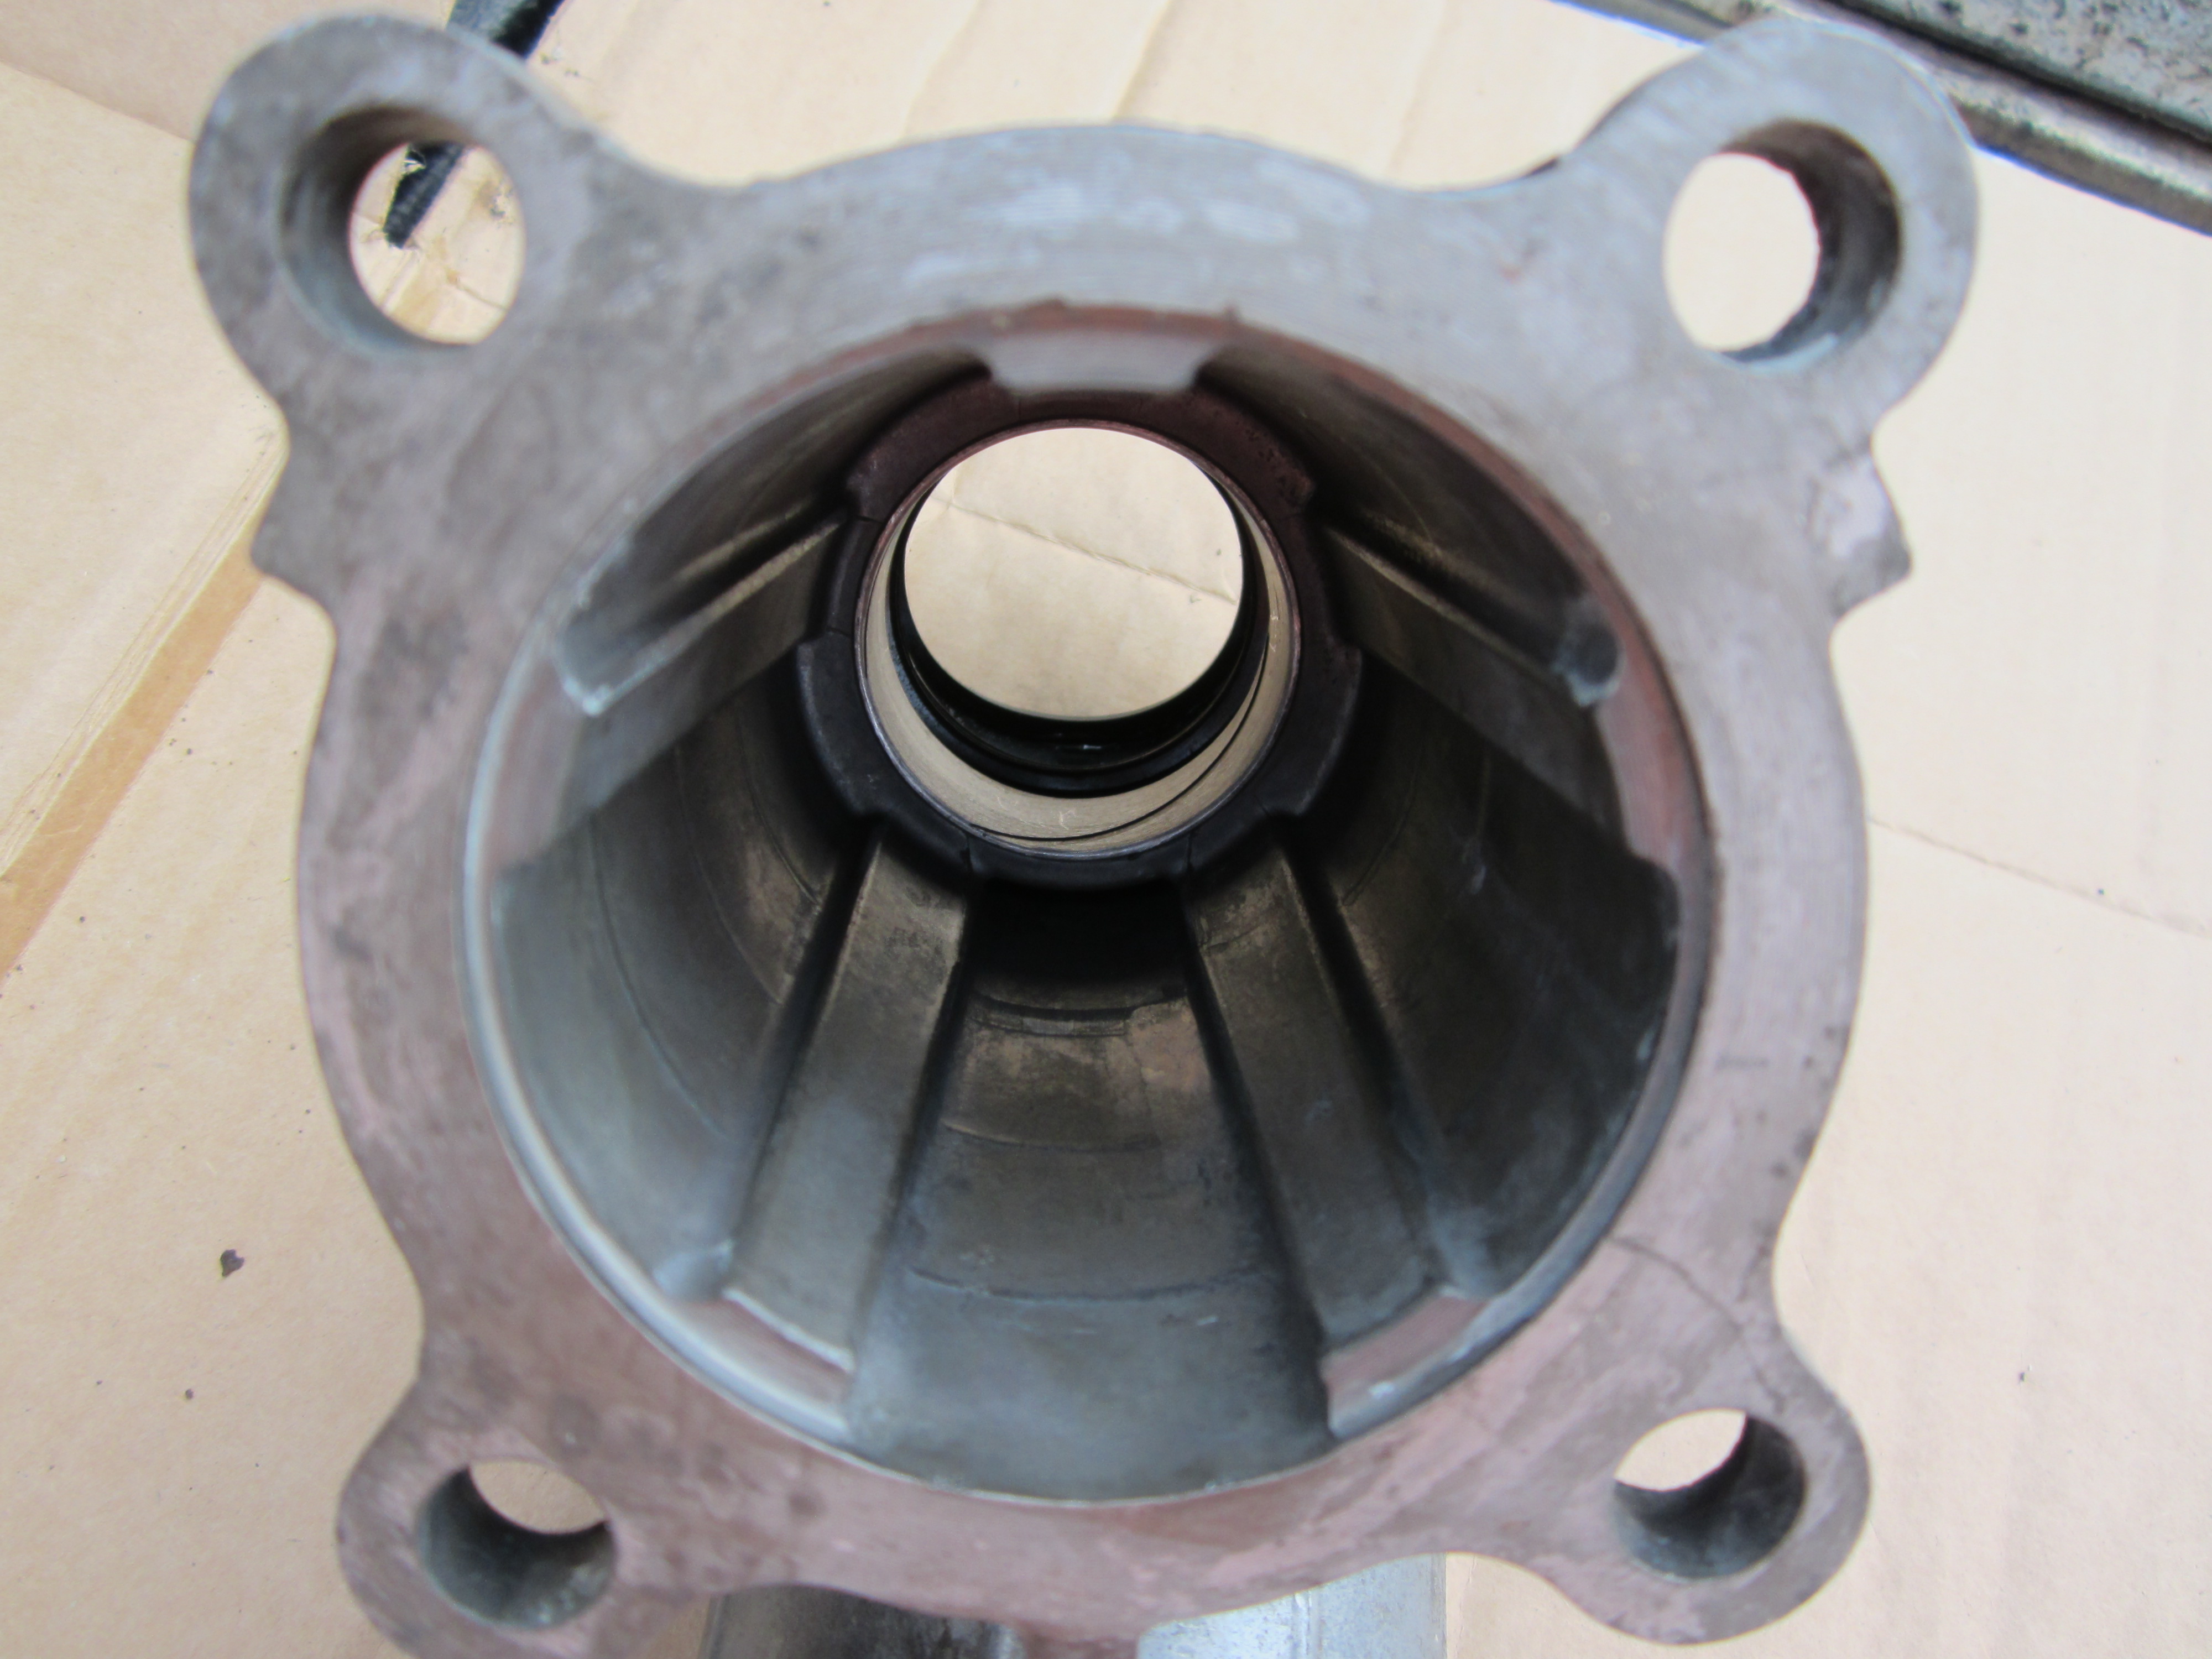
There is a bushing in the tail shaft of the transfer case. This is pretty important, and is often overlooked. It allows the yoke to "rattle" (for lack of a better term) on the output shaft. I have recently replaced it on my truck and one of the suburbasauruses. Good luck! Hag
-
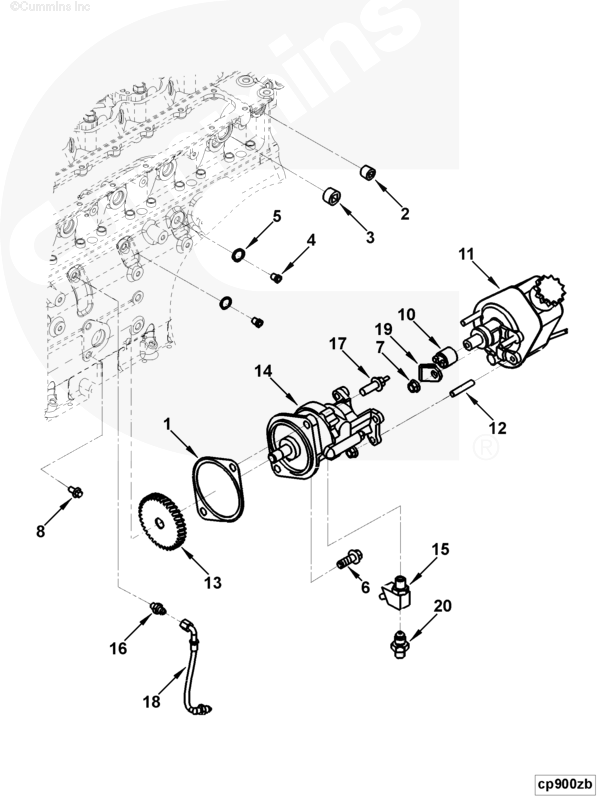
Nates, There are a couple places for the vacuum pump to leak oil. 1) Gasket to front timing cover (least likely) 2) rear seal where the drive coupling exits to drive the power steering pump. 3) oil feed line. You will just have to clean the area well and use mirrors to see where it is coming from. Hope you find it! http://www.fixinrams.com/ has some great pictures of the vacuum pump apart so you might be able to see better what you are looking at/for. HTH Hag
-
Tom, Welcome to the forum! Diagnosing a vibration can be fun! (throwing hammers through windows fun) It appears that you notice this vibration even at idle and in park. (you need to verify this. Big difference on what to check.) Your harmonic balancer looks ok in the picture. If you notice it sitting still, that narrows it to a rotational vibration (anything on the crankshaft) or the vibration isolators (the motor mounts, transmission/transfer case mount) I would check the trans/transfer case mount first, as you also noticed a funny shift. (I use a jack and jack the trans up. The trans should move with the mount, not relative to it. Motor mounts are harder to check, but you have a friend watch the motor move as you have it in drive (or reverse) with brakes fully applied. HTH Hag
-
CSM, What values did you get when you ohmed it? From leg to leg, you should read about 12 to 14.5 ohms (depends on the wattage of the heater) AND you should check for continuity of each leg to the ground. (looking for current leakage.) There should be ZERO continuity to ground. When it is quiet, I actually hear the water boiling near my block heater (a gurgling noise). That would be normal. You could have popped the breaker, due to the load. a 1200w heater is pulling 10 amps. Standard household circuits are broken on 15 amps. high inrush can fool house breakers. (ESPECIALLY if it is one of the newer arc flash or GFI types.) You may not have a problem at all. HTH Hag
-
The trailer/tow option/connector takes a wire for reverse lights to the trailer for reverse lights on the trailer. I am betting that the trailer constant hot is now touching the neutral safety wire on the rear end of the vehicle. Hope you find it! GL Hag 2001 FSM Ram 8W-54-3.pdf
-
Glad you got it!! Sorry I was so far behind.... the Christmas and New Year schedule have been rather... ummmm... interesting here.lol!Hag
-
Sargen,page 8w-50-10 and 8w-50-11 are the pages.You will notice that the headlight switch actually changes the state of the fog light relay.The fog light relay interrupts the GROUND of the lights. The positive of the fog lights is hot 100% of the time from Fuse G in the PDC.Sounds like you figured it out. Just hook the bulbs up to the two wires. (RD/OR is 12v+ and LB is 12v- ) They will operate off of the headlight switch and multifunction switch just like the original ones.Hag
-
I will donate to the shipping fund.Hag
-
Hope everyone had a great Christmas and new Year!! Sorry I wasn't on.... Too much going on.I just wanted to point out that that the Item in center of picture 2 is actually the combination Transfer case vent (very important), and CAD switch ambient vent. When we change the lever on the TC, the vacuum switch there applies vacuum to the CAD to either engage it or disengage it. The CAD actuator must vent the accumulated vacuum to change direction, it does this through this vent.Have a good one,Hag
-
I think I will try the sports then.I emailed Daniel Stern... are they still in business? I am not going to beg a vendor to sell me a product.... I never got a response from them, so I ordered parts from else where...What are the best bulbs to use? Mainly for the high beam. I don't want my low beams to blind people. Hag
-
Mike,LOLz!!! City boys are NOT the only ones with cracked exhausts.... Case in point right here...But I have to give some "city boy" creds, because my replacement is a great stocker, left over from a pretty boy upgrade! Chances are they come from running exhaust too hot, and turning truck off, or hot hot hot and splashes of water. It is a long casting, differential cooling is gonna be a constant problem. A clean up (so the casting can move under the bolts) and retorque during valve lash adjustment would probably keep them from cracking. It is pretty obvious from the corrosion on mine, the casting could not slip under the hold downs.Merry Christmas everyone,Hag
-
Dodge,Depends on the rust.... My ball joint press now has a bit of an S shape along with the C shape. I had to cut the ball joints and take the knuckles to work and use our 150 ton press to take them out. My 20 ton home press hit the pressure relief without budging.Most times they are not that bad, but get a better press even if you have to rent it. I also had to make some of my own pushers, as the standard sizes in the kit are for skate boards or bicycles or something.....Good LuckMerry Christmas,Hag
-
Will be putting new headlamp assemblies in.I sort of had my heart set on putting sports in. 4 headlamps HAVE to be better than two. (no I am not doing the projector bs etc. I would consider "crystal clear" etc stock replacements)I noticed there are far more choices for single bulb solutions. In the back of my mind I remember a couple people mentioning that the 2 bulbs in the housing didn't provide good reflective backs etc.I have ZERO concerns about new wiring. (either way, I will be going to control relays) The price difference (quad vs dual) is not significant enough to make the difference.Which will give me better lighting without UNINTENTIONALLY blinding others. (sometimes they do deserve it...)all suggestions greatly appreciated! Even the stfu ones!Have a Merry Christmas!!Hag
-
Rogan,Weird, my servo was missing too.... Plug hanging there, but no bracket. I got a servo out of a junk truck, (so not sure if it works or not... could be part of the problem.)in the back of my mind, I have wondered if mine should not have a servo, because if I am not mistaken, the 02 model did all the cruise through the PCM (mine is the 01.5). But since I had the pigtail hanging there, I figured it would use it. my light comes on when I arm it, but no other response.... Thanks for the wiring diagram. Will try and sort it out a bit when I have time. (the fenders will be off soon, so it will be a good time to peek at it.)Hag