rancherman
Unpaid Member
-
Joined
-
Last visited
Everything posted by rancherman
-
Yep.. 'problem solvers'. greasable upper and lower. I can picture in my mind how you cut through the boots, and knocked out the tapers with a hammer, but how the heck did you press out the actual joint???? Did you 'carry' the whole front axle to the shop press?? One good whack was all I needed to knock the knuckle off the 2 tapers.. (I was quite surprised)
-
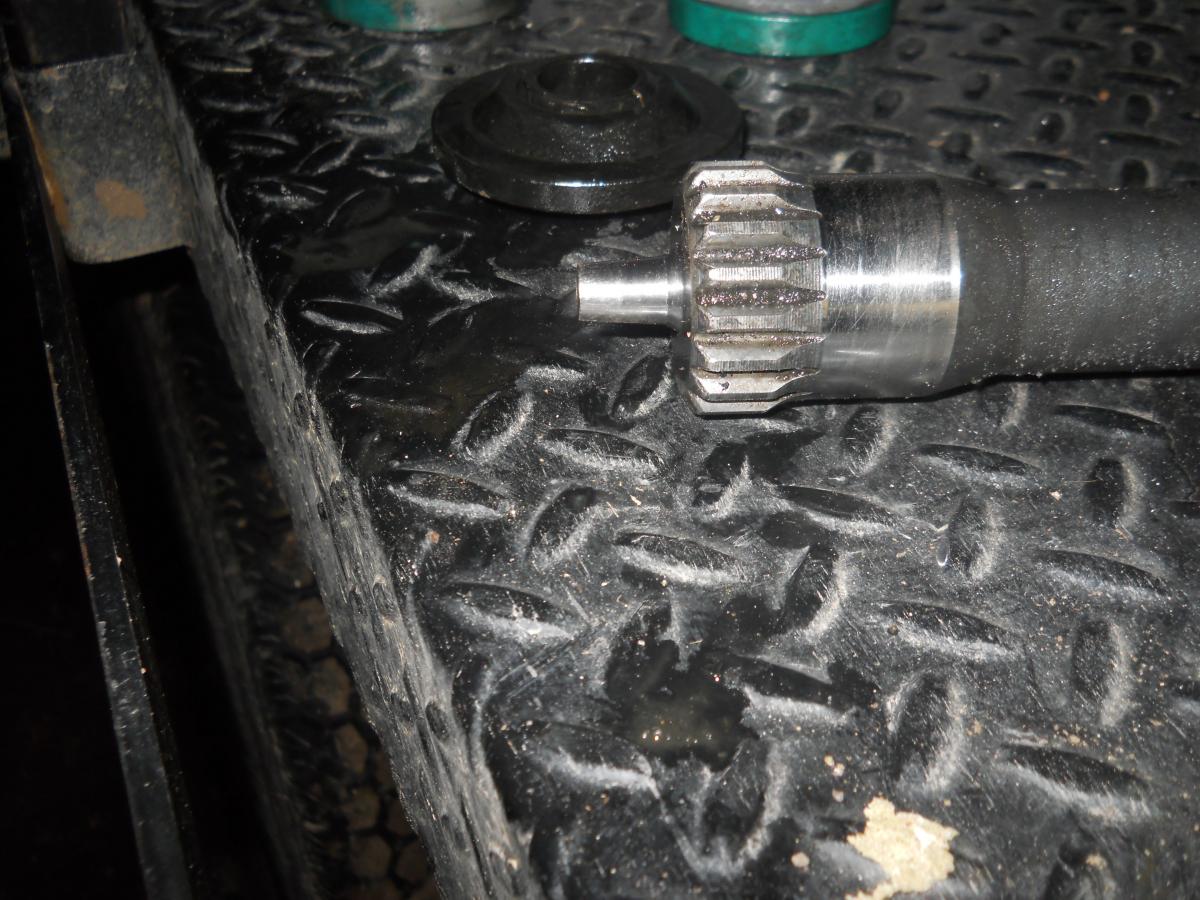
update... I think I found the right replacement.. OEM replacement from Mother Mopar about 90 bucks. Not as bad as I envisioned. Price: $116.00 You Save: $31.45 (27% off) Sale Price: $84.55 Genuine Mopar Manufacturer: Mopar Part Number: 4762162 Part: INTERMED SHAFT Edit, Now I'm not real sure about this #. The online mopar parts sites do not specify dana 44 or dana 60.. I scrolled down and found this listed # for ALL dana 44's. even though I typed in 'Ram 3500' It still showed a dana 44. hmmmm. So I went down the list a little further and found the correct one for the dana 60. about 5 bucks more. I'll confirm before ordering. Look at part # 6 in the diagram^^^^ it's called a pilot bearing. Mine is missing in action.. either ground up or someone else forgot to put it in...
-
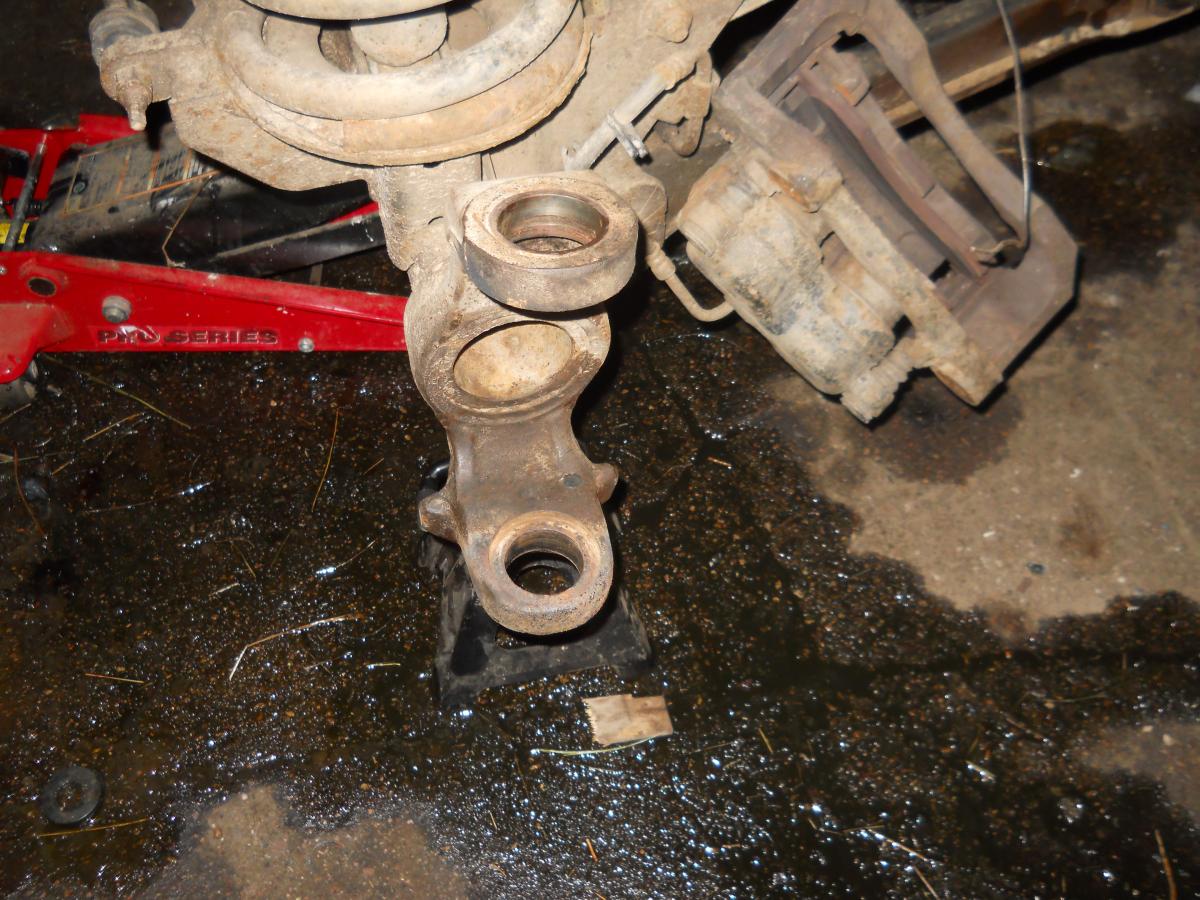
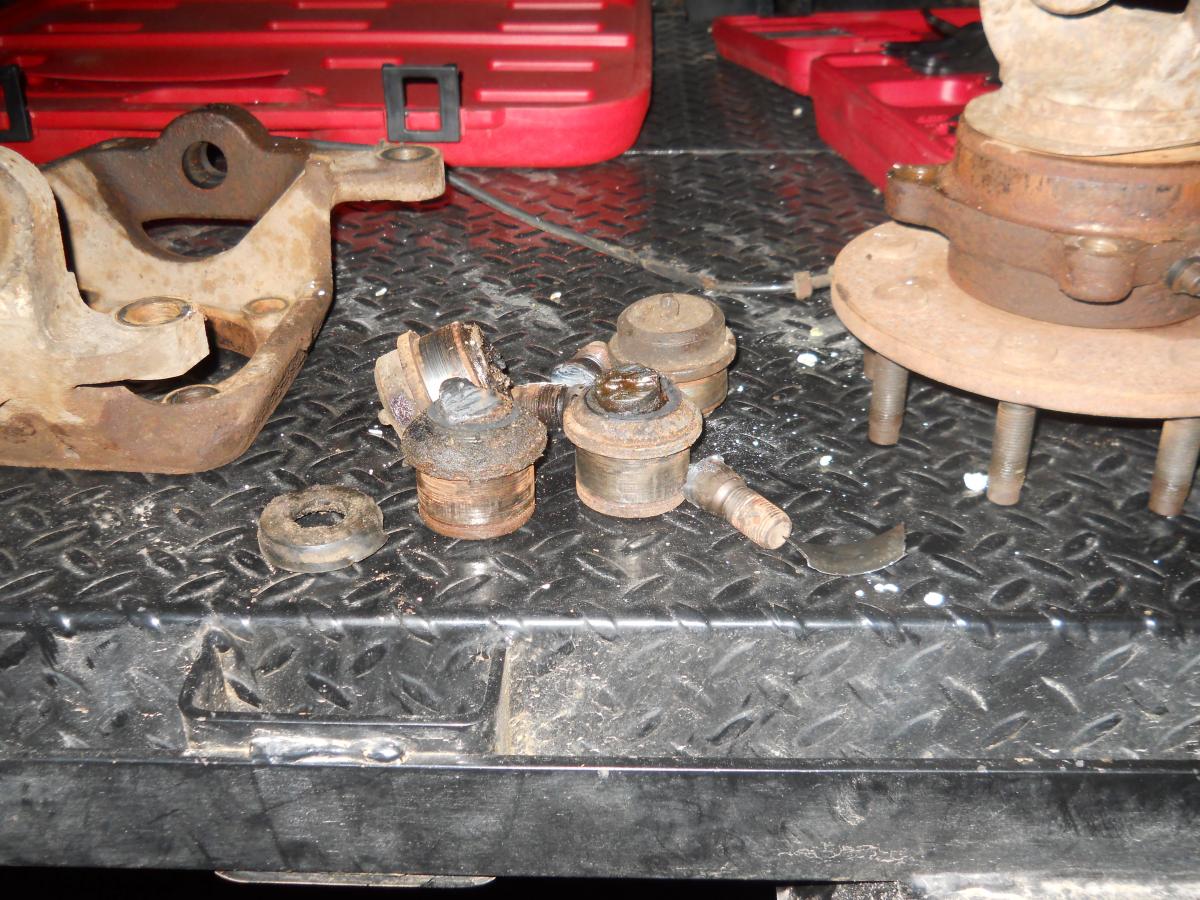
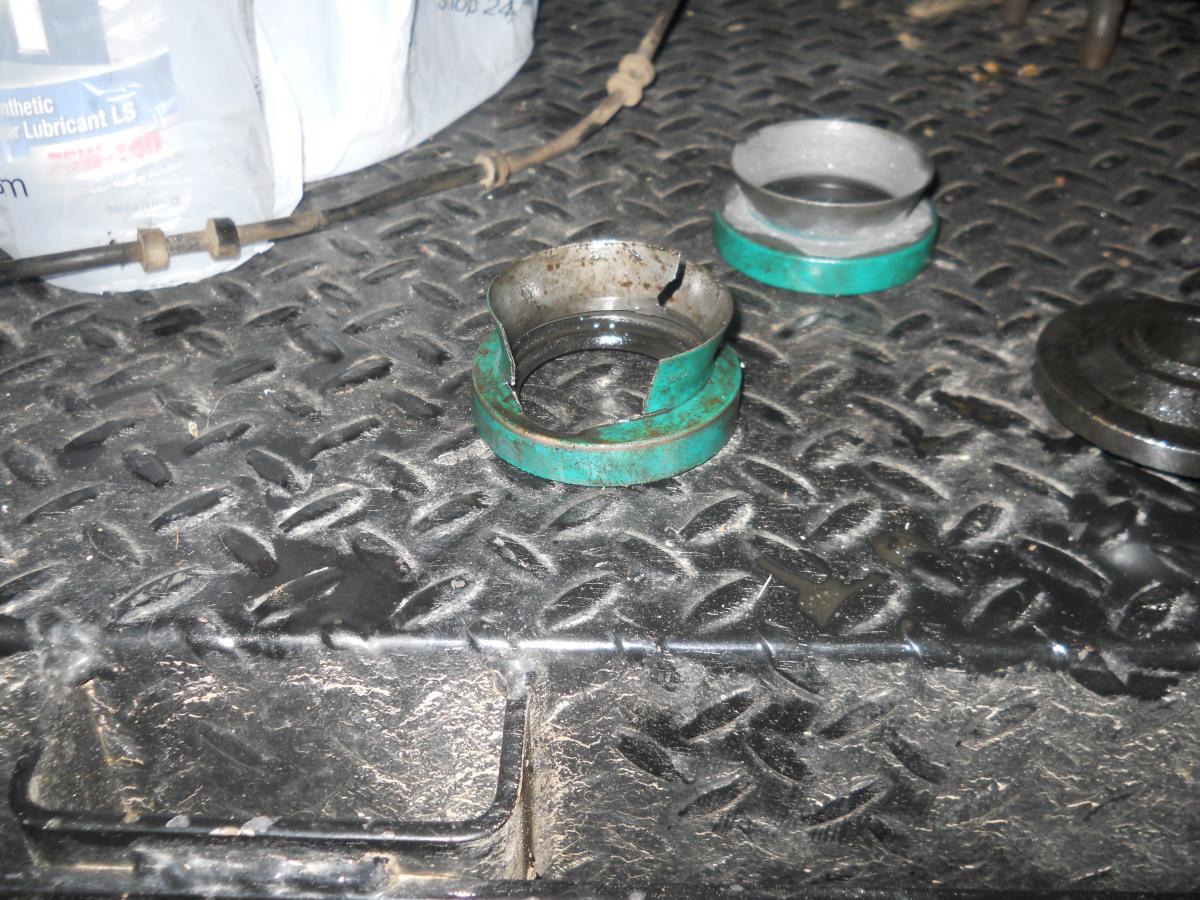
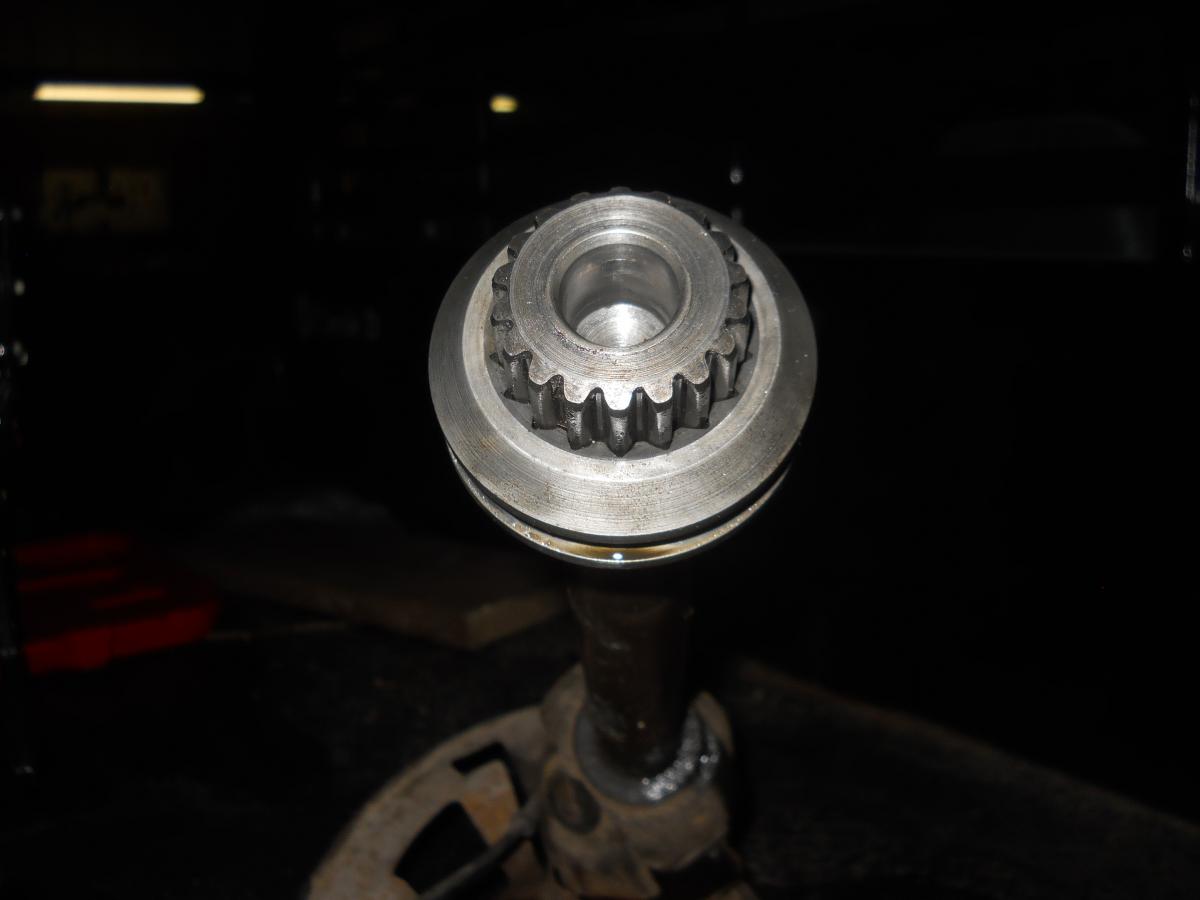
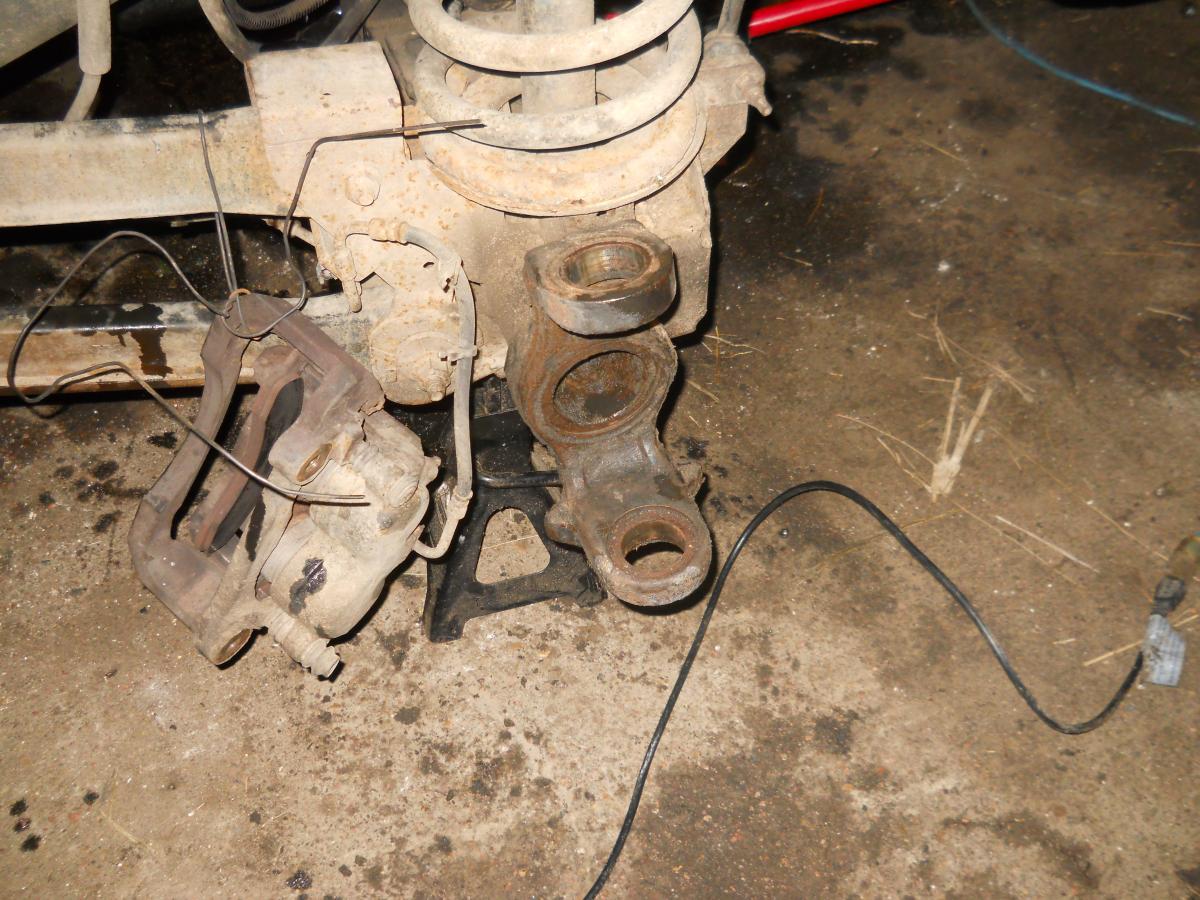
Pics: Here's proof that I actually got the ball joints out! My ebay ball joint press kit has quite few receivers and arbor bits, but I still had to torch off the studs (after knocking off the knuckle) There just wasn't enough 'room' in the one receiver that fit diameter wise. I had to 'modify' one receiver... cut it at a slight angle with a chop saw. The lower ball joint yoke is in a tapered yoke, necessitating a taper cut receiver. Otherwise, there's no way the press would be straight. I pulled the intermediate shaft out before knocking out the seal.. I was getting a little suspicious... Look at the taper on the small part. Should be straight. There's about 3/8ths inch slop in the mating hole on the outboard shaft Dang, if that shaft was just flopping around, no wonder for my previous post "4X4 slow to disengage" Here's the old seal, and a new one. Notice the busted side, and 180 degrees away, is a 'wear hole'... The old seal was a snap to knock out; the taper cone was gone and the steel rod I used to knock out the seal, I immediately found a 'flat' spot! Otherwise, the rod would've just skated up and over the seal! Here is the end of the outboard shaft... the hole in the end actually supports the shaft. I suspect it needs to be just loose enough for lube to get in, and for allowing the axle to move a little when the steering is turned. God only knows what this hole has been hammered out to! Look closely, you can see some 'smearing' going on inside! And last but not least... proof of the ball joints removed on the passenger side. The round adapter disk (black) you see should fit the new seal perfectly to pull it home with a redi rod. It is part of the adapters in the ball joint press kit. So far, I haven't been able to find a new intermediate shaft. Either oem or aftermarket... anyone have any ideas? Outboard shafts are plentiful.


-
GEEZ... I think I found my 'slow to shift into 4x4' problem. The inner shaft on the passenger side is supported by the carrier itself (inboard) and there is a bushing to support the outboard side... Then the outer shaft has a smaller diameter which rides in the inner shaft. Mine is ground down to a pointed nub... there is no way the outer axle would've been lined up so the sliding collar could engage. I'll get pics later for tonight. Anyway, I got the seal knocked out really easy!.. I was surprised, the 'cone' that guides the axle into the seal was busted out in the bottom 1/3.. which made it easy to put a pipe up against to drive out. The loose axle apparently wallowed out the seal, and a big part of the cone that guides the axle into the seal.. Now I need to measure the pilot hole in the other axle to see if it's chewed out, or if the smaller diameter on the inner axle is toast.
-
I'd try to find a Petty history buff, or some other Petty/DODGE/timeline website, Got to be something somewhere some guru has documented every move Petty ever made, both on track and business wise. You bet, they put a ton of 318's in tonners.. just geared em accordingly! Dodge did quite a work up of small blocks for the sportsman classes, based on the 340/360 configuration.. It's very possible Petty had a hand in it! As you know, Dodge and NASCAR didn't 'get along' after the early 70's... There could've been quite a pile of iron that got thrown back into 'public access'. Legends, myths, folklore, and RACING... Those were pretty exciting times! Wading through what actually happened will give you more information than could be ever processed.. both actual truth, and gossip..
-
I'm wondering if it was the actual 318 that was supposed to be in it. 318's never made it into nascar. If the valve cover was original with the engine, and the stars were Petty's doing, It's possible you were actually looking at a 360. ONLY difference visibly is the thickness of the harmonic balancer. 318's all had steel cranks, (thin balancer) and 360's were cast crank. (thick ugly balancer) The steel cranks were heavier than the cast ones, and therefore were internally balanced. Most of us that have owned 318's never would place "very powerful, fast" in the same sentence of 318 cube engine! Sure, 340-360 heads, intakes, and cams can make the 318 come to life, but still, in a 3/4 pickup.... Seeing you are in 'deep south'... you probably had some 'good ol boys' rendition of a Petty clone or knock off.... Lots of things can happen in 40 years!
-
MOOG K7394 and K7397. Both made in USA Both greasable Both look good, Nice precision looking outside. Both still in the box Hopefully by tonight I'll have found some time to press them in.,. Probably spend most of my free time on the truck today with the axle seal.
-
Going to do the passenger side only tomorrow. I've read a couple threads where they've knocked the seal in from the cad opening.. and others where they used redi rod and pulled it in with a few washers. How did you do yours? I only got the ball joints out today. Took almost 3 hours, but I had to cobble up a little better tool for the bottoms. I got a ebay 'special' Chinese ball joint press and kit, So I wasn't too upset that I took one of the receiver tubes and cut a slight angle across the end. The angle cut now matches the taper of the lower yoke.. I just hope the threads on the screw hold up 4 more times. They really got beat up in one spot. Son pickup up fresh axle lube, Mobil 1 75-140. Whew, that stuff is pricey! 20 bucks a quart. Good reason to install a new 12 dollar seal!
-
Thanks Dieselfuture. I replaced this trackbar about a year ago, and 'seems' ok for now. The one I put on was supposed to have a larger ball joint I'll keep it in mind (adjustable) when it's time! Just walked in the door, got her stripped down to the ball joints. Drivers side bearing was a little troublesome, passenger came right out with using the extension trick on both. Man, it's nice having someone behind the wheel! 2 hours in it so far. Ha, drivers tie rod pulled apart just as the bearing came out! (shoot, I probably had 'nother 10k miles on that joint!) ;) passenger shaft seal apparently needs changed. Will do both. Any slick ways to clean the gunk out of the axle tube? Or just take out the cad and front cover and shove all the crap to those and clean out from there? never changed those before, are they just a soft seal? snag with a hooked wire and pull out? EDIT did some searching, and I might of been a little optimistic on how easy the seals are to replace! Since only the passenger side is leaking, I'll only replace that one.. through the cad opening.
-
I'm pretty sure there is at least 1 'good running' 24v in the Denver area.. might be a tad closer!
-
whoo! Parts finally showed up yesterday. And the temp here is ABOVE freezing during the day! I'll try to get the ol 3500 disassembled tonight. Nice surprise, both uppers and lowers are greasable. I thought only the lowers were going to be according to the description @ rockauto. Best place to point those long 45 degree zerks? to the rear?
-
Going with bedliner only, on my ranch truck But if the noise is too ringy dingy, I'll pop a rubber one back
-
Good question. "Legal or not" I guarantee you, if an accident occurs with injury or death of your passenger or occupant of other vehicle.. the insurance companies will have a field day with the poor bastard that has a custom 'anything'.
-
I'm still laughing my arse off... I gotta get out more!
-
mine is on the way.. ordered last Fri. and yes 2wd low is a benefit. Squatingbull, our problems are the sliding collar that connects the two axles... Our factory hubs are not 'dis engageable'. (man, that's a new word) There's 2 things happening inside that little aluminum housing.. first, there is a shift fork that is actuated by vacuum, and the other is a switch that indicates if the dumb thing is completely positioned or not. When your vacuum came off the other time, it probably sucked up some crud, snow, whatever... and it's slow to respond.. I've replaced a lot of the vacuum switches on the transfer case over the years that were rusted, gunked up.. probably where the crud and water goes when the line falls off. When you have tires that are not quite equal front to rear, that can make engagement quite a battle too. If you go with manual hubs, like CSM said, you'd just lock this shift fork over into 'lock'.. I've used a stack of washers to hold it in place.baling twine. That stuff on-the-farm is the most evil "everywhere you look" stuff ever to be brought onto a farm. If it turns, rotates, spins, I guarantee some of that crap is wrapped up on it.. and has destroyed the seal. It's like a magnet.. And we are not exactly driving in the most sanitary conditions either! I've recently switched to Mobil Delvac grease. Before, I was using Conoco Super-sta #2 I really like how well the Mobil is 'staying' in worn bushings/bearings a lot longer.. it's really clingy.good deal.^^^^^ Take a die grinder or larger bit and knock off the sharp edge of the new hole (kinda like countersinking) Just enough to remove the square sharp corner. Granted, Dad's plows were subject to hitting raised manhole covers, median curbs, guard rails, bridge rails... buried/parked cars.. at 45 mph... Probably a tad more abuse than what you guys are doing!Where you drill, how you treat the raw edges of the new hole can be just as snarly as welding in the wrong place, using the wrong filler, heat. DOT is getting REALLY picky on 'add ons'. They are looking for welded-to-frame type stuff, and are not playing 'nice'. Both can be done with great results, both can be done with disastrous results. For liability reasons.. I'd recommend you find a bonafide truck frame shop. to get your hitch mounted. My Dad was co-owner of Henke Mfg. Snow plows. They made the big V plows, wingers, one-ways, and reversible plows seen on State highways... mounted to everything from small 2 1/2 ton trucks up to the biggest Motor grader/patrols.. Lets just say Dad did a lot of correspondence with these manufacturers to find out where they'd be allowed to drill, weld, on these new machines. Do NOT drill or weld anywhere close to the radius on the frame, or the lip of the frame itself.. the 'middle 2/3's' of the frame is safe... and NO weld will be perpendicular to the length of the frame. Always diagonal.. and never connect a weld to another one in a different direction. Stay away from existing holes, bolts with new holes or welds by at least 2x the diameter of THAT bolt or hole. IF something happens while going down the road, and it doesn't even require your loss of control of the truck or plow... just an accident and not even your fault, Your rig is going to be looked at with the most demanding eyes. If something is found that doesn't 'look right', it's going to hurt.Thanks, I think.LOL, I get it now! Fargo was dodge rebranded. Fargo Trucks From Wikipedia, the free encyclopedia Jump to: navigation, search Not to be confused with Wells Fargo. Fargo FK2-33 Truck 1946 Fargo pumper fire truck from Témiscaming, Quebec. Fargo Power Wagon truck in Batey ha-Osef Museum, Israel. A 1956 Fargo pickup. Fargo was a brand of truck manufactured by the Chrysler Corporation. Fargo trucks were a rebadging of Dodge trucks. History[edit] The first Fargo trucks were built in Chicago by the Fargo Motor Car Company from 1913 until 1922. In 1928 Chrysler bought the business and created their own line of Fargo trucks.[1] Shortly after its creation, Chrysler also bought the Dodge Brothers Company, adding Dodge and Graham Brothers badged trucks to its product line. From then on, Fargo trucks were almost identical to the Dodge ones, save for trim and name, and were sold by Chrysler-Plymouth dealers. Production began in the late 1920s.[1] U.S. sales were discontinued in the 1930s, but the name Fargo was used until 1972 for Canada, and lived longer for other countries around the world under the Chrysler Corporation's badge engineering marketing approach. Most of the Fargo trucks and bus chassis sold in Argentina,[2] Finland, Australia, India, and other countries in Europe and Asia were made in Chrysler's Kew (UK) plant. Most were sold also under the Dodge, Commer or DeSoto names. Theories on why Chrysler used the name Fargo include the imagery of open range of the American west, symbolized by the city of Fargo and the Wells-Fargo stage lines, while another theory assumes there was a play on the words "Far" and "Go", denoting durability. Fargo trucks today[edit] The Fargo brand still exists in Turkey, where Fargo and DeSoto trucks are currently made by Turkish manufacturer Askam, with no technical or business connection with Chrysler.[3]However Askam itself is the descendant of Chrysler Kamyon Montaj Fabrikası founded in 1964 at Istanbul.true, but I would've sworn there was a 'travelall' on the tailgate of his Dodge van.. I'll buzz up there and see if it's shed isn't buried in snow! LOL, weren't those IH's a 'design miracle' Not only the body, but their 4 cylinder.. "V-8" cut in half...LENGTHWISE.My neighbor has one, but it's called a travel-all? I remember the IH binders were called travelalls too.. Was the 'fargo' thing a Canadian moniker?Except for my Jeep CRD, EVERYTHING I own is getting 15-40 Conoco Fleet. Main reason for me is the inventory headache.. and almost importantly is the amount of zinc.. All my old junk is flat tappet. And the last time I did the research, couple years ago, that Conoco had the highest amount. I suppose I should do another check.Not really validating anything here, in fact was only demoting the KN to that level of use. Your probably right on the best type of air filtration.. just about all my off road stuff uses that. Large metal can, and there is a inverted blades inside the canister that gets the air rotating as it enters the canister.. the heavies then (should) spin to the outside, and end up in that little 'sump'. The largest filter I have is 30 inches long, and 18 in diameter.. RBHF! costs 120 bucks, and then there is the 'small' one that goes INSIDE that one! We blow those outers out for about 2 years, and replace both inner and outer every 2 years.