


Greenlee
Unpaid Member
-
Joined
-
Last visited
Everything posted by Greenlee
-
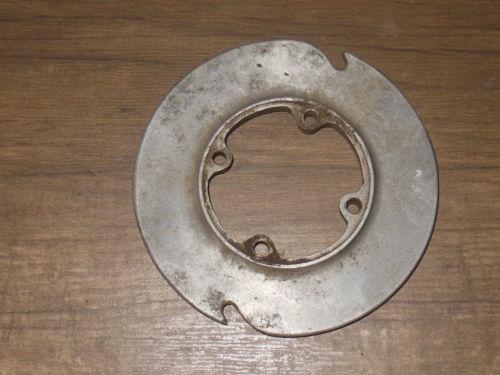
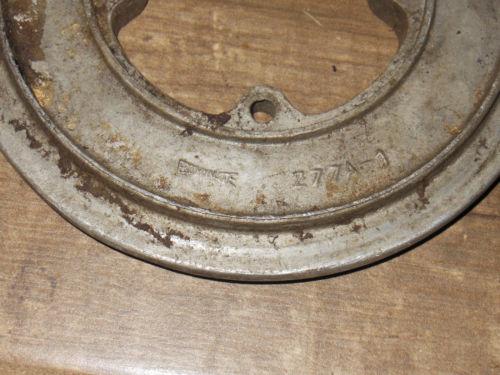
It's a step up from fabricating one especially for the price, it's some type of Vacuum Assembly, didn't pay any attention either. I throw it up when I see it again. Mopar Part No.: 5013679AA VAC LINE-A/C AND HEATER VACUUM HARNESS A/C And Heater Vacuum W/ PWR HEATED MIRRORS
-
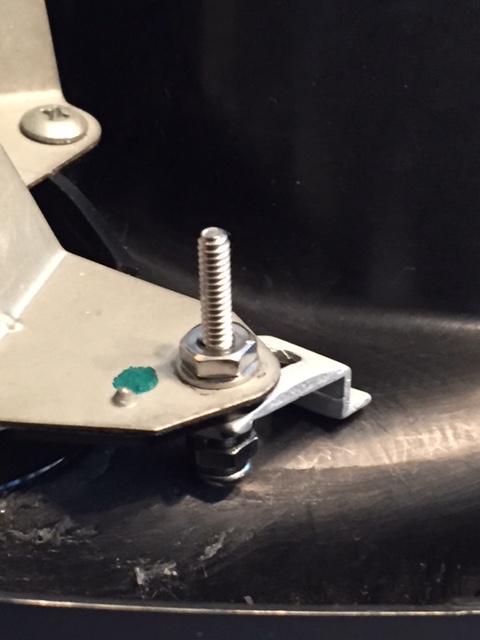
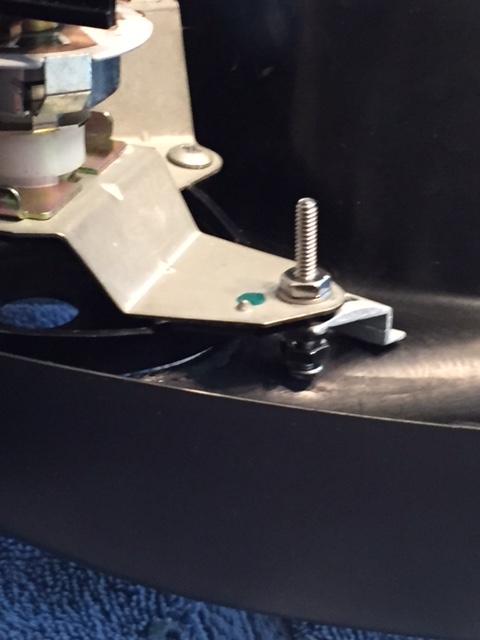
I bought a selection of 4 elbows, popular brand but I can't think of it off hand. None of them worked, haven't been able to reach the parts department at Dodge but I'm dong a search now, thanks for the tip The rubber elbow 1/4" is not sold separately by Chrysler, it's an entire assembly from the Vacuum Pump to the wire harness holding the line in place at the rubber hood seal. Part Number and Made in Mexico is 55056421AA The picture is from Rock Auto $13.03 Dorman has a 1/4" elbow as well, Dorman, Part # 47092, Advance Auto is holding one for me now, about $3.50. Live and Learn it's listed for $15 on the Mopar Parts Online
-
I know I was assuming that who ever worked on it might have done this deliberately. I was telling my son about it and mentioned the place I took my truck and he told me that he used to take his trucks there for repairs. Funny thing is when they got a truck back from them there was always more issues to deal with. On the last one a little over a year ago when they cranked it something was rattling horribly, they got a floor jack under it and found the starter bolts were all backed out and the starter just hanging in place or just enough to work. What ever the job was it had nothing to do with the starter and how could all of the bolts back out at the same time. Maybe the owner doesn't know what's going on but somebody is messing with more than what the work order was written for. I plan on telling my friend I usually deal with what happened and maybe he should be more careful who he recommends to fill in for him. I usually don't think of things like this happening but right off the bat the line is completely out of sight instead of being close to the nipple it came out of, I had to reroute it back over to the Vacuum Pump fitting on top, makes me wonder. I thankful for all the help and suggestions that guided me to find the issue. One more question I have is where I can buy a replacement rubber 90 that attaches to the Vacuum Pump and the small plastic vacuum line. What will work and where to find it. Thanks
-
Let's leave the past alone, there might be a few other little evil ones trying a sales pitch on spark plugs and color TV Okay, I thought of this too but this guy beat me to it, here's the link to a YouTube Video that addresses your start issue with the Honda
-
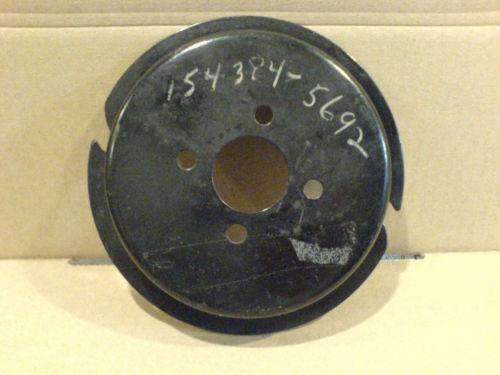
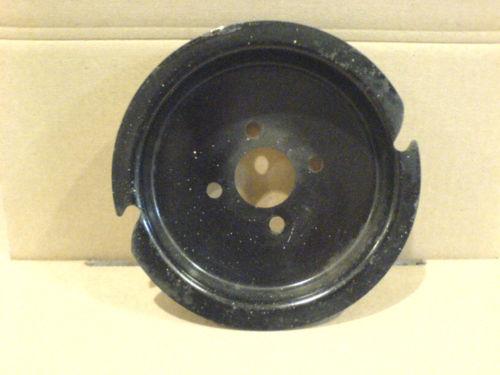
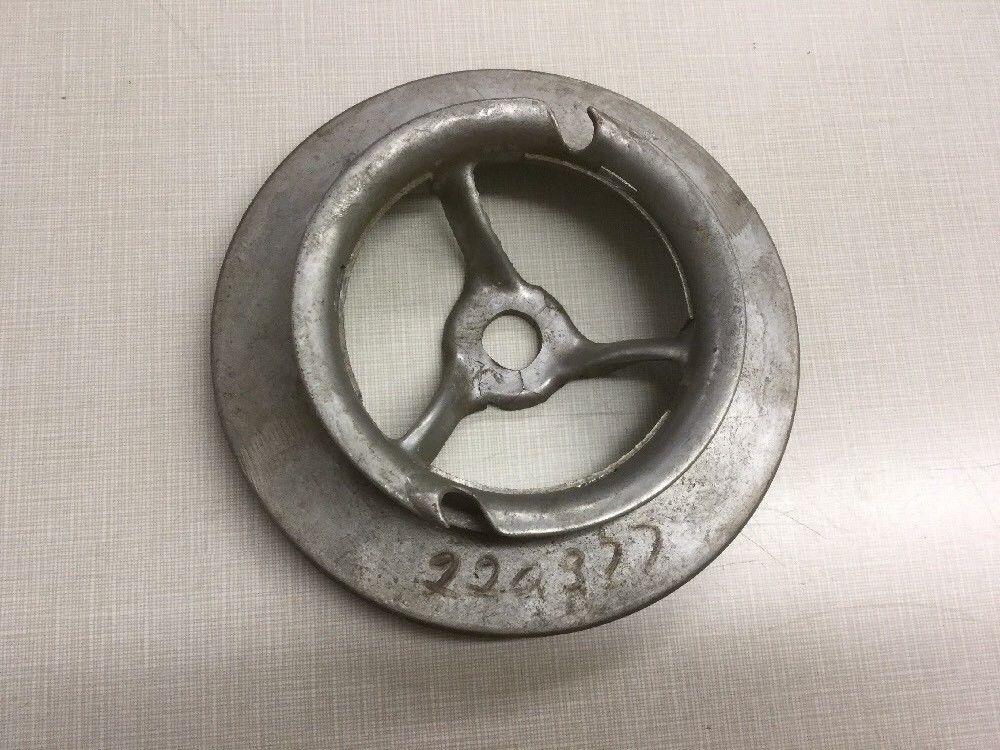
Here's another one I found on eBay, SIMPLICITY, ALLIS CHALMERS TRACTOR ROPE START PULLEY 154384 *NOS PART* H-14 $27.00 I fell victim to similar traps but not for color TV viewing afterwards, I bet shows looked great in color, how long did the effects last? lol Vintage Genuine Kohler Engine Recoil Starter Rope Pulley 220377 $35.00
-
Good advice, I might not be in the ball park with what needs to be found. Most Honda engines bust right off but I'm sure there are some that you have to call dripley's dad over to have a talk with it. Are there any pictures that we can see what's going on
-
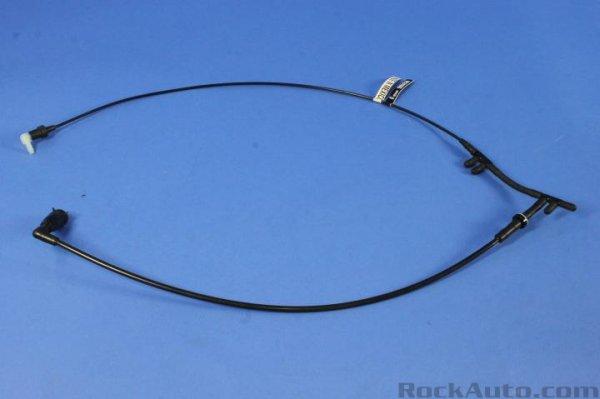
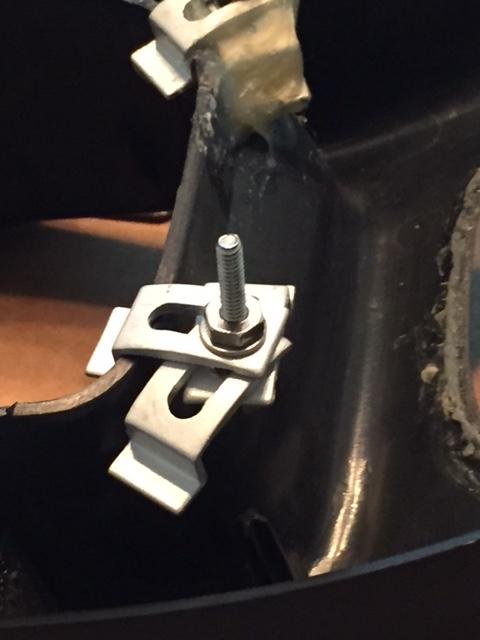
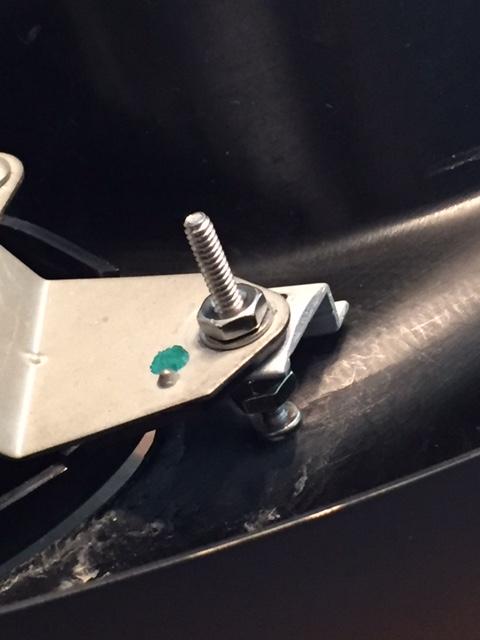
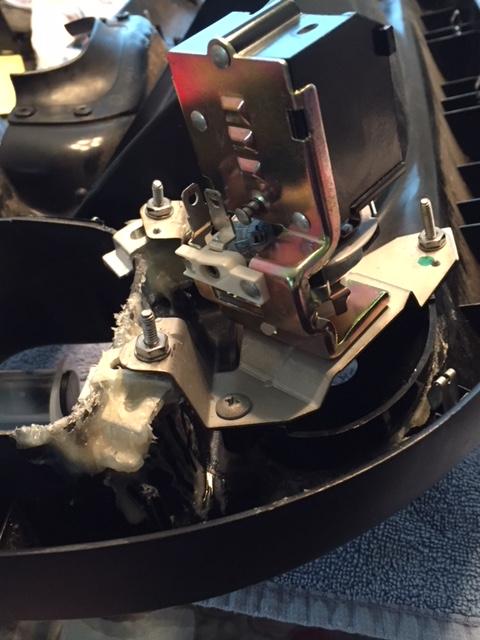
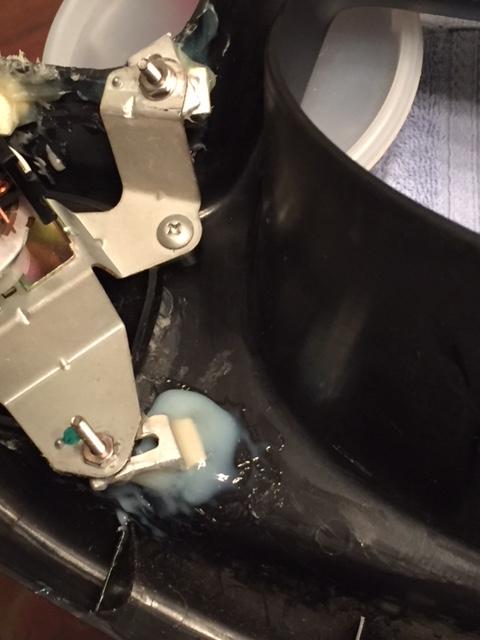
You all were right on the money, I got a flashlight and started at the Vacuum Pump then went up to the firewall and fuel filter area. Didn't see a thing, tried to look under the dash but I couldn't begin to get my fat head down there. Went back to the Vacuum Pump and this time noticed a small rubber 90 degree fitting that was open on the end. The line going to it was routed in a way that I couldn't see the end, somewhere under the battery. I had to pull it out and route it another way to mate up with the Vacuum Pump. Makes me wonder why in the world it would be like that. The rubber is rotten but still holding a vacuum. I need to replace it so tomorrow I'll start looking for another rubber 90, I'm not going to stick it to a buyer now that I've seen the condition. Many thanks for the help and advice.
-
I agree, you could do this and know it's safe to drive. I would shop around because some folks are way too high. Just saw what you said about the frame guy, I have seen frames for sale on eBay for around $800.00 in parts or salvage area. Shop around, there has to be a deal out there
-
I don't know if this would help or not but I began looking as soon as I saw your post. Thought about older outboard motors and found this on ebay: VINTAGE EVINRUDE MOTORS OUTBOARD BOAT MOTOR ROPE PULLEY COVER PLATE This is $40.00 but you can see from the design that with some tooling and material how you could take a 1/4" piece of plate turned on a lathe with 2 holes drilled apposing one another and finish slotting with a file, add spacers to under side to bring it up, weld it or bolt it to adapt to your engine and get a good pull rope with a wooden handle and you are on your way. Well this isn't much but I understand where your at. Maybe a piece or 3/4" material since you need an edge to make a groove for the rope. I wish I could help, I have a friend with a mill and lathe here in AL. You would have to design it to work on your engine. If you don't know that I don't make a lot of sense you will after reading this.
-
I guess I should start at the Vacuum Pump and chase the lines back to the Fuel Filter area like you are saying. Everything worked great prior to doing this. I hope it's an accident that caused the lines or what ever it is to lose Vacuum, I wasn't very happy with the owner and he made it clear he wasn't happy trying to start it back up. Thanks John, I know it's a goofy question or topic but I really appreciate some direction to go in. I'll let you all know what I find. Well I guess it could be an easy thing to pull loose, thank you DRipley for the reply, I'm going to start at the pump and work my way up to the firewall and so forth. Have a good day
-
I'll start there, is there any reason you can think of that it would be pulled off? It doesn't come into play with an oil change unless they thought it was a fuel line. It doesn't take much to start a 12v or 24v after the fuel filter is changed, I always primed it and cracked a few injector lines, never had a starting issue. I told this shop to call or even look it up on YouTube or Mopar Forum. I must have pissed them off to charge $40.00 with the oil and filters supplied. I'm getting too old for all of this. Appreciate your suggestion Royal Squire, I hope it's something simple.
-
I'm sure it will be better than any custom job you have already looked at, bring it on, you got plenty of viewers.
-
My friend Tony went out of town on a hunting trip so I had to take my 12v to another shop he mentioned for the oil and filter to be changed and fuel filter to be changed. I dropped it off last Thursday and picked it up a couple of hours ago. Left my phone number in case they couldn't get it started because of fuel filter change. They never called and that was the issue for taking 6 days to complete. Everything except the fuel gauge worked fine prior to leaving it with this shop. I get in to crank it and it acts like it is in 20* below zero, A/C only comes out the wind shield vents and cruise doesn't work either. More crap to deal with. I don't have a clue where to start looking for a line pulled off or cut, I feel it was done deliberately, hope I'm wrong about that. Don't see where any vacuum lines would come into play with a oil change. I took it back and told him what was going on but he said that wasn't any fault of theirs. I'm trying to sell this truck and thought I could list it today but now I need to fix the vacuum issue. Any body know where I should start looking? Thank you ahead of time for your help.
-
I think it would be a fun project and rewarding to know that you fixed the problem with the core and didn't spend a $1,000 doing it. There are a lot of How To on making a dash and Bezels on YouTube. A pile on materials that can be used. I think it would be great to find another avenue and not be at the mercy of the salvage yards wanting too much $$$$$$$ for a 20 year old part. I'm sure you will have the support of the entire Forum. I bet if you had a fiberglass core replacement it would sell. Good luck and keep us posted
-
Well I hope not too, I wish I had removed the Bezel and plastic piece inside the glove box to take a look at it's condition. Anyway you look at it your work is cut out for you. My only concern is this might get the wheels turning for others with similar issues. Thanks Yours is really torn up but I think you are on the right track to fabricate your own, If you have to remove the broken up Dash Core you would have a pattern to improve on or work with to make things work again. Let us know what you come up with and the steps involved. I would like to see it After I set the headlight switch in position on the backside of the Bezel it gave me an idea of the height but no idea of what I could improvise with. The clips jumped out at me as something to start with but I believe all good things come from above. the rest fell in place and I am thankful for that. Thank you, us Dodge owners need all the help we can get at times
-
I see now that mine are prone to go out. Not enough drive time even though they seem to always spin the engine just fine. Like everyone is saying, it depends what you are using the batteries for. I always paid top dollar thinking the best one's are the most expensive but that has nothing to do with it. We have a 2015 Buick LaCrosse we bought with 7K on it, my wife drives the wheels off. I've always checked the batteries and fluids but 3 weeks 5 weeks ago at 56K the battery went out, no warning, just all stop. I don't know what I could have done differently to make it last longer. A lot to learn about batteries or at least a lot to learn for me. Great information.
-
That's with 2 batteries as well on the 1st Gen? My batteries were $268.00, found the receipt today. I have never owned any vehicle batteries that lasted more than 4 years, 3 years is probably more accurate. Must be more to it than the average person knows or deals with, I'm happy you can get such a long period. The 2 new batteries in my 12v are 4 months old and the set prior were brand new, had to put them in shortly after I bought it. On the new batteries one shorted out and the other had 1 or 2 bad cells(?), anyway in 3 years I have only put about 7K miles on this truck. It doesn't matter, I'm used to buying them every 3 or 4 years anyway.
-
You won't as long as you keep the 2 stroke added. I'm a novice and continually learning but the 2 stoke has kept mine going. Did you notice a change in the way your engine sounds, quieter?
-
What a set up MoparMan, I'm trying to find out what the CCA is for my 98 12v and 99 24v, just bought 2 new batteries from Advance Auto 4 months ago, some where around $380.00. I was looking online and some are saying 1025 CCA, that's kind of high isn't it? Don't know anyone as smart as you, walking Encyclopedia
-
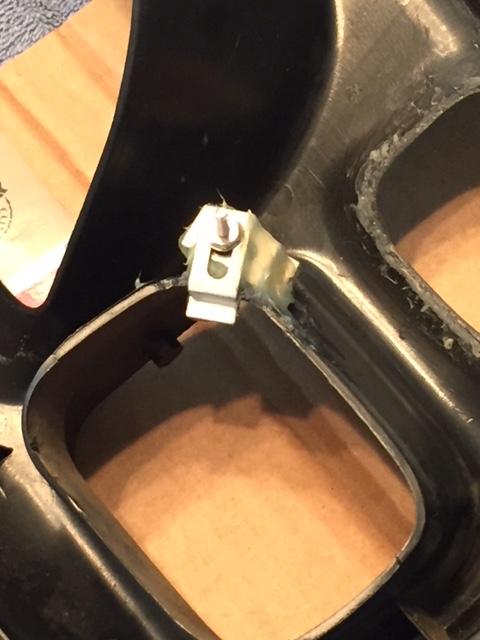
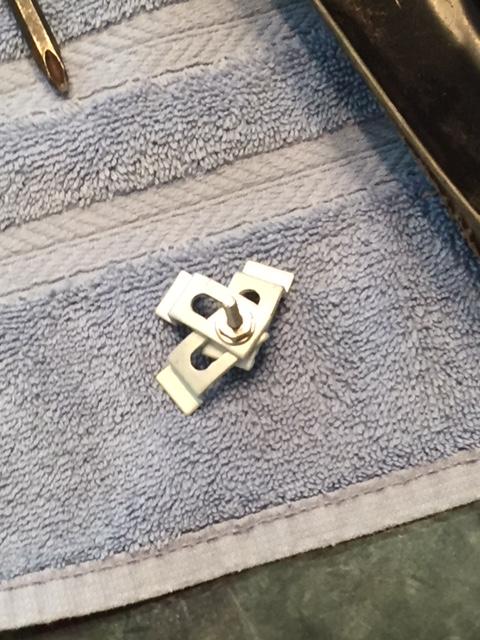
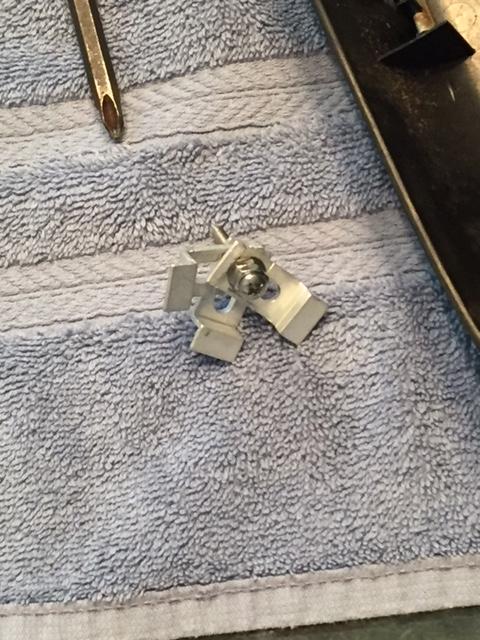
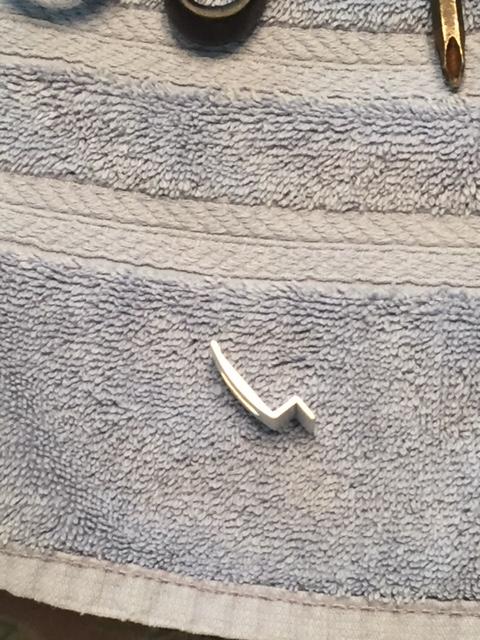
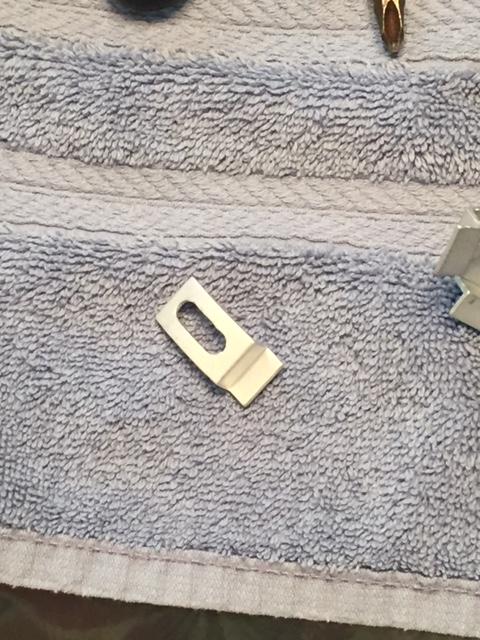
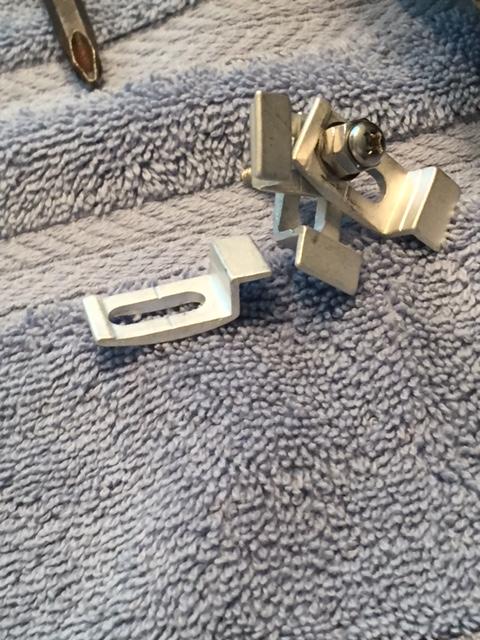
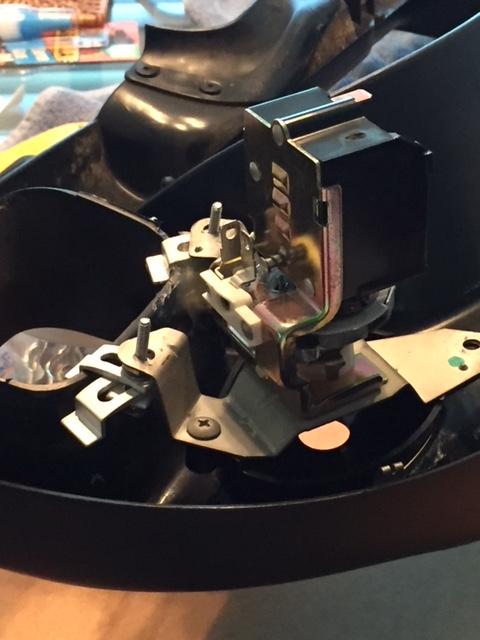
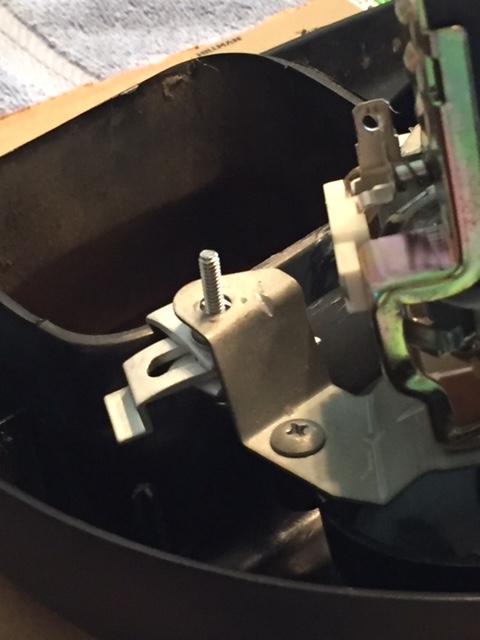
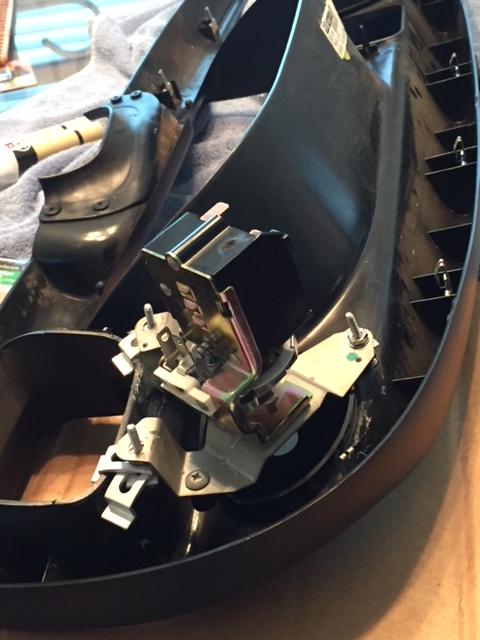
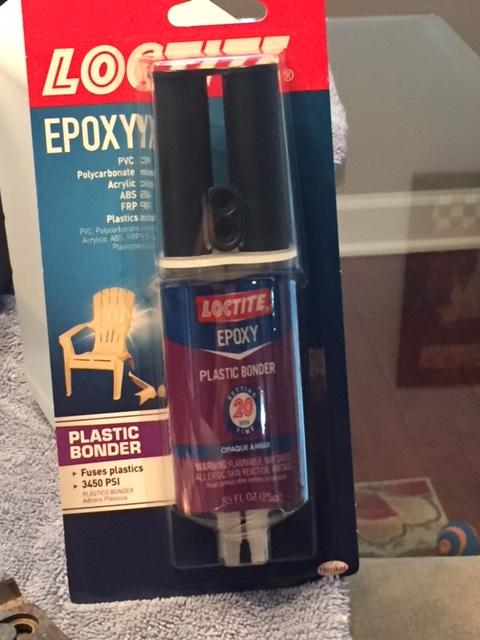
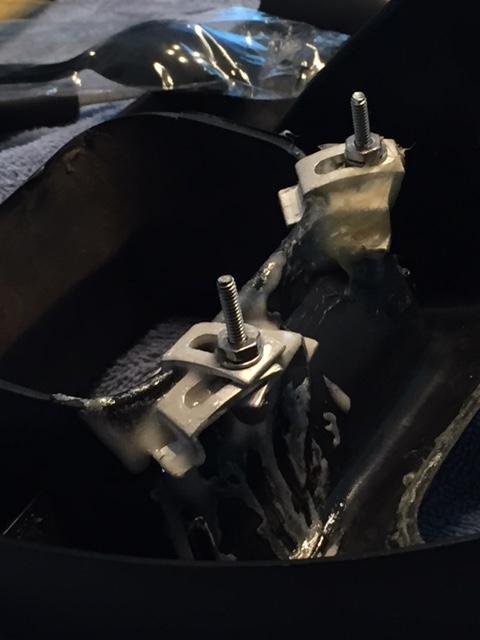
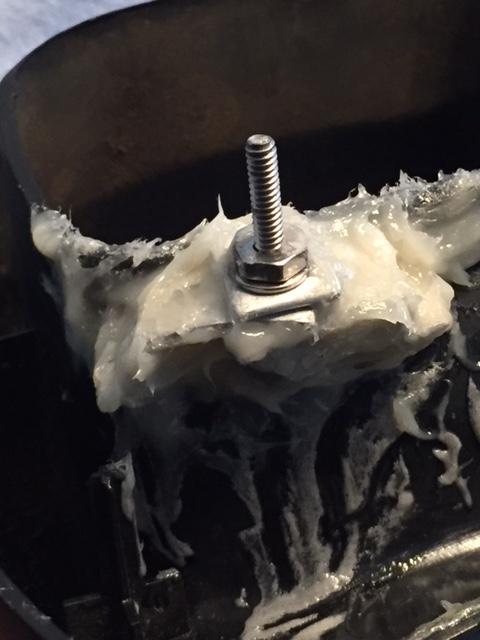
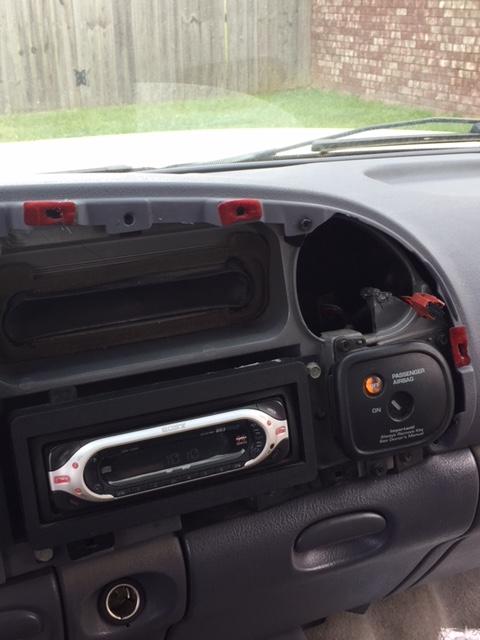
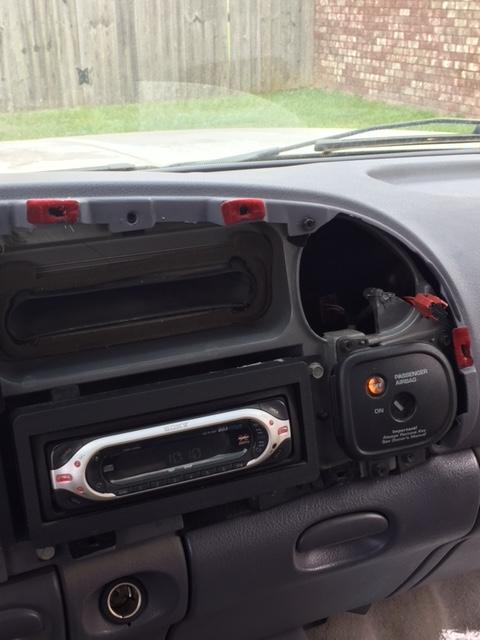
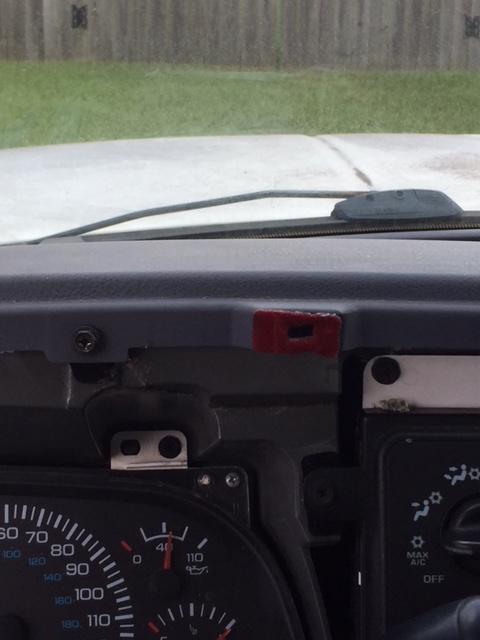
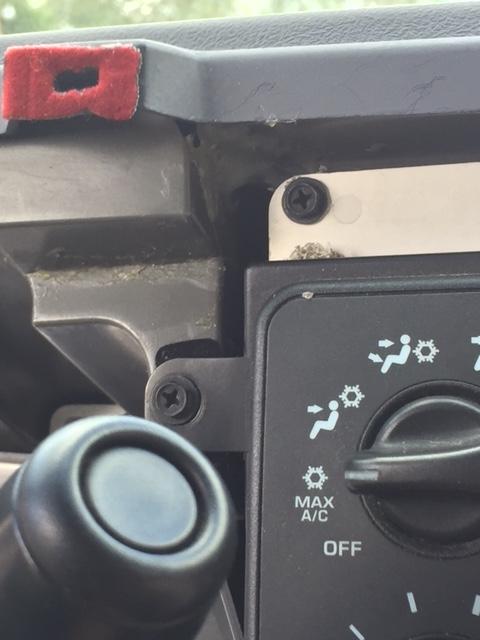
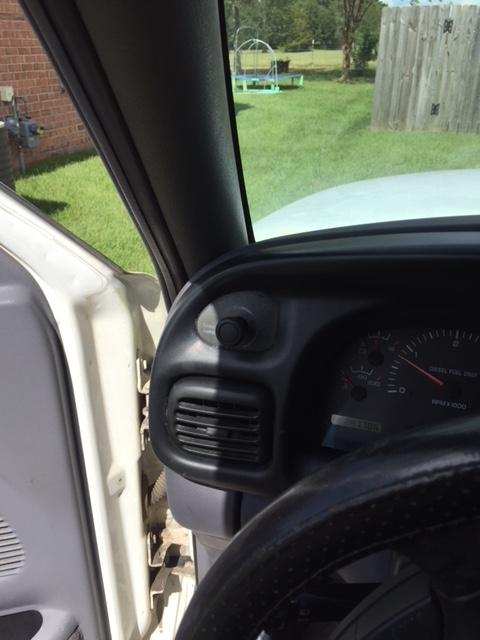
I am positive beyond a doubt that I am not alone dealing with a broken up dash core frame from a wreck or break-in or the famous familiar quote I hate to hear “What Ever” , it explains everything. Something happened to cause your plastic Dash Frame Core Assembly to break. Age could be the biggest factor or a combination of age and all of the above. Hopefully somebody has done this and would share the how to results on the Forum. My 1998 12 valve Dash Frame Core Assembly is in pitiful shape. Cracked from door to door in several key places like the A/C controls that had screws or a screw in the bottom plate but the top plate was completely gone so the Bezel was holding it in place. With some luck I found the pieces laying in the dash and reassembled it adding an additional screw at the top since the other holes were gone. The head light switch had been wired or rigged in a way to try and hold it but it moved around. Bouncing around as I drove but I thought it was something I could tighten. Besides the headlight switch being all up in the air, the Bezel is shot too, very brittle, and broke in several places. I have removed many but this one was a joke. I decided to sell this truck but couldn’t pass this on to a new owner knowing there has to be a way to make it work and be cosmetic again. The following is what I did to make it look NORMAL again. I used Loctite 2-part epoxy plastic glue because in was thick and didn’t run down the Bezel like Gorilla 2-part epoxy plastic glue. You need to clean all surfaces being glued, If it’s a slick surface you might want to score it up some to give the glue something to bite into. I also used the Loctite to fill holes that were broke out. I predrilled with a small bit to attach screws again. I had several pictures of the broken or cracked areas but the hole where the headlight switch bolts in is the main issue so what I fixed and repaired on the rest worked out fine. I bought a used Bezel on eBay, best investment I made. Great shape and an exact match for the 12 volt accessory and air bag switch. I found some screen door clips and put them together so they would pinch the edge of the vent on the Bezel since there was nothing but a hole in the Dash Core. The entire time I had to constantly center the switch but with the first set of clips in place I could tack it in and set up on the next one. Repeating the process and then gluing it all to stay. This picture with the metal chair in the background shows what I mean by centering the switch so it sits correctly The screen door clips would pinch tight enough to hold the location. Once it did I always used to switch to hold it and flipped it over checking the front as expressed above. The Loctite set up fast, a few minutes and you could relax and load it up with some more. The glue running down from the clip is the Gorilla Glue. You can see once the switch and two points of contact are established the third and finial can be fitted. The last location I used washers to get the screw set at the right height to hold the clip as level as needed. I applied two layers of epoxy glue and double nutted it all which I didn't take any pictures of. Finished. It's rock solid. I made it a point not to over tighten, and no I don't have any torque numbers to throw out there. Bach in the truck and looking good, the entire dash looks new again. Pretty sad for a truck with this mileage Hope this will help somebody or get the wheels turning. It's a shame to pay so much for a Dash Core Frame Assembly and then almost half again for shipping. If I had the money and was restoring or had a truck that was perfect all the way around and the Core got damaged maybe I would buy one. This is the best I could do and by the looks of it I saved maybe $900.00. I can live with that. Thanks


-
I tried everything except the trash can. Let me try to correct I'd be happy to have a pay grade but it would be above mine too. Thanks for looking. I thought this would be the right place to put the additional repair or should I put it in a separate new topic on Possible Headlight Switch Attachment. ??????????? Is it too late to edit the main post?
-
Thank you Sir but can you help me? My computer screen froze and I had to turn it off and on to get back and recover the page I did. Now I have double photos, from the picture of the mileage down needs to be deleted and I have tried everything. Any ideas?
-
Been gone a little over a week, started this before I left. One thing I found out about the Dash Cores being sold is the shipping is crazy. Anywhere from $300 to $400 added on. I'm getting my 12v for sale but the dash is broken all the way across from door to door. I had glued several pieces of the Core back in but too many pieces missing to do a good job. Another screwing. This truck must have been in a head on, Air bag plastic, center dash plastic where the A/C controls screw in, dash cluster has several breaks, and last the head light switch has nothing to attach to. All good things come from above including all idea 3 pictures of what I am working with, didn't want to load a pile of pictures so I picked to one's that showed the basics. Next is the new Bezel I bought and a way to attach the Head Light Switch directly to it so would stay in place. Screen door parts and some #8x32 screws, nuts, and washer put together to lock in on the edge of the vent. I used the bolt pattern on the light switch to center it before tacking it in place with the glue. Enough glue to hold it in place and more added once it set up for about 10 minutes. All the glue running down the vent is from using the Gorilla 2 part glue. i used the screw to set the distance so it would touch the plastic Bezel holding the correct height. By no means am I saying do it like this, I felt blessed to have an idea that made it possible to have a functional light switch and not one hanging by the wire harness that took 2 hands to work. It's solid as a rock too. Installed back on the dash and it has a completely new look, NORMAL. I had to keep flipping it over to check the switch bezel (?), don't know what it's called, but with it in place the rest was easy and fell in place. I made sure I got plenty of glue on the hardware I needed to lock in place but didn't risk over tightening. Back in the truck at last. It looks NORMAL for a change and doesn't raise a lot of eyebrows. It's the best I can do and wanted to share it with the Forum in case others might be looking for a way to solve a similar issue. Thanks Picture of the 2 part glue.


-
I wonder if the Quadzilla Adr can indicate the timing it's set at during idle being it's advanced already? (I forgot where I posted this) I would be interested in the same thing as you MoparMan, longevity and MPG. Sounds like there are a multiple options for any situation. Point me in the right direction on the articles and I'll start to look them over. Thanks That's great, I've seen some of the conversation from other members discussing tunes and they do sound complicated. This is not canned tunes but more custom from what you are saying. Well I'm leaning in this direction and like you said there's a lot of support on this topic. Appreciate the advice.
-
Ok, I have an idea what you are saying. I need to build a platform to set on the door sill that I can lay on. That was a great idea. Oh, spray some WD40 on those old chains hanging in the same spot for all these years. lol

