


Tractorman
Yearly Subscription
-
Joined
-
Last visited
Everything posted by Tractorman
-
Sometime problems get figured out just by chance. If you would have kept track of which side the adjusters came from, then you would not have posted the above statement and you would have likely re-installed the adjusters on the same side from which you removed them. This, of course, would have been wrong and brake performance would have deteriorated over time as the lining wore. So, in this case, it turned out to be a good thing that you didn't keep track of which side the adjuster came from when you brought them into the garage for cleaning. Now you have good performing brakes and you did the work yourself and you probably learned a bit along the way. Good job. - John
-
Another good combination! - John
-
You forced me to go and find that song on the Internet. I remember it now, just never realized that was the word being said. Creedence Clearwater had a lot of good songs. - John
-
I would agree that your setup serves you well. "Choogles", that's a good word. - John
-
Yes. That is about 50 gph. Are you hearing this when the engine is running? - John
-
@IBMobile's test is a good one. One reason you are seeing the pressure fall off after starting the engine is because the fixed displacement internal vane pump inside the VP44 takes over. With the engine idling this vane pump returns at least 18 gph of fuel to the tank via the 14 psi overflow valve. The lift pump is not keeping up with that flow rate, consequently, the pressure falls after engine is running. Only two reason come to mind - the lift pump is faulty, or there is a blockage somewhere in the fuel line. It is not air. The lift pump can pump air mixed with fuel. If there was too much air, the engine would probably die and would not restart. but a gauge would still show fuel pressure. - John
-
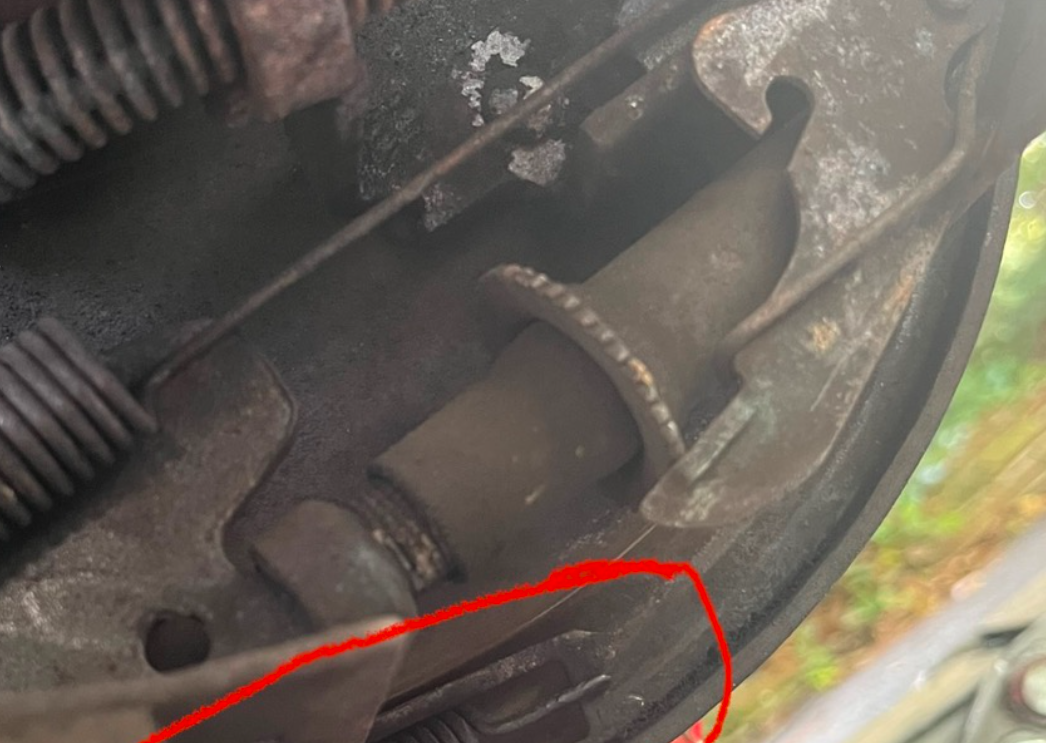
Sometimes you know more than you think you know, but just don't use your own knowledge. I know, because I do it often enough myself. Here is a closeup of your own photo of the brake on the left side. Note that the threads are right handed (I believe that this adjuster is on the wrong side). I say this because when the lever is pulled upward by brake shoe action via the adjuster cable, the toothed wheel will rotate in a direction that will bring the bottom of the brake shoes closer together. It should be doing the opposite - pushing the brake shoes farther apart. You can hold the adjuster and lever in front of you and imagine its upward travel engaging a tooth. The action should increase the length of the adjuster. With that information you will know which side to install it. If it is in fact true that the adjusters were on the wrong sides (which I believe is true), this enforces my reasoning that just because you put something back together the same way you took it apart does not necessarily mean that the parts are installed correctly. Maybe others could look at the photo and post their thoughts. - John
-
Hey! Don't say "no one". I use that tire size! - John
-
Oh boy, see what you started? Personally, I believe that computer controlled fueling for diesel engines is far superior in performance than mechanically controlled fueling, especially when it comes to tuning. However, I am very glad that my truck is not laden with computer controlled items like engine fan, or power windows / door locks, or a TIPM (3rd and later generation), headlights, 4WD, and so forth. For example, because my power windows are not computer controlled, I was easily able to rewire the control switch to operate the windows without the ignition switch being turned on. Very useful and simple modification. I think that one of the reasons I like my VP44 fueled truck is because of good performance, good reliability, and a reasonable cost for replacement parts - especially the injection pump when compared to just injectors on a fully computerized common rail fuel system. I find I am easily able to diagnose non computerized electrical problems with the use of an electrical diagram and a test light / digital multimeter without the use of diagnostic error codes. - John
-
@Andyba20, It is very unfortunate to have those repairs done so poorly on your truck. I am sure this is why so many who seek information from this forum are very leery of dropping off their truck to a repair shop. If your drums are in good condition (not heat cracked or out of round and are within diameter specs), you could probably just emery cloth them and install new shoes. Whichever way you go, the last thing to do before installing the brake drum is to use liberal amounts of Brakleen and a shop towel to clean the shoes and drums of any handling contamination. - John
-
You will have improved braking. If all of the shops performed excellent work, this forum wouldn't exist. Drum brakes have been on the way out for a number of years. When that happens, usually knowledge goes away with it. Here is a good story. After a couple of years working as a fleet maintenance mechanic for Copper Mountain Ski Resort in Colorado, I was promoted to shop foreman. We maintained a fairly large fleet - a dozen snowcats, heavy equipment, about 50 trucks and vans, golf course equipment, transportation equipment, etc. About a year before I started working there as a mechanic, the landscaping crew had purchased a 3 axle 10,000 lb GVWR equipment trailer. Apparently, from the day it was purchased, the electric trailer brakes never worked right. Over the course of a year the trailer was sent back to the manufacturer several times in an attempt to get the problem resolved. Well, it never happened. I saw other mechanics trying to figure it out from time to time, but without success. So, finally the landscaping crew gave up complaining about it and used it without trailer brakes. When I became the shop foreman, I asked my boss if I could bring that trailer into the shop and find out what is wrong with it and then fix it. He gave m the go ahead. So, I brought it into the shop and had all wheels and drums removed to expose the brake hardware. I offered every mechanic an opportunity to figure out the problem. But, I also said that nothing could be disassembled until the problem was resolved. I told them that I thought whatever is wrong with the braking system is going be simple and fundamental, and left them with that. Throughout the rest of the day, I had conversations with several mechanics about the problem, but after each discussion we would rule out that possible solution. The next morning with a fresh cup of coffee in my hand, I looked at the brakes on both sides of the trailer. I began to chuckle. The problem was obvious, but I didn't notice it the day before and I had looked at it several times, myself. I let all of the mechanics know this information and I gave them two hours to figure it out. No one did, so I gave a hint. I said, "Remember one time awhile back when a mechanic said that when does a brake job, he leaves one side assembled so that he has a reference in case something goes wrong? And at the time I made a remark 'what if the referenced side is assembled incorrectly?'" There was silence for a moment and one mechanic piped up and said, " The axles are on backwards". He was correct. All three axles installed incorrectly by the manufacturer. Needless to say, we switched the axles around, put on some new brake hardware, and lo and behold, the trailer brakes worked great! Made some people happy in the landscaping department. - John
-
Thanks @SVALIN. I was just trying to visibly see that there is more brake lining on the secondary shoe. It appears that is the case. The brake shoes should be the same size, but the brake lining should cover more area on the secondary shoe. There can be brake lining thickness differences and material type differences, too. Usually, the primary shoe would have the thicker lining than and cover less area than the secondary shoe lining. It will interesting to see what the other side looks like. - John
-
@SVALIN, would it be possible for you to post a photo that would show the bottom of both brake shoes? That way we could see the difference of the primary and secondary shoe. - John
-
You are performing some good troubleshooting here - you are definitely on the right track. It sounds as if you still have the OEM lift pump circuit. If that is the case, the ECM provides power to the lift pump with two circuits - one for engine start and one for engine run. The ECM is carrying the full electrical current load for the lift pump - not the best design. If this is your problem, relaying the lift pump using the ECM to provide power to the relay coil would be a good solution as long as the ECM is still performing properly. This modification would reduce the electrical load on ECM lift pump circuit considerably. In the worst case scenario (ECM no longer supplying power to lift pump) you could use a switched circuit in series with an engine oil pressure switch that would supply power to the coil of a relay for the lift pump. This would accommodate the "in case of an accident" feature. If you are referring to the relay in the PDC, this relay is for the fuel control solenoid inside the VP44 injection pump. It has no affect on the lift pump circuit. - John
-
With the information that you have provided, I recommend to take the other side apart for inspection. This way you can replace what you need, but most importantly, you can adjust the service brake and parking brake properly. You can verify that all of the parts are assembled correctly, as well. One important part of drum service brake adjustment is specifically observing that both primary and secondary brake shoes are seated against the anchor pin on each side of the vehicle before adjustment. Here is what can happen. A mechanic installs the primary and secondary shoes and hardware on the left side. He ensures that the shoes are seated against the anchor pin and installs the brake drum. He goes to the right side and installs the brake shoes and hardware. He notices that both shoes have not come up against the anchor pin, so he pushes them against the anchor pin. He believes all is well..., but maybe not. What can happen (and many times does) is that when he pushes the brake shoes against the anchor pin on the right side, the energy from that action transfers through the equalizer in the park brake circuit to the park brake actuator on the left side. Consequently, the primary (forward) shoe is pushed away from the anchor pin on the left side. This will result in improper service brake adjustment and improper park brake adjustment. The usual cause of the above-mentioned issue is someone (during the life of owning the truck) adjusts the park brake cable (along the driver side frame) when the service brakes should been adjusted instead - or at least, first. At the very least, I recommend that you loosen the park bark adjusting cable considerably before adjusting your service brakes. Then, after service brake adjustment, follow up with the park brake adjustment ensuring there is a bit of slack on each rear wheel cable at the equalizer. This will allow for full brake shoe contact to the anchor pin at each foundation brake. - John
-
My recommendation will be based on your answers to some questions regarding the rear brake history of your truck. Do you know if the park brake cable has ever been adjusted (the cable adjuster on the driver side frame rail). If it has been adjusted, was it done correctly? Have you replaced the rear brakes recently? If so, did you do the work or did a shop do the work? How many miles and years on the current rear brake parts? - John
-
That is good information. I can't say that I can detect the "creaking" noise in the video. Something that comes to mind is I believe someone posted on this forum (or the TDR forum) about a cracked or loose flex plate. If I recall correctly (which happens less and less), the noise only happened in reverse, which seemed odd. It had something to do with how the torque converter operates differently in forward than in reverse. I don't remember the details. If a failing u-joint is suspected to be making the creak, there is an easy test to eliminate or confirm this without removing the drive shaft. A u-joint that is failing to the point of making noise generates heat at the exact failure point. Take the truck (after setting a few hours) for a drive. After no more than 5-10 minutes of driving, pull over and feel each post on each u-joint by hand. If there is a significant temperature difference, you have probably found the problem. I have used this procedure a few times and in some of the tests, I actually marked the posts on the u-joint where I felt the heat. Each time, upon driveshaft disassembly, I had correctly identified the failing post / posts. - John
-
Watching the video a couple of times, I agree that the "moan" seems to be in cadence with a tire revolution, not a driveshaft revolution (3.55 turns per one tire revolution). Also, the previous posts and video are not clear as to whether or not the truck operator is controlling the reverse speed of the truck with the foot brake, or if the transmission selector is in "reverse" This information could help with troubleshooting. - John
-
I agree that this is dangerous, but I just wanted to clarify what W-T posted. He does not mention anything about starting the engine and shifting into a gear. He does mention to "hand turn the tires". - John
-
That is one impressive video!!! - John
-
@DownHomeDiesel, I highly recommend calling High Country Auto Specialist in Silverthorne. Ask for Curt - he is the owner. He is a reputable guy. He has the proper test equipment and knowledge to diagnose your problem. The address is 150 13Th St #1, Silverthorne, CO. Phone 970-513+9148. - John
-
@JAG1, no large farm equipment. I bought a new John Deere compact utility tractor (4200) in the year 2000. I bought several implements for it and have extensively modified some of them. I also replaced the mechanical top link arm and side link arm on the three point hitch with hydraulic cylinders. I added a bank of three hydraulic control valves to make the implements do their work much more efficiently. I currently have almost 4,000 operating hours on that tractor. Over the years I have modified many landscapes (including my own). Because of my intense interest in the work that these tractors can perform, my wife and family nicknamed me Tractorman. Early on, my wife incorporated the name into my email address. - John
-
I used to have a Gopro. They are great cameras. I think your camera would have made the light adjustment if you had moved the camera closer to the shadowed area to eliminate the surrounding bright light. The camera has a tendency to do light averaging, so on a bright sunny day anything in the shadows will likely make it hard to see the details. - John
-
Good information - but, more questions. * Are you the original owner of the truck? * Are the injectors still original? * Are you using a tuner? * You said "Same road at the same speed", but you didn't say what the speed was. * Is your transmission an automatic or a six speed manual? From your information given so far, I would just keep driving and continue to monitor fluid levels and and gauges. Also, stop occasionally to check tire, brake, and wheel bearing temperature on both vehicles. - John
-
Could use a little more information. Approximate combined weight, mph traveling, rear axle ratio, tire size, method of calculation. etc. A couple of factors that can lower fuel mileage. * headwinds * elevation change - Pocola - OK 500 feet, Amarillo TX -3,600 feet - John


