


CUMMINSDIESELPWR
Unpaid Member
-
Joined
-
Last visited
Everything posted by CUMMINSDIESELPWR
-
that engine keeps breaking ****... list out what the engine has broken so far and how many times? (its a beast, ive ridded in it with ya) if it dont break the diff that will be a surprise!
-
mike when you get the new headgasket, spray a nice coating of this on it. when i rebuilt mine i sprayed it good and it has held up fine.
-
i think i still have my swaybar links... i think they are still good. want them?
-
sucks to hear, nothing lasts forever though. once done it will last longer though!
-
ive been wanting to put a locker in the rear of mine... guess true trac is a winner!
-
im getting away with running 35's as i have the 4:10 ratio, it does well. the only time i use 6th gear now is if im on level flat road cruising with no load/trailer. other than that im in 5th and it works out well
-
holy crap yeah you need shorter gearing with those 37’s is yours an auto or manual?
-
so what egt temps are you seeing currently? i run rv 275 injectors, 6spd manny, 35" tires and 4.10's everything else is stock and cruising flat ground 65 6th gear mi around 700-750ish but i can peg the egt easy if i stomp on it but i defuel at 1250.
-
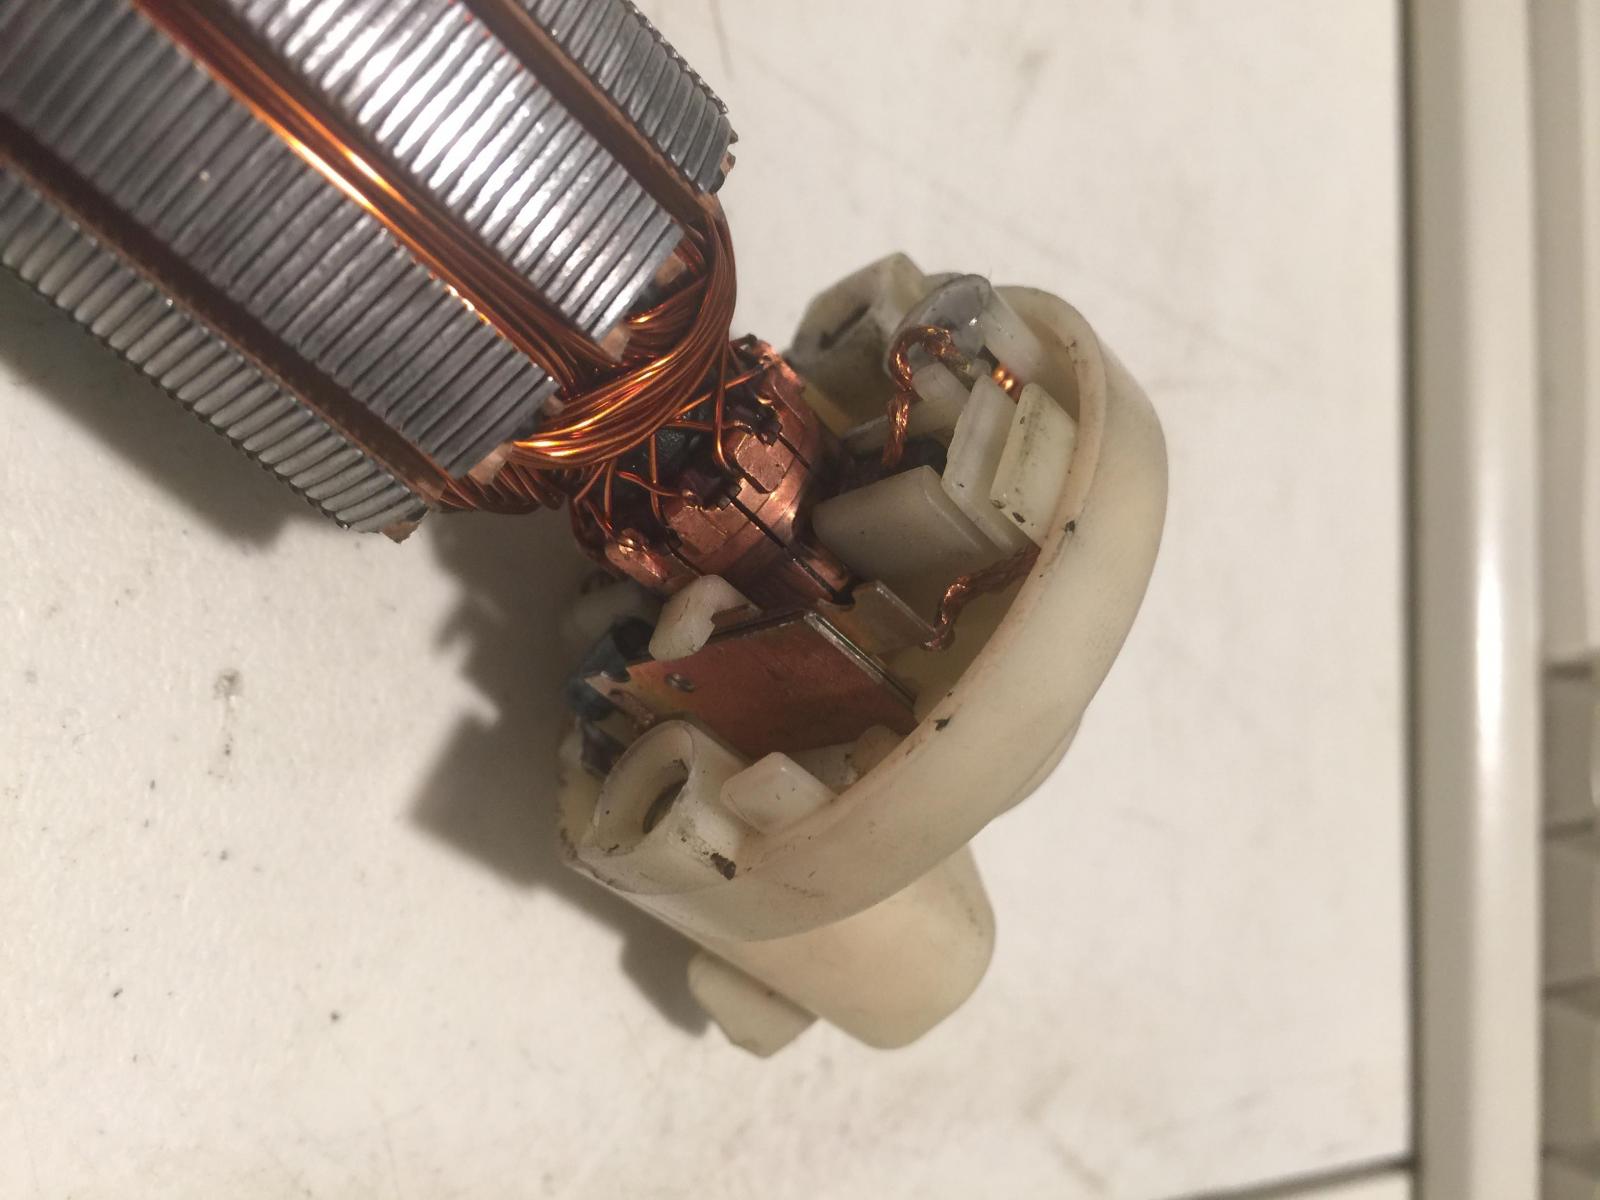
So i got my new seat in and it took 2 minutes to remove the old beat up one. while i had it off i decided to tackle the dead motor for the front side of the seat up/down and why it wasnt moving. I pushed the up and down and watched as it barely turned. even helping with a wrench didnt work so i took it off with the 2 torx screws attaching the worm gear housing to the frame. Tested again and it spun but was weak and after about 20 seconds of freespin it would stop... ok so i took it apart and cleaned the stator and brushes. still same effect, 20 sec and stop. so i took it apart and looked at it and here is what i found and the fix but there is a safety clause to this fix and it is at your own risk to perform. on one terminal there is a plate thermistor between the brush and the plug. it appears that this thermistor is the safety feature for keeping the motor from burning up if a switch gets stuck or sat on. It had worn out and was resisting waaaaay to easy. So all i did was clean the copper and solder a bead on to bridge and bypass <---WARNING DOING SO DEFEATS THE SAFETY PERFORM AT OWN RISK. now seeing that i never lower the seat and the motor now runs like a raped ape i just unplug it and leave it as i always end up bumping against it lowering it (probably why it wore out) to access motors and clean them, under the seat cushion are 4 10mm bolts easily accessible. remove them and lift seat off. what you see are the seat motors. clean them as you wish and lube as you wish. if you have and weak motors, get a torx wrench and remove the two black screws on the worm housing to the frame. then a phillips to unscrew the motor housing. carefully disassemble and you will see the thermistor. make sure bearings spin freely and lube if needed. scrape a clean spot on the thermistor and solder a bead where i did and reassemble and test. if you plan not to adjust a seat once set UNPLUG IT as to not start a fire. as you can see a seat motor goes for $70-$150 so if you need a free fix just to get them working when you need them here you go again this is a DO AT YOUR OWN RISK as this bypasses the thermal safety of the motor. If left plugged in a chance of fire may occur if motor is activated for a long period of time, thus unplug it for safety.

-
you can always push it down a hill to get it rolling
-
one could buy a cooling radiator for a pc, refit it for the low pressure side of fuel return under the cab and put 3 waterproof 120mm fans full blast and you will have cool return fuel to the tank. wouldnt cost you more than $175 just put it on a ambient temp switch, anything over say, 60F and it stays on, anything below it shuts off (for cold weather heating of fuel) radiator https://www.newegg.com/Product/Product.aspx?Item=9SIA9F94ZW4269 waterproof fan x3 https://www.newegg.com/Product/Product.aspx?Item=9SIA6255JC0134&cm_re=waterproof_120mm_fan-_-9SIA6255JC0134-_-Product
-
CUMMINSDIESELPWR replied to CUMMINSDIESELPWR's topic in 2nd Generation Dodge Reliability / Performancedriver/passenger are universal. they just bolt to the frame of the chair itself.
-
its what we are here for man! i do have a video of me doing one set of valves start to end when i rebuilt mine, only difference for you is you will need to TDC each cylinder before starting. everything else is the same
-
i have two in the bed box lol the belt itself is loose on the pulleys so wear is minimal (very little stretch) it would take foreign object breaking it to fail otherwise
-
yeah true first time always slower for learning it. i did mine with the head off so rotating the engine wasnt in the steps. use grease on the nut when tightening so you dont bind the threads when compressing (one thing i saw quickly on first set) have a magnet pen to catch the keeper inserts it really helps! lemme know if you have questions but you can do it.
-
it will take you a couple hours to do the seals by yourself :P
-
that is a good write up of where the wires go and such, but man that soldering job is hideous!!! lol something like this requires a micro tip soldergun to be precise and clean. soldering the transistor to the casing is good to use as a heatsync it also looks like the vp44 housing can support a 4 port rotor head and the 6 port rotor head i would also be willing to do this repair on a known bad pump for someone free and send back to see if it works (for the good of the cummins community). any takers?
-
http://www.digital-kaos.co.uk/forums/showthread.php/73680-Bosch-VP30-VP44-injection-pump-repair-solution/page7 https://www.westfloridacomponents.com/T143PE08/IRFZ44N+IRFZ44+N+49A+55V+Transistor+MosFET+International+Rectifer.html 49 amp 55v If i ever had to replace a pump again ill keep the core and was contemplating doing the transistor replacement and using a non conductive thin oil being pumped through a cpu computer radiator with peltiers in order to ensure the electronics housed on the vp stay cool. as we all know the heat kills these and mosfet transistors generate a sh!t ton of heat which cant go anywhere else but the housing of the pump and which is cooled by the overflow of fuel through it. thus why having psi over 14 to push the overflow valve open and getting flow through is mandatory. this video lists this transistor. 55v 42amp https://www.amazon.com/5PCS-IRLR2905TRPBF-MOSFET-N-CH-IRLR2905/dp/B01G0QHVQS/ref=as_li_ss_tl?ie=UTF8&qid=1509288828&sr=8-1&keywords=irlr2905&linkCode=sl1&tag=amp036-20&linkId=8cbb278a6229b5759f168da394f3c19d this vid lists this transistor, 41amp 55v as well https://www.digikey.com/product-detail/en/infineon-technologies/IRLU2905/IRLU2905-ND/305417 i am confident that i could do this repair easily. i have done micro soldering for years what i am thinking is this is the driver that provides current to the plunger for the injector plate or something like that. makes sense that an electromagnet would need a lot of power to hold up against high psi injection system mechanism
-
i figured it was about time to replace the driver seat as the original one is beat to hell. so fleabay it is and found this gem for good price!! https://www.ebay.com/itm/Dodge-Ram-Driver-Passenger-Lower-Seat-Cushion-Cover-Fabric-Dark-Gray-1998-2001/163206312350?fits=Year%3A2001|Make%3ADodge|Model%3ARam+1500&hash=item25ffdab19e:g:TXUAAOSwjS9a5PvX next ill be tearing out the carpet and hurculining the cab floor as the old carpet is old and stanky... and it is a truck so it will get dirty.
-
thats cool they warrantied them, but still left you both down for a period of time till replacement arrived. got to admit if the fuel boss fails its gonna be the belt which is $15 and 10 miuntes to change on the roadside. if it fails otherwise there are serious issues.
-
ive left mine sit for 6-8 months with zero issues. best to have a full tank to keep the fuel "dry"
-
look into fuel boss mechanical pump. wont fail like electrics and the psi increases with rpm of engine. same price less headaches.
-
valve covers are cast then machined. unless you mig/tig one together to exact dimensions.
-
i need to do this to my driver seat.... anyone got $ for me lol
-
i second the return check valve, when installing my fuel boss a small piece of nylon tape got caught in it and it wouldnt build pressure. once cleaned... pow 21psi! the banjo return on the vp44 can wear as the spring gets old but it takes a lot of miles to wear one out, basically it wont hold 14psi anymore and open easier. they are not cheap either.

