Jump to content

Welcome To Mopar1973Man.Com LLC

We are privately owned, with access to a professional Diesel Mechanic, who can provide additional support for Dodge Ram Cummins Diesel vehicles. Many detailed information is FREE and available to read. However, in order to interact directly with our Diesel Mechanic, Michael, by phone, via zoom, or as the web-based option, Subscription Plans are offered that will enable these and other features.  Go to the Subscription Page and Select a desired plan. At any time you wish to cancel the Subscription, click Subscription Page, select the 'Cancel' button, and it will be canceled. For your convenience, all subscriptions are on auto-renewal.

Posted

First, my question.  I have her all torn down to the point where I just have to remove the timing cover.  Fingers crossed no grooves on crank.  222K on the clock.


I bought a cummins seal at the dealer.  Says cummins on the part. 


Question..... which way is OUT? 


Logic tells me this side should face INWARD towards the crank:

2016-04-03%2019.02.18_zpsxr5nc1ct.jpg


And this side OUTWARD facing away from the crank:

2016-04-03%2019.02.11_zpsaigiwyou.jpg


Reasoning, the second picture has a rotational marker.  when facing you it is clockwise.  when facing the front of the truck, the crank turns clockwise.


Why am I asking?  bc the plastic alignment piece is conical (cone shaped).  you have to pull tight from the front and it will actually expand the inside of the seal out a good bit.  i assume this is so the seal will fit over the crank shaft nose.


You would literally have to pull this cone through the seal by pulling it up through the seal in this photo correct?

2016-04-03%2020.05.10_zpshzb9sgkb.jpg


btw, I am doing this via the dodge service manual which says install in the cover first.  i have no depth tool so i am going to have to wing it and hope.


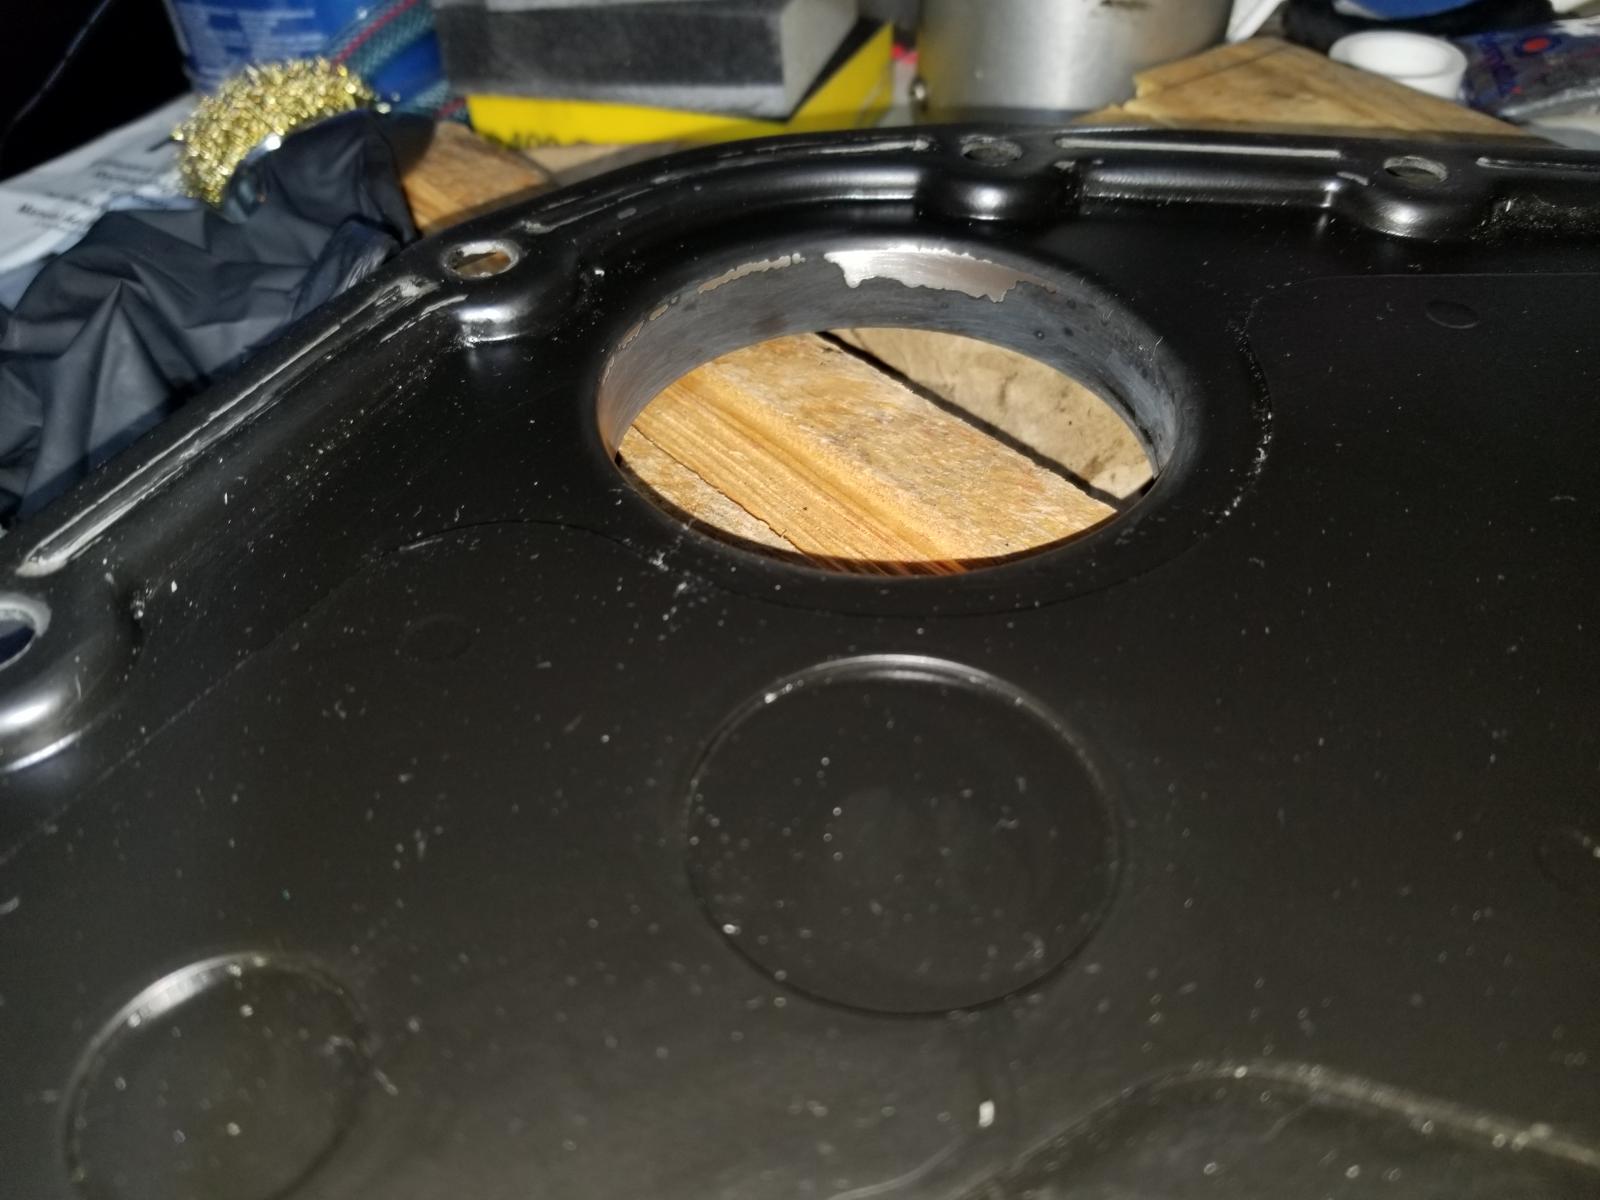
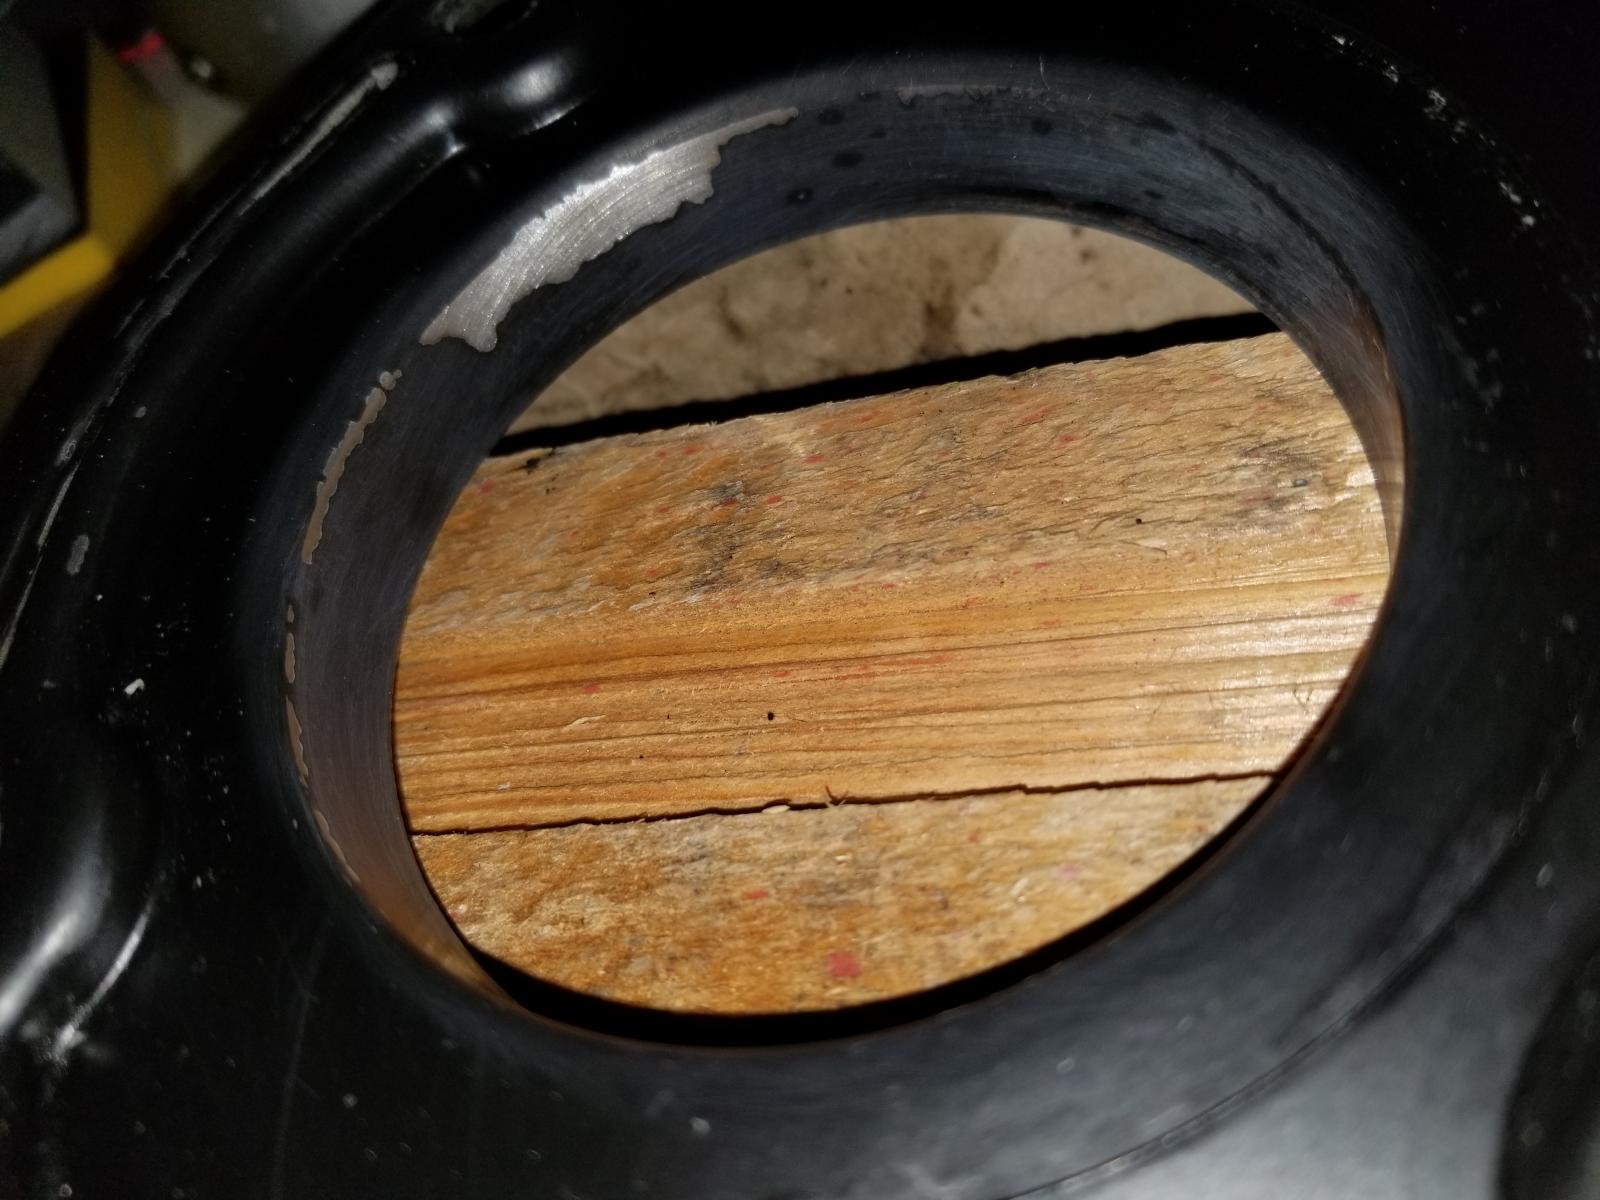
this is what the dealer did to me...... twice.  he put it in the wrong way and not only did he do that he put on gray silicone rtv on both the inside and outside of the seal.  no no no no no!


right hand side of the photo also broke the lip the seal goes into. before i took this apart he told me to buy a new cover b/c he thinks it was warped.  ummmm.... or u broke it.


2016-04-02%2017.41.36_zps9ixyehf5.jpg


2016-04-02%2017.41.43_zps65merzct.jpg


2016-04-02%2017.41.03_zpsauiaohhr.jpg


This one you can see how this is really installed backwards:

2016-04-02%2017.41.06_zpsatjfkppv.jpg


moparman you may know this thread from another forum.  i got banned b/c i was upset and cursed with stars to filter the words.  no warning no nothing.  just banned.  still need help though.  this has been going on for 4 months.

Edited by bms231

  • Replies 84
  • Views 17.9k
  • Created
  • Last Reply

Top Posters In This Topic

Most Popular Posts

  • Wild and Free
    Wild and Free

    This is a perfect example of why paying with a CC in certain instances would have gotten your money back on a contested service as you have all the evidence against the dealer on a screw up and then s

  • If everyone did it themselves wouldn't that put you out of a job?   I'd much rather do my own work as well, but I don't have the skills that most on this site posses.  But I always look forw

  • my article is complete..........   https://mopar1973man.com/cummins/articles.html/24-valve-2nd-generation_50/51_engine/12-and-24-valve-front-crank-seal-replacement-r474/    

Posted Images

Featured Replies

  • Author

The finished product.  I am leaving that loctite 620 in there.  hardens in 24 hours.  ZERO of it is touching any seal material or yellow sleeve. 


i won't know until tomorrow if depth is right... but... i used the cummins tool so hopefully when I do the install, all goes well.


2016-04-10%2018.29.05_zpstn1ntrhe.jpg


2016-04-10%2018.29.16_zps2kck31er.jpg

i installed mine by hand on original oem cover on a workbench. started it with fingers and tapping with deadblow to get it in, then with a 2x4 i whacked it till it was flush with lip, then used the install tool which set it into the housing about 1/4" (from front) and it has worked fine. strange you have so many issues with yours :(

  • Author

just found my baring location has no rubber gromet in it.  dunno if the dealer left that out or one wasnt in there.  he just did a valve service.  likely forgot to put it back in.

Got er in.  don't mind the locktite 620.  thought it would have hardened by now, but still goopy.  oh well.


seal is a hair cocked, but square in the cover.  really weird.  i tightened the right side of the case down a bit harder to compensate.


waiting for ultraback to hardened for an hour per instructions, then torquing to spec


2016-04-11%2010.52.13_zpslfwwyhtg.jpg

you might like this redneck engineering.  i went to lowes and got 3 M8x1.25 120mm long bolts.  threaded them through the cover and used that to perfectly align the cover before pressing on the cover w/ ultrablack.


2016-04-11%2009.47.52_zpsyad9rkuc.jpg


2016-04-11%2010.31.41_zpsgzu3chze.jpg


my seal work.  i found i had to scuff the back of hte cover to get the ultrablack to stick.  first attempt it literally slid right off. 


2016-04-11%2010.29.17_zpsrjygu2qm.jpg

Edited by bms231

  • Author

got her buttoned back up..... tired


i wound up not starting her.  rotated the crank by hand twice.  book says let her sit four hours dry.  i am going to let it sit 24 hours b/c ultra black says wait 24 hours before putting vehicle back into operation. 


fingers crossed.

  • Author

started her up with Mike on the phone. she didn't explode. rain tomorrow. will take her out Wednesday and check for leaks. still have to get air out of cooling system. 

  • Owner

Very, very impressed with the idea of the bolts.


2016-04-11%2010.31.41_zpsgzu3chze.jpg


Like I told @bms231 I'm going to purchase a set of bolts for this reason and keep them in my toolbox for future jobs. I'm sure soon I'll be doing more gear case resealing. Then his idea of pressing the speedy sleeve on with the damper. Again another very smart idea.


So I got to give Brian a big High Five for great ideas neat tricks and idea!


  • Author

Started her up tonight to bleed the coolant system.  Let her bubble for ~30 minutes.  So far 45 minutes run time on the truck.  Fingers crossed... no oil as of yet.  Don't want to jinx it.


Waiting on a part from dodge.  Stupid dealer never put the plug back in my bell housing where the barring tool goes.

On ‎4‎/‎11‎/‎2016 at 10:02 AM, bms231 said:

just found my baring location has no rubber gromet in it.  dunno if the dealer left that out or one wasnt in there.  he just did a valve service.  likely forgot to put it back in.

Got er in.  don't mind the locktite 620.  thought it would have hardened by now, but still goopy.  oh well.


seal is a hair cocked, but square in the cover.  really weird.  i tightened the right side of the case down a bit harder to compensate.


waiting for ultraback to hardened for an hour per instructions, then torquing to spec


you might like this redneck engineering.  i went to lowes and got 3 M8x1.25 120mm long bolts.  threaded them through the cover and used that to perfectly align the cover before pressing on the cover w/ ultrablack.


That's because most Loctite products are "Anaerobic" which means they will only cure in the absence of air, which is why the exposed product will never harden. One needs to use Loctite primer for an almost instant cure of most of their anaerobic products. The bottles are actually designed to allow air to flow through them, if not it would be solid in the bottle much like the product usually is under the cap.:wink:


One needs to research the products and how to properly use them before just assuming how they are to work.


You did however choose the retaining compound with the largest "Gap fill" spec of .015". to help with the nicks and gouges on the crank.

Not to be a buzz kill and hopefully as many issues as you had that the seal lasts for a while but from my experience if the seal is not straight and plus the fact you installed a seal that is made to spec for the crank dimension alone and not with a sleeve under it rather than a matched seal sleeve kit it will not last as long and will wear into the sleeve fairly fast and start to leak.

Edited by Wild and Free

  • Author
11 hours ago, Wild and Free said:


That's because most Loctite products are "Anaerobic" which means they will only cure in the absence of air, which is why the exposed product will never harden. One needs to use Loctite primer for an almost instant cure of most of their anaerobic products. The bottles are actually designed to allow air to flow through them, if not it would be solid in the bottle much like the product usually is under the cap.:wink:


One needs to research the products and how to properly use them before just assuming how they are to work.


You did however choose the retaining compound with the largest "Gap fill" spec of .015". to help with the nicks and gouges on the crank.

Not to be a buzz kill and hopefully as many issues as you had that the seal lasts for a while but from my experience if the seal is not straight and plus the fact you installed a seal that is made to spec for the crank dimension alone and not with a sleeve under it rather than a matched seal sleeve kit it will not last as long and will wear into the sleeve fairly fast and start to leak.


?? 


1. used the Cummins seal kit per the thread. so it is a match set of sleeve and seal. oem cummins. even called them with my engine code to confirm. 


2. researched the 620.  said it above which is why I selected it for the gap coverage. originally had the stick, but saw the gap coverage wasn't as great as the liquid for. 


3. read the instructions on the bottle, their site, and technical spec doc. mentioned primer, but never exactly said why. most spray paints say use primer but 99% of the time it's not needed. figured it was just another add on and acetone cleans just as well. 


so.....I waited 4 days. on the bottle it says cure time of 24 hours. the way they word the primer leads me to believe nothing about required use.   designed to promote the curing speed of LOCTITE anaerobic adhesives and sealants without any significant loss of joint strength


Edited by bms231

bms,


The stuff where no oxygen is will cure.  The goo hanging out on the outside where it is surrounded by oxygen will not. It will stay gooey.  This is why the 620 doesn't harden in the bottle....  In fact if you try to pressurize the bottle, it will leak, its made so that our ambient oxygen will migrate through the bottle and keep it from hardening. 


The primers work pretty good and help clean the area, but they don't do anything to cure the the goo that is exposed to oxygen.  If you want to cure the stuff on the outside you will need to make an oxygen free atmosphere for it.  It appears that acetone or iso-alch will act as a solvent and remove the un-polymerized portion  


HTH


Hag

Haggar hit it on the head with the Loctite as I was trying to. I did not say Loctite primer was necessary I was just merely explaining why the excess product would never ever set up, primer can be used as a cleaner yes but the 24 hour cure time is for the product in the area void of air between the crank and sleeve alone with no primer use, with primer it is a few seconds to just a few minutes depending on product for cure time is how it works.

Sorry had to go back through and reread the thread , missed the post about getting and using the matched kit.

On ‎4‎/‎4‎/‎2016 at 8:20 AM, bms231 said:

I was honestly thinking of using this autozone sleeve.  use a little bearing mount to mount it to the crank.  then use the stock cummins seal over it.


http://www.autozone.com/internal-engine/crankshaft-seal/duralast-crankshaft-seal/dodge/ram-2500-3-4-ton-2wd/2001/6-cylinders-7-5-9l-turbo-diesel/630211_726041_4222/?checkfit=true


I saw this on another thread.... is this thing even seated far enough back?  Does the seal run along the backside lip or anywhere on the "repaired" sleeve portion.  I assume the later.


002.jpg


For the speedy sleeve in the pic above the installation ring "The lip portion to the inside" which is what the install tool cup is for and pushes against is to be torn off the actual sleeve after install, There is a perforated area that it will separate at.

Edited by Wild and Free

  • Author
On 4/14/2016 at 2:25 PM, Haggar said:

bms,


The stuff where no oxygen is will cure.  The goo hanging out on the outside where it is surrounded by oxygen will not. It will stay gooey.  This is why the 620 doesn't harden in the bottle....  In fact if you try to pressurize the bottle, it will leak, its made so that our ambient oxygen will migrate through the bottle and keep it from hardening. 


The primers work pretty good and help clean the area, but they don't do anything to cure the the goo that is exposed to oxygen.  If you want to cure the stuff on the outside you will need to make an oxygen free atmosphere for it.  It appears that acetone or iso-alch will act as a solvent and remove the un-polymerized portion  


HTH


Hag


Thanks dood.  Definitely get the anaerobic meaning... but didn't realize it was actually anaerobic.  Kinda has me worried now about this stuff setting not setting up ever and causing leaks.  Everyone said use loctite.  service manual says mopar bearing mount.  figured loctite bearing mount should be the same thing.  hopefully it holds. 

You will be fine the Loctite is about the best product and the stuff is cured I assure you.:thumb1:


  • Author

well.. been a week and out a few times. 


my fix has held longer than the dealer's two attempts. 


first trip out I left a coolant puddle in home depot's lot. upper radiator hose wasn't tight enough. if that's the worst thing to happen I'll take it. 

  • Owner
2 hours ago, bms231 said:

first trip out I left a coolant puddle in home depot's lot. upper radiator hose wasn't tight enough. if that's the worst thing to happen I'll take it. 


That one reason I still love the old spring clamps. No guess work. Slip it on and release. Always a good clamp.

  • 3 years later...
On 4/5/2016 at 9:06 PM, CUMMINSDIESELPWR said:

found this and it might help you, they make a sleeve install tool! i installed with hammer as my crank was sitting on the workbench.


This was very helpful, thx for sharing.

Did This Forum Post Help You?

Show the author some love by liking their post!

Welcome To Mopar1973Man.Com LLC

We are privately owned, with access to a professional Diesel Mechanic, who can provide additional support for Dodge Ram Cummins Diesel vehicles. Many detailed information is FREE and available to read. However, in order to interact directly with our Diesel Mechanic, Michael, by phone, via zoom, or as the web-based option, Subscription Plans are offered that will enable these and other features.  Go to the Subscription Page and Select a desired plan. At any time you wish to cancel the Subscription, click Subscription Page, select the 'Cancel' button, and it will be canceled. For your convenience, all subscriptions are on auto-renewal.