Jump to content
Posted

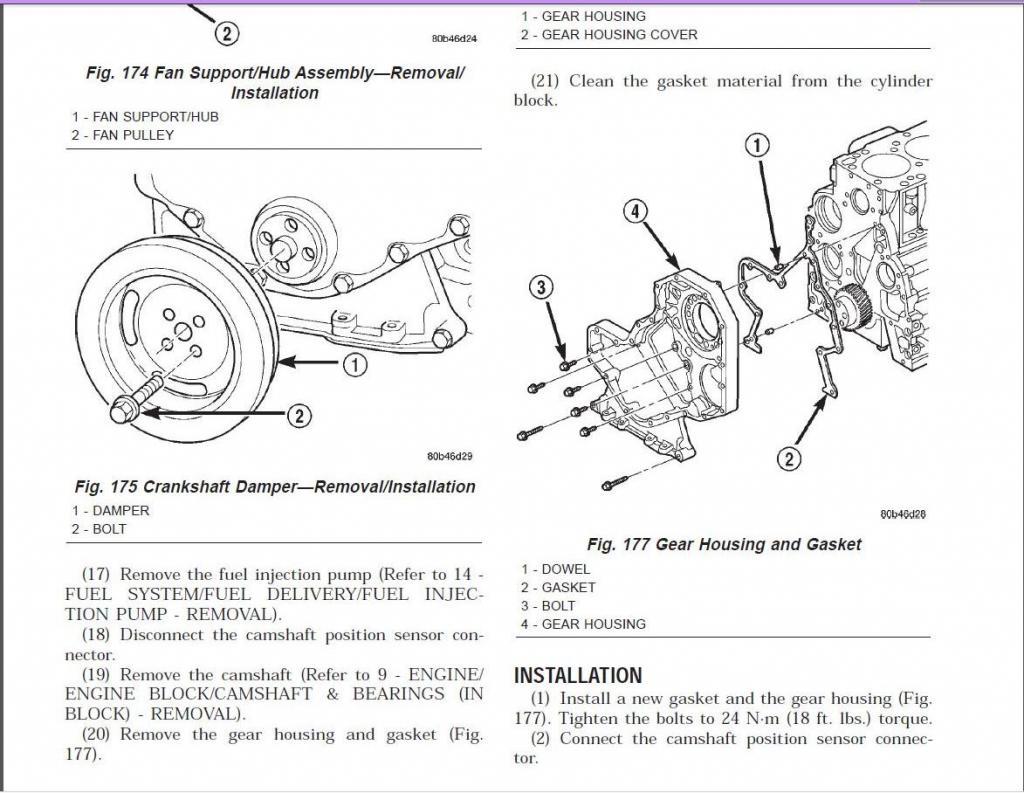
Getting ready to address the kdp soon. At the same time I'm going to clean the radiator, degrease the engine & delete the puke bottle & add a fuel boss. Want to try and get all this done before it get's to cold outside.Questions: I've decided to just unbolt the pulley assy from the block instead of using the custom wrenches to take the fan apart. Is there a gasket between the pulley assy & block? Or can I put it back together with the high quality grey rtv stuff? Same goes for the timing cover. Can I just use grey rtv on the re-assy?I've done the kdp on my first gen years ago, and I recall it was pretty easy but I used a new gasket for the timing cover. Any other pointers or step by steps for the 2nd gen?Thanks

  • Replies 23
  • Views 3.4k
  • Created
  • Last Reply

Top Posters In This Topic

Posted Images

Featured Replies

You don't need any gaskets, but I would recommend a new crank seal. Just use the grey rtv and you should be fine. Also remember to check the bolts that are behind the timing cover. Some of them can come loose.

New crank seal and a tube of rtv is what I use, you can get the whole kdp kit from genos for pretty cheap. There is no gasket between fan mount and block. I would also suggest doing a t-stat since you are already there. And like said above, check all the other bolts. I have done probably 6 kdp kits on mostly 12 valves and I have never had a loose bolt or pin.

  • Author

Good advice.How difficult is it to remove the crank pulley / harmonic balancer?thanks!

4 bolts and it should wiggle off. Hardest part is getting new crand seal into cover when its off the engine. Also unbolting the fan is a pain

There are rare occasions on the 24 valves but I have never seen or heard of them, only read that people do it. If I had a 12 valve I would do it, but on a 24 valve I wouldn't be worried especially a 2000 and newer.

I replaced mine with the kit from Genos, it was real easy and the instructions were great and easy to follow. It is a good piece of mind.

Dave Conrad (Fishin2Deep4U) posted the bill for repair on another forum when it fell out on his Dad's '02 so it certainly can happen although I am sure less so the later the rig.

  • Author

Damn! That's unbeliveable. . I found the link to the thread: http://idahoturbodiesels.com/vb/archive/index.php?t-1261.html and the link to a picture of the dodge invoice (it was covered under warranty) http://s54.photobucket.com/user/Fishin2Deep4U/media/dadsrepair.jpg.html I quote Dave from the thread refrenced above " Fishin2Deep4U 12-08-2007, 02:42 PM 1St gen all the way to 2000 i think. Make that 2002. December of 2002 to be exact. My dad's was a victim of the KDP. I have the revised case in mine. The build dates were 4 weeks apart, mine being built first. You don't know until you look. :-? Dave" Soooooo..... the question is does your 02 have the revised case or not? and the final question is: How can you tell if you have the revised case??? Do you need to take it apart to see? Or is it obvious on a visual inspection just looking under the hood? Does it sound like there are differennt manufacting factories for these engines? Depending on which factory implemented the revised case? Thanks!~

Far as I have found out the only way to be sure which case you have is to open it up and look. I have tabbed a KDP and installed a new crank seal in about 2 1/2 hours with nothing but hand tools.

That is the one and only 2002 I've heard of a KDP failure. It was suppose to be fairly rare by 2001.

May very well be, but what if yours were the second one??? Not worth waiting to find out IMHO. I had to do my vacuum pump seal and clean the radiator fins so pulled the cover also. Mine is apparently the updated one that is stepped but I tabbed it anyway since it looked like it could still back out and I was already there. :smart::thumb1:

On mine the dowel pin was fine.(tabbed while I was there and to be sure). What made the project worth while was that I found one of the case bolts hand tight. The other four were tight. That one bolt could have caused me a BAD day.

  • Author

On mine the dowel pin was fine.(tabbed while I was there and to be sure). What made the project worth while was that I found one of the case bolts hand tight. The other four were tight. That one bolt could have caused me a BAD day.

Good advice. I'm still considering doing mine for this reason, even if the kdp is uncommon for the 02.
  • 2 weeks later...
  • Author

Ok so I did the KDP job today.All went well. Dowel pin was fine but I peened it with a center punch to make sure it doesnt move. I noticed a couple of the timing cover bolts were on the loose side. Otherwise the 2 bolts that I could see inside the timing area were sorta tight but I backed em out and put lock tite & re-torqued anyway. (the one next to the KDP was a torx head)I did the crank seal too. I gotta say that was one of the more difficult seal jobs I've done. Had to drive the seal into the timing cover from the back. After that it was easy once I figured out that the plastic sleeve included with the seal is an install tool to help slide the seal over the crank journal without rolling the seal lip.On another note, I had initially purchased the crank seal from NAPA but it turned out to be WRONG. Some 2 piece thing, looked nothing like the original. Couldn't make it work and it was too small for the crank journal. . NAPA guy swears it was the right one. Dumbasses. Luckily I found it at the dodge dealer so I could at least finish putting the timing cover back on today.I degreased/pressure washed the engine before starting. After cleaning Happy to notice I have a #56 block. Deleting the puke bottle too. Took out the radiator, gonna put new hoses and clean the radiator too. Some greasy sludge in the radiator finss, and tremendous caked crease all about the front of the engine I'm guessing (hoping) it was all from the puke bottle.Sure is nice to have a clean engine regardless. Now I can watch it to see if any oil leaks occur, & I'll be able to see where coming from.I'm installing my fuel boss while I'm in there. Prolly next weekend. Yay. Running out of evening daylight quick here in NJ.

  • Author

On mine the dowel pin was fine.(tabbed while I was there and to be sure). What made the project worth while was that I found one of the case bolts hand tight. The other four were tight. That one bolt could have caused me a BAD day.

The other 4? Where are the other 4 exactly? Are you talking about inside the timing area or the longer bolts that pass through the timing cover and case? While inside the timing case I could only see 2 bolts within. It looked to me like the case was mostly mounted/held in place with longer ones that pass through the cover and case. Thanks

Yes there are five inside the cover, one was "hand" tight the other four were pretty tight. some of the bolts can't be seen because they are behind the gears. I did mine 2 yr ago but seem to remember that a couple were hidded by the gears.

  • Author

Yes there are five inside the cover, one was "hand" tight the other four were pretty tight. some of the bolts can't be seen because they are behind the gears. I did mine 2 yr ago but seem to remember that a couple were hidded by the gears.

Can the bolts be accessed through the spoke holes in the gears?

yes. If you do a search on here for timing gear cover there is a post that has a great pix of the gear case with the cover off that shows most of the bolts.

  • Author

yes. If you do a search on here for timing gear cover there is a post that has a great pix of the gear case with the cover off that shows most of the bolts.

Ok, found it. I see one bolt accessible through one of the gears, but I can't tell if there is one more bolt under a gear or if it's accessible through a gear spoke. Here is the picture from the thread you mentioned, and another picture of the exploded diagram from the shop manual. I havent put the fan and radiator back on yet, so I think I'm going to open up the timing cover again and double check. \ Click the pictures below for larger image. post-12776-138698210302_thumb.jpg

post-12776-138698210291_thumb.jpg