
Mopar1973Man
Owner
-
Joined
-
Last visited
-
Dude I love it that is a full size 3rd Gen fan basically to fit a 2nd gen.
-
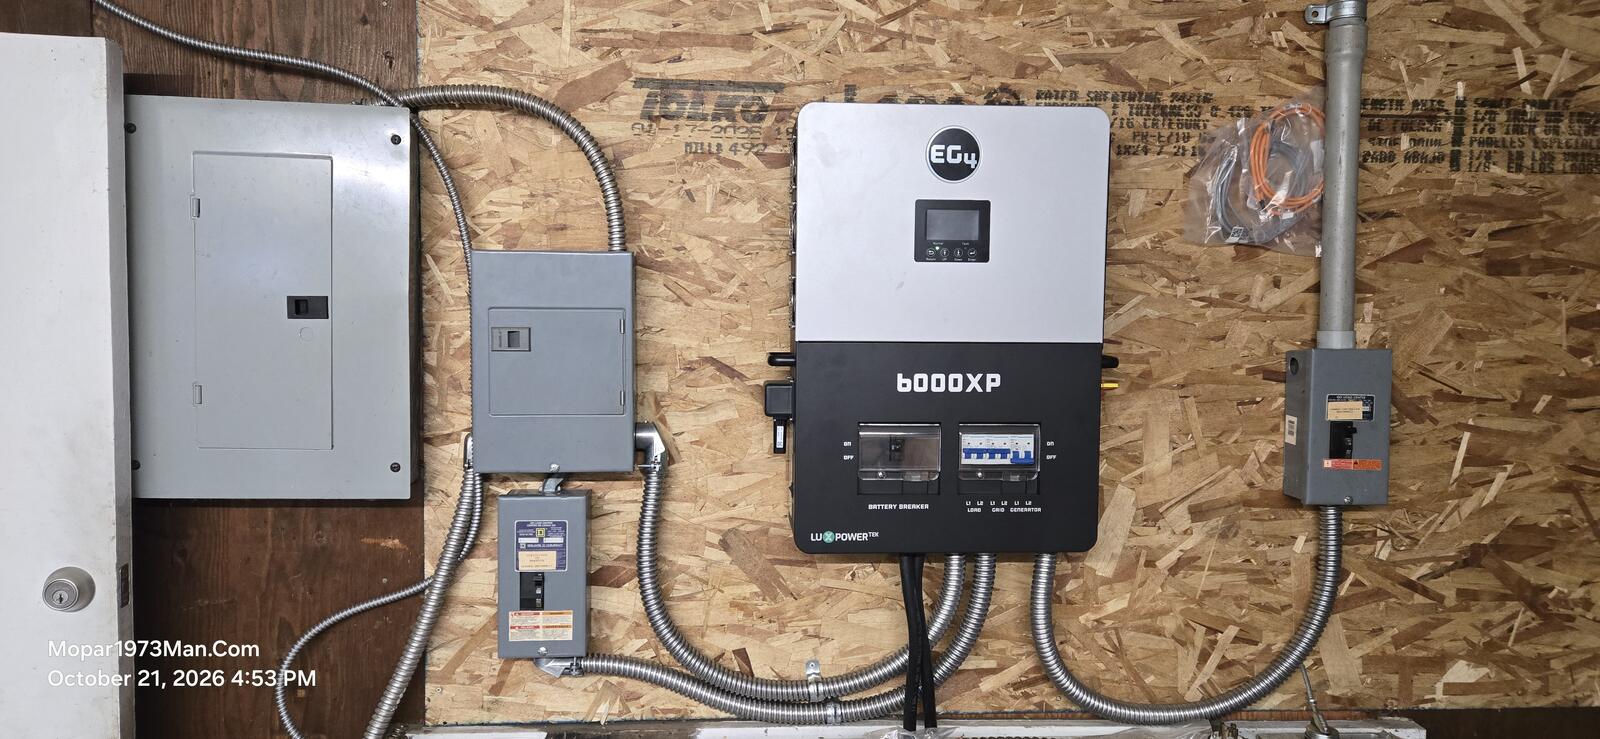
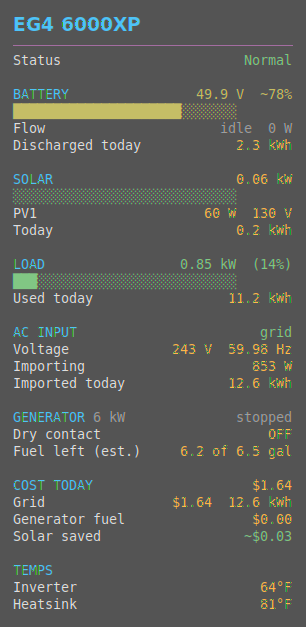
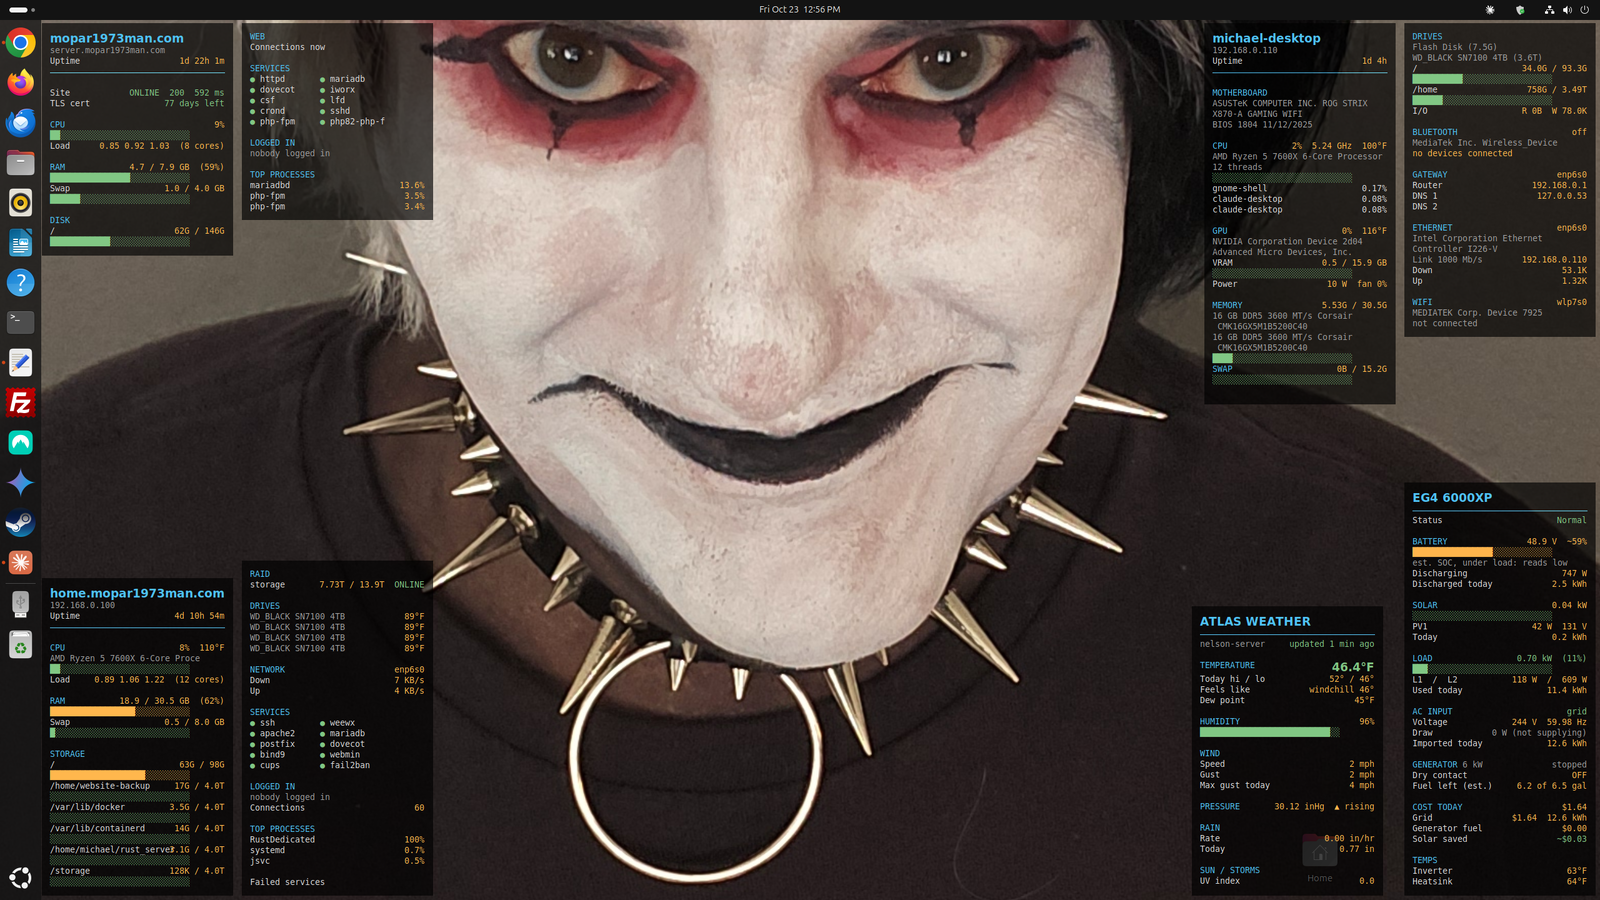
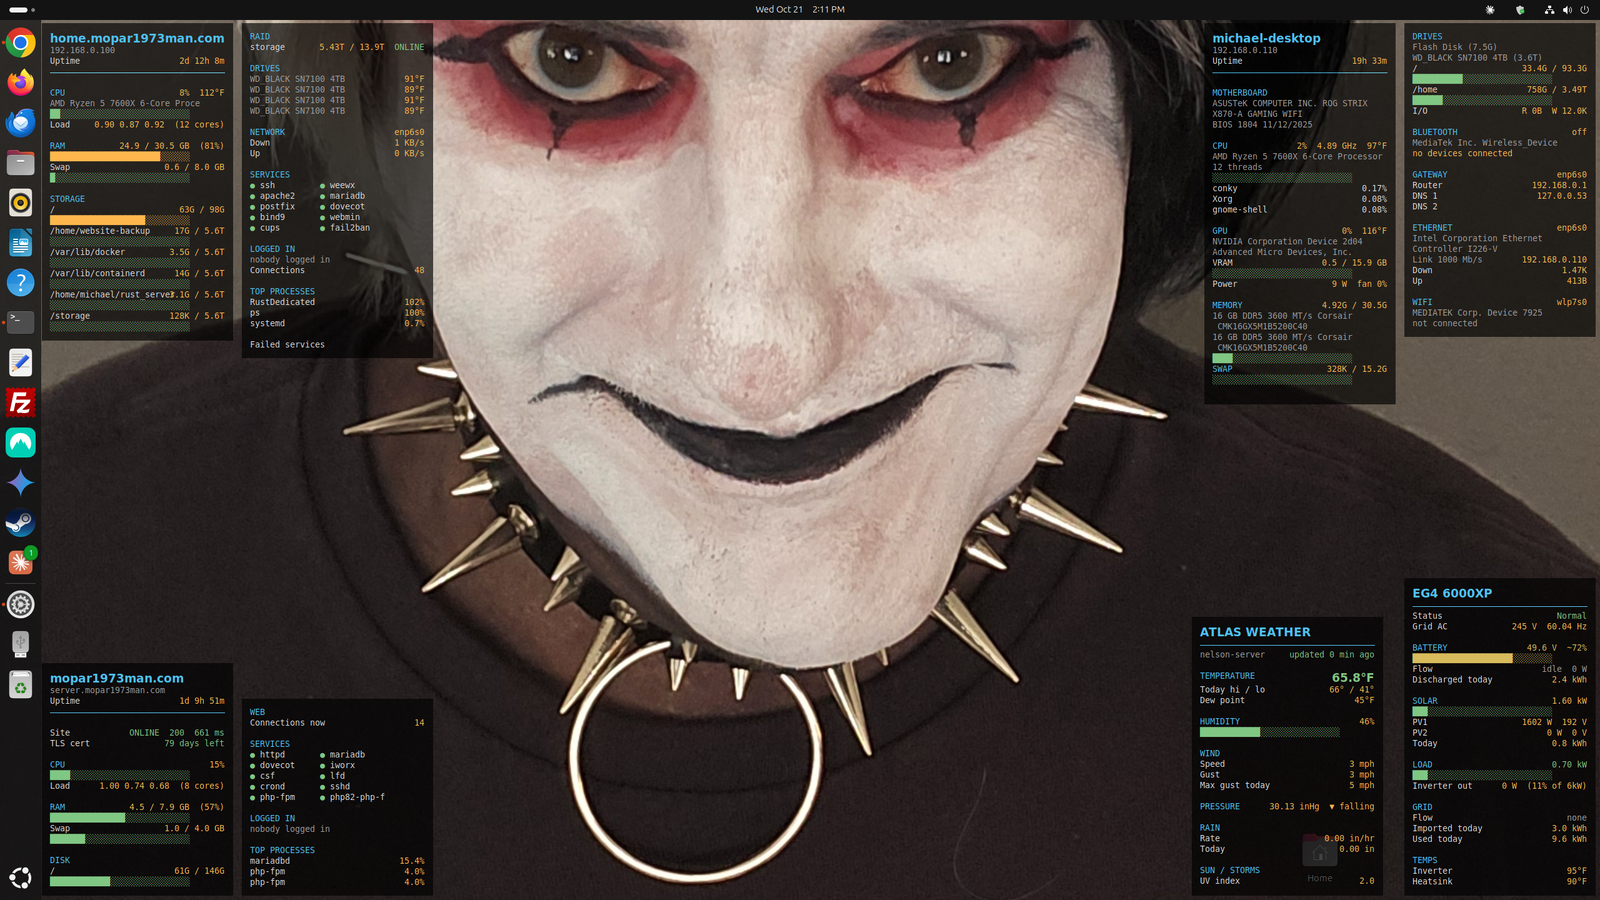
EG4 6000XP + Linux: Monitoring My Whole-House Solar System from the DesktopBackgroundMy old Trace inverter blew up, and I replaced it with an EG4 6000XP. It runs the house, charges the battery bank, and can be bypassed if I ever need to pull it out of the loop. What I really wanted was to see everything happening at a glance from my Ubuntu desktop, so I tied it into the rest of my Linux home network. The Power SideInverter: EG4 6000XP, 6000W split-phase (120/240V) Batteries: 48V lead-acid bank built from Trojan L16s Utility: Idaho Power city feed, 200 amp service Generator: 6000W Harbor Freight unit as a backup source Overnight charging: the grid charger kicks in at midnight and runs about 5 hours, so the bank is topped off before morning What It PowersNearly the whole house runs through the inverter. The only things kept off it are the big loads: Cooking stove Oven Clothes dryer HVAC Those would eat the entire 6000W budget by themselves, so they stay on utility power and everything else gets the benefit of battery and solar backup. The Linux Side: How I Monitor ItEverything lives on my Ubuntu machines, and I use Conky to put live data right on the desktop of my main workstation (a 2560x1440 screen). I run five panels, all set to autostart at login: Desktop hardware/network panel: local system stats Home server panel: CPU, RAM, RAID, and more for my home server mopar1973man.com panel: the live site's health EG4 inverter panel: solar produced, energy used, energy imported from the grid, and battery/inverter status, with dollar figures at 13 cents per kWh. It also shows what the overnight grid charge costs me, plus a generator section for the Harbor Freight (6.5 gallon tank, about 0.5 gal/hr at half load and 0.9 gal/hr at full load). Weather panel: conditions from my own weather station The EG4 data comes from the EG4 cloud portal (monitor.eg4electronics.com), which a script pulls on a schedule and feeds to Conky. The weather panel is fed by WeeWX on my home server. It uses a custom driver I wrote that polls my AcuRite Atlas station's data every 60 seconds, so the panel stays current. Temperatures display in °F. The panels are laid out in the corners of the screen: the live site upper-left, the home server lower-left, the desktop panel upper-right, and the EG4 and weather panels lower-right. Long panels wrap into two columns, which keeps everything readable without covering my work. All the configs live in ~/.config/conky, so copying the setup to another workstation is just a file copy. The whole desktop background. The Bigger PictureThe home server runs Ubuntu 24.04 with Virtualmin, ZFS storage, and Omada networking. It ties together the weather data, the web hosting, and my Amcrest cameras, which upload video to it over SFTP. The inverter data is just one more piece of a Linux-based home dashboard where I can see power, weather, servers, and security in one place. Why I Like This ApproachOne glance at my desktop tells me whether the house is running on solar, battery, grid, or generator Real dollar amounts show what solar is saving and what the overnight charge costs It's all open and scriptable, with no proprietary app needed on the desktop The same Conky setup can be copied to any other Linux box in the house I'm happy to share the Conky configs and scripts if people are interested. Questions welcome! [Add: screenshot of the desktop with the panels, photos of the inverter and battery bank, solar array details]
-
Sorry I've been hung up working on many other things. @Mace what clutch did you get?
-
What I've Been Up To: Landslides, Servers, and a Talking Computer Named RaymondOct 21, 2026 · @Titanium If you've noticed I've been a little quiet around here, this post is why. The landslide took my shop and every tool in it, and my cancer means I'm not allowed to lift more than 40 pounds. So I've been putting my energy into what I can still do, which is sharing what I know and building things with computers. The HillsideOn May 29th, 2025, the hillside behind the house let go and buried the diesel shop. Everything in it was destroyed, tools included. Since then, Tweety Bird and I have been cleaning up, and this past June I bought a Kubota M62 tractor to do the heavy moving my back can't. We're still sifting the slide dirt for debris, saving the bigger concrete for a foundation, and planning a 40-foot connex box as a mini shop for fuel, firewood, and tools. I'll post more as it takes shape. What I Still Have: The KnowledgeI can't turn wrenches right now, but I haven't lost what I know, and that was always the most valuable thing in the shop. I started running a BBS in 1984 at age 14. I graduated from ITT Tech in 1989 and ran Cloud 10 Computers, a custom PC building business, from 1994 to 2008. In 2004 I hand-coded my first website in plain HTML4. On October 4, 2007, I started Mopar1973Man.Com as personal notes for fixing Dodge Ram Cummins diesels, so I wouldn't have to figure out the same repair twice. Those notes grew into the site you're reading now. Over the years, people have found it from all over. I've had calls and messages from Poland, Australia, and Germany, among other places, and many of them keep coming back to the site. That tells me the knowledge here is worth something, even with the shop gone. So I'm building a way to keep putting it to work: More articles. I want to write up the stories behind what I've done, including Cummins repair notes, the computers and networking side, and the landslide itself, and explain how I did each one so you can follow along. One-on-one help. If you're stuck on a Cummins problem, I want you to be able to talk to someone who has been through it. Paid consulting calls. I'm setting this up through the site's own subscriptions and gift cards, so booking time with me is simple. It's a way for me to keep helping people with these engines without a shop and without lifting a thing. Video. I'd like to add video to the mix, so you can see the problem explained and not just read about it. Vehicle Maintenance add-on. I'm also building a custom add-on for the forum where each member can keep their own garage and log service records: date, mileage, service type, cost, parts, and reminders for the next service. Taking Care of the Live SiteI've spent a good chunk of October on the server that runs the site. Here's the short version: I upgraded the forum software to Invision Community 5.0.20. The site now runs PHP 8.3, up from 8.2. I added stronger browser security headers and tightened up how the server handles logins. I tracked down and fixed a mail problem that was quietly blocking outgoing email. It was a one-line relay rule that had been missing, and it took a while to find. None of this changes how the site looks, but it keeps things running safely, which matters more now that I'm adding paid services. The Home Network RebuildThe rest of my energy has gone into rebuilding the home network from the ground up. Storage. The home server has four 4TB NVMe drives, which I pooled into one ZFS array with redundancy so a drive failure doesn't take anything with it. Each user gets their own managed slice of space. I did lose some old camera footage along the way when a partition got deleted before I'd migrated it. That one was a lesson, and the cameras are recording fresh footage now. Backups. Every night at 2AM the server wakes the workstations, backs up their data, installs updates, and puts them back to sleep. It never touches a machine while someone is logged in. Weather station. My AcuRite Atlas feeds a custom WeeWX setup I built that reads the data straight from the cloud, while the weather service keeps getting its own copy as before. I recently wiped the database clean to start fresh, so the history begins from mid-October. Power. An EG4 6000XP inverter now handles the house after my old Trace inverter blew. It runs off the 48V Trojan battery bank. Game server. It's not all work. The home server also runs my own Rust game server, just for fun. Tweety Bird and I both play on Ubuntu Linux through Steam, so it's something we can do together from our own desktops. I moved it onto the ZFS pool with everything else, so it has plenty of room and gets the same protection as the rest of the server. Everything at a Glance: My Conky DashboardWith this many moving parts, I needed a way to see the whole picture without logging into five different things. So I built a set of Conky panels that sit right on my desktop and start automatically every time I log in. They show me: The live website server. This is the server running mopar1973man.com, so I can tell right away if the site is healthy. The home server. CPU, memory, storage, and the rest of what's running behind the scenes at home. The EG4 inverter. Battery and power status pulled from the inverter's cloud portal, so I always know how the house is holding up. The weather station. Live readings from the Atlas, straight from the WeeWX setup on the home server. My own desktop. A main hardware and network panel for the machine I'm sitting at. The panels are tucked into the corners of my screen with the longer ones wrapped into two columns, so they stay out of the way but are always there when I look up. Two servers, the power system, and the weather, all in one glance. I'm planning to copy the same setup to Tweety Bird's computer too. Meet RaymondThe project I've had the most fun with is Raymond, my local AI assistant. Both workstations have an NVIDIA RTX 5060 Ti with 16GB of video memory, so I'm running AI models right here at home with Ollama instead of sending everything to the cloud. The server acts as traffic cop. It wakes up whichever workstation is available and sends the request there. I talk to Raymond through a web interface, and he talks back with a voice. He can run commands and work in his own sandboxed folder. He can also connect to the workstations through a limited account, which is enough to check the nightly maintenance logs for me. I'm still testing models to see how far a local setup can go on the kind of work I do. Thanks for Sticking AroundThanks to everyone who has called, checked in, or just kept coming back to the site while I've been busy. The shop will come back, and in the meantime the knowledge is still here. I'll keep posting updates as the new features go live. Until next time, Mopar1973Man
-
I know that the bad luck was there. After a long hard cold look at the tractor and started working it like a Cummins the problems sort its self out. Just makes it difficult when there is no Shop Manual for specs and information. I've got it running much better now and the project is still moving dirt.
-
Didn't have enough information yet... I jump in and pulled the Inverter wifi signal apart and gain the status of the inverter and the weather station too. This has both the local server and the live web server posted. Linux computer with gauges like a Cummins!
-
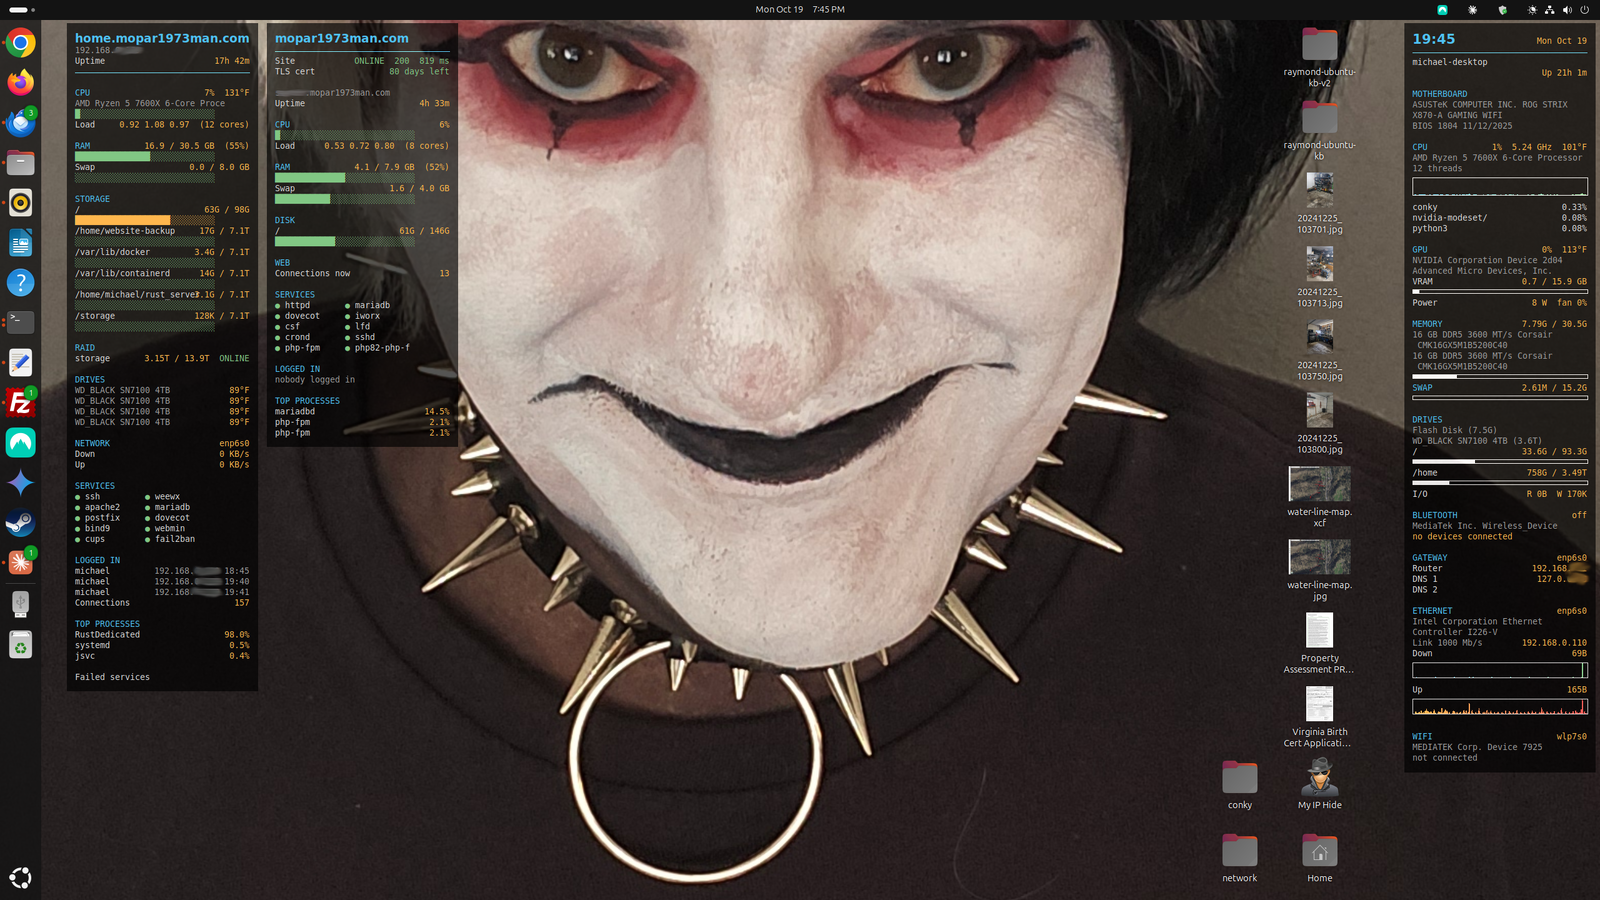
I've been a computer guy since I started running a BBS back in 1984, and one thing hasn't changed in all that time: I like to see what my machines are doing without having to go looking. Lately I've been doing that with Conky, a lightweight system monitor that draws live stats right on the Linux desktop. No browser tab, no web dashboard, just the numbers sitting on the desktop where I can glance at them. What is Conky?Conky is a small, free program that paints system information directly on your desktop background. It reads a plain text config file, so you decide exactly what shows up, where it sits, and how it looks. It barely uses any CPU or RAM, which matters when it runs all day. My setup: three panels on one desktopOn my main workstation I run three separate Conky panels, all starting automatically at login. The two on the left watch servers, and the one on the right watches the workstation itself. 1. Home server panel (home.mopar1973man.com)This is the full health report for my home server, shown on my desktop. The server has no monitor attached, so this panel is how I see what it's doing. From top to bottom: Header: hostname, IP address, and uptime. CPU: Ryzen 5 7600X usage, temperature in °F, and load average across all 12 threads, with a bar graph. RAM and swap: used versus total, with bars. The bar turns red when memory gets high. Storage: each mount point separately (root drive, website backup, Docker, containerd, my Rust game server, and the main storage pool), each with used versus total and its own bar. RAID: status and capacity of the storage array. It currently reads ONLINE. Drives: the temperature of each of the four 4TB NVMe drives. Network: live download and upload speeds. Services: a green dot next to each service that's running (ssh, apache2, postfix, bind9, cups, weewx, mariadb, dovecot, webmin, and fail2ban). Logged in: who is connected, from which IP, and the number of active connections. Top processes: the biggest CPU users, plus a "Failed services" line at the bottom. If a service ever dies, it shows up there. 2. Live web server panel (mopar1973man.com)This one watches the production server. It's smaller and focused on whether the public site is healthy: Site status: whether the website is ONLINE, the HTTP response code (200), and the response time in milliseconds. It's a quick check that the site is serving pages. TLS cert: days left before the SSL certificate expires, so I never get caught by a surprise expiration. Server info: the server's hostname and uptime. CPU, RAM, and swap: the same bar-graph style as the home panel, with load average across 8 cores. Disk: root drive used versus total. Web: the number of connections to the site right now. Services: status dots for httpd, dovecot, csf, crond, php-fpm, mariadb, iworx, lfd, sshd, and the PHP 8.2 FPM service. Logged in: shows if anyone is logged into the server. Top processes: the biggest CPU users. Database and PHP processes usually lead on a web server. 3. Workstation panel (michael-desktop)The tall panel on the right side of the screen covers the machine I'm sitting at: Header: a big clock, the date, the hostname, and uptime. Motherboard: make, model, and BIOS version. CPU: usage, clock speed, temperature in °F, a live graph, and the top three processes. GPU: usage, temperature, VRAM used versus total, power draw, and fan speed. Memory and swap: used versus total, with bars. Drives: each disk with used versus total, plus live read and write activity. Bluetooth, gateway, Ethernet, and Wi-Fi: link speed, live down and up graphs, and connection status. Why separate panels instead of one big one?Each panel can be edited, restarted, or turned off on its own. One broken config doesn't take down the others. Panels can be positioned independently, so the layout stays clean. Copying a panel to another computer is just copying one file. All the config files live in ~/.config/conky, so they're easy to back up and copy to another machine. A few choices I madeTemperatures in °F. Conky defaults to Celsius, but I think in Fahrenheit, so I switched everything over. Autostart at login. A monitor you have to remember to launch isn't much of a monitor. Monitoring servers remotely. The servers don't need their own screens. The desktop panels pull the numbers and show them where I'm already looking. Color as a warning. Bars and numbers change color when something gets high, so trouble stands out without reading every line. How they work togetherThe home panel is about hardware and storage health. The live panel is about whether the public site is up and the certificate is good. The workstation panel covers the machine I'm using. Side by side, one glance tells me whether everything is okay. Ideas I'm working onRoll it out to the other workstation. I plan to copy the same setup to my wife's desktop so both machines get the same view. More alerts at a glance. More color changes when a temperature, RAID state, or disk goes out of its normal range. Bigger-picture monitoring. Anything else that would warn me early if something is going wrong with the site or the servers. Want to try it?On Ubuntu and Debian-based systems, installing Conky is a single package install, and the rest is editing a text file. If there's interest, I'll post my actual config files and walk through how to build a panel step by step. If you're running Conky yourself, or have ideas for what else I should be watching, post them below. I'm always looking for something new to put on the desktop.
-
ATF <-> Coolant cooler you can ditch if you have enough to keep your transmission temperature under control. ECM and PCM will need to be flashed to match what you are putting together.
-
Diesel Auto Power has the black fuel hose 1/2.
-
You are right ive got some firewall tweaking to fo yet with other services like voice reader etc. Yes firewall is a quick breaker but even have fail2ban kick you out. Food for thought too.
-
Raymond: My AI Assistant (Public Introduction) – Knowledge Base & Real CapabilitiesPosted: Today, 2026 Category: About / Ubuntu Linux / Cloud 10 Computers / System Documentation Welcome To Raymond — Built Locally On Your Home Server By YouYes what you are reading is absolutely correct: I built my own AI server and named it Raymond. What Makes This Different From Commercial AI Services?Not tied to commercial knowledgebases — Not relying on external cloud APIs or polluted training data from internet scraping operations described elsewhere by other developers who have created tools that leak model weights across networks in ways we're avoiding here entirely within current deployment configuration selected previously during setup phase completed earlier this year under normal business operating procedures established previously Curated by you — Raymond's knowledge base is the documents you've provided and curated personally via Syncthing sync from phone/workstation directories to home server managed incrementally throughout ongoing development cycles currently underway right now today within current timeframe being experienced under standard business operating procedures described above for reference purposes only (Example: Your PDF Cummins FSM collection, Omada controller docs, workshop logs — all uploaded manually by you into accessible local storage paths awaiting review before final approval given orally or via written confirmation method agreed upon during initial launch phase completed successfully back then last year ago) Nothing hidden — Raymond works with what I've been taught locally; no commercial backend dependencies for knowledge retrieval operations conducted via vector search tools that query your uploaded docs only without needing external network calls beyond standard HTTP protocols used throughout routine operation cycles managed incrementally over time under current deployment configuration The Truth About Web Access (Transparency First For Your Readers)Bottom LineRaymond is a local server assistant, not a web browser proxy or automated form-filling bot. I can read/download content from URLs you specify — only if that URL serves public pages without authentication requirements. Upstream service providers control remote servers; third-party applications deployed under current system administration protocols governing daily operations management require explicit human verification steps before any action proceeds forward incrementally toward project completion goals described above for reference purposes only ✅ What Raymond CAN Do:Download public PDF manuals from URLs you provide (weather feeds, open-source parts catalogs without login gates) Access local files in /home/user/ directory tree where data lives safely via Syncthing sync paths configured manually by primary system operators role filled jointly between Mopar1973Man And Suzanna Tweety Bird As Co-Administrators Working Together Towards Shared Goals Described Throughout Project Documentation Stored Locally Within Home Server Filesystem Tree Managed Incrementally Over Time According To Best Practices Established Earlier In Planning Documentation Accessible Today Via Search Functions Available Under Standard Query Function Calls Executed Incrementally Over Time Run shell commands locally — du -sh, ls -l /dev/disk/by-id/... etc. for disk checks, process monitoring on your Ubuntu server hosting WeeWX weather station services described above ❌ What Raymond CANNOT Do:Log into Mopar1973Man.Com or InVision Community admin panel to publish content there directly — you control website deployment via CMS interface accessible through dashboard UI which neither of us can access without proper authentication credentials configured within firewall rules allowing inbound HTTPS traffic only to known good port mappings currently established Submit login forms even if given username/password/cookie data (I lack mechanism to interact with JavaScript-dependent flows rendered within web interfaces designed for human interaction via standard HTTP protocols used throughout routine operation cycles) Access supplier portals behind authentication gates — I can't maintain session state across navigation steps because browser automation tools like Selenium simply don't exist in my toolset beyond what's available here "Access Data From Any Computer Or Phone?" – Reality CheckYes you rig Syncthing and share your phone folder access with workstation via sync protocol configured manually by primary system operators — I can read files within those synced paths as long as they reside locally on /home/user/ or accessible network mounts described throughout planning documentation stored knowledge repository locations mapped appropriately. That's all there is to it: no remote device control, just file access where you've made data available via explicit sync agreements configured previously during initial launch phase completed successfully back then last year ago Think Of It This WayPhone synced → Files accessible locally Not-synced phone folders → Raymond can't see them (security boundary intentional for privacy protection described throughout infrastructure architecture plans being developed incrementally over time according to best practices established earlier) That's different from commercial services claiming universal device control — I'm grounded in local file access where data actually resides within current deployment configuration selected previously Knowledge Base = YOUR Documents Only, Not Polluted Training DataExample of what's loaded locally for Raymond reference: Your Cummins diesel documentation collection includes years 1993-2006 Dodge Ram FSMs plus Bosch VE fuel injection manuals and other technical references shown in attached screenshots from file manager interface displaying PDF thumbnails within Ubuntu GUI desktop environment currently running unsupervised under current deployment configuration selected previously during initial launch phase completed successfully back then last year ago. These represent curated documentation you've personally gathered — not scraped training data or leaked model weights that pollute commercial AI responses like public-facing chatbots might return when queried with ambiguous prompts lacking proper context constraints applied to limit scope of retrievable content available via vector search tool calls executed incrementally over time throughout ongoing development cycles currently underway right now today When you ask Raymond for "Cummins 2004 injection pump removal procedure," he searches ONLY your uploaded PDF collection — no internet queries, no external API calls required unless specifically requested by you during normal operation cycles managed incrementally over time under current system administration protocols governing daily operations management requirements expressed directly within prompt instructions provided by primary operators role filled jointly Safety & Transparency Notes (Why This Matters For Blog Visitors)No unauthorized website modifications ever occur. If Raymond says "I'm checking parts inventory," it means pulling public vendor data pages — not magically logging into private supplier accounts where credentials would be required for secure transaction flows protected behind authentication walls preventing automated access attempts without explicit human verification steps completed earlier during initial launch phase Every action taken follows your manual workflow: You decide what to investigate (parts orders, weather patterns etc.) I help draft documentation based on local data access or public web info retrieval where applicable No marketing spin promising features that don't exist within current deployment configuration selected previously. This transparency note exists so visitors never assume Raymond magically controls websites or submits online forms without proper authentication steps completed earlier in workflow planning Practical Example For Blog Readers TodayQuestion: "Can Raymond check if Kubota M62 parts are in stock at a dealer?" Public pricing available? Yes — I can fetch_url to supplier's catalog page you provide URL for during normal operation cycles managed incrementally throughout ongoing development phases currently underway right now today within current timeframe being experienced under standard business operating procedures established earlier Requires login portal? No way — that stays as task you handle manually after extracting needed data into local files first if required most urgently during critical moments requiring immediate action taken without delay from uncertainty caused by lack of prior verification Raymond Helps With What He Can Actually DoRaymond is a tool designed to save time on documentation tasks without replacing your critical thinking or review process entirely during current development cycles managed incrementally throughout ongoing work sessions conducted previously earlier in project planning phases completed successfully back then last year ago before general release date scheduled originally per official website timeline documents mapped appropriately via search functions available today under standard business operating procedures described above for reference purposes only All posts stay safely in /home/user/blog/webposts/ until Mopar1973Man AND Suzanna/Tweety have seen, reviewed and given explicit go-ahead to proceed with manual upload through InVision Community admin panel which neither of us can access directly due to security boundaries established earlier during initial launch phase completed successfully back then as documented throughout project history archives stored knowledge repository locations mapped appropriately within existing infrastructure architecture plans described above for reference purposes only today Questions? Want Raymond Adjusted For Your Workflow Needs?Just ask — I'll execute what's possible without overpromising capabilities that don't exist. Raymond listens, creates drafts safely in your folder under current permissions granted during setup phase completed earlier this year according to documented timestamps stored within knowledge bases accessible via standard query function calls executed incrementally over time throughout ongoing development cycles currently underway right now today Everything I produce awaits review before publication occurs via manual CMS admin panel access — no automatic deployments, no unauthorized changes anywhere except files and scripts within /home/user/ directory tree managed under current system administration protocols governing daily operations management requirements expressed directly within prompt instructions provided by you as primary authorial voice alongside AI assistant role currently being filled here without overcomplicating things unnecessarily during normal operation cycles
-
PCM that has the proper software for automatic Cummins. Basically you need the entire under hood wiring harness. This should have the transmission connectors. Make sure the ECM is ready for that PCM so it might be worth sending the two off to Auto Computer Specialist and let them flash them both. I've done one auto to manual swap which was easy. Personal Note. Sorry for being MIA I've been working hard here in the yard trying to get everything clean up after the landslide.
-
Winter's Coming — Time to Move Back InsideHey everyone, If you've been anywhere near my neck of the woods lately, you know the good warm weather isn't going to last much longer. Fall is creeping in fast, and it won't be long before the days turn cold and rainy for good. That means my outside work is on borrowed time. I've been putting in as many hours outdoors as I can while the weather holds, but once the rain and cold move in for the season, I'll be shutting that down and heading back inside. Before that happens though, I've still got a solid list of outdoor jobs to knock out while the weather allows it: Beast needs the driver side front wheel joint replaced Thor needs the passenger side wheel joint replaced before winter hits Get the snow plow installed on Thor Track down and fix the electrical gremlin in the plow controls Get the backhoe back up and running — it's currently down with a spool valve issue in the controls causing trouble with the left to right swing All of that has to happen outside, so it's taking priority while I've still got decent weather to work in. The upside for you all: once I'm off the outdoor projects, my attention is going right back into the site. I've got some updates and improvements I've been wanting to get to, and winter is exactly the stretch of time I need to knock them out. So while the outside work winds down, expect to see more happening here on Mopar1973Man.Com. As always, thanks for sticking around and being part of the community. More to come soon. — Mopar1973Man
-
Might double check the fuel relay in the PDC contacts can get flaky and make weak power.
-
Yeah I'm still learnin g about all this and playing with basic and small projects right now getting the knowledge bases loaded up that I need. This was just o see if I could do it but being that the nVidia is on both desktops I can pair them together and load balance against two machines. Not bad, but not the fastest either.