TFaoro
Unpaid Member
-
Joined
-
Last visited
Everything posted by TFaoro
-
It hasn't changed much. It removes some of the TM, but is still limited to ~65hp because it doesn't have a wiretap to fuel. IMO it's a great box (if you have a light foot, otherwise it's smokey) especially for towing.
-
Mike is right, and my hands are so callused it makes it hard to feel small bolts. Couple that with gloves and I'd be dropping bolts left and right I filled up this morning. 220 or so miles and netted 19.2mpg I haven't been driving very nice, the engine isn't completely broke in yet, I have been turing much higher rpms than normal, I went and drove up a mountain pass, and I don't think my speedo is calibrated (I'm going further than the odo says because of larger tires.) Hopefully the mileage will continue to get better
-
Thanks Greenlee! I've considered some thing for when I'm out of school. Whether that ever facilitates into anything I'm not sure. I hope this thread has been fun for everyone to follow. I've really enjoyed this project! I think online you can get the kit for 120 then add in the gun 20 or so... then paper, tape, sandpaper ect. I would bet around 200 was the total cost. Sure as heck beats the 750 bucks LineX wanted to do the same thing. You can see it tomorrow and let me know if you like the texture. I wouldn't mind doing it.... we'll talk buddy! I'll give him a call tomorrow. You are correct about the ring needing to crush the gasket's fire ring. I did GDP's instructions for putting the head on, so "1" torque in your book haha. So tonight I changed the oil & filter, re-torqued all of the studs (One at a time broke one loose, took the nut off, applied ARP lube, and put it back on) and set the valve lash when the engine cooled down to 100*. I can say the studs were LOOSE! Just for giggles I torqued a couple before doing the process correct and got 1/2 to 3/4 of a turn on each one. They might have been around 100 ft-lbs. I feel a lot better about getting after it now. I cut the filter open and it looked spotless inside! Good news, the motor isn't eating itself. Hopefully I don't have to to the torquing many more times.... 190* motors hurt. Clean filter. Quite a shame to throw away 3 gallons of oil that wasn't even black yet....
-
It's a lost cause....
-
Well I stand corrected.... Smarty FTW!
-
http://forum.mopar1973man.com/index.php?/topic/9120-miss-at-all-rpms/page-2 Look here......
-
It was actually really easy. Sand the big stuff, tape off the lines, sand to the lines, wrap the truck, use self-etching primer on bare metal spots, pour the catalyst in, shake it and shoot it on. Wait around an hour and shoot on a second coat. (80 grit sandpaper on everything) I need to call him and have another talk.... MAYBE he said only for the breakin but I could have sworn he said at all times. The head is O ringed. I think I posted pics earlier.... Either way the 3 torques were done when the engine was out to get the "stretch" out of the studs. I did it following the GDP instructions because of everyone complaining about popped head gaskets after stud installs. If they made vehicles las they wouldn't be able to sell the new ones!
-
There is no TM on manuals.... The ECM is programmed differently. At least that's what I've always known. My 5 speed doesn't show any sort of change in power at 25mph.
-
I believe once the truck gets to a certain speed. It was dodge's way of keeping the low end torque from ripping the trans apart. rburks, check your personal messages.
-
It says for 4-5 quarts of oil... We have 12, so extra is ok with me until it breaks in. I'll drop down to 2 for the rest of the trucks life after the second oil change. I have torqued the head 3 times so far... This will just be the hot torque, and hopefully the last one for a while. Maybe.... I don't know I can just tell it pulls way harder on the top end. Like all the way to 3100 (That's where I let off) pulling hard no drop off.
-
They cost too much to do that to them! Thinking about the front bumper plastic though.... So I started out the night by pulling a bunch of the injection lines to get number three pulled out. I never got it all the way out (I wasn't willing to take the intake horn off) but I got it pointing straight upward and was able to clean it up. About 45 min with 400 grit sand paper got all of the pitting removed. Then I used a scotchbrite pad to make it smooth. I then cleaned it out with starting fluid and blew it out. It's good and sealed up now! Took the truck for another drive tonight. About 60 miles. This thing keeps running better and better! I opened it up a bit and wow that cam makes a HUGE difference on the top end. 34-35psi of boost on stock tuning and it pulls HARD (again for being stock.) Tomorrow I'll drive it to work and do the re-torque, change oil, and adjust the valves. Thanks everyone for the compliments! I'll continue to update this as the engine breaks in.
-
Power and heated. They are the 2009 style with the blinker in the corner.
-
Thanks! The break in will all be on stock tuning, or "lower" power with minimal smoke. This keeps the extra fuel from contaminating the cylinder walls during the breakin. Not a problem for me because I don't "roll coal" like a moron. So break in starts out with 200 miles of constant changing rpms. Never want to let the engine run at a certain RPM for extended periods of time. If I do that it will run great at that rpm but not so great across the rest of the power band. I'll then do a hot torque on the studs, change the oil, let it cool off, and adjust the valves. Then I'll add 3 more bottles of zddp additive. I also plan to cut the filter open and see if there is any metal inside. Next I'll go another 1300-1500 miles of changing rpms and change the oil again. After this one I'll only add two bottles of the zddp. From here I'll gradually add power until I've maxed it out. 5,000 mile oil changes will happen from this point forward. With the black strip down the side the mirrors need to be black.... If I could sell these for 200 or 250 I think I'd buy some new ones. Any takers!?!?! The tip doesn't appear to be cracked, but I'll be taking it off tonight. If it is I think I'll blame you for mentioning it!
-
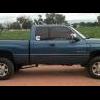
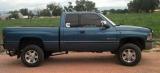
So I finally got the truck out and was able to drive it tonight. Wow I've missed driving something that can get out of its own way! :rof Did about a 50 mile drive. The engine seems to be running pretty good, it just has a bit of a weird skip to it. I pulled into the gas station to buy a tea.... come back out and there's a puddle the size of a half dollar under the truck. I crawl under it and see the underside is all spotted.... skid plates, fuel tank, differential, driveline ect. I see something about to drip off of the bell housing and it has a blue tint. So I pop the hood and start it. There is a lot of fuel leaking out of the #3 injector line where it meets the crossover tube. Like wipe it and see fuel start running right away. I'm guessing that's where my skip is. #3 injector not getting all of the fuel it should. I headed back home and checked the line. It's tight so I guess I'll pull it off and see what's going on tomorrow. Other than that the engine seems great. Starts well, gets up to temp quickly and bounces between 188 and 193 deg, spools fast (For dodge tuning) just seems to be doing well. The transmission is shifting 100% better into 3rd and 4th. The new syncros are definitely working properly! So for those of you picture guys that aren't going to read my ramble above here's some entertainment! Don't mind the fuel return line... it's been re-routed already The shadows make the bed liner look funny on this one so I put it last. There were four of us just staring at it
-
Bad news... 3rd gen spins the other direction, so the threads would be backwards.
-
That's it as far as I know. Noise, apps voltage jumps, and brakes. Nothing else should be affecting the system. Feel free to correct me if I'm wrong though.....
-
Fan? No. Won't fit in our shroud. Fan clutch? Maybe... I need to look into it.
-
You didn't address my top comment.....
-
APPS voltages jumping up and down will confuse the PCM and make the TC unlock.
-
No... but you kinda learn how fast to accelerate, gain speed down hills, loose speed up hills ect. That alone will net you more. Congrats on 1,000 posts btw!
-
Try to get a screw started in it and pull out? I've done that to remove seals before.
-
If you haven't loosened the injectors I wouldn't worry about loosening them to install the tubes. They should already be centered. When I do mine: Install injectors (leave hold down loose) install tubes, install injection lines and torque, then loosen lines and torque injector hold down. Re tighten lines and you're good to go. If you don't loosen the lines before torqing the hold down the injector could sit a tad crooked in the bore and not seal on the bottom surface.
-
Sounds like it's time for a 3rd gen fan clutch with a switch in the cab... I've found low freon to cause the exat issues you have described as well.
-
Sounds like the cap to me. If there is anything over 12 or 14psi I can't remember which our cap is, it should pour into the overflow not out any of the boots. Where did you purchase your cap from? As for clamps you need the constant tension spring clamps. It'll keep those hoses tight through the expansion and contraction. You really need to test and see if you are getting pressure into the coolant system with a gauge. If the pressures are that high it could blow out freeze plugs and that's another story.
-
Got a couple pictures of the bed liner showing how rough it is. Not bad for a DIY kit if you ask me! I'm just waiting for it to cure now.