bjytech
Unpaid Member
-
Joined
-
Last visited
Everything posted by bjytech
-
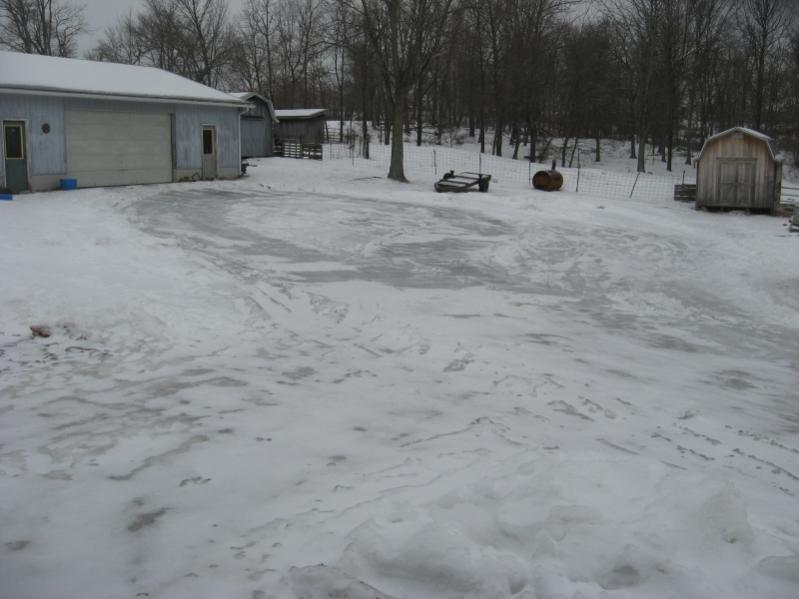
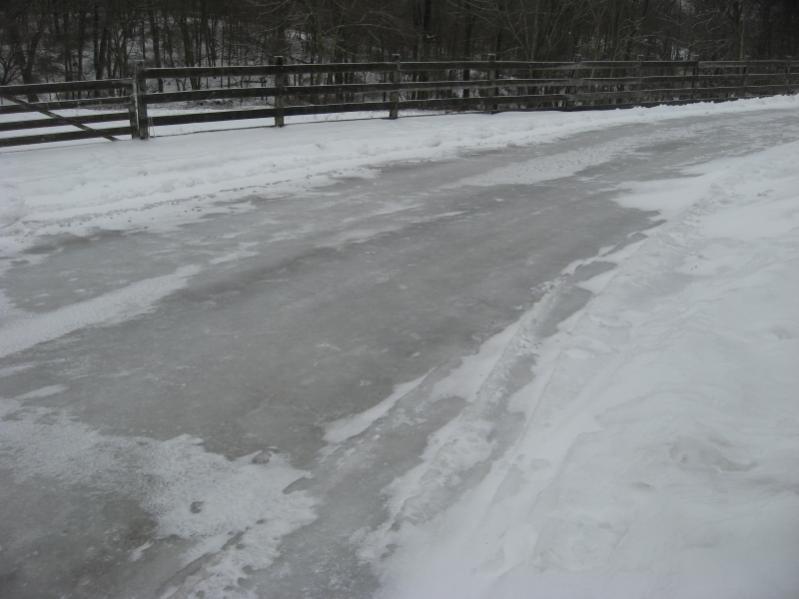
That is a lot of snow! I wish we would have got more snow from this storm that went through but we got mostly ice, Theres about 1in. of ice covering our whole driveway and about 1/2in. covering everything else. Roads are under a level 3 so there's no going anywhere for me even if I could get out of my driveway.

-
You'll have to post up that trick about the snap-ring, I took my compressor housing off in the fall and cleaned it all up so I could actually hear the turbo whistle and it took me forever to get that snap-ring back on.
-
Just by looking at it I'd say A is darker than B, but I opened it in Paint.net and there exactly the same HEX number code. Crazy mind trick!
-
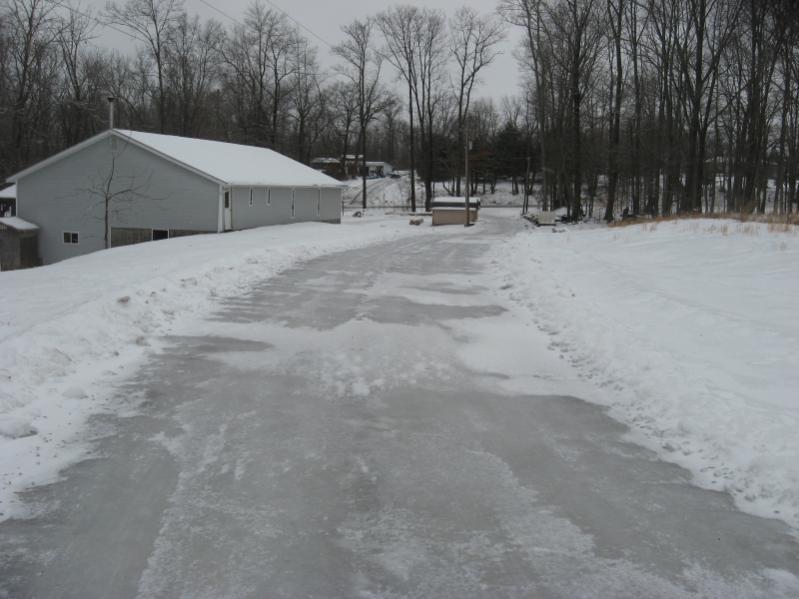
I had some fun in the snow...err should I say ice this morning. I took my truck out of the shop to do a benchmark test against how it is in 2wd with CAD unlocked vs. 2wd with CAD locked and I had a time getting back up the hill into the shop without my 4wd working. The first try i almost got up but then I just started sliding back down while spinning my tires so then I drifted around a little bit on the driveway before I finally got a run up on the hill and put her back in the shop.
-
Well I took the articulator/CAD cover off and locked my axle in and tested it somewhat. In 4wd it bucked quite a bit which was expected, In 2wd it seemed like maybe there was a little binding getting close to full lock but I can't really be sure because the driveway is pretty icy and I couldn't take it out on the road because the power company is working out there and has our drive blocked in for now.
-
I haven't run that setup, but I'm going to be because the other day I found out that my CAD doesn't lock-in any more so I'm going to be doing that setup here when I get the chance. I guess it would seem like it would make it like an 02 axle but I'm not sure. I'll have to go out and figure out a way to lock my axle in and see what it does without the transfer case in 4wd.
-
With p/n 1100 the CAD would be engaged all the time and you don't want that if you drive on the road because you'd get wheel hop/bucking around every turn and it would probably cause something to break sooner or later. The only application you'd want to use p/n 1100 for would be a strictly off-road use only vehicle. If you want you can also make your own posi lock cable, I found this write up through another forum a while back and saved it in-case my articulator ever stopped working. The Writeup is for a jeep but our axles work exactly like there's do. http://www.jeepforum.com/forum/f12/home-made-posi-lock-write-up-595515/
-
I'm really liking GT5, its tons more fun than I remember GT5 Prologue being. I bought a Dodge Challenger SRT8 tonight on it and then tuned it, so now it has over 700HP
-
Pretty good I got Gran Turismo 5, enough candy to last me for quite a while and I got to eat some of my favorite food so its all good! lol
-
Why Thank you guys! It's been a pretty good day today.
-
I have a OBDII ELM327 USB reader that I use with my laptop. With my truck I can monitor RPM, Vehicle speed, IAT, and Engine coolant temp, although the engine coolant temp always reads 150*C so its pretty useless, could just be that my ECT sensor is bad but then again the dash gauge works so who knows.
-
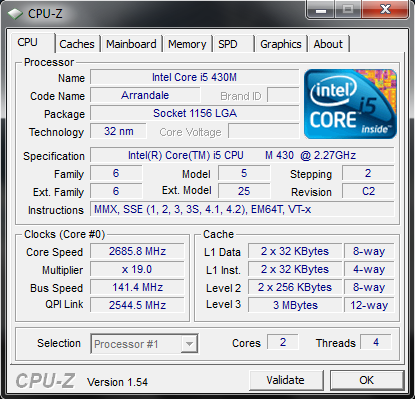
Its in a Asus G60J laptop, I really like it and it seems to run alot cooler than the core2duo that I had in my last computer.
-
Here's my CPUz results... with "turbo mode" on.
-
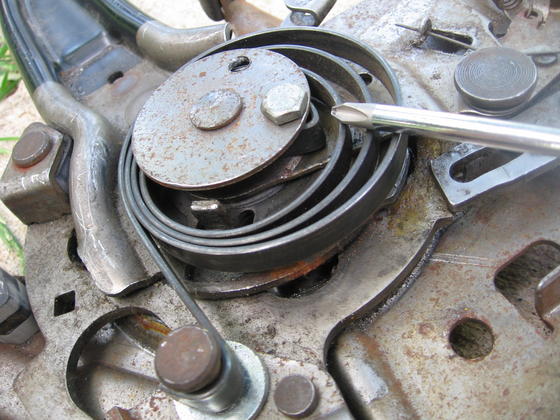
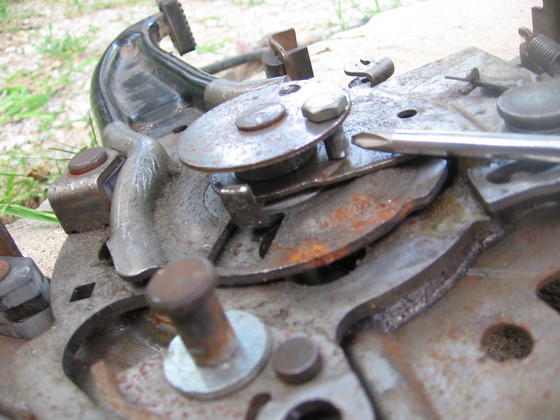
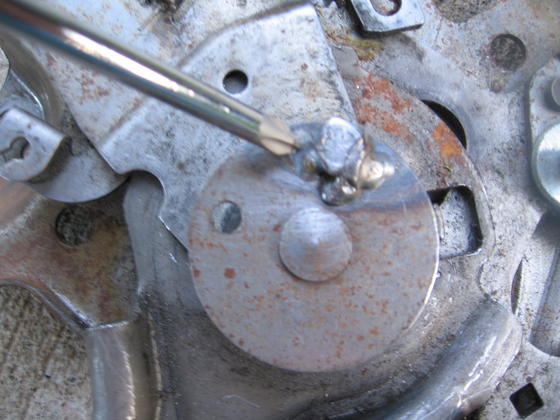
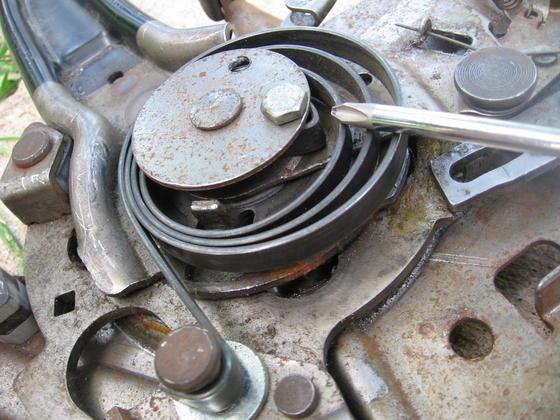
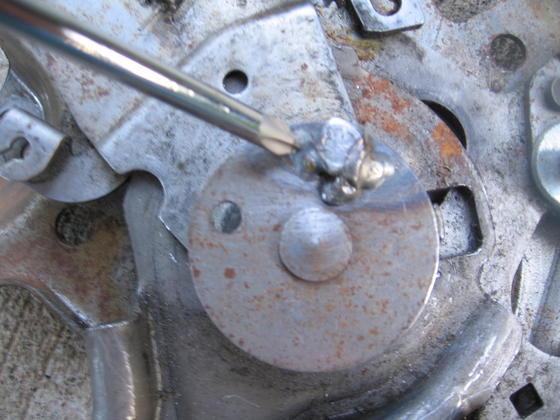
I signed up for a trial membership at TDR after I found their site last month and its good for 60 days so heres a copy of the post that I believe your talking about. Originally posted by SRath over on TDR. This post is for owners of early 2nd gen trucks like my '96 that have the annoying at best, and dangerously ineffective at worst, parking brake pedal that won't stay down when set and/or won't stay set at all (like mine was). It is intended only to share my personal solution for the problem with members who need it or are just sincerely interested in improvements to our trucks. If your parking brake makes you happy the way it is, or you have a newer truck that does not have a problem, or if you simply don't believe in using parking brakes, this post is probably not for you. It is what it is. Nothing more. But it works well. And it costs virtually nothing. The R&R of the pedal assembly is the hardest part and is 99% of the work. So if you can do that, you can do this fix. It does require one spot weld. If you don't have access to a welder, or if the instructions leave you confused, I'll be happy to do the entire mod for you for free if you send me your parking brake pedal assembly and pay for return shipping. Please understand that this solution does not fix your rear brakes if they are the problem. It fixes the parking brake pedal on models with the same miserable design my '96 had. Dodge later changed that design (I don't know exactly when), and that alone should tell you something about how it (didn't) work. My solution is very simple to do and makes the pedal stay where you set it. It will hold better, no longer pop off, and will no longer return to the top position when set; leaving you unsure of whether it is set or not, driving with your brakes on, or parking with them off. Your shoes and drums and their mechanisms and adjustment must be right for any parking brake to work. Adjusting your parking brake cable slack is part of the process after reinstalling the pedal. The entire modification is easily reversed to stock if you don't agree it is better. My parking brake was as bad it could get and would not stay set reliably, yet my rear brakes were fine. My engine compression alone would not hold the truck in all situations. Putting it in gear and shutting off the motor to exit the truck for even a brief moment was a pita, as was having to use wheel chocks all the time. I had to find a solution; and I did. The parking brake is great now. Better than new. The parking brake pedal stays where I put it. Happily, so does the truck now... [i have included some suggested R&R instructions for the pedal assembly. Some guys won't need that. Others might find parts of it useful. Please bear in mind that I did this fix many months ago and did not write notes on the R&R part and removing and reinstalling my pedal assembly may have been a little different since I already had much of my interior removed for other reasons. Improved instructions, feedback, and suggestions from those who do this mod are most welcome. "Thank you!" to Joe G. who did this mod very recently and suggested some changes to the R&R instructions and encouraged me to repost it.] Parking Brake Pedal Removal (suggested tips): 1> Under the driver's side of your truck is the parking brake cable adjuster. Loosen it completely and get all the slack you can for the front cable. > It helps to use plenty of penetrating oil on the threaded shaft. > If you can, use a dremel-type rotary tool with a wire wheel brush on it to clean the threads as much as possible first. > You will need a pair of vicegrips and a 13mm wrench. The threaded shaft is too long for a normal deepwell socket, so a ratcheting boxend wrench really helps! > Use the vicegrips to hold the adjuster yoke from turning. > Use antisieze when you reassemble. You will be adjusting your parking brake here when finished. 2> Remove the parking brake pedal assembly. > You will need a 13mm socket (preferably a flex socket) and some various extensions. A really long one helps. > Make a note or take a photo of how the wiring bundles around the parking brake pedal assembly are routed. You want them the same way later. >There are two nuts on the firewall and a bolt in the kickpanel. The top nut is hard to get to and I removed my knee panel from the dash to help. >There is also a tiny clip that holds the release handle cable to the pedal frame. Remove it and the release cable ball end. Remove the brake light wire. >The parking brake cable housing itself is held in the hole in the pedal frame with spring-type fingers. Squeeze those fingers down and remove the cable housing. (Get the pedal assembly unbolted and down on the floor first, where you can work on it.) >Remove the lead-ball end of the cable from the parking brake mechanism. Leave the cable in the truck. > As an alternative, you can leave the cable with the pedal assembly if you think it will be easier. But you will need to completely disconnect the adjuster end and pull your carpet back to get to the screw holding the cable to the floor where it passes through. > Play with the stock assembly enough to understand how it works. Push the pedal down and operate the release. Watch how the center section operates and how the pedal "freewheels" independently. Note how little tension is placed on the ratchet holding/release mechanism. It is an ineffective and ridiculously overcomplicated design and you're going to change those things. Actual Modification: Look at the photos, particularly the one showing both the stock assembly (on the right) and the modified assembly (on the left). Focus on the center section and spring and compare them to each other. The stock configuration has the big spring winding clockwise out from the center. It is anchored on the inside to a bent metal tab. The modified version has the spring flipped over and winding the opposite direction. It is anchored on the inside to the new "anchor" bolt you are going to install in the center plate. Both have the outer end hooked on the same stock pin, only in different directions. (and those few simple changes are the entire modification in a nutshell!) The other photos give some different angles and closeups. The extra empty hole drilled in the center plate of the modified assembly was just an experimental hole as I was figuring out how much tension to put on the spring. Ignore that empty hole. More is better. Step by step: > Remove the spring by hand. It has low tension and comes off easily. > In the close-up photo, note where I drilled a 1/4 inch hole in the top center plate. Do the same now. It does not need to go through the bottom plate nor does it need to be in exactly the same spot, but try to get it close. > Cut a 1/4 inch bolt to length so it just reaches through the hole to the bottom plate, as seen in the close-up photo. > Put it through your hole nice and straight and spotweld the head to hold it in place. > Put the spring back on flipped over so it winds the opposite direction (counterclockwise from center) from stock and so the hooked inner end hooks over the bolt you just installed. Hook the outer end over the same pin it was on originally. > The original bent-tab inner anchor, seen in the photos, does not seem to get in the way, but you can flatten it down if you want to. > Play with the pedal assembly a few times; pushing the pedal down and then releasing it. Note the changes in the function of the center section and pedal. It will now stay down when set and snap back when released. Also note how the tension of the spring now provides a firmer positive engagement of the ratchet holding/release mechanism. Much better! (That's it. You're done with the modification! Now you can just reinstall.) Reinstall and Adjust: 1> Reverse the removal procedure to reinstall the parking brake pedal assembly. Be careful of wiring that runs through your kickpanel to the door and any other wires in close proximity. 2> The final step is to adjust your cable slack under the truck. I like mine so the pedal goes 2/3 to 3/4 of the way down when fully set hard. Make sure the brakes release fully, too. If you run out of adjuster threads, you probably need to adjust your brake shoes using the star wheel inside the drum. Or you may need new shoes and/or drums. That is a different job and is just a straighforward normal brake job. 3> Your parking brake pedal will now stay "set" in whatever position you put it in until you release it. The spring will put tension on the ratchet assembly to help hold the engagement; something important it did not do before. The pedal will pop back to the top only when released, and will do so visually and firmly. I hope this works for everyone else as well as it is working for me. If you have any questions, problems, suggestions, or criticisms (now that you have tried it), please let me know. If you don't have a welder or other equipment, I will be happy to do the modification for you if you can send me your parking brake assembly.


-
I've got one, my PSN ID is "Bryan10-" lately I've been playing Battlefield Bad Company 2 and I'm planing on picking up Call of Duty Black Ops this week some time and I've got some other games to so who knows maybe we have a game in common we can play some time.
-
holy cow thats a big gun, it has so much recoil it even lifted up the table it was tied to
-
My Dad has a 2wd 1st gen and it makes a knocking sound that seems to be coming from some where around the shocks when you go over bumps too. I'm guessing dodge didn't change much if anything from 1st to 2nd generation in that area so I'm going to have to check this out on his truck.
-
From the helicopters I know it looks to me like its an Apache.
-
I just went out and tested it in my truck and your right. Although I had a 94 for a while before I got this 96 and it was the other way around, but it had quite a few chopped up wires in it so maybe the PO rewired it or something for some reason.
-
Are you testing the outlet with the key in the on position? Because if I remember correctly the power outlet only gets power when the key is turned on.
-
Around here I get my diesel at marathon stations, mainly because its either that or citgo and marathon is usually cheaper anyway. As far as I know its just plain #2 that they sell if there is any bio in it they don't say on the pumps.
-
I pretty much always take off in 2nd, 1st just seems like to low of a gear to start in when empty for me.
-
That should be everything you need although I don't think you need the screws because my Dad has a Dell XPS 410 system and the hard drive mounting is completely screw-less in it. Speed wise there shouldn't be any noticeable difference between the new and old drive. As for copying the old drive onto the new one I'm not too sure how one would go about doing that.
-
This spring when I was going to tab my KDP and replace the seals which I hoped would fix my oil leak, I found that the KDP had come out and cracked the timing case right under where the fan bracket mounts to the block. I really didn't want to pay what the shops charge to replace the case so I just decided to try and fix it with some JB weld and its held up good so far, I couldn't get down in to JB weld the part of the crack on the back of the timing case that's against the block so I still leaks a drop or 2 here and there.
-
My truck has about 325k miles on it.