War Eagle
Unpaid Member
-
Joined
-
Last visited
Everything posted by War Eagle
-
You're right, this forum is not a busy one but you can always count on specific response from the Smarty folks (i.e Brian, etc) and many times a lot of the actual smarty users chime in with info. I think it would be a good place to try with questions specific to Smarty use.
-
It's this one: http://smartyresource.net/forum/forum.php
-
-
I have an '01 TDI and my brake light switch affects cruise control. There maybe other things that can affect it but if my switch fails then I loose cruise control. It has happened three times in the 145k I have on the clock. All three times were when the car was under warranty. I lost power once and it turned out to be the mass flow sensor. This happened under warranty also and nothing since. I have yet to have the plugging trouble that W&F experienced.
-
It has been my experience that if they are not voltage regulated then the vendor doesn't advertise that and they post voltage requirement as simply 12v. Vendors that offer voltage regulated lamps will post voltage requirements as 5-30v, or 7-14v etc., or some will simply post it it the technical info section as specific feature for their lamps. You can buy cheaper LEDs on ebay but they will not last. Look for the voltage regulation feature.
-
A very common issue with LEDs is that people buy non voltage regulated LEDs and experience dissatisfaction with the life of their units. Supply voltage variation causes the current draw from the LEDs to rise and fall and this will kill LEDs prematurly. In my opinion the better LEDs (suitable for 12v electrical systems) can handle voltage variation of from 5-30v without compromising the quality of light or the life of the LED. But this regulation doesn't come free as is manifested in a higher priced LED. Often times we just shop by price but from sad experience I have had to repurchase LEDs many times until I realized what was going on and started buying regulated ones and my short life problems went away. I am running voltage regulated LEDs and have not had to replace a single one in the last 4 years that I started using them. Not saying that is your specific problem but it is one thing you might check out.
-
I used this company for my LED lights in the RV. http://www.ledtrailerlights.com/cm/cm_CL32.htm One of the reasons I like them is there is a lot of technical info included so you can choose the temp range of the lights as well as the lumen output. So many of the sites selling LEDs don't include that information and you can be easily dissatisfied with your purchase because they don't have the kind of output you were hoping for. You can look up the lumen output and the temp range of the incandesent bulbs currently in the RV and then choose LEDs that have more lumen output, etc. You can use soft light or choose daylight and make it light and brite inside the RV. I would recommend you choose regulate LEDs (run on wide voltage range). They will last much longer than the cheap China LEDs and you won't loose light output as your batteries start to taper off.
-
Just as a piece of nice to know information: the refrigerator operating in LP mode has a normally closed "gas" valve that is operated by dc voltage. If the power level of your batteries goes too low to keep the solenoid on the gas valve open (I don't know what that level specifically is) then the "nc" valve will shut off the gas supply and the 2-way frig will stop operating when not hooked to shore power or a genny. I am not saying this is the cause of your low batteries but I am saying without sufficient dc power your gas valve will not stay open so the refrig can operate in LP mode.
-
The new current software updates for the S06 (SW9) is listed at 210hp and could be more depending on mods you have on your truck. I run on SW9 for my local driving because I get the best mpgs in town on that setting, but I am not using the power. I have learned to control my driving with my right foot. I think most of the recommendations you would get from Smarty is to not go above a certain power level if you haven't done some upgrades to the trans or clutch. But if you can control your right foot then you can certainly use the higher power settings without doing any expensive mods to the truck. Reasons why you might want to run at the higher SW levels is because the timing is incrementally advanced as you go up in the SW levels. SW9 has more advanced timing than SW7 and so on. However, if you want to play with the new found power at the higher SW levels then you better understand that unless you beef up the trans or clutch then you could very well be setting yourself up to be spending a good chunk of change for repairs and/or upgrades. I run stock lift pump and stock CP3 and have had not problems. Both of these pumps are good solid performing pumps and provide more than sufficient fuel for the truck unless you are going to be really pushing the truck as in racing or hot rodding. As I said I run the upper SW levels and I have 50hp injectors and have never seen a problem for lack of fuel. If you have a set of guages in your truck so you can watch the vitals, then you won't have any trouble with melting pistons. Again, if you want to push the hp and drive the truck like there is no tomorrow then all bets are off.
-
Yes, timing advancement can lead to improved mileage and performance assuming you are driving for mileage. If you don't use the right driving habits - then your mileage will vary!
-
I propose we do another swap!
-
Sounds like you already own the cabover camper and if this is true then you most likely know the weight of the unit when you are loaded and head out for Montana. The 2014 Ram 2500 trucks have a nice interior compared to previous years so you'll have a nice ride. What you will need to watch though is that there will be a payload capacity for the model of truck you decide to go with and as you might guess it won't be unlimited. While I am not exactly sure on that model I think it is somewhere between 2900-3100 pounds (depending on configuration). The most likely limit in determining that payload will be the tires. If your loaded camper is heavier than the rated payload then you would need to look seriously at upgrading the tires/wheels, going to a one ton dually or getting a lighter camper. If your camper weight fits within the payload spec then you would be golden. Pulling a trailer of 4-wheels behind would likely be no problem because the truck has over a 17,000 pound tow rating.
-
You got something against chopped liver?
-
There will probably be as many opinions on this subject as there are people that respond! I recently had my transmission gone through because I wanted to set it up for heavier towing than the stock tranny could handle reliably. So that meant I wanted to beef up the tc, valve body, thrust bearings, various solenoids etc. Since I was intending to add an e-brake I decided to put in a billet input shaft to help avoid any potential damage from the higher torque loads it would be seeing with the e-brake and heavy towing. This was a personal choice and since I was already in the transmission it was much less expensive to do it then than to accidently break it sometime in the future (when I was working the truck hard) and then have to pull out the tranny and do it later. The same logic was used for the flex plate. I know lots of people use the stock flex plate for heavy towing and do fine with it but when I looked at mine when the tranny was out there were definite wear showing up at the junction of where the input shaft works with the flex plate. The issue was pretty simple again for me. Cheaper and easier to do it when the tranny was out than to find I have to pull it again at some later date and do repairs. Maybe I never would have had a problem with the stock flex plate and stock input shaft but that was just a risk I didn't want to take. Tranny work is sooo expensive that I just don't want to go into it again. That's my story! And I'm sticking to it.
-
I had the same kinds of questions when I was trying to decide what to do for a tuner. I read everything I could find about the options and as many reviews as I could find also. I learned that not all trucks were the same or could be expected to act or perform the same. There are so many variables that come into play (i.e. tires we run, speed we drive, weight we pull, geography of where we drive etc., etc.) The list of unique characteristics between our trucks is nearly endless. So my goal was to get as much mpg improvement as I could get for my driving style and what I do with my truck. It isn't all that important to me to make as much HP as possible. So it came down to personal preference for me. While there are many that use the Jr and are very happy with the results I chose the S06 because it gave me many more variable parameters to adjust and play with to see what did better on my truck. As an example I have many more timing options to change on the S06 than on the Jr and the same goes for torque mangement etc. Timing advancement can improve mpg's and hp. As an example I found that my truck gets improved mpg's in town when I run SW9 with timing on 2 and torque management on 1 (but I don't use the power than SW9 enables, but the timing is a big plus). On the road (empty) I got my best mpg's using SW5 with timing on 2 and torque management on 1. The setting is different when I am loaded and carrying my camper. If I was using the Jr I am sure I would have seen improvements and found something my truck liked better (than just operation in stock form) for my driving style but I would have had many fewer choices to try with the Jr than the S06. Nothing wrong with the Jr and it costs less then the S06 but it just couldn't provide me with as many choices in my quest to improve mpg's.
-
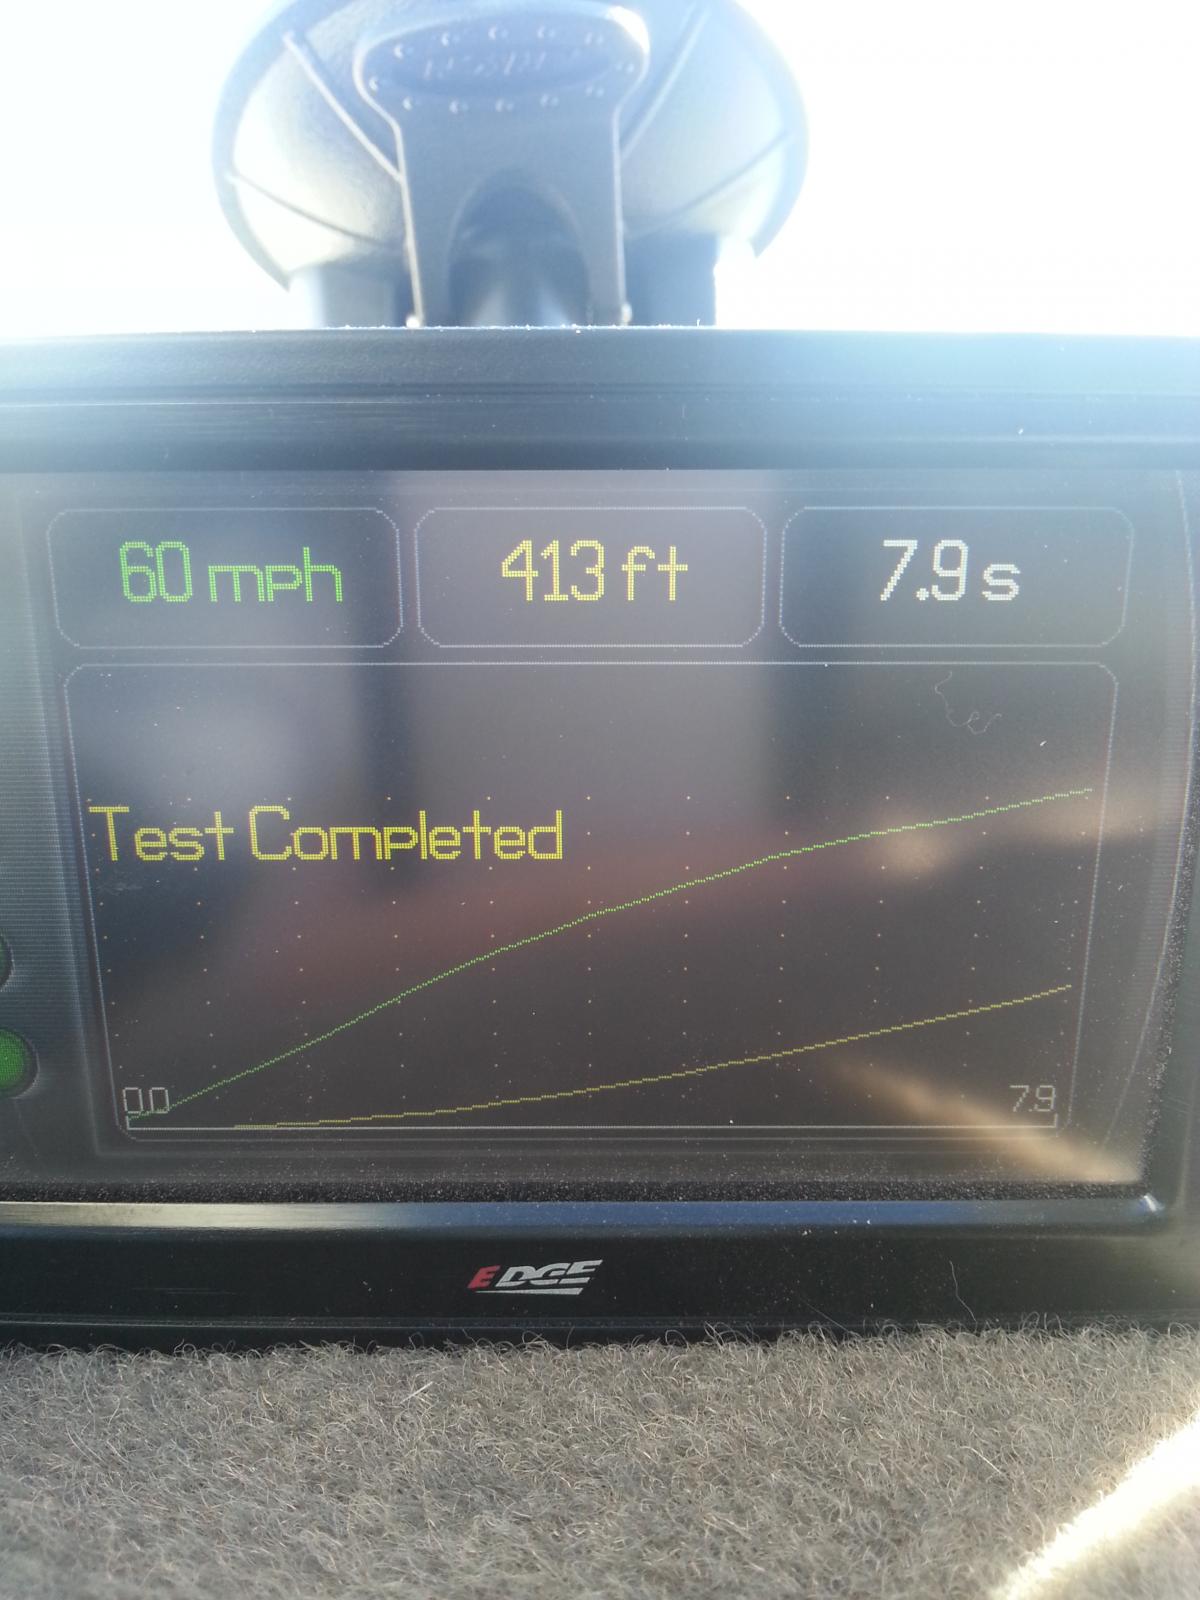
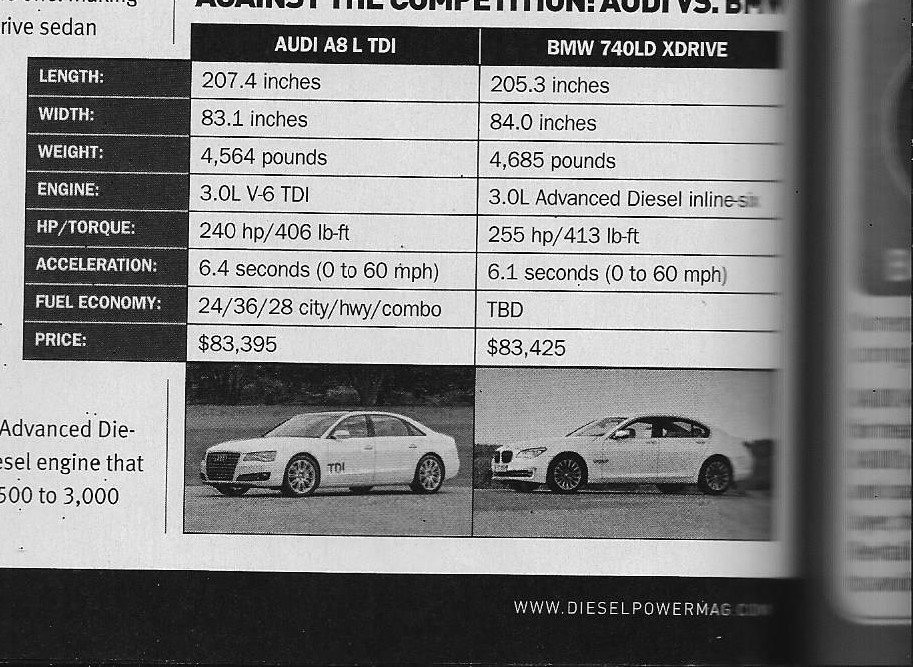
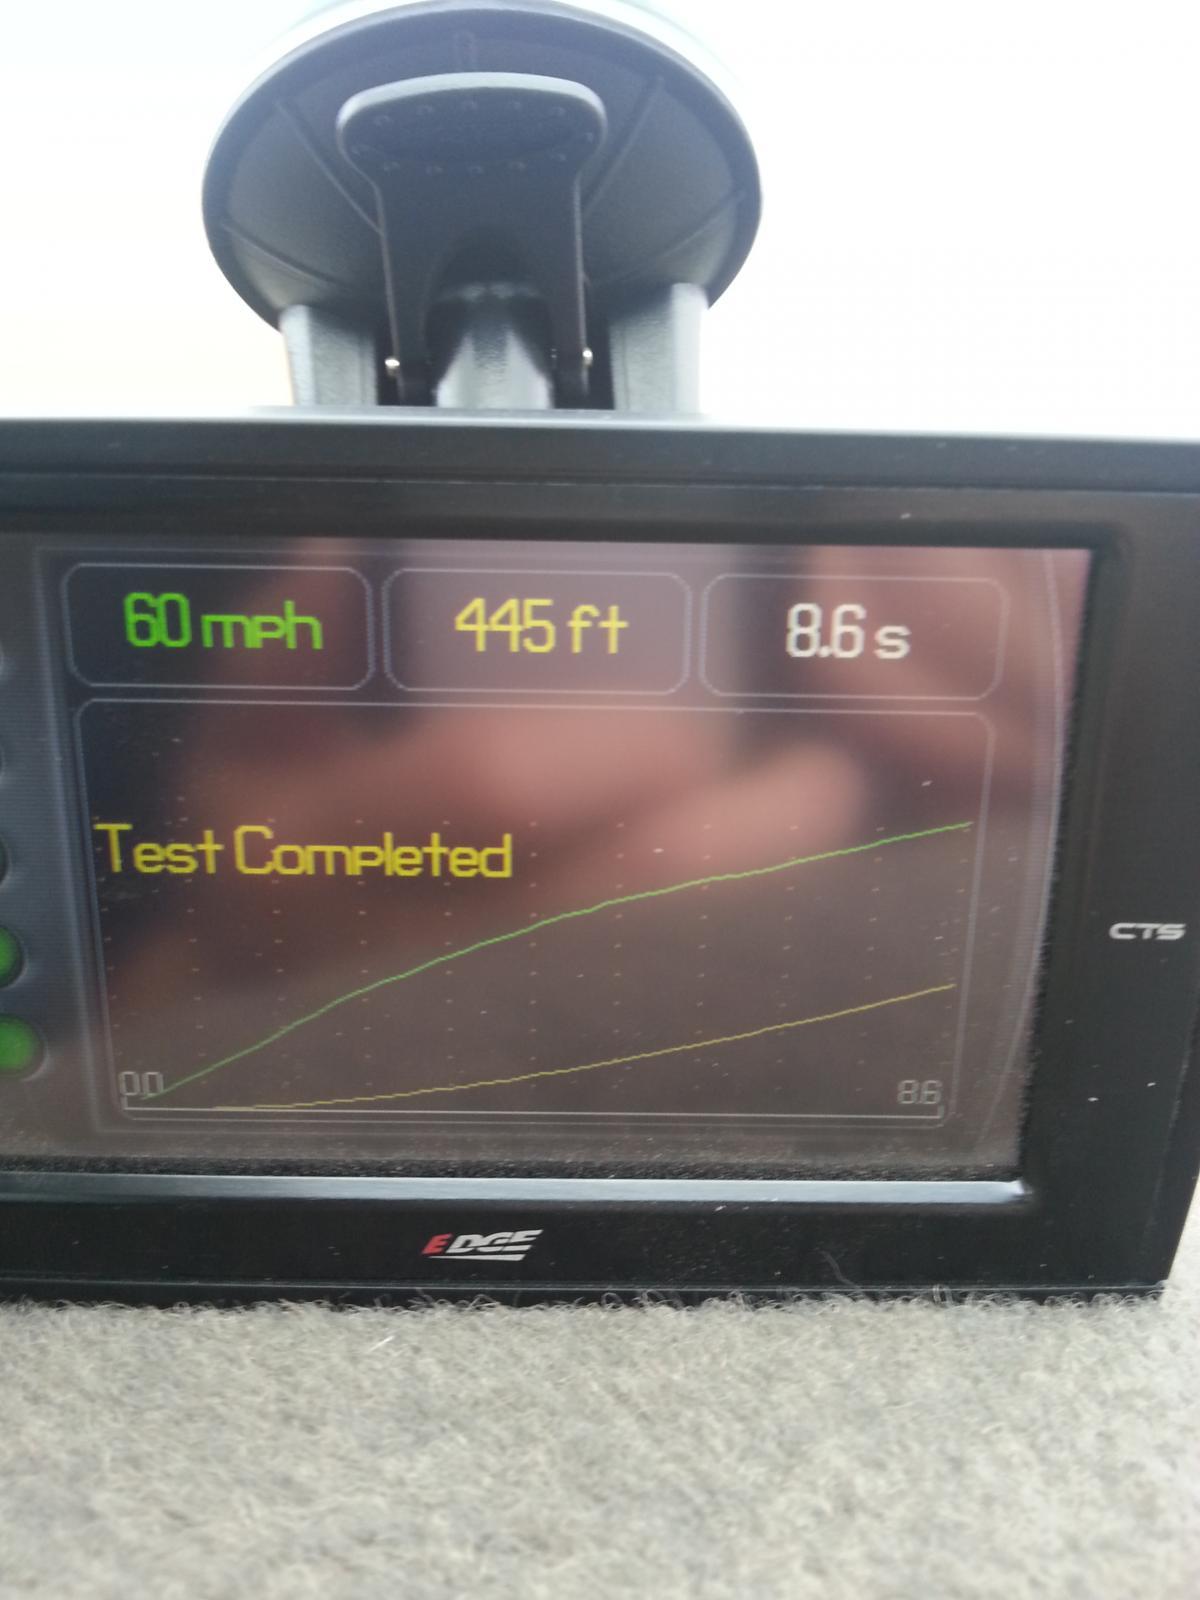
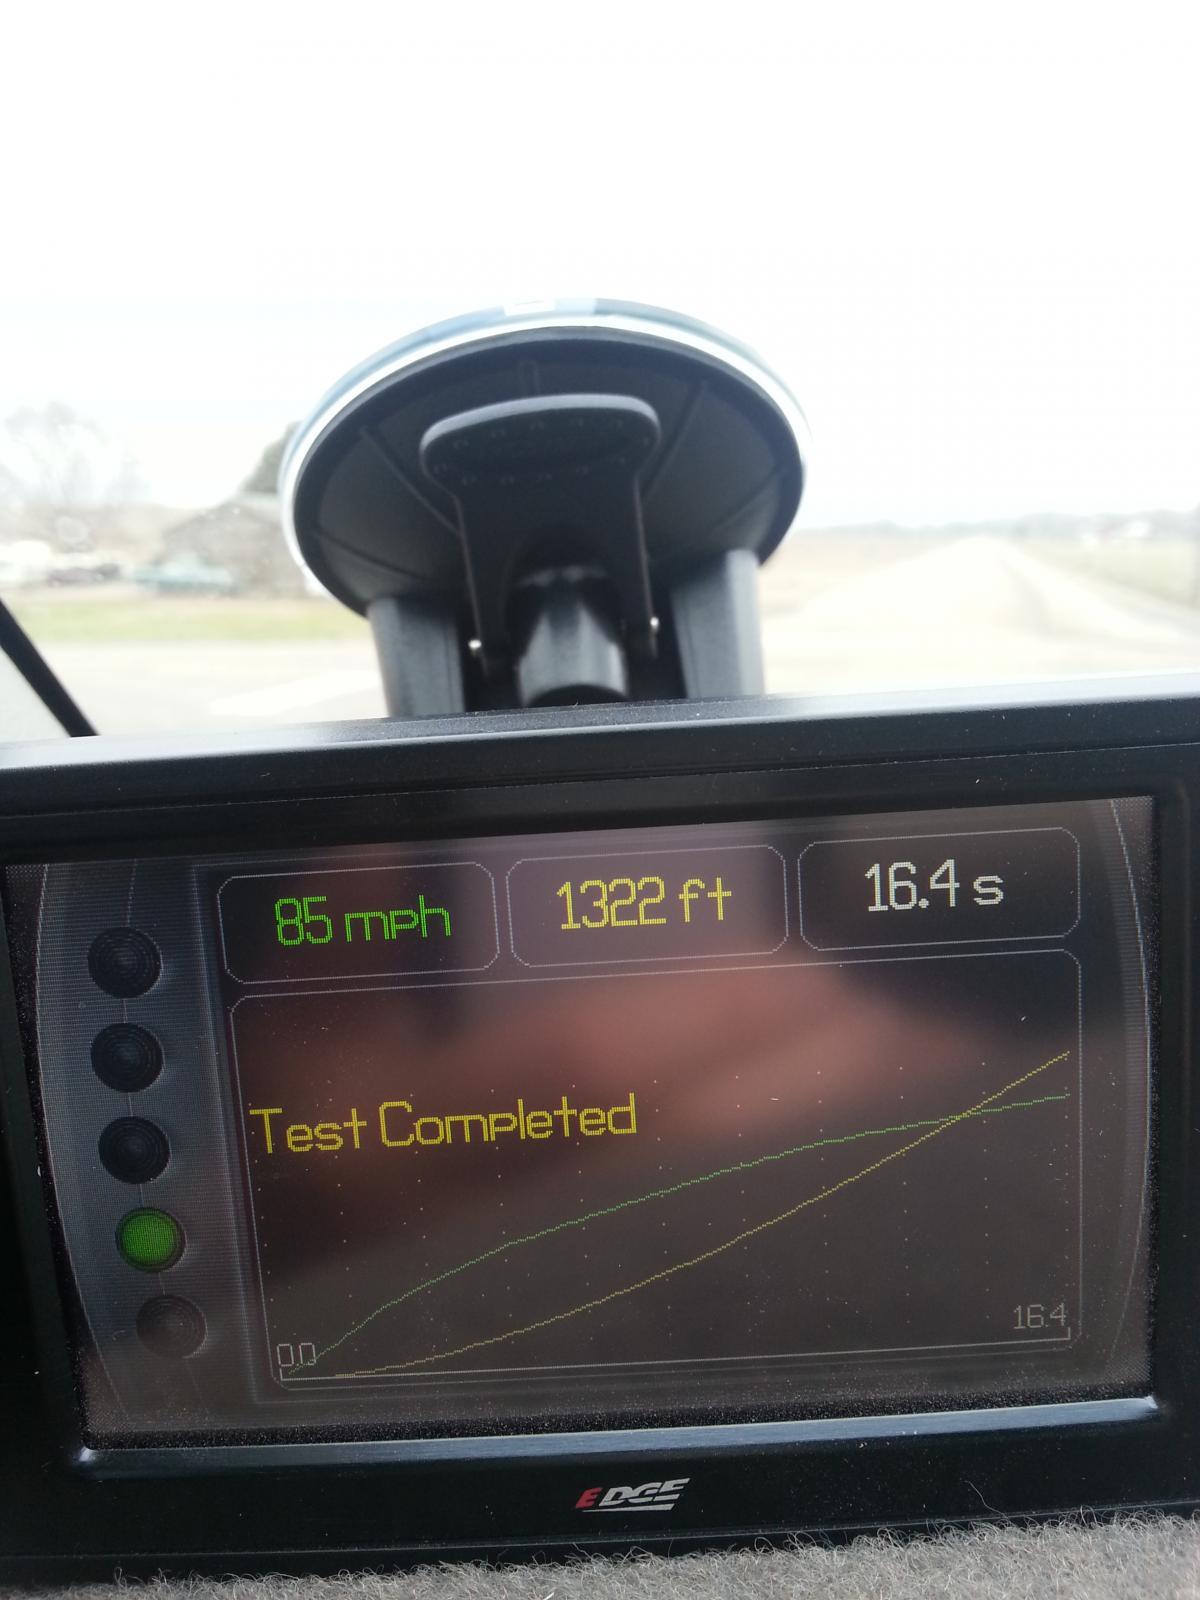
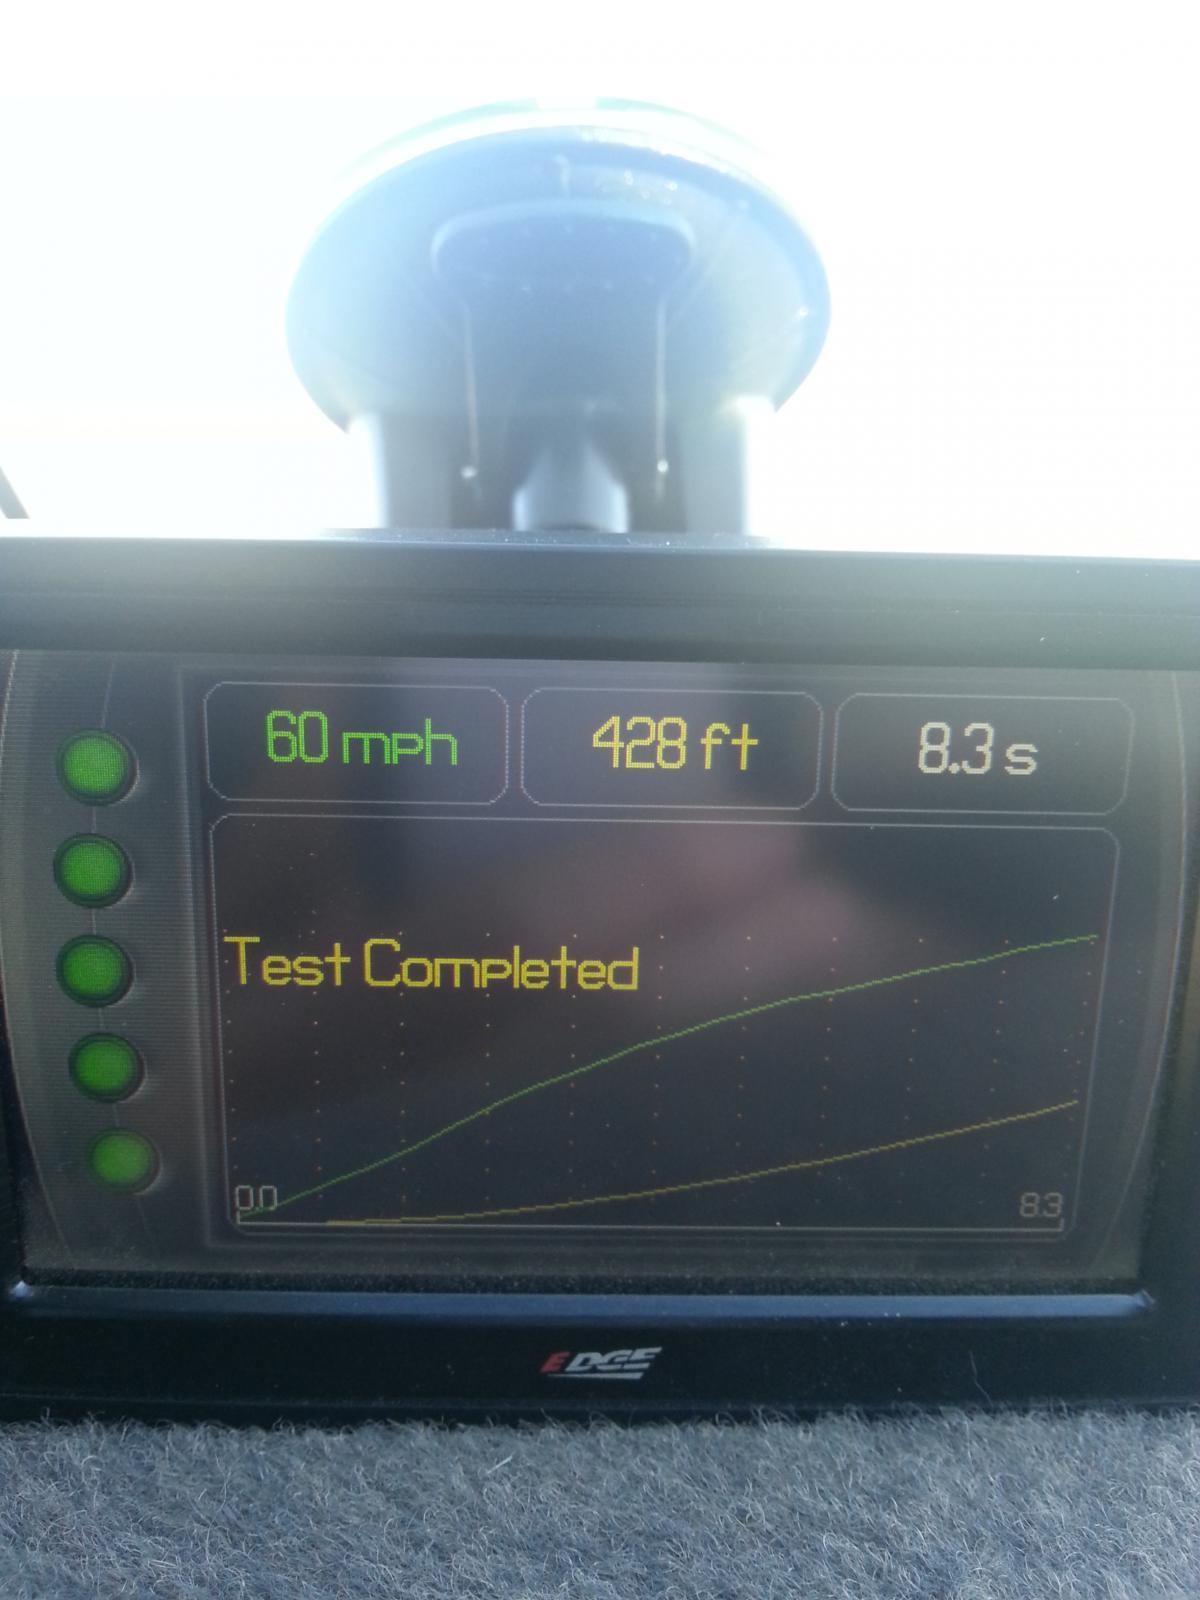
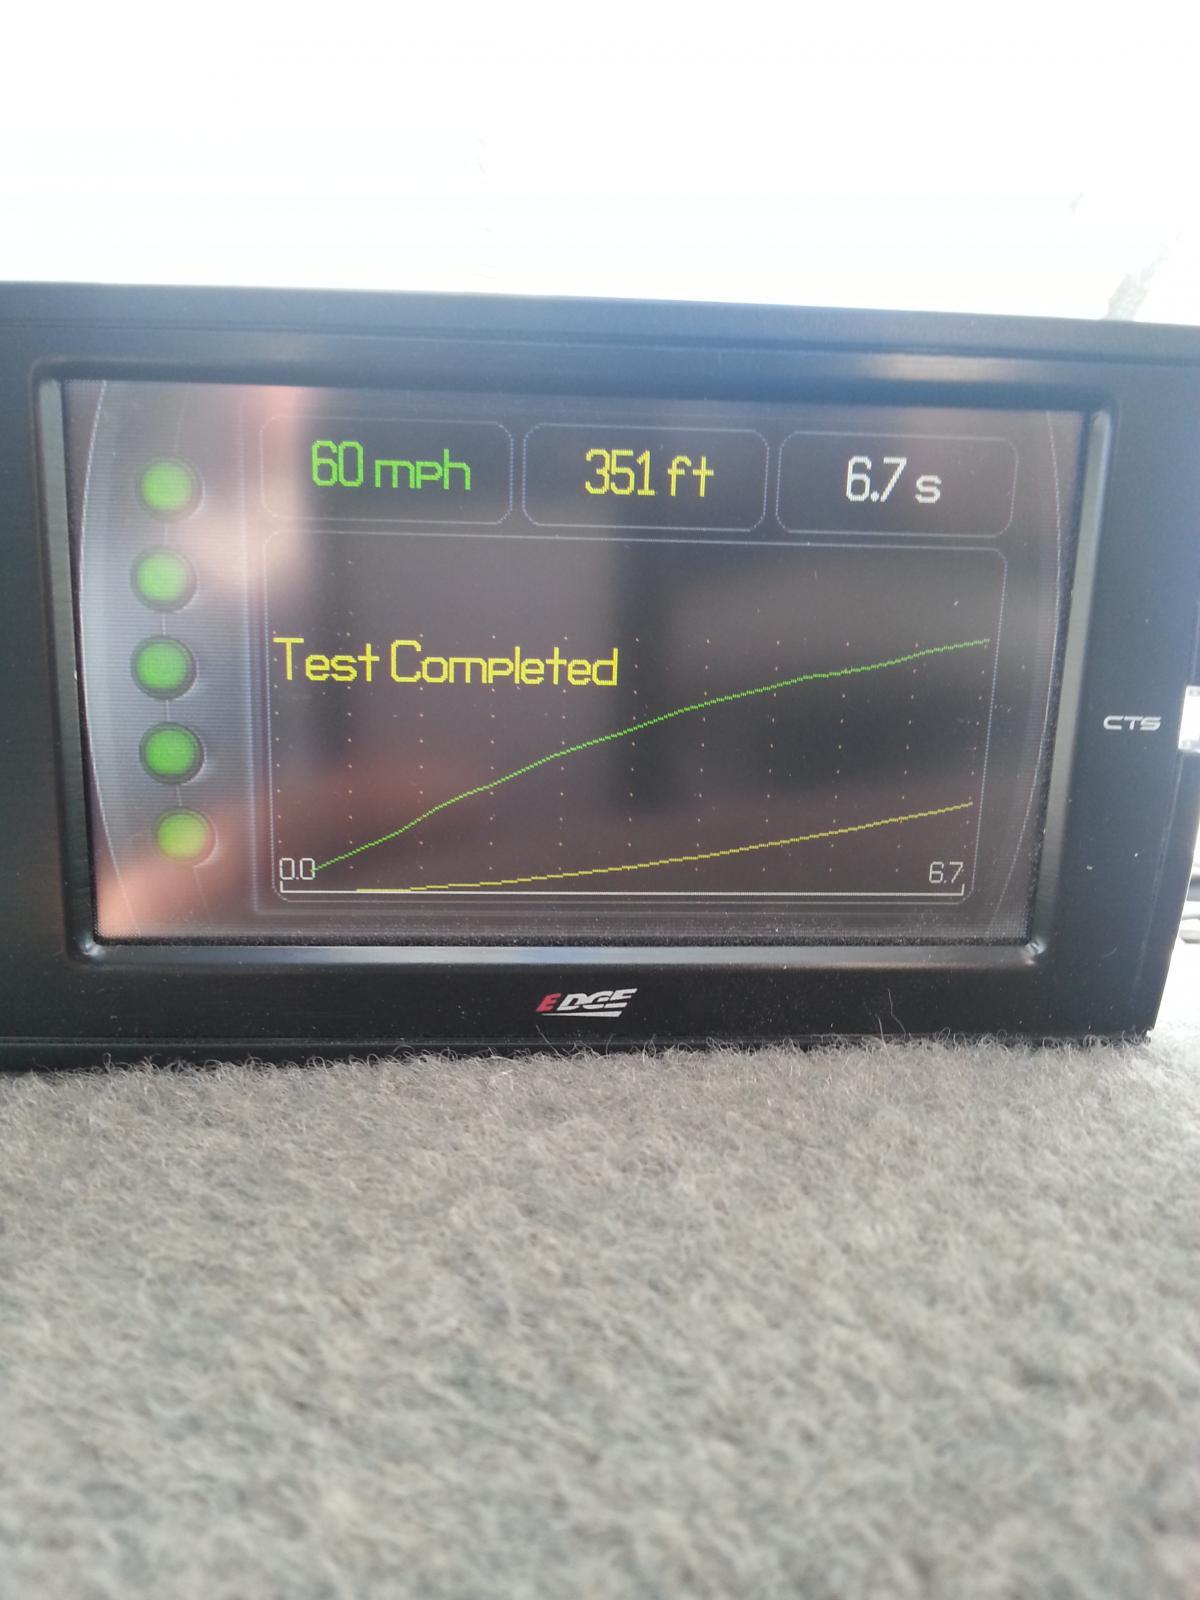
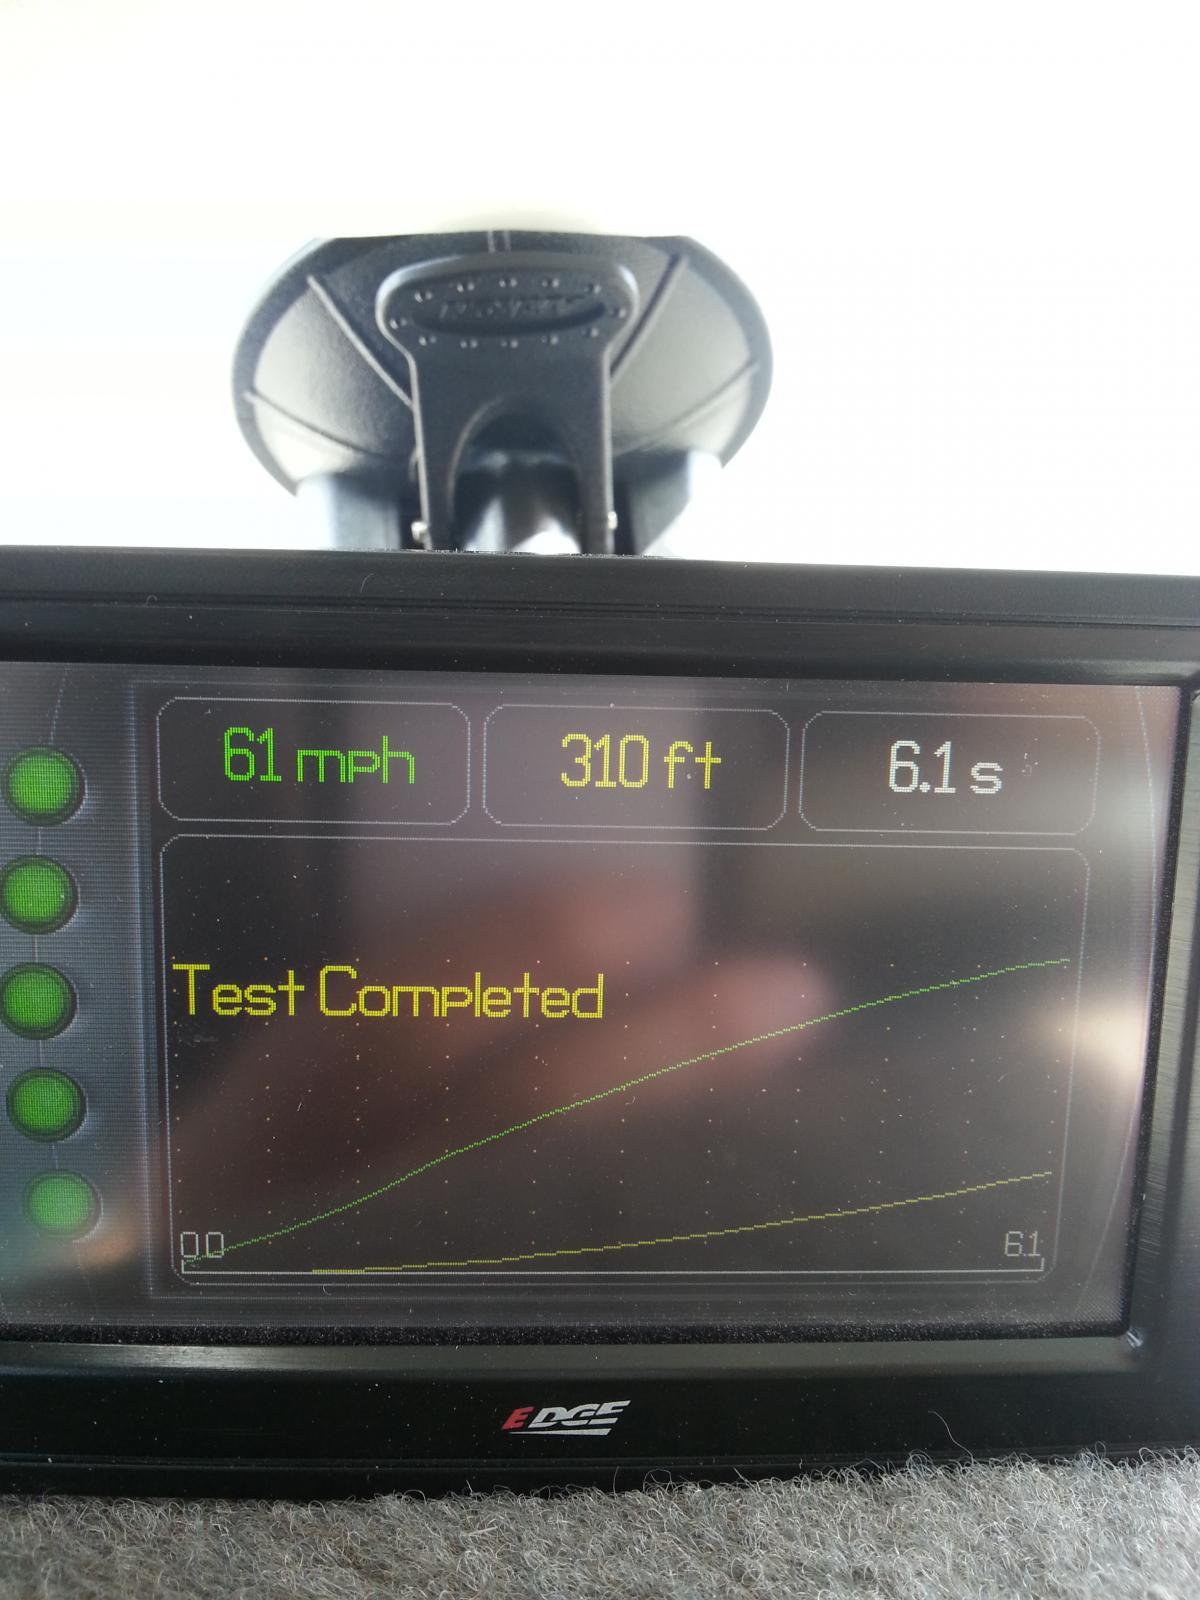
So I use my '05 3500 SRW 4x4 w/SWB mostly for recreational purposes. I carry a LEER canopy when I am not carrying my slide in camper and I may haul things in the bed like building materials, rototillers and light machine equipment. I sometimes tow a trailer and I tow a boat sometimes with the camper on and sometimes without the camper on but I don't really use the truck as a work truck. In March of this year I decided to work on my tranny in anticipation of carrying more weight with my truck. I wanted it built specifically for towing and not racing. I planned to install a PacBrake as well and knew it would be better overall to do some mods so I could get more out of the tranny and not find myself on the side of the road someday wanting. So I went to Ultimate Transmission in Boise and had them work the trans over and make it a strong and safe tow transmission so that I wouldn't have to worry about any trouble in the future. I got the triple disc low stall tc, all the special solenoids, roller thrust bearings and other internal upgrades, billet input shaft and modified valve body so the the e-brake will work in 2nd gear. Driving it now you can tell things are very different. The shift is firm (but not hammered) and it just feels much smoother and seems like it is effortless to accelerate to speed. Before I had the transmission work done I took the truck out and tested some performance parameters so I would have a before and after comparison. I run an Edge Insight that has some data logging capabilities so I ran a 0-60 and a quarter mile run with the smarty S06 turned off to get base line performance data so that in the future I could do a compare after doing any specific mods. This files shows the 0-60 times at 8.6 sec. This was for a non boosted launch with the original stock tranny and no smarty. This file shows the qtr mile run at 16.4 sec. This also was a non boosted launch with the original stock tranny and no smarty. I have a little over 2000 miles on the upgraded tranny now and began doing a little testing to see if there was any factual performance improvement. The first test I ran with the upgraded trans was a 0-60 non boosted launch and no smarty. It ran 8.3 sec so the gain was .3 sec in the 0-60 time over the stock tranny setup with no smarty. Of course this makes sense because with the low stall tc you would expect lockup sooner than with the stock tc stall speed. More hp to the driving wheels while under acceleration. The next test I ran was 0-60 with the upgraded tranny in tow-haul mode. It was also a non boosted launch with no smarty. This run was 7.9 sec. The gain was .4 sec for 0-60 time over the non tow-haul run. Now I don't know a lot about transmission tow-haul parameters but it appears the shift points are changed when in tow haul. It feels like engine rpms reach a higher point before the shifts occur. If I am looking at this data correctly then I am seeing a .7 sec improvement in 0-60 times over the stock transmission performance in the non tow-haul mode. This should yield more crisper accelerations when pulling out in traffic with a load on etc. I don't know if I can specifically compare 0-60 times in a stock tranny to the 0-60 times in an upgraded tranny using tow-haul mode and say I am seeing a 8+% improvement in acceleration in my 0-60 times, but the what I feel is a nice improvement over what I had. Now I haven't rerun the quarter mile test with the new trans but that may come sometime in the future. But I am now going to start testing with the smarty on and see what performance is gained by using the smarty. Since I started this series of tests I have now installed 19.5s on my truck. In theory I should see some performance decrease (as compared to stock 17" wheels and tires) because of the increased rotational mass I picked up with these new tires. I won't really have any data to compare the results to since I didn't really do any data collection while I had the stock 17" wheels and tires on the truck. However, these 19.5s have a very stiff sidewall and operate at a higher pressure than the stock 17" ones so I am expecting the rolling resistance to be somewhat less than the 17's but I don't have any way to really measure that. However, I am expecting it to help offset the rotational mass increase but I just don't know if that will be true or just wish full thinking. On to some testing with the smarty hooked up. I have a S06 PoD Smarty and set up my first run with SW3 with T on 2 and TM on 2. This file shows the 0-60 times went down to 6.7sec. This was for a non-boosted launch with my 19.5s on and the tranny in tow haul mode. My next run was with SW5 with T on 2 and TM on 2. This file shows the 0-60 times have moved down to 6.1 sec. This was for a non boosted launch with my 19.5s on and the tranny in tow haul mode. So I am now over 2.5 sec faster in the 0-60 times than the stock configuration of my truck. As a side note I just read the July 2014 issue of Diesel Power magazine where it had an article on the 2015 BMW Series 7 with a diesel and 8 speed auto. The price tag on this car is over $80k and it weighs 4600 pounds and has a 0-60 time of 6.1 sec. Hmmm...! So my 8k pound truck will accelerate at the same rate as this beamer. This same article listed the specs for the Audi A8 TDI (another $80k auto) and you can see it has a 0-60 time of 6.4 sec. So I have only run the 0-60 times using SW3 and SW5 at this point. I am putting my slide in camper on the truck this week because I have some recreation plans coming up and I will probably be keeping an eye on mpgs rather than 0-60 numbers for a while. So further testing will need to wait for when I get the camper off the truck. One thing I am still thinking about is the impact of the heavier rotational mass of using my 19.5s on the truck. I am probably not going to take the 19.5s off the truck and re-install the stock 17" wheels and tires and re-run the tests to see if I can see a performance change in my 0-60 times but as we can see as I have gone up to higher SW levels on the Smarty I continue to see improvement in the 0-60 times.


-
If you want a little bump in power get new BMS with 50hp nozzles for the same money as it takes for new OEM.
-
Does the Smarty S06 modify when you actually see peak cylinder pressure? Can it be used to force it to happen so your engine is more efficient? Do non-stock injectors (i.e. BBi's, 50hp etc.) modify the timing as to when you see peak cylinder pressure? Can the combination of tuning (S06 or UDC) and injectors modify (improve the efficiency of your engine) the timing/combustion cycle that you see much improved efficiency over the stock setup? When is the timing adjustment one can make actually hurt the efficiency of the engine assuming you are not racing, spraying outside the bowls or abusing the engine in any way?
-
You know one thing about the english language is that it is not always possible to understand what someone means when they say something you think you understand. As an example when I read your post that you were planning on buying a camper next year in the 3-4k weight range, the first thing that went through my head was that you were buying something that would fit in the bed of your truck. Those kind of units are most often called campers or slide in campers. The things we pull behind our trucks (connected to a bumper pull type hitch) are often called trailers or travel trailers and the things we pull behind the trucks but are connected to the hitch (goose neck, kingpin..) in the bed are often called 5th wheels or 5ers. So here I was thinking that your camper was to be a slide in camper and was about to reply that you will likely be outside the capacity of your wheels and tires with that much weight in the bed. Others seemed to answer with input thinking your were talking about hooking up to a trailer of some kind (which likely wouldn't strain the tires and wheels much at all). So not knowing for sure, I think I will sit this one out and wish you the best in whatever it is you are going to be getting
-
Ok, 20 minutes later, and I see those same rims on Ebay for 795 for a set of 4, and additional 160 for trucking. Not as bad as I was expecting! Tires too were only a 'tic' higher than what I've been buying for the '00. (235 80 16's ) $119 for the 245 70 19.5, F rating $133 for the G rating $149 for the H rating. (treadwrights) If there is an American Tire or Discount Tire in your neck of the woods you should be able to get the Vision 81 style rims for $180-185 each and no shipping.
-
I am getting ready to remove my Leer canopy and put the slide in camper on my truck. So I sat down and looked at all my mpg calculations over the last 5 months to see if I can come to any conclusion on the use of these vortex generators on my truck canopy. I have just short of 5K miles with them on now and have driven in all kinds of weather. What I can say about them is that there has been no noticeble driving (performance) behavior as a result of the install. I just couldn't feel anything different at low speeds or high speeds (highest speeds were 72mph ). I didn't see that it kept my rear window any cleaner when it was raining or snowing. On trailers etc., these are reported to keep the dust and debris off the back of the rig. They are also reported to stablize the drive when big rigs pass you by. I just didn't notice any of this on my truck with just the canopy on. I might see that on the slide in camper because it is so much larger and more likely to be influenced by the pressure wave of big truck sailing by. I'll have to report back later on that issue. Also I was not able to identify any increase in mpg's in any driving around town and limited hiway miles at 65 mph. However, when I drove at higher freeway speeds (such as 70-72 mph) I noticed a slight increase in my mpg's. I have many tanks of use driving at 65 mph over the up and down roads of Idaho getting 19.5-19.6mpg (with canopy on and no vortex generators). Well I ended up making 3 trips over to Idaho Falls this winter and driving it at 70-72 mph and getting 19.8-19.9 with winter fuel. So I can't tell you exactly that I got .3 of mpg increase due strictly to the vortex generators, I can tell you that I have never seen this result in the past and I am inclined to believe the implied benefit of the vortex generators was likely more noticeable on my truck at the higher speeds than my normal driving style (which is usually 65 mph). I do plan to install these on my slide in camper and I will report back if I see any difference in handling or mpg's
-
No airbags. My truck has the overloads on it and I use product called 'Stable Load' which is in essence a large bumper that replaces the stock spring bumper pad and it forces engagement with the overload springs so when I load my camper I don't get any sag, dip or sway of the body. This is the second truck I have used them on and they have worked really well for me.
-
Welcome. Nice Avatar! Are you a float plane pilot?
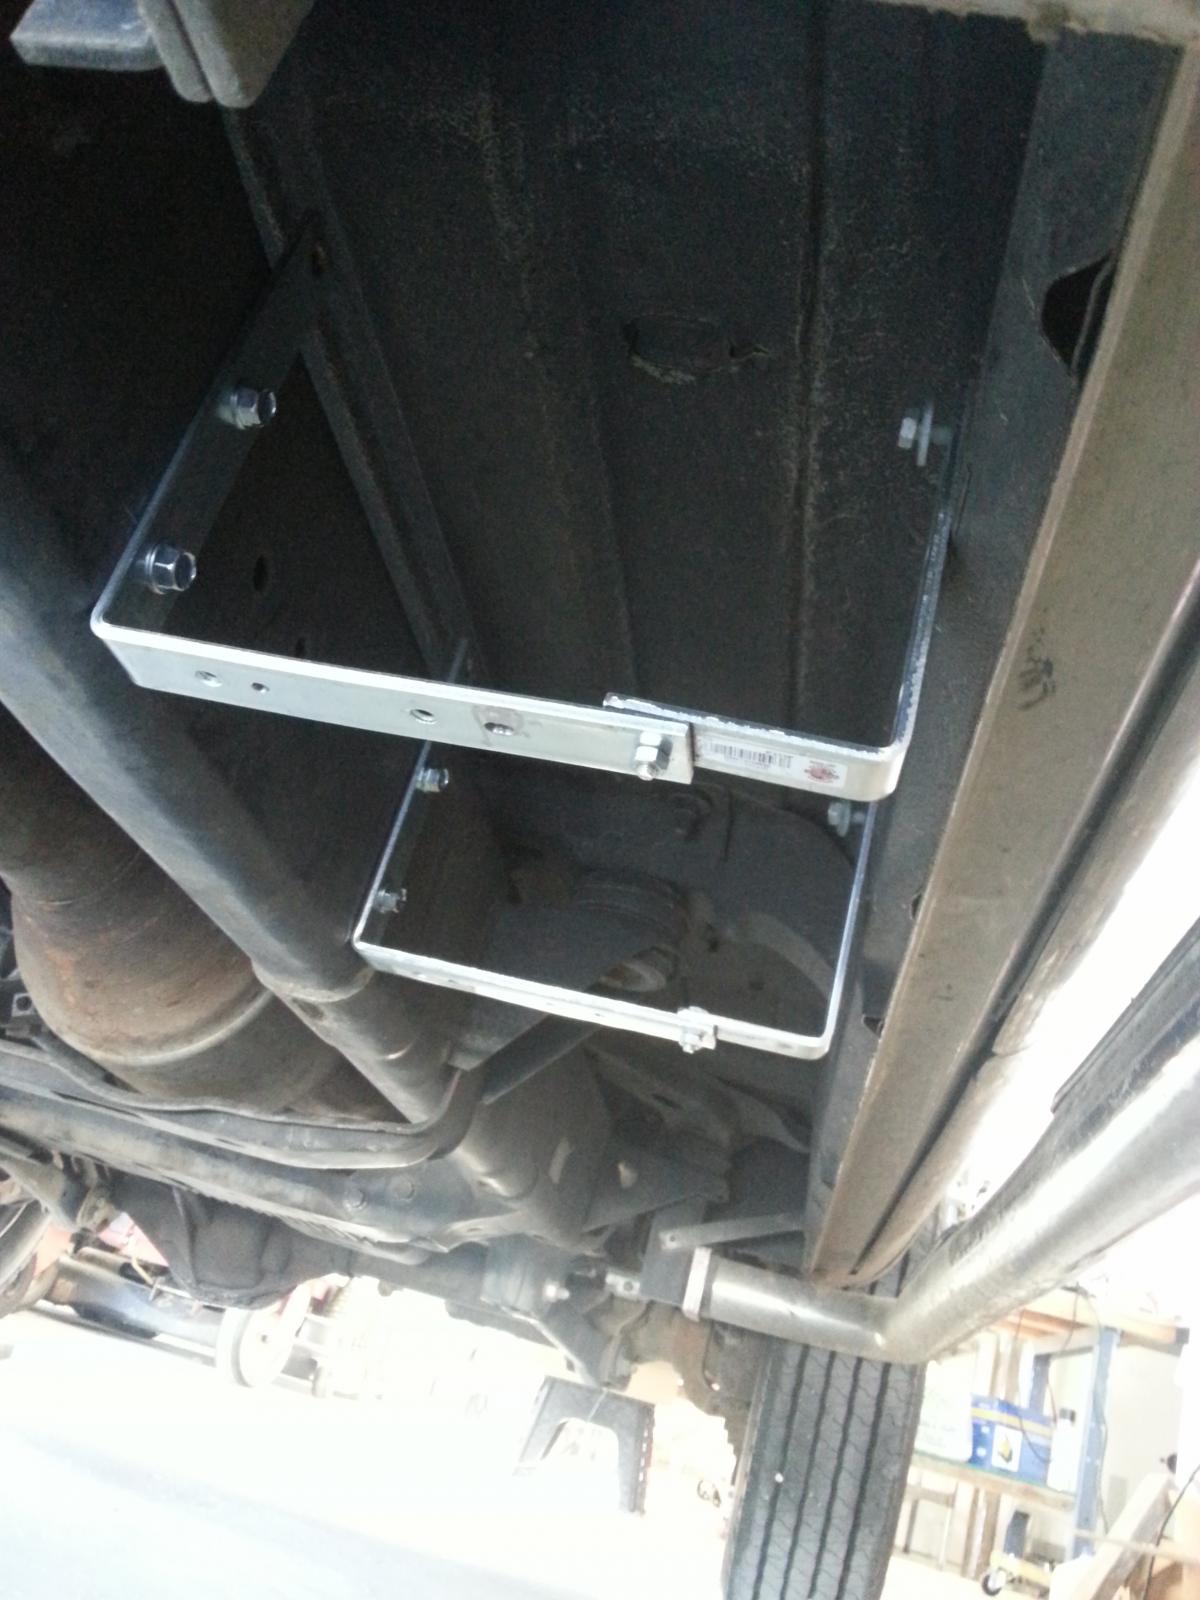
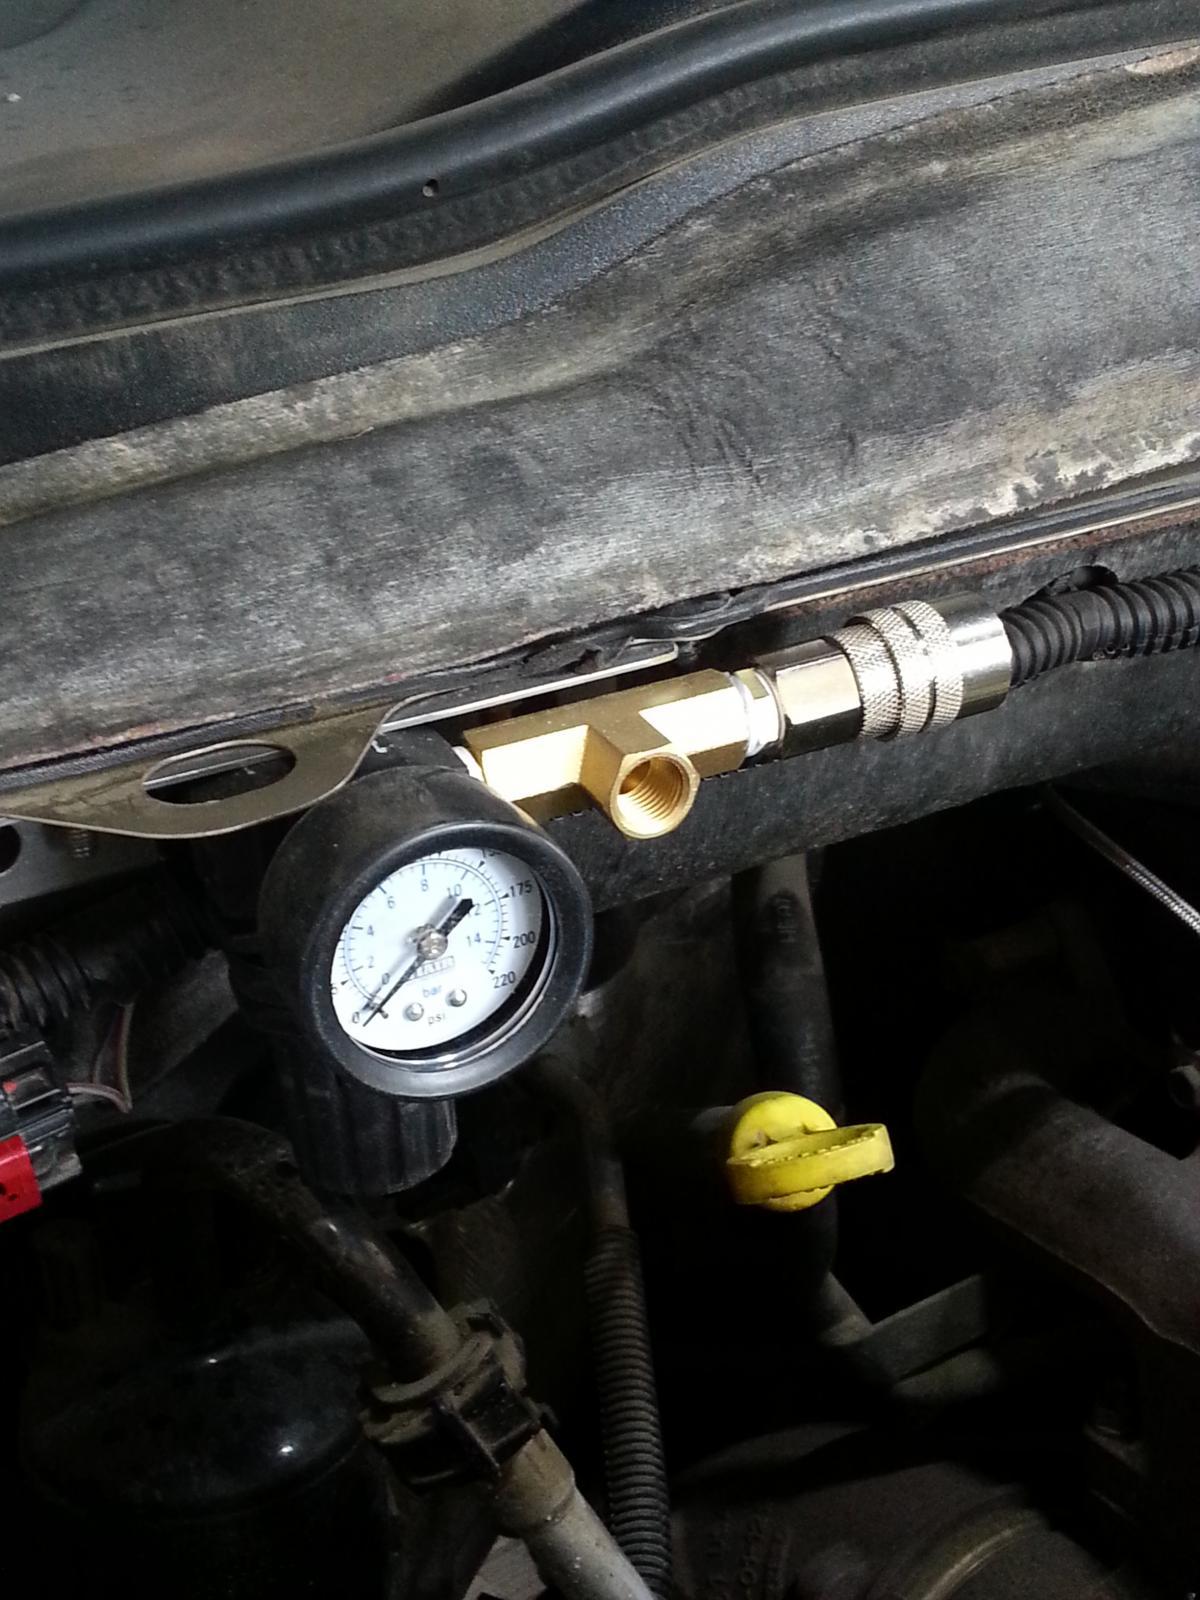
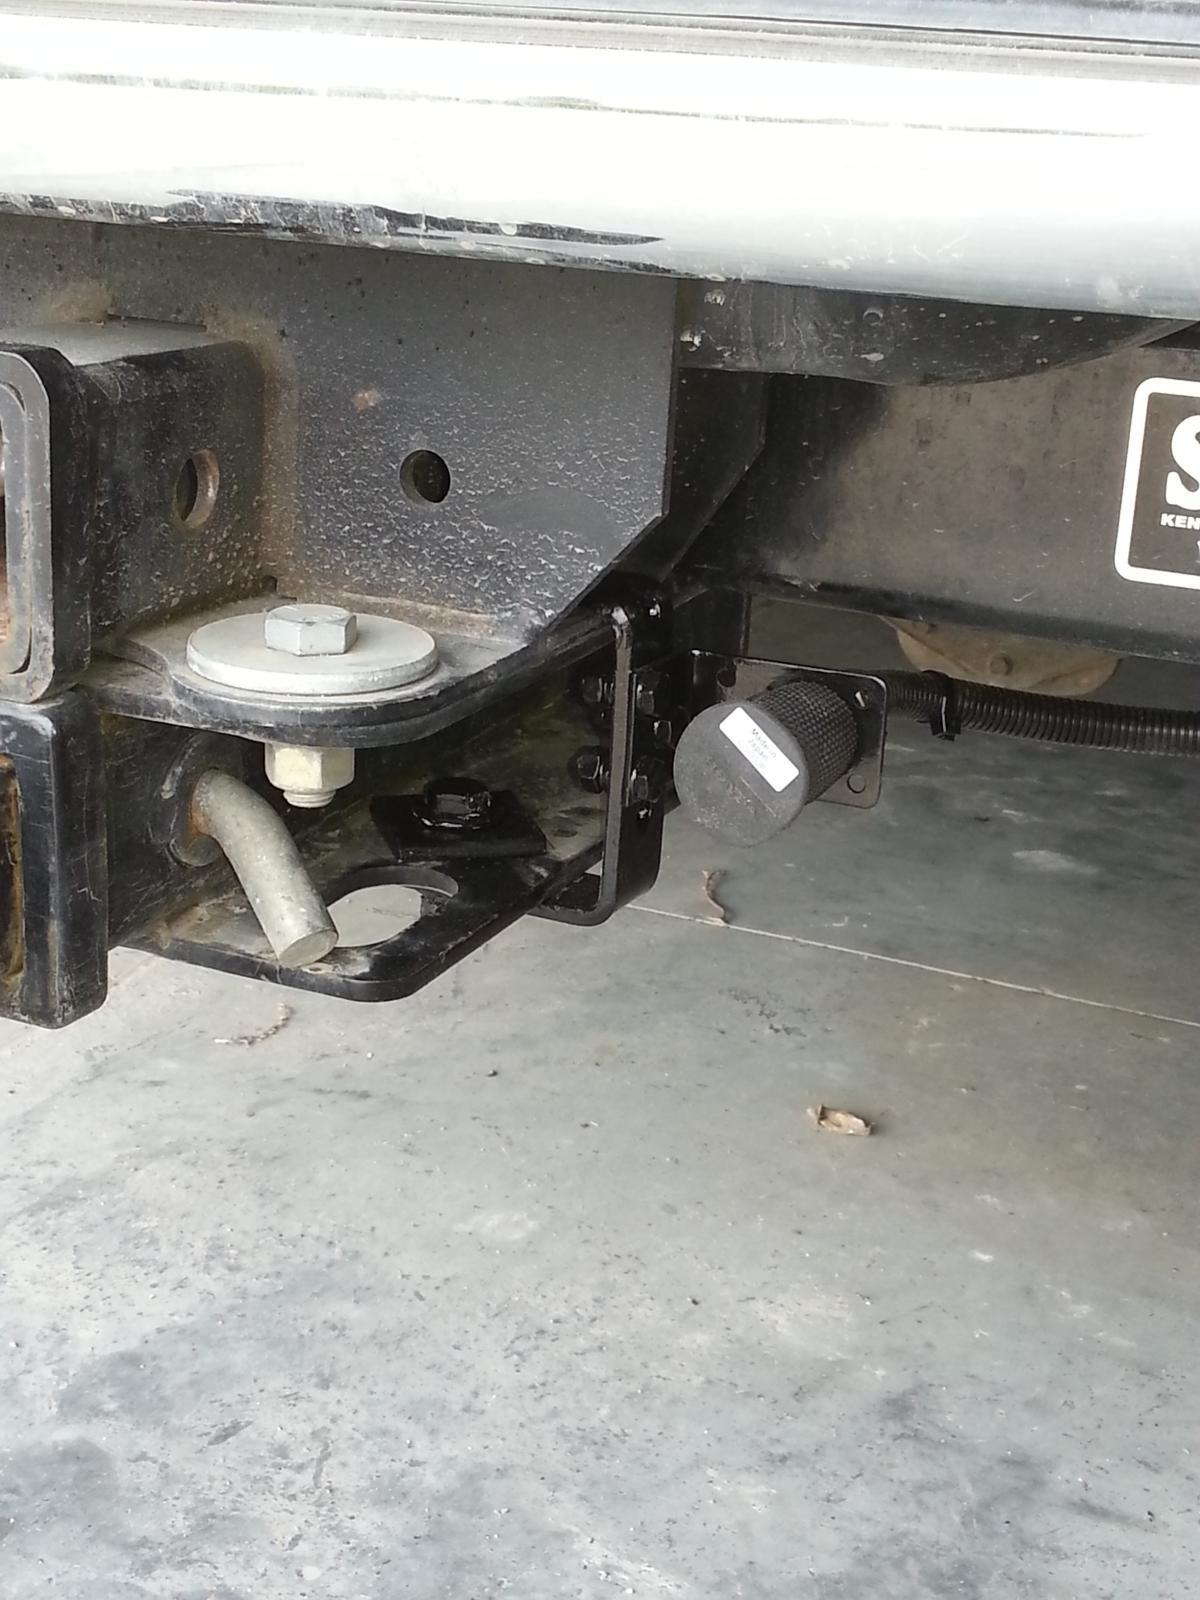
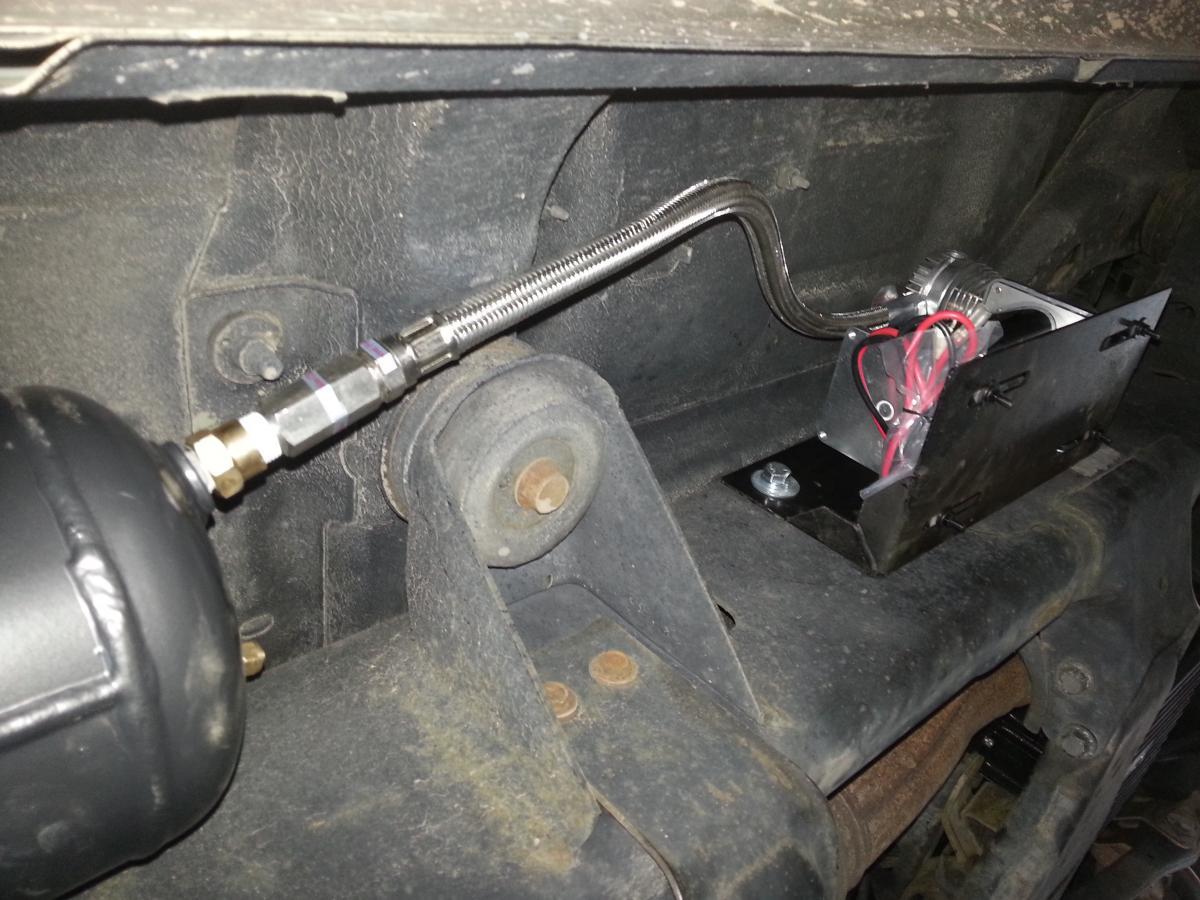
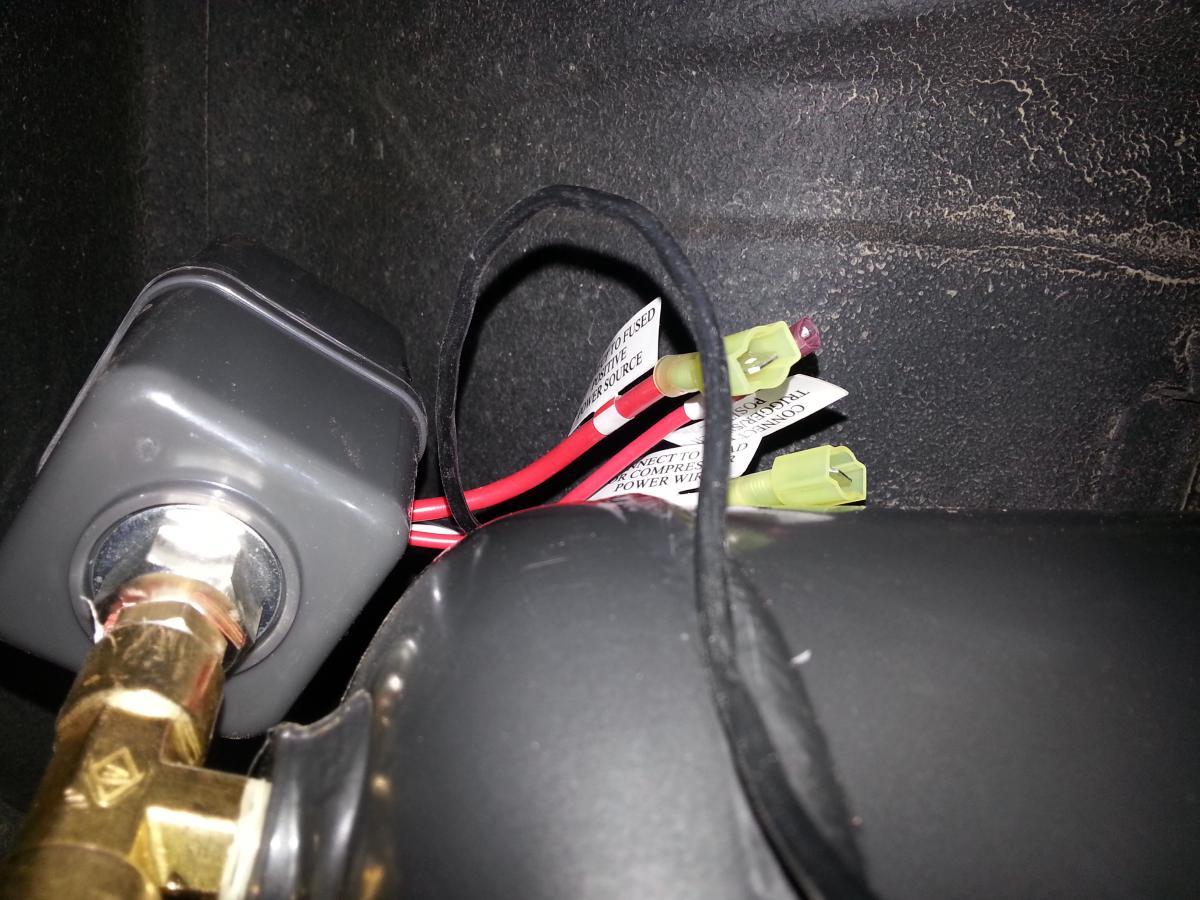
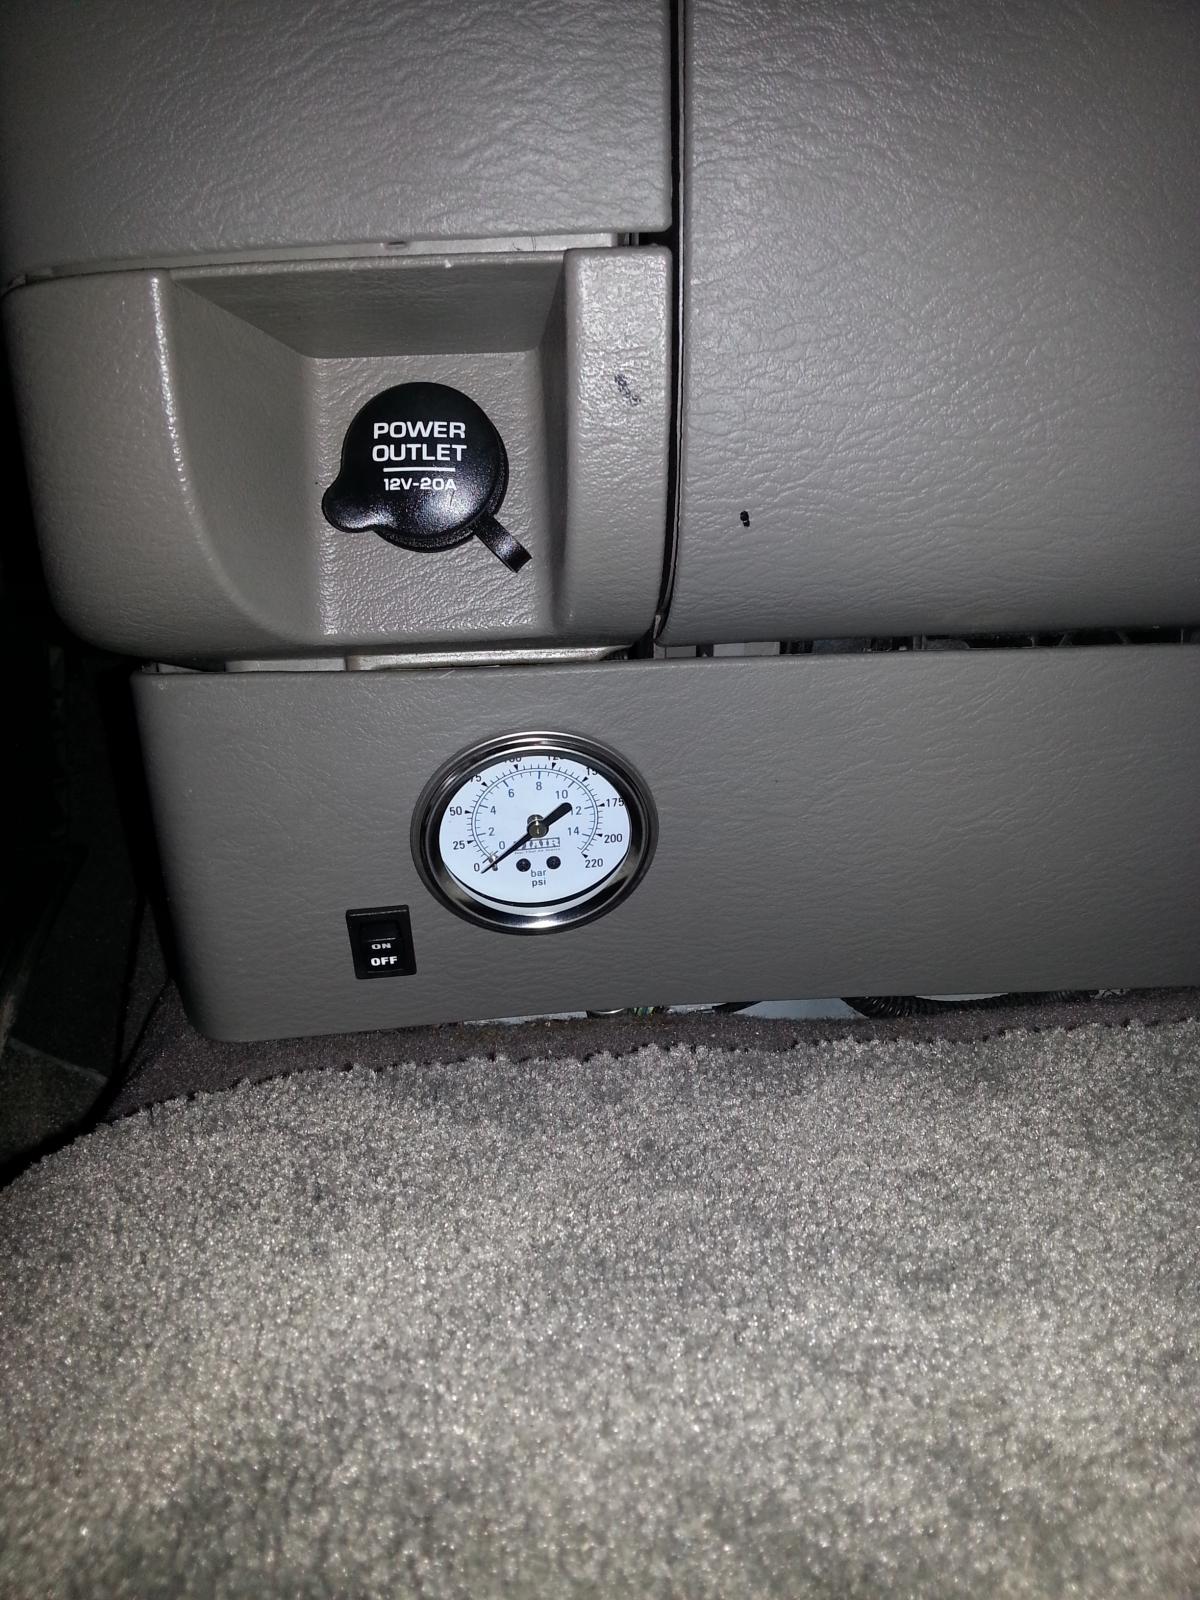
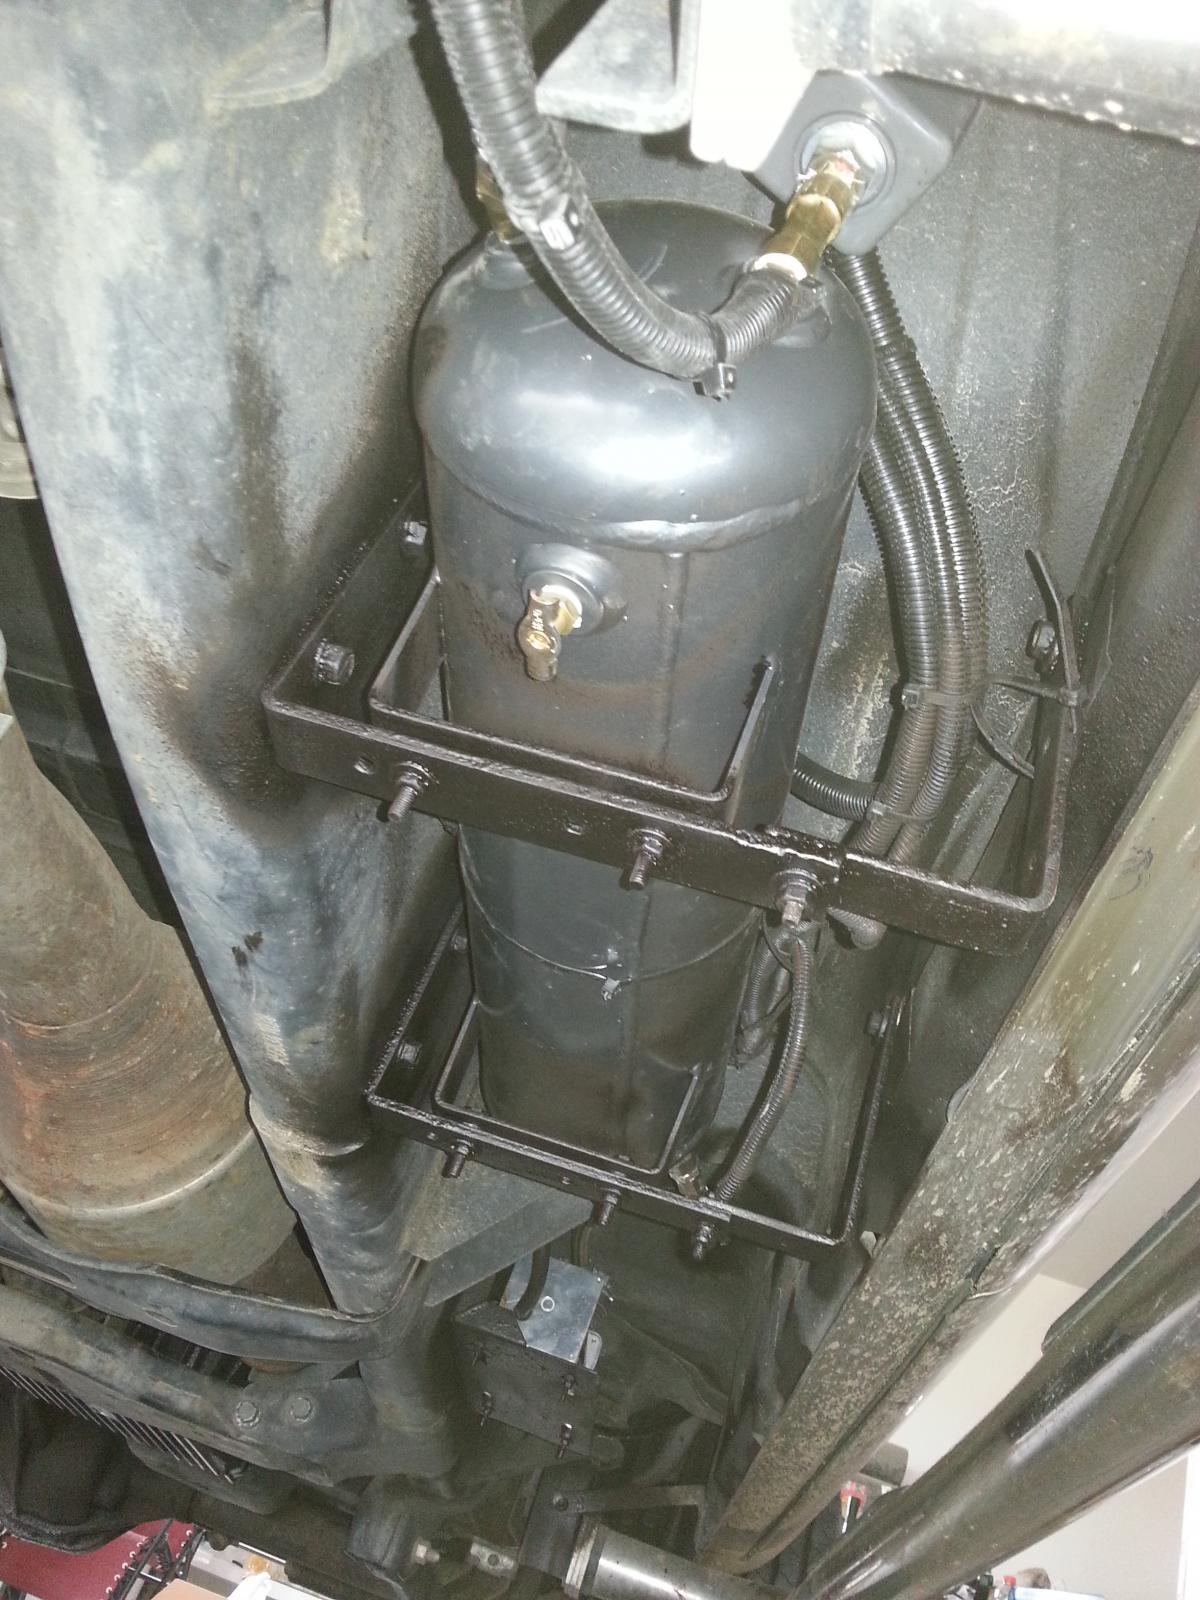
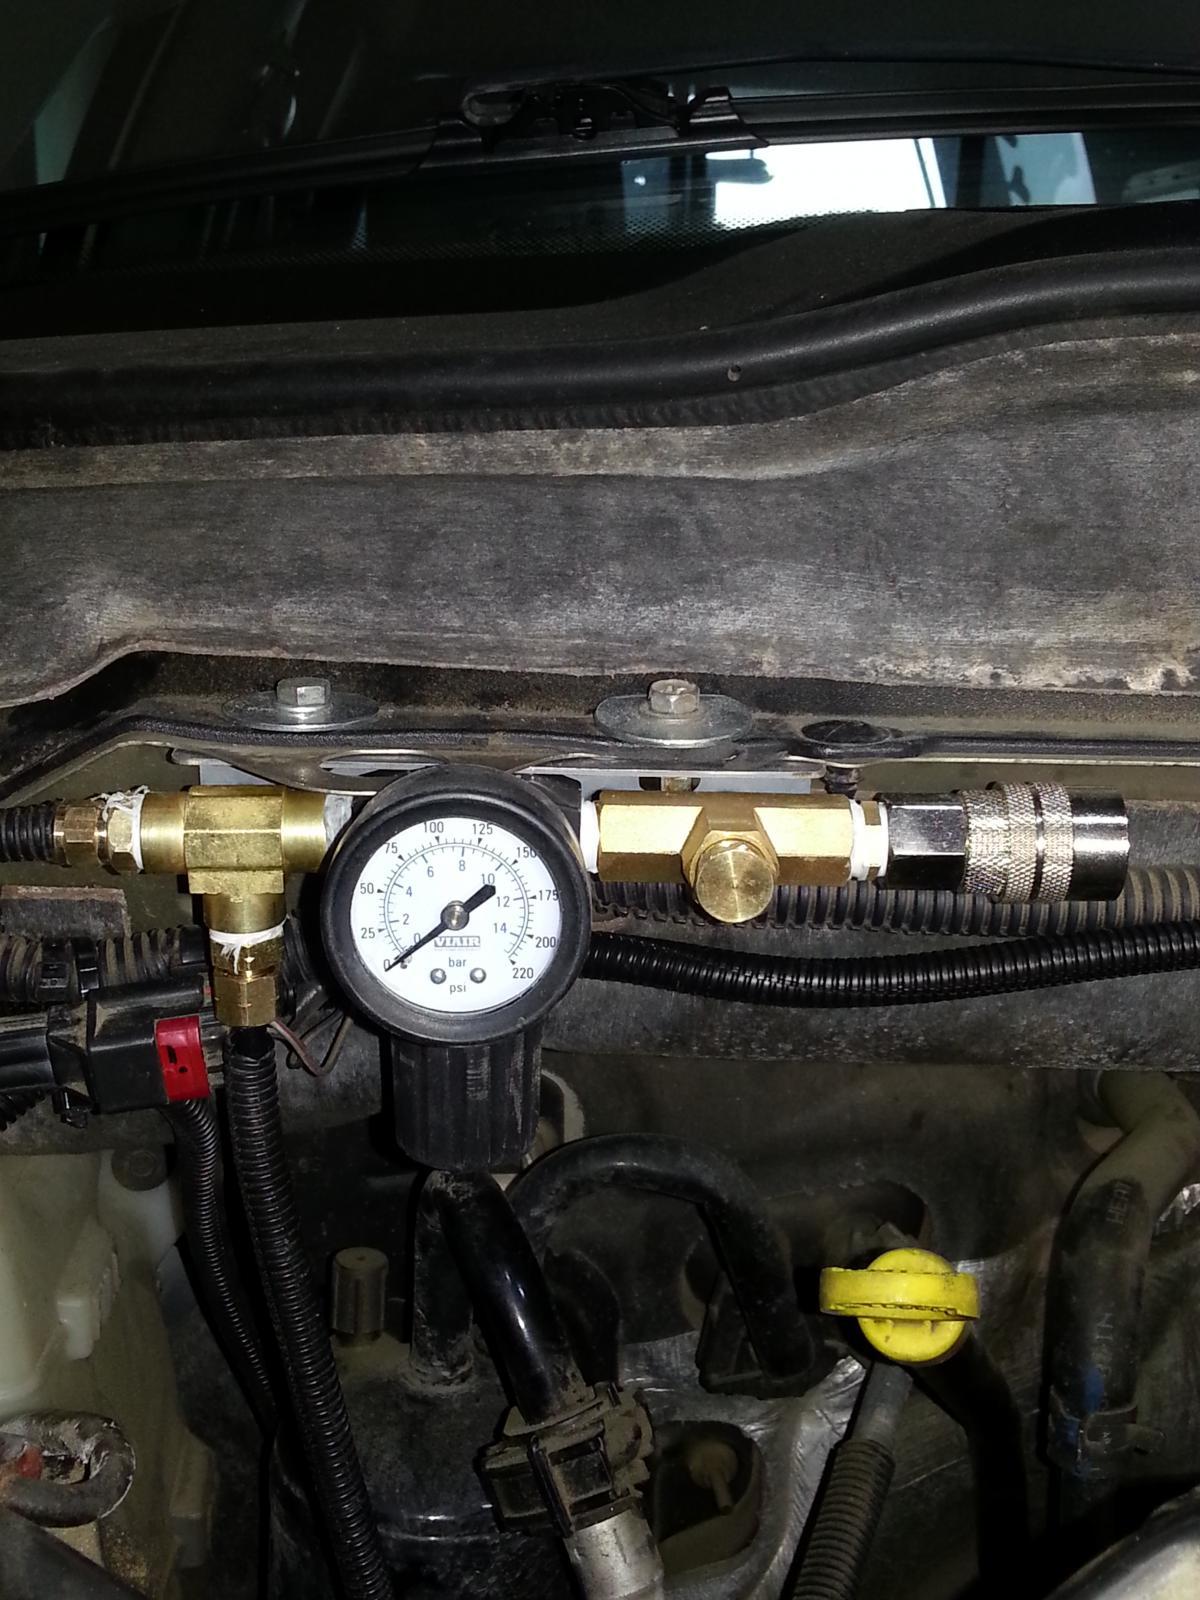
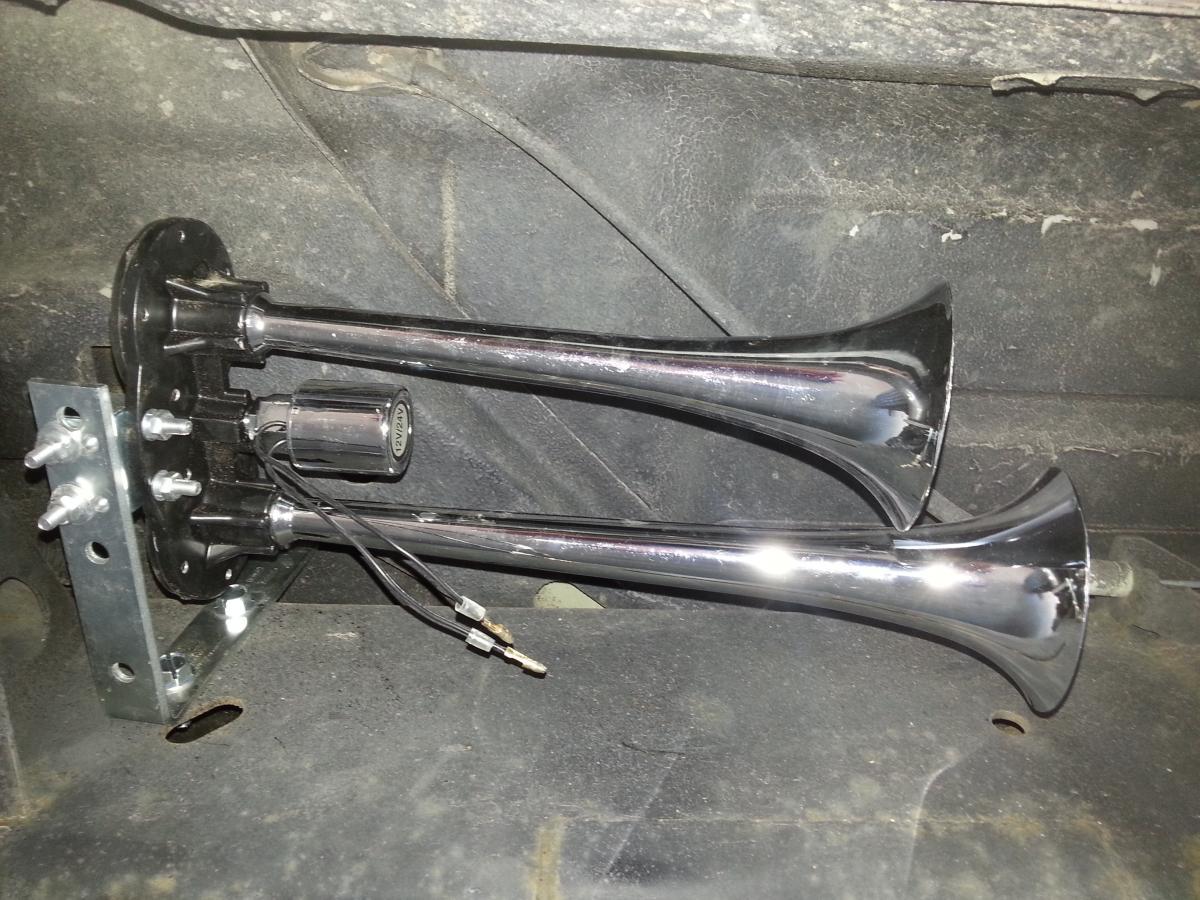
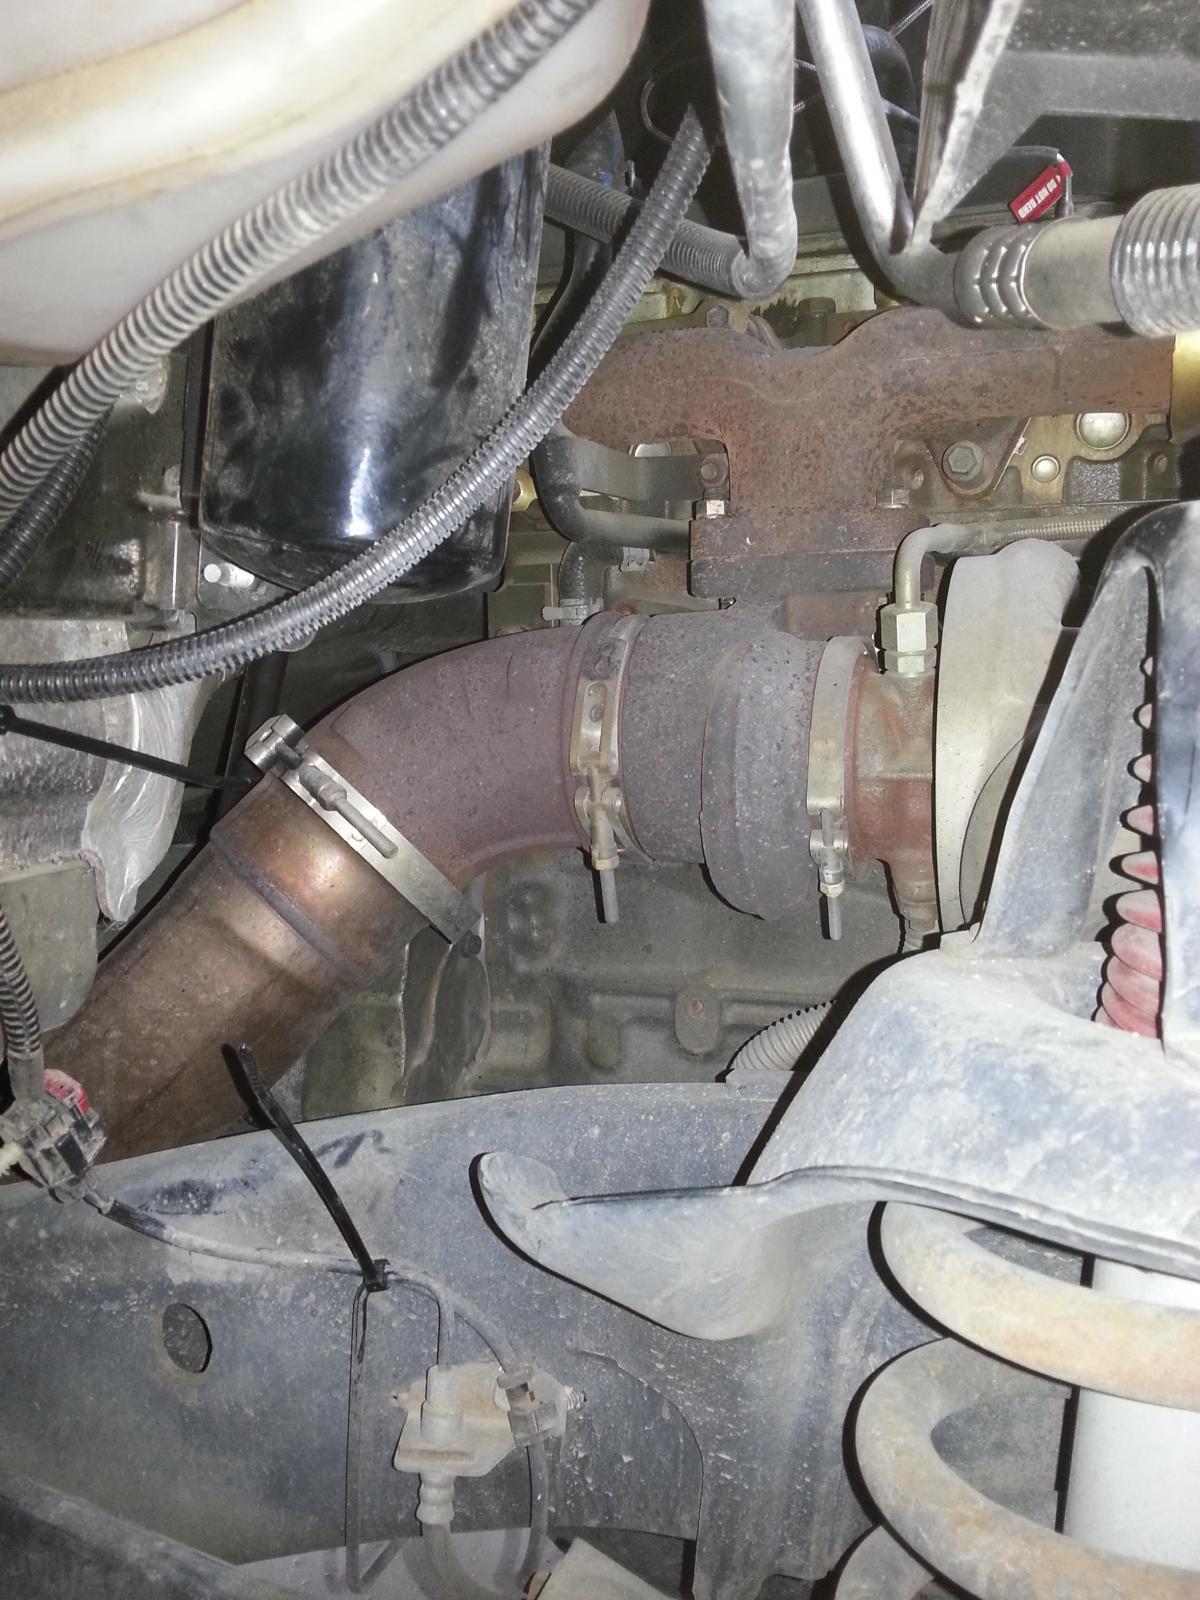
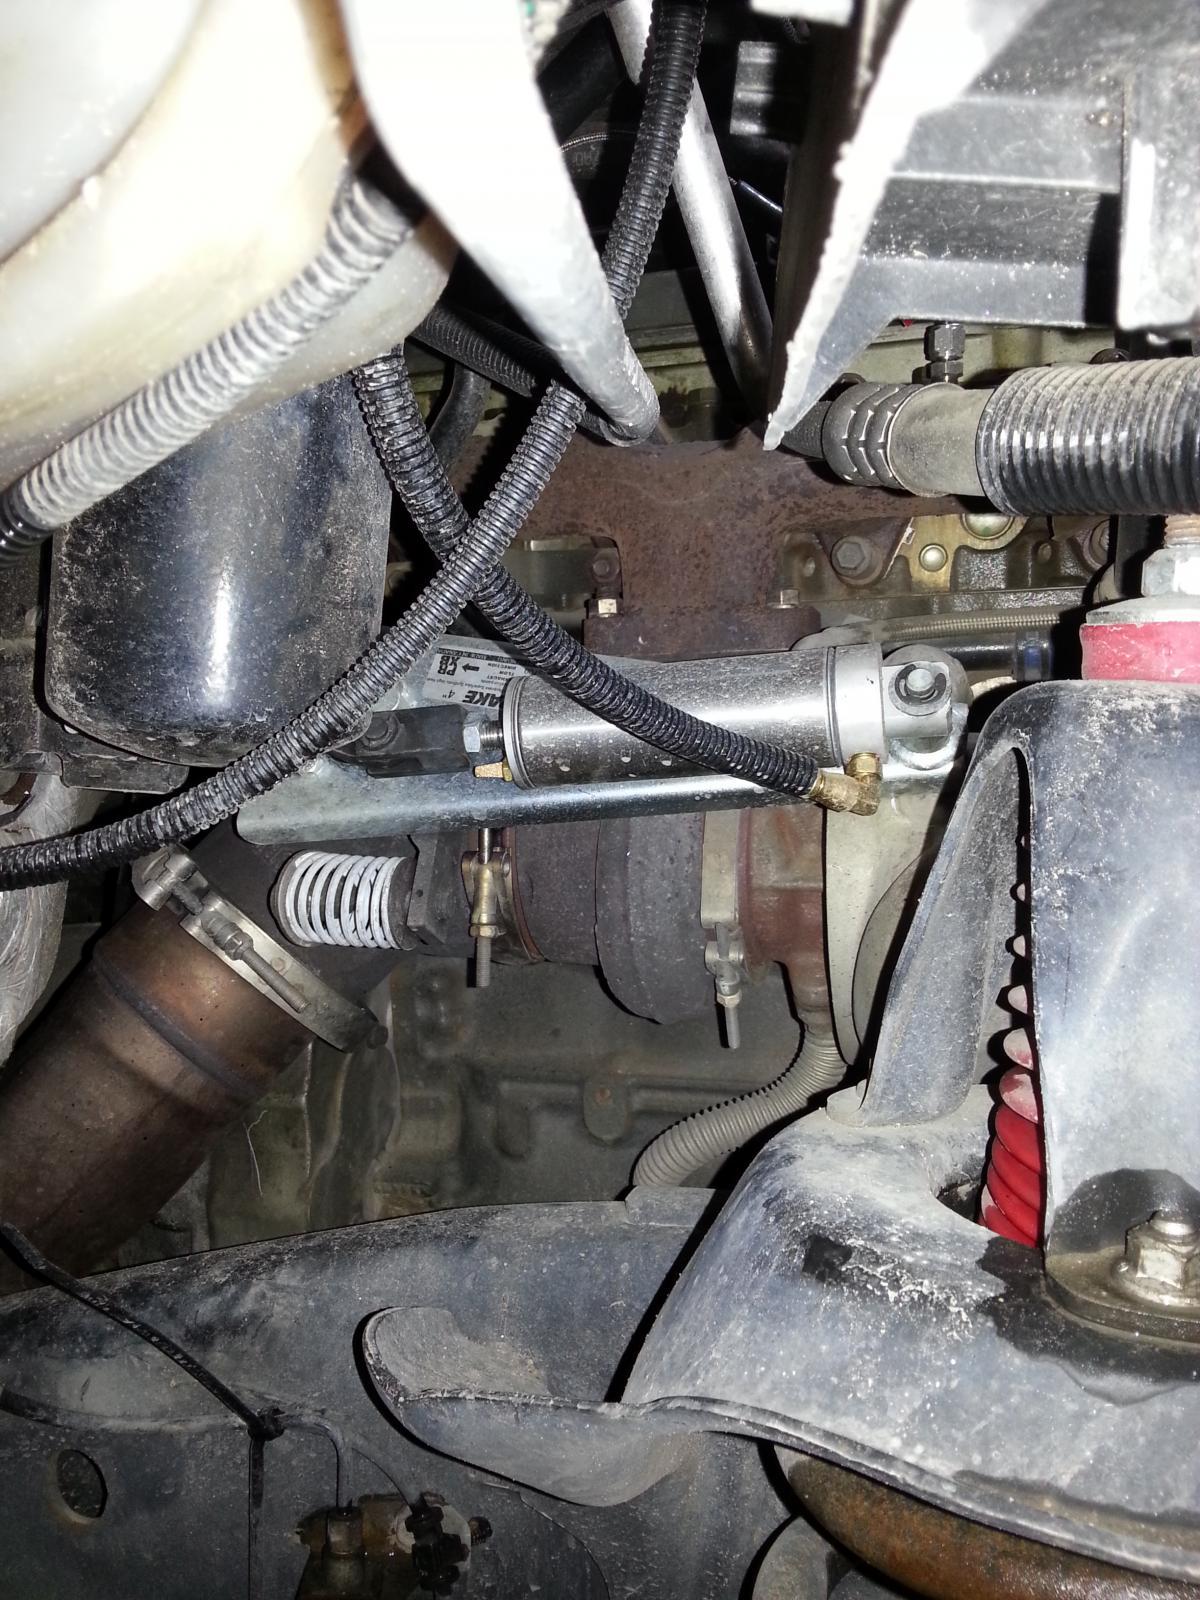
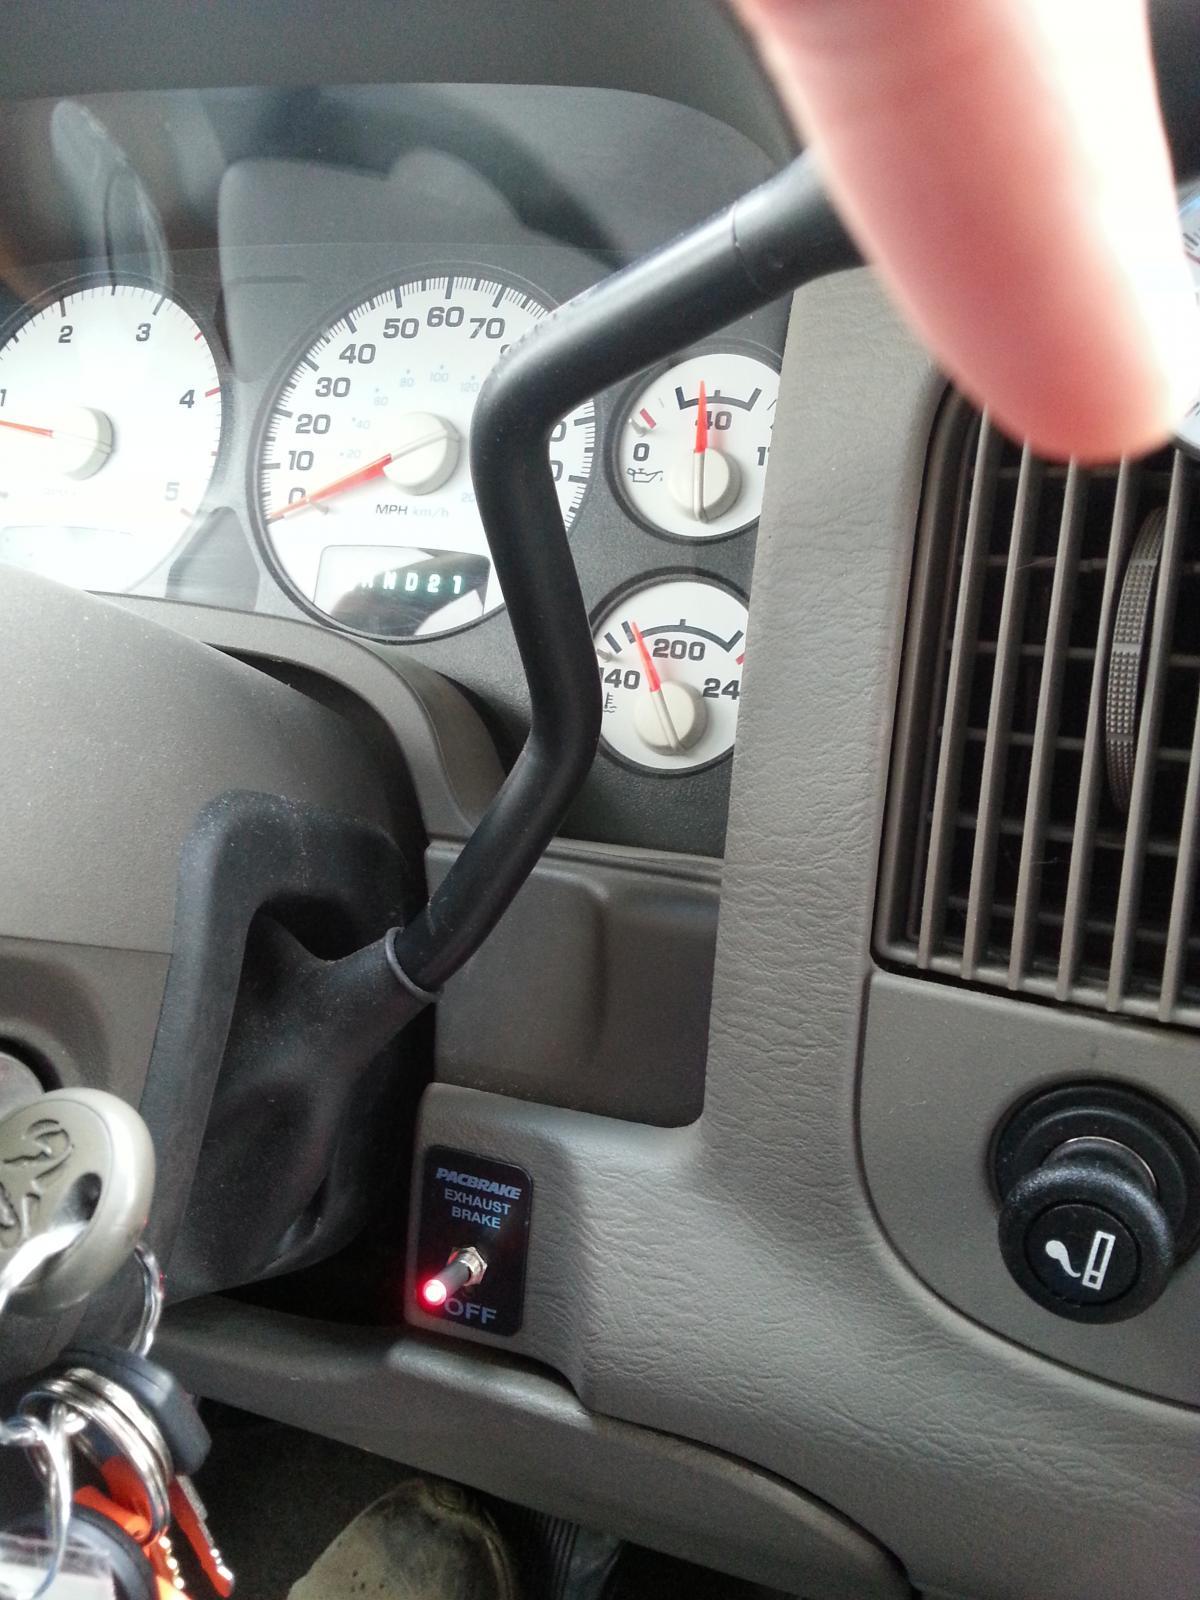
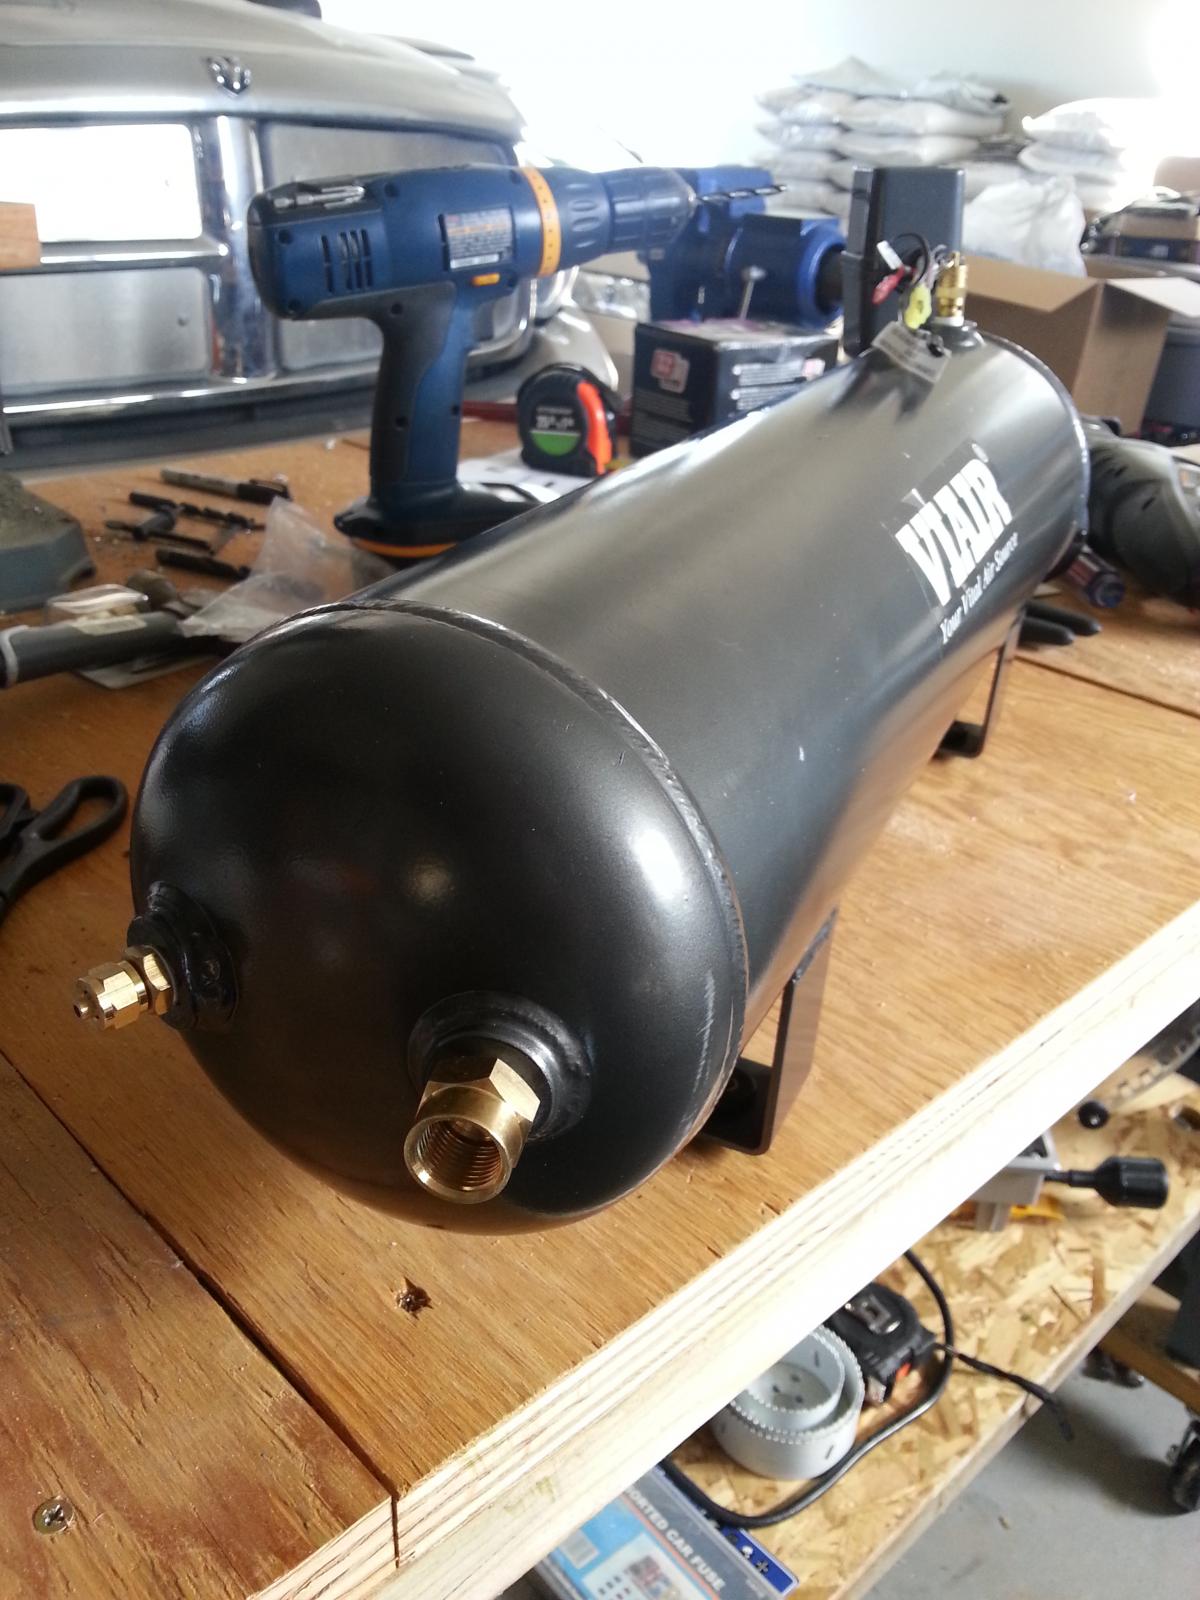
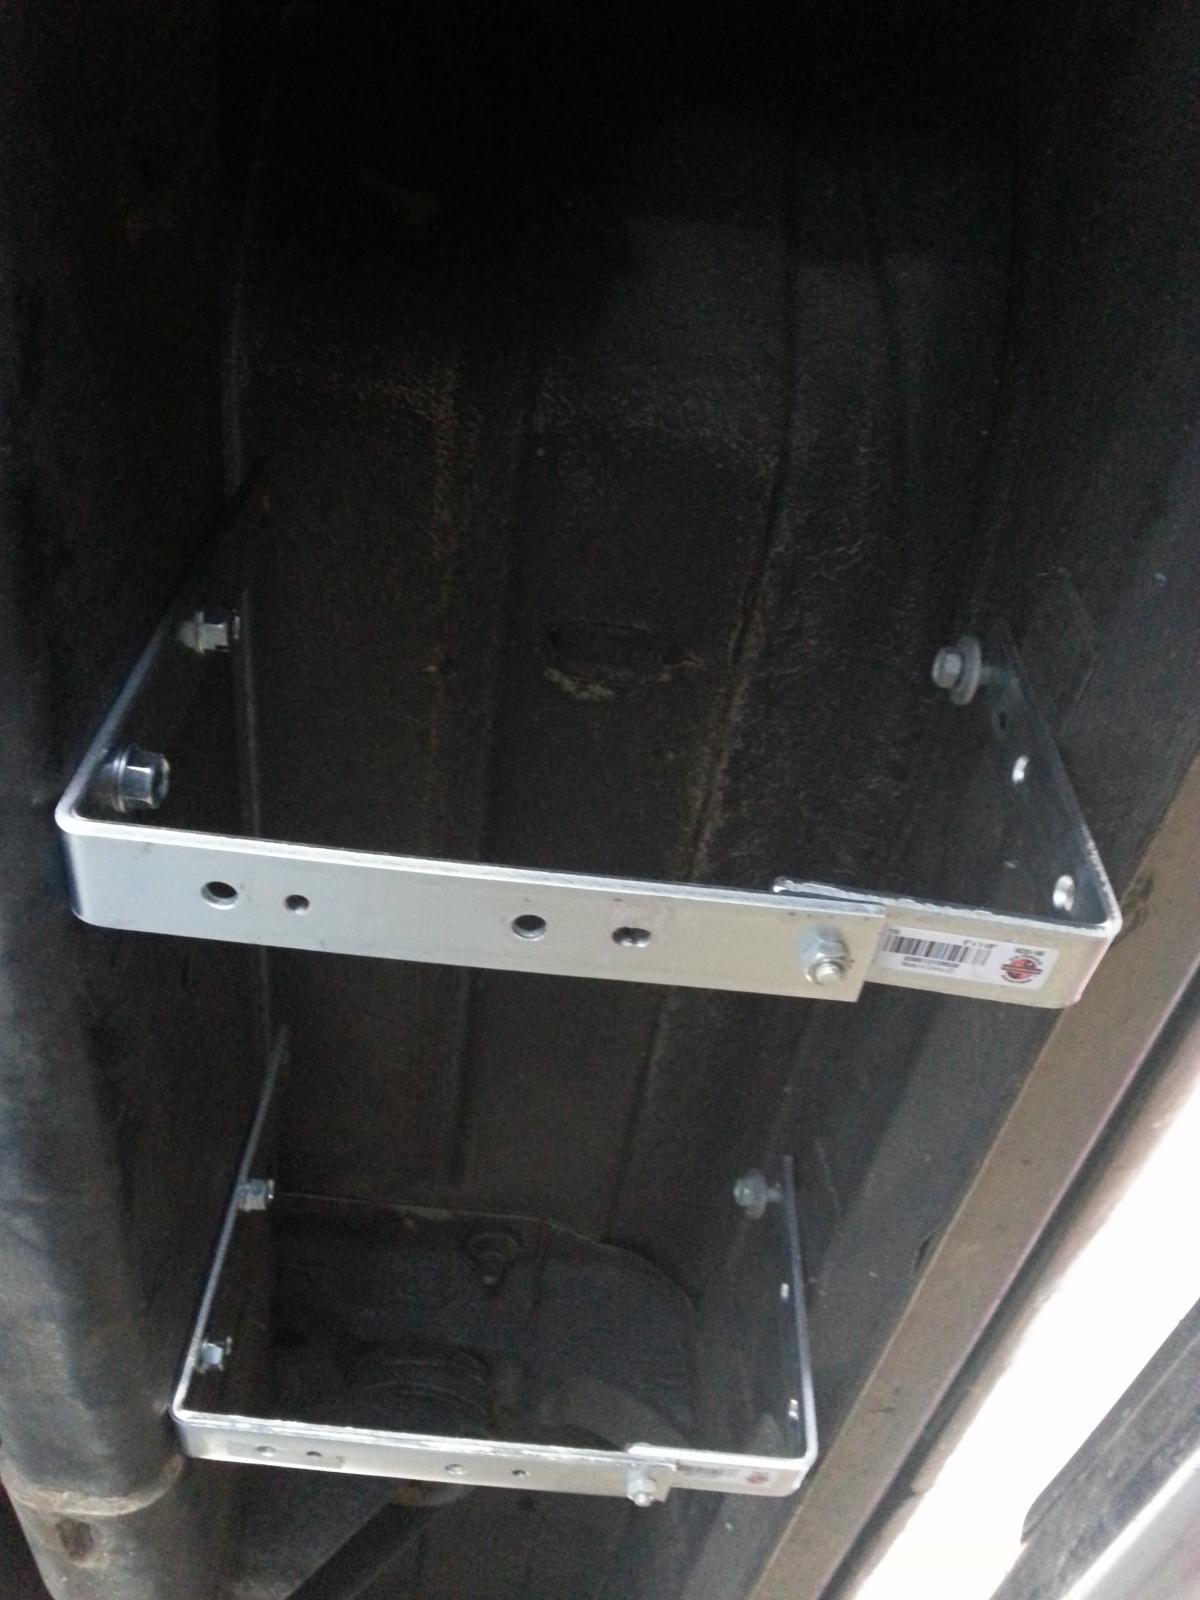
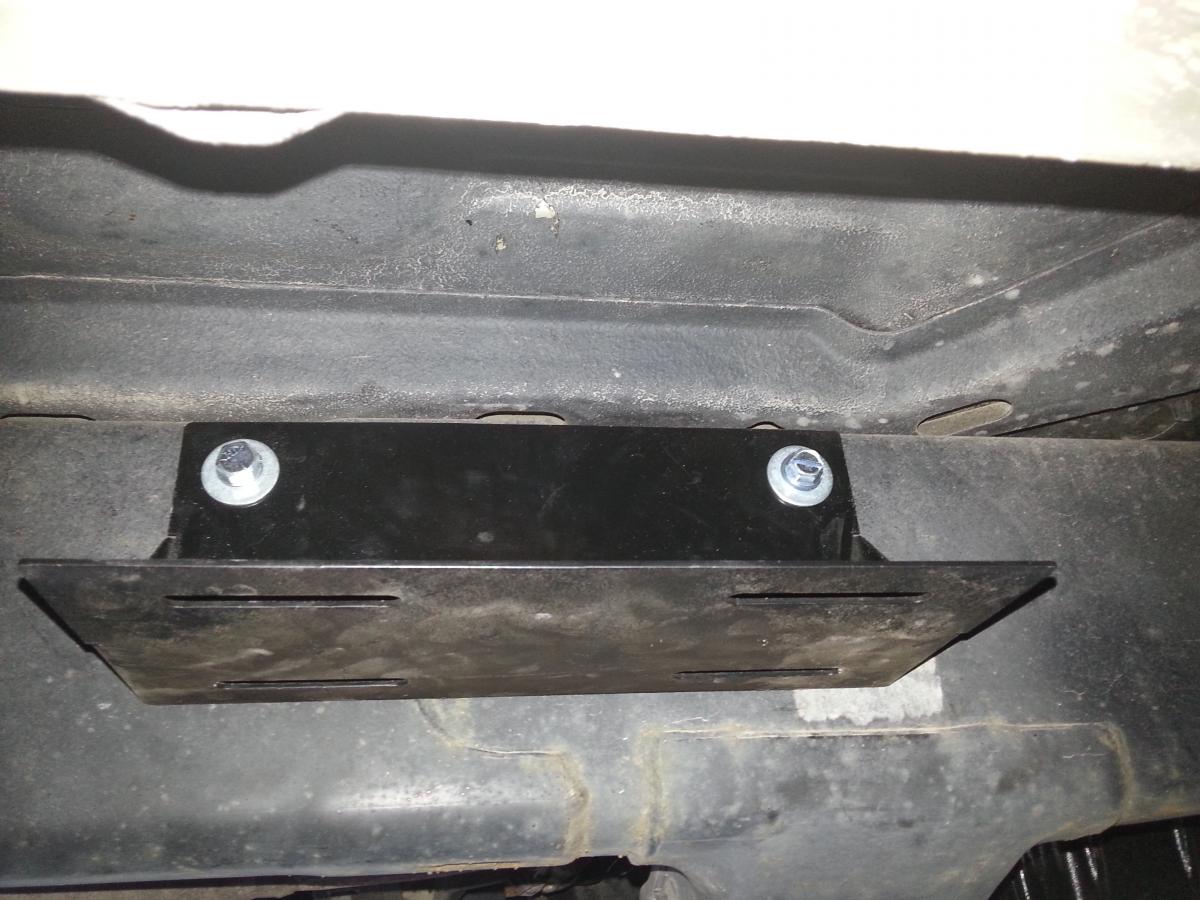
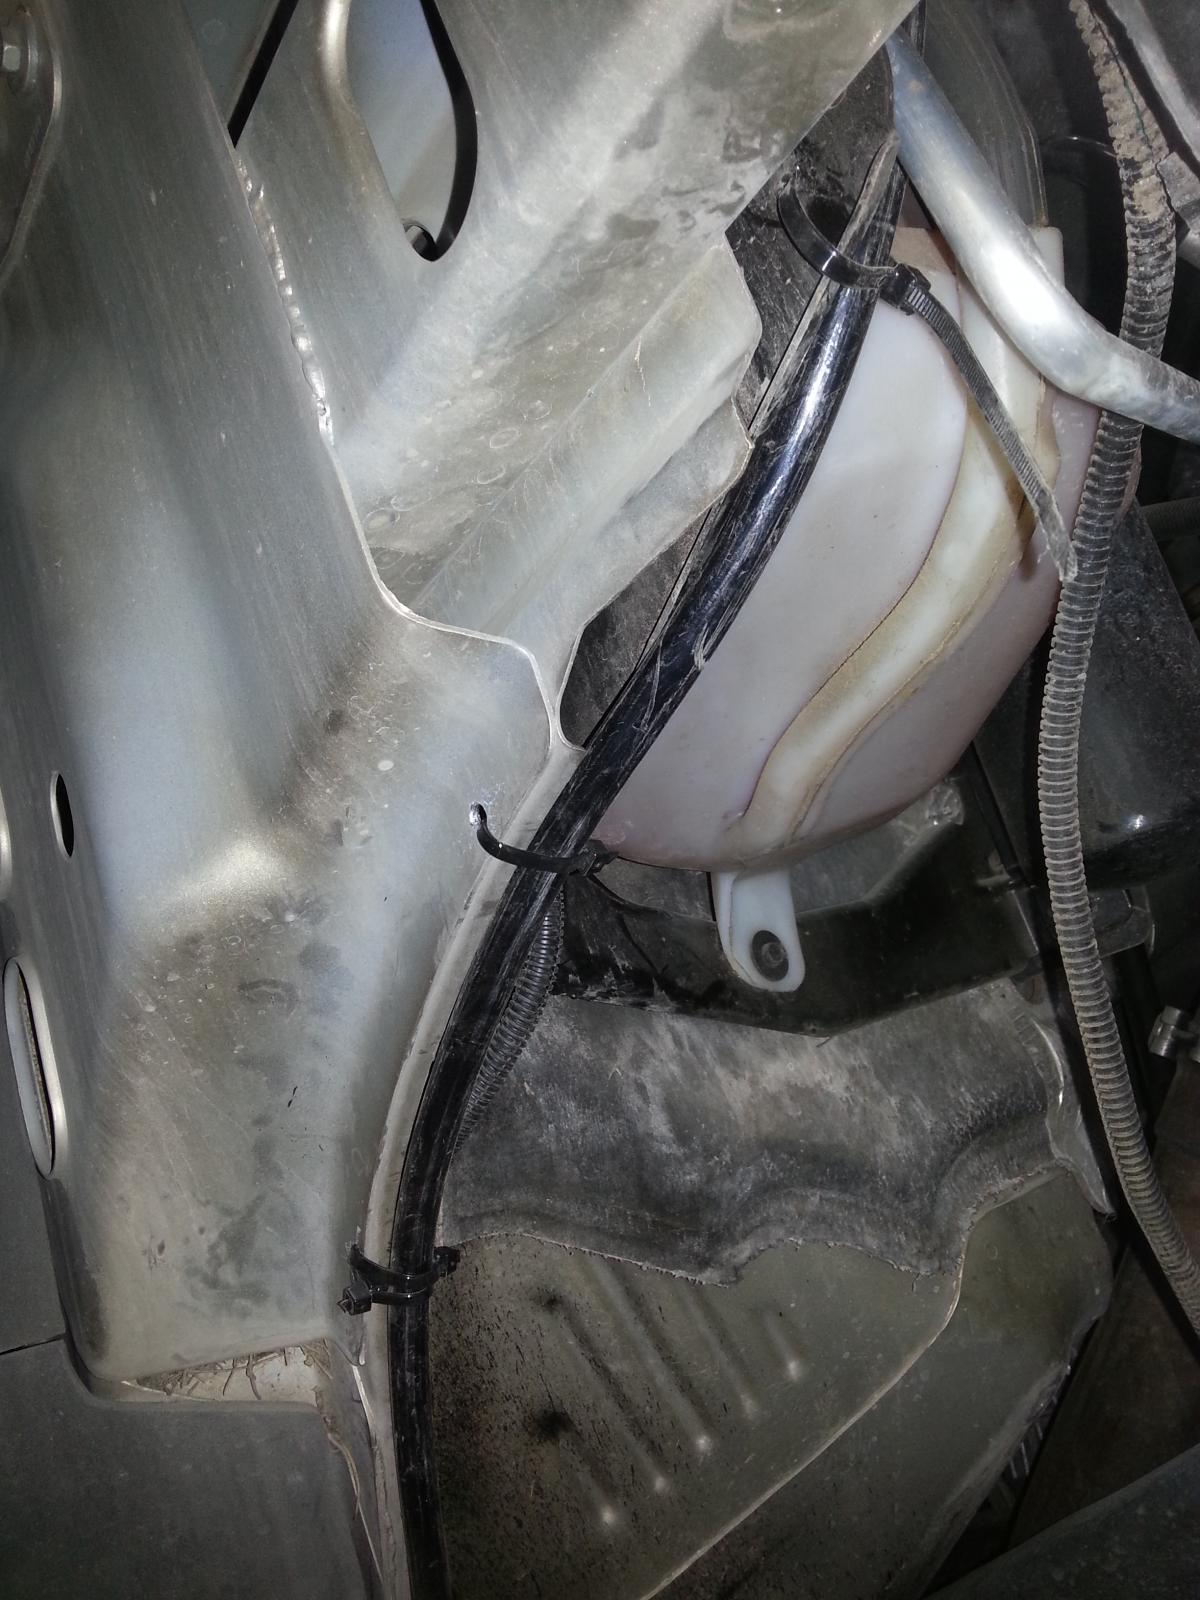
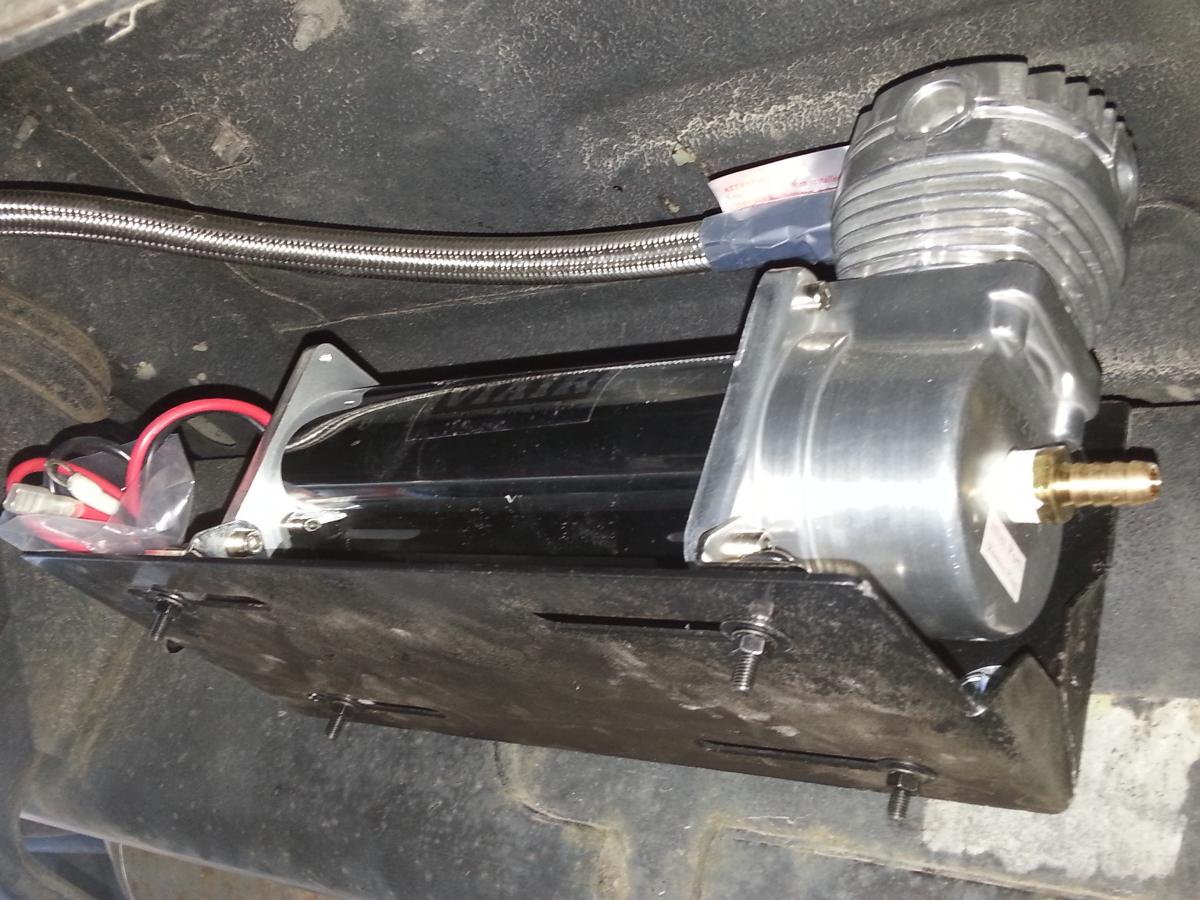
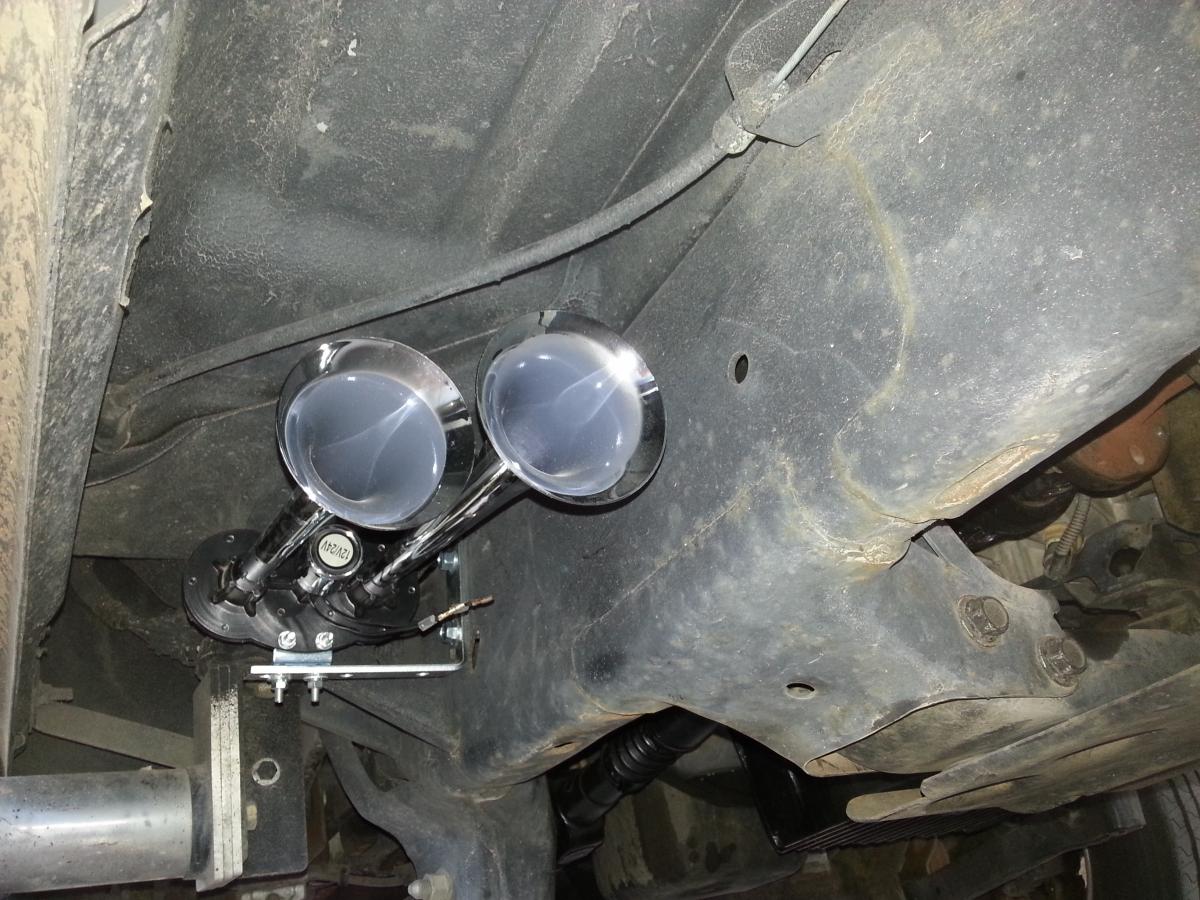
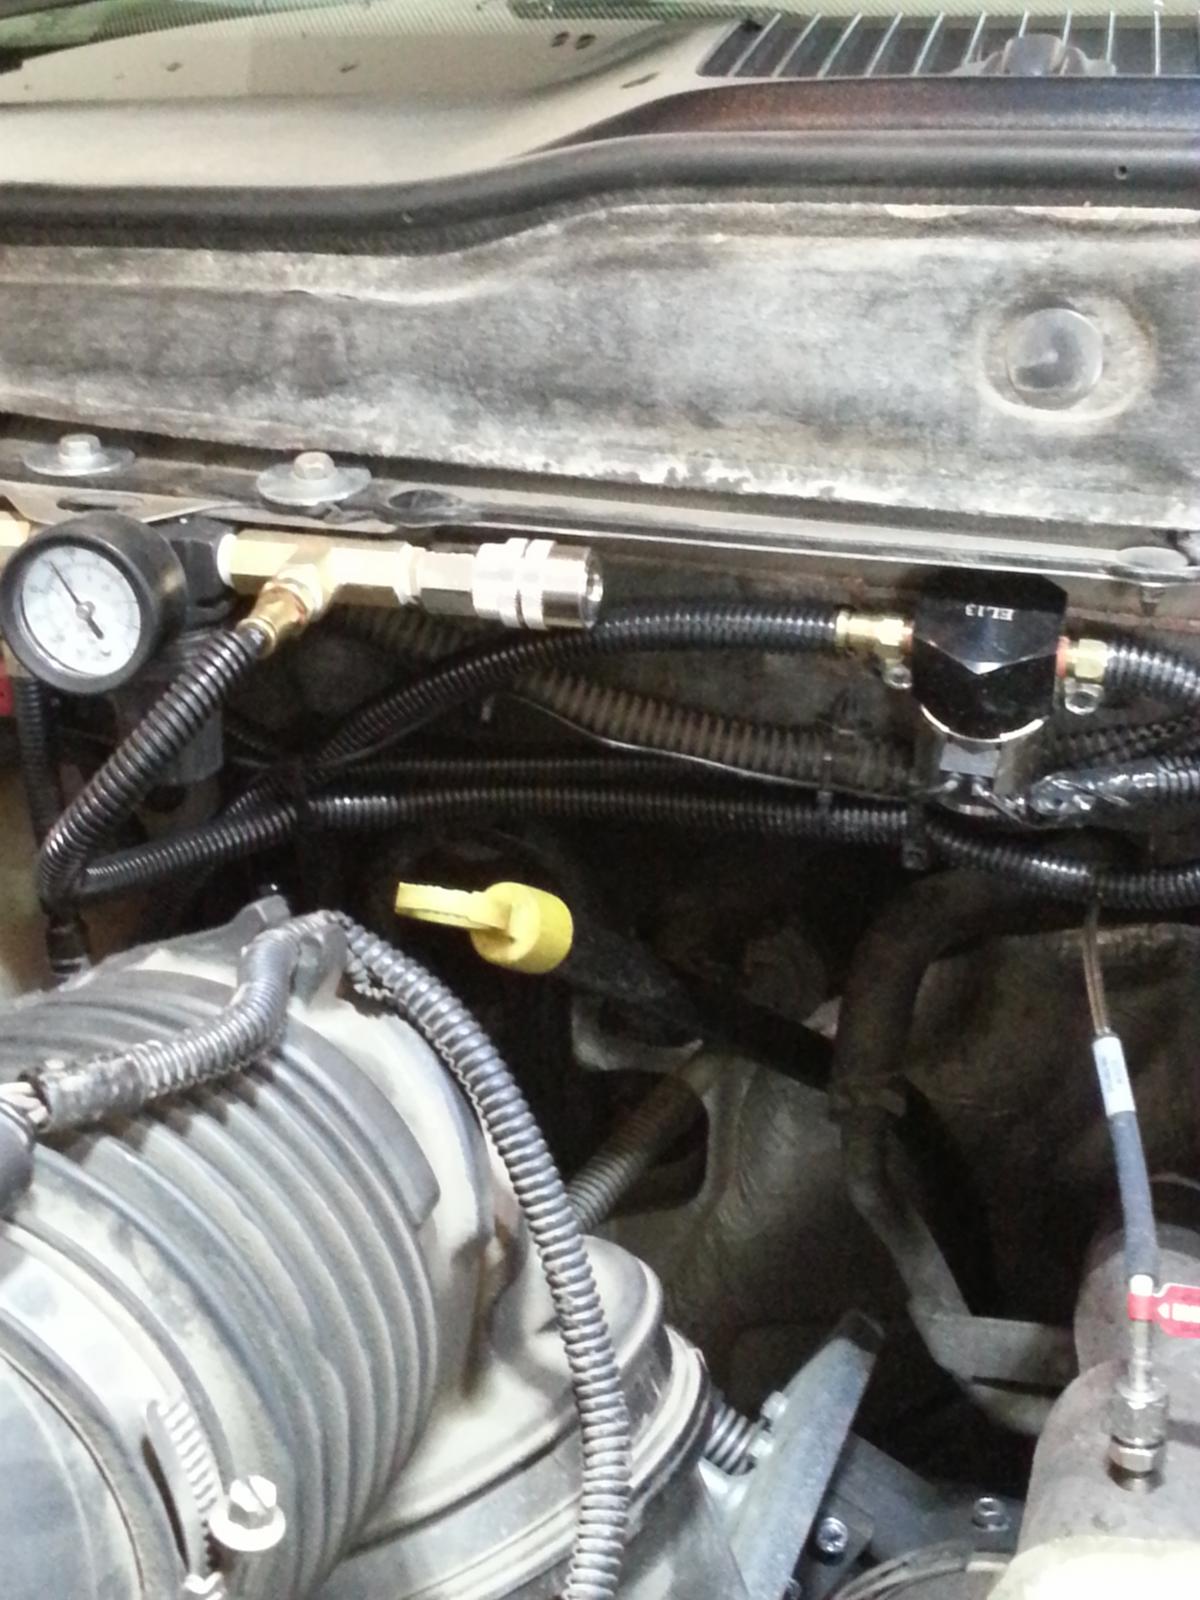
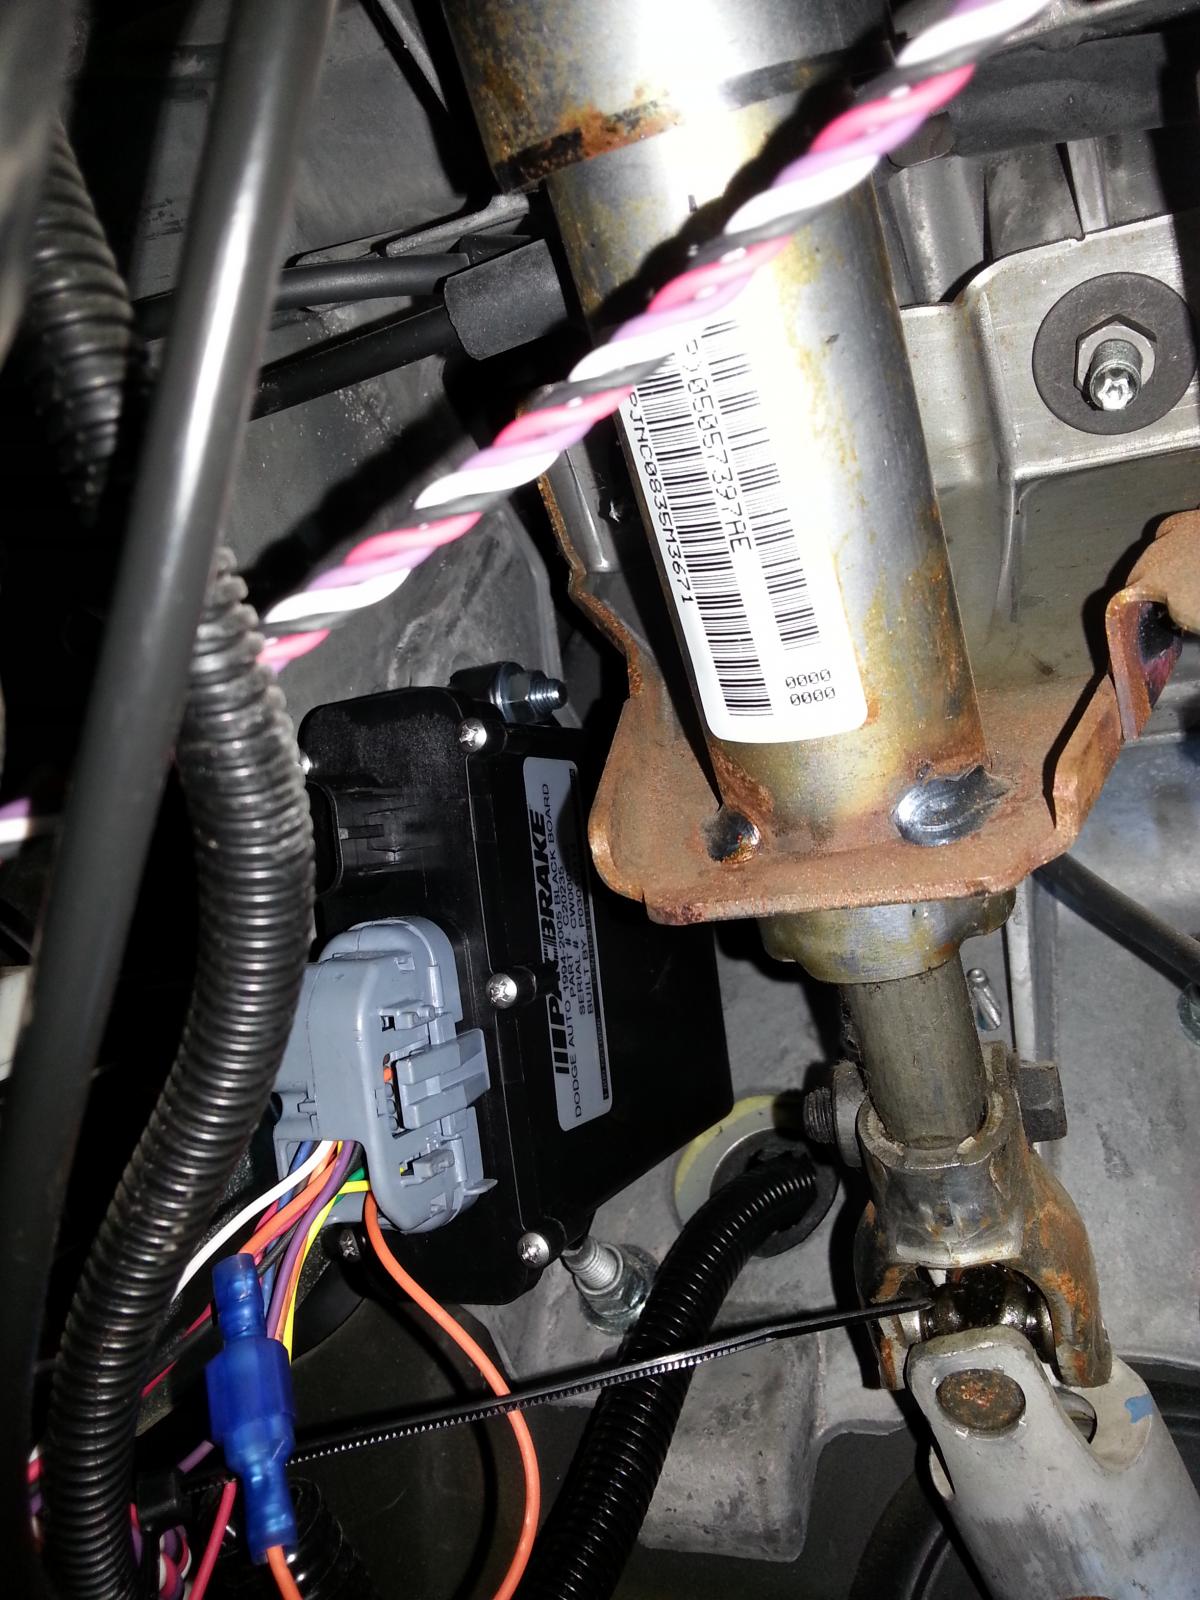
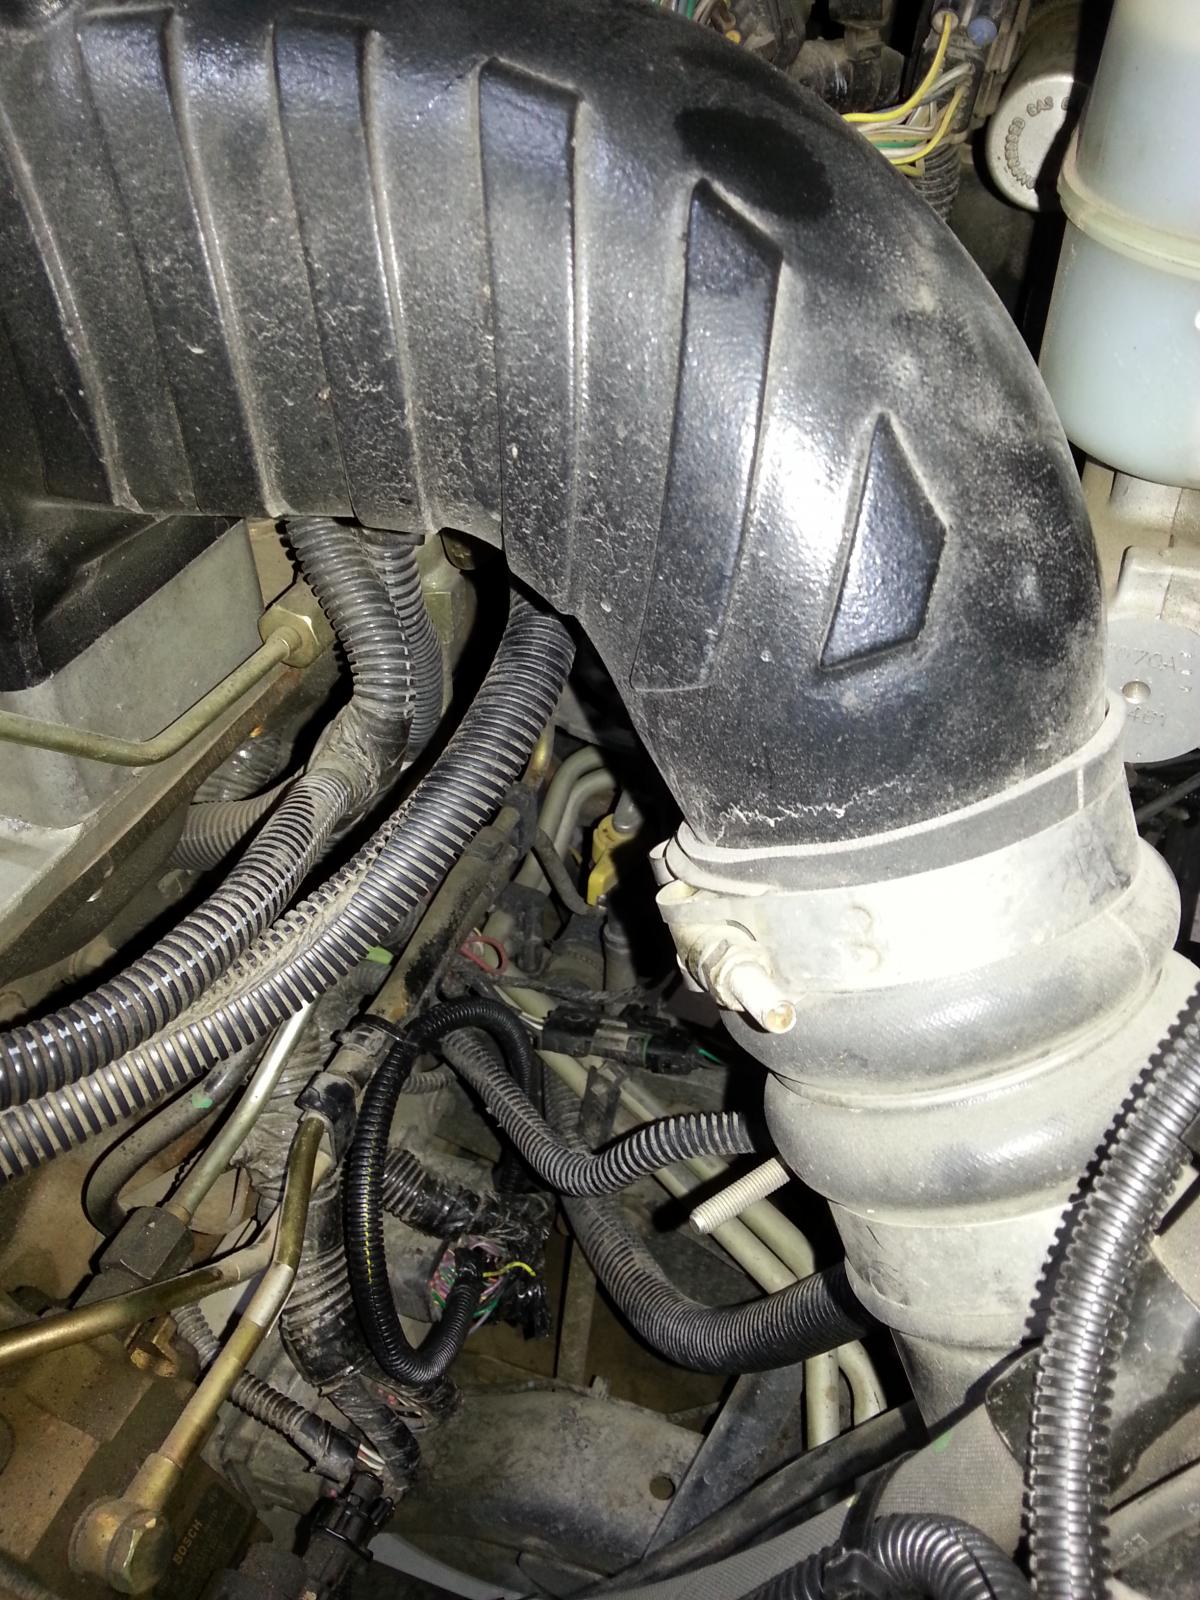
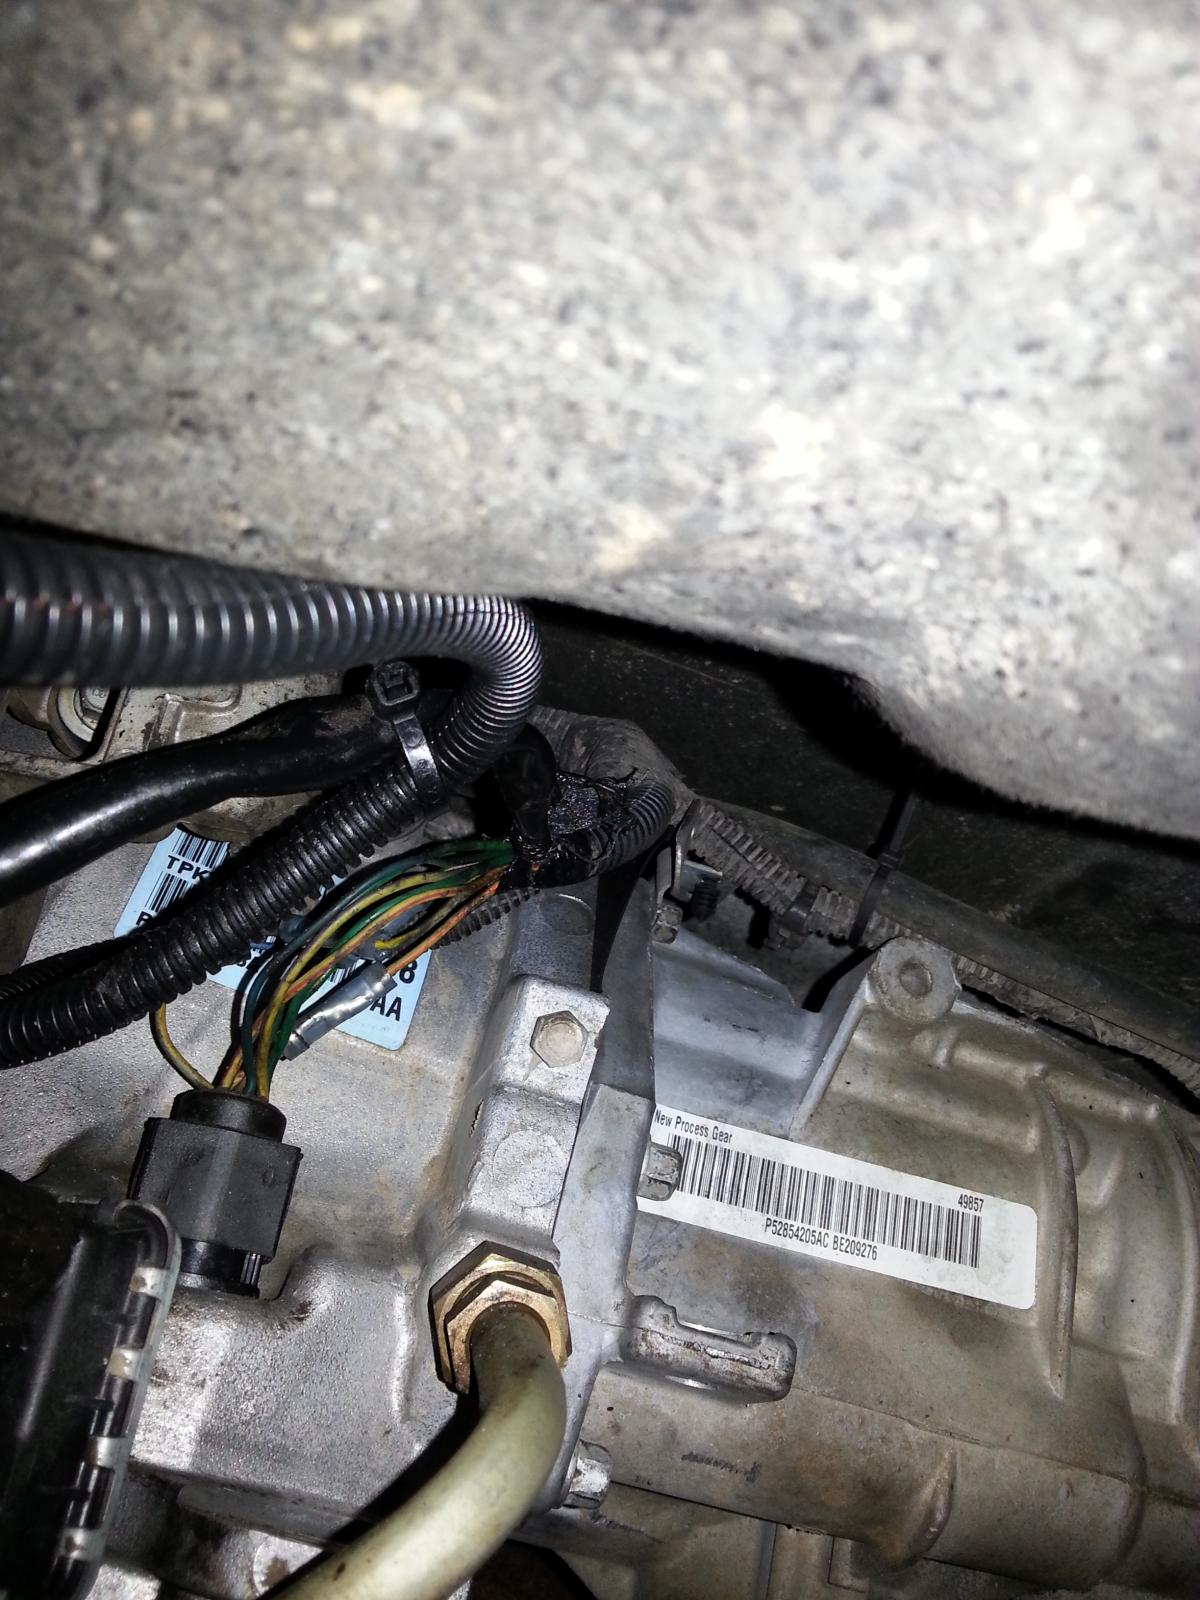
I have been contemplating the installation of an OnBoard Air system (on my '05 CTD) for quite some time. I wanted to install a PacBrake (which needs air to operate), also I wanted to have a couple of quick connect couplers mounted on my truck so I can air up tires etc. when needed. I also have an air horn that is just begging to be installed on my truck. Doing some research I found there are dozens of different compressor systems. You can easily spend way north of a couple 'G' notes on some systems but my wants were simple enough that I didn't think I needed to get too fancy. I didn't want to install the system in the bed of the truck because I sometimes carry a camper. I didn't want to displace my spare tire or install it inside the cab of the truck. Also I didn't want to try and cram something into the engine compartment. So I decided to look for something that I could install on the outside of the truck frame rails between the frame and the body overhang. I decided on an constant duty cycle Viair 480c which is rated for a maximum working pressure of 200psi. I opted to go with a 2.5 gallon storage tank. It was the recommendation on this forum to not install too much storage because you can end up impacting your tire air -up time if the compressor is having to fill larger storage capacity along with filling your tire. The PacBrake doesn't take much air volume to operate and I don't plan on laying on the horn alot and airing up tires is not a regular occurrence so I am thinking the 2.5 gallon tank will work just fine. I installed a 110-150psi pressure switch because my 19.5" tires are rated to 110 psi and I didn't see a need to make the compressor operate at the 200 psi level. PacBrake recommended 100psi maximum so that meant I would need to install a pressure regulator to control the pressure it will see. I wanted to mount the compressor and tank in a solid manner so I didn't have vibration or equipment breakage problems somewhere down the road. I decided to make a 'U' shaped cradle to set the tank in and used "Stanley" L shaped brackets to make the cradle out of (got those at Lowe's). They are very heavy duty brackets and are galvanized. I opted to use 3/8" self threading bolts to mount the brackets to the frame rails. Again I wanted something that would take the punishment of hanging under the truck and the bouncing from the road. I used self tapping bolts because I was working in a bit of a tight location for trying to use a tap to thread the holes. I found a compressor mounting bracket that is made for the Viair compressors and decided to use it for mounting the compressor. It is also very heavy duty and I could tuck it in close to the air tank to make the connection to the tank fairly simple. This bracket also could be mounted to the truck frame rails and provide me with easy access to run the compressor inlet filter up in the engine compartment rather than having it placed somewhere under the truck where I thought the dust and moisture would be much less desirable. As I worked to get the tank and compressor located I tried to take into consideration the route I would run the air lines. My plan was to install a quick connect coupler somewhere near the front of the truck and one near the rear of the truck. My thinking was that this would give me added flexibility when it came time to string out an line to air up any of the truck tires (or help some other rig). So as I looked over the real estate I decided to mount one inside the engine compartment and connect it to the pressure regulator that I would install to regulate the air supply for the PacBrake. So a few brass fittings allowed me to come up with a fairly compact solution. There was a very convenient location that would allow access to the coupler while standing on the ground next to the truck and the location would be a straight shot for the supply air line to come from the compressor (under the truck) up through the wheel well area to the pressure regulator. The rear quick connect coupler is mounted on a bracket that is connected to my hitch and I have it covered with a rubber sock to keep mud, water and junk out of the coupler when not in use. All of the air supply lines are cased in a plastic wire wrap for abrasion protection. Here is a picture of the wheel well with the splash guard removed and you can see the compressor inlet line (and the less visible pressure line) zip tied to the wheel well and the splash guard will cover it all up. Again this provides a straight shot (simplified routing) from the compressor and tank up into the engine compartment. Compressor inlet line is 3/8" and air pressure supply lines to regulator and quick connects are 1/4". The air supply line to the air horn is 3/8". Here is a picture of the compressor set on the mounting bracket and you can see the high pressure SS braided outlet line that feeds the storage tank. The electrical hook up is fairly simple in that the pressure switch I installed comes setup with a built in relay to start the compressor. So I needed to run a trigger wire from the ignition switch on circuit (so that the compressor can't run unless the key is on) to the relay on the pressure switch. Then there is a 12ga power wire that runs from the battery to the relay for the main compressor power (pulls 20amps under full load), and then another 12ga wire going from the relay up to the compressor motor. I opted to install an on/off switch and a pressure gauge in the cab of the truck. I didn't want another gauge on the dash or column so I decided to install it in the kick panel below the ash tray and power outlet. It was very simple to get the 1/4" airline into the cab from the regulator (actually I installed a 'T' just prior to the regulator). I then could bring the line from the 'T' to this gauge just through the firewall under the heater) and along the bottom of the dash over to the kick panel and the back of the gauge. I also installed the switch right next to the gauge in the kick panel. It sits low and close to the floor so you are not able to read the numbers but you can clearly see the gauge needle and it's location on the face of the gauge. The primary purpose of the gauge is to tell me if the system is working. I can see it from the drivers position since you can't hear the compressor running while driving. When I finished the install I zip tied everything down so it doesn't flop around when driving and I sprayed all the brackets, bolts etc. with undercoating. While the compressor and electrical connections are not water proof or water tight they are water resistant. I plan to make some splash guards that will provide some additional protection for the pump and the electrical connections on the tank. When I get those installed I will add some pictures of my approach. When I installed the pressure regulator I installed a 'T' so I could connect the quick connect coupler and placed a plug in the other opening. This plug will remain there until I install thePacBrake. Once I have the PacBrake installed, the plug comes out and that port will be the connection that will be used for the PacBrake. This whole assembly sets just above the location where the brake will be installed and again it is a short and direct run for the airline. Air Horn Install I was hoping to install the air horns up front or maybe even in the engine compartment. But in the end I just could not find a satisfactory place to install the horn. This was primarily due to their size. I ended up installing the air horns under the truck on the driver's side. I mounted them to the frame rail with another Stanley 'L' bracket. Those things are super strong and it seems to hold the horns very solid. The trumpet portion of the horns is facing toward the rear of the truck. My thinking was that this would prevent water,dirt and other stuff from being rammed down the horn while driving. This thing is water resistant but I also plan to make a splash guard and mount it around the assembly to help keep it as dry as possible. Pictures will come later after I get the splash guard built and installed. PacBrake Install So I was finally able to move on to the PacBrake install. With the wheel well splash guard removed you have better access to the exhaust elbow that needs to be removed to install the PacBrake. Work to remove the elbow and install the exhaust brake assembly is kind of tight so it actually takes a little more time than expected. I was actually surprised at how compact the PacBrake unit was. I guess I was thinking the air cylinder and its mounting plate would take up much more space than it does and even make space around the turbo area more congested. As you can see from this picture it doesn't really take up much additional space. The cylinder actuator airline you see in this picture comes from the solenoid that operates the brake. As planned, I just connected into a 'T' fitting I installed on the output side of the air pressure regulator I had previously installed. This picture shows the location I placed the solenoid and the air line connection to it. Since my truck is an '05 with auto (Dodge made the '05 48RE with a somewhat unique control methodology which is different from later versions of the 48RE) there is a 'brain box' (transmission controller) that has to be installed that controls the TQ lockup. The air solenoid is electrically controlled through the interface of the transmission controller, the connection to the ECM and to the transmission. This picture shows the mounting of the transmission controller box up under the dash near the left side of the steering column. This picture kind of shows the connection made to the ECM. This picture kind of shows the connection into the transmission but it was pretty tight to get a picture of all the detail connections. I installed the in cab PacBrake actuator switch on the transmission shift lever side of the dash. Now I need to learn how to effectively use the exhaust brake. I have never driven a truck with an exhaust brake, so I am sure there will be much to learn.