Haggar
Unpaid Member
-
Joined
-
Last visited
Everything posted by Haggar
-
Wild, Welcome. I am not sure what is available to a member vs test drive, but in our download section we have the factory PARTS MANUALS. I just did a quick look at my 2001 and there are 8 part numbers just for the drivers side parking brake cable (just the one connected to the drum). Depends on exact manufacture date and etc. And that is not including the disc rears, that is a whole different section. Don't get hung up on the written procedure for parking brake cable adjustment. If the rear brakes are adjusted properly, you should never need to readjust the parking brake cables for wear in the brake linings, (that should be adjusted at the brake.) only for stretch in the cables. Think of the parking brake as the lever you push with your foot. This pulls a cable That cable then connects to a balancer (or splitter), that pulls the two cables that actually pull the levers in the drums. (there could be other cables in the system, but they are just to lengthen, the visual is the same) Disconnect the lever and front cable from the balancer. Verify that when you push the foot lever the cable that should pull the balancer moves about 1.5". when you release the brake you will need to pull the cable back as there is no spring attached now. (you may want to have a friend pull it back as you slowly release the lever.) This should move without hindrance. remove rear wheels and drums. Ensure that when you pull each parking brake cable the cable pulls easily and freely (only the spring is your resistance.) and the brakes linings should physically move as you pull the cable. you adjust the cables so that as soon as the parking brake lever begins moving, the levers on the rear drums begin moving. Its that simple, don't overthink it based on increments. I suspect you will find one of your cables is not moving freely. GL, HTH Hag
-
I agree on the Denso. All 3 of the gen 2's I am responsible for have them. Yes the diode pack is a bit more expensive and not as easily replaced as the Bosch, but other than that there is no difference we have observed. If you have a good local starter/alternator re-builder, never get a "new" alternator (they are usually rebuilds from an unknown source), have yours rebuilt! The mods will help, but they still wouldn't stop the grid heater relay failure. I think everyone needs to take a close look at their relays. mine failed in a similar fashion as yours, but I luckily caught it sooner than you did.
-
Your first question is Yes. Its fine to install without doing any mods. For the others, hopefully someone will chime in. You are going to need to read and reread the mod instructions so you can grasp what is needed in your instance. I think what the other guys were saying, is they are only protected to 150 amps. you are putting a 180 amp alternator on, and they are warning you to not copy them, their system is a bit lower amperage. Hag
-
I do a lot of hydraulics and pneumatics at work. We use the loctite 545. There are others like vibra tite and such that have a similar product. We use it especially in the pneumatics, the ports are so small just a smidgen of tape or basically anything can cause a problem in the logic. In the hydraulic systems and booboo extra just becomes miscible in the fluid and goes away. HTH Hag
-
The AC noise is for when the nations begins making AC noise. It is an alternator and just like all alternators no matter who made them, It makes AC power. Electronics inside the alternator clip the AC waves and make them look like DC. When those electronics begin expelling their magic smoke, you can get more AC than you really want. While the alternator is making the AC power and turning it into DC, all voltage regulation is done inside the PCM. On many vehicles this was actually done at the alternator itself. Chrysler for many years on many vehicles decided to incorporate voltage regulation in the PCM. There are probably many good reasons to do this, but to us average guys, when the voltage regulation lets its magic smoke out, it can take the whole PCM with it. All we are trying to do is make the magic smoke stay where it is supposed to. or when the inevitable happens and the magic smoke escapes, it escapes from parts that are easily and more cheaply replaced. HTH Hag
-
Grrrr, Sorry about that and read you had a boss, but didn't register. I was just trying to clear the lines of air if that happened to be the problem. The clear line would help since you cannot pre load the lift system easily. Look at the power/communication connector on the VP. If it is original, there will be a tattle tale tape around the lock on the connector. if it is still there and intact, guaranteed to be original vp. broken definitely a swap, missing, well adhesive only has a limited life so unknown until you look closely at the pump and see if it has some rebuild info on it. try block heater on it. try cycling the grids extra. I wonder if the timing just can't keep up with the change during start to idle. Need to look closely with a scanner. something stupid like the IAT being waaay off, or map sensor telling a stupid story. They can fail and not be out of range. The programming doesn't use logic to figure if a sensor is bad. If the coolant temp is 40 and the intake air is 175 and the boost is 10psi at start up the program would try to chart a timing /fuel map for that condition. Good Luck! I agree, I wouldn't condemn the VP yet. Hag
-
My brother's VP never fully died, but never ever threw a code. For years it would have fits of dead pedal. Real randomly and intermittently. Eventually it would have dead pedal until it warmed up. Once warmed up, it would run fine, but never threw a code. I swapped nearly everything except the VP with items from my truck. Nothing ever followed it. So we put a VP in it and it has been fine. So hard to say if it was a solder on the board or sticking timing. But either way, it was the VP and no codes, so the limited programming never saw the error to report it. I know you hate to throw a vp at the problem. I do anyway. Keep searching for it. your issues sound a bit odd, as you have narrowed it to a pattern. Try some variables on top of that (block warmer) (bump starter 3 to 4 times before first start etc.) and see. Good luck Hag
-
That is what I thought on the C&C, that it was narrower. I could not prove it in the MOPAR parts catalog though.... All the parts i kept looking at would be used (with the same part number) if it was a 62 or a 65. (62 being a regular cab and bed truck and 65 being a cab & chassis of a certain wheel base....) rear axle housings were the same so spring perches were the same. the "fuel tank cross member" shared the same part numbers, rear frame rail extensions were the same.... grrrr hope you find what you need or can make something work! Hag
-
Greg, Thanks, The black piece is still on my block. Just the silver part of the bracket. I ordered one from fleabay. That should get me going. Will have to mock it up a bit to see if I can get the injector pump in place and still add that bracket next week. Hag
-
Thanks for the picture Dave. I would have thought they went into the holes right under the injector lines. (If i was going to fabricate one that was where I was going.) But I kinda like the shelf Idea.... I hope i can get it in with the injector pump already installed...... Hag
-
Go to Firestone's site. For some reason they are listing a different part number for the cab/chassis. I agree there should not be a huge if any difference.... But it is not just Etrailer labeling, Firestone made a distinction. 2071 is what you need I think. Hag
-
I usually think of ebay, but figured this was closer to hen's teeth and never looked..... Thanks Greg! I agree it would be a fairly easy one to make. If you have dimensions.... I still can't believe mine is gone... grrrrr. Thanks, Hag
-
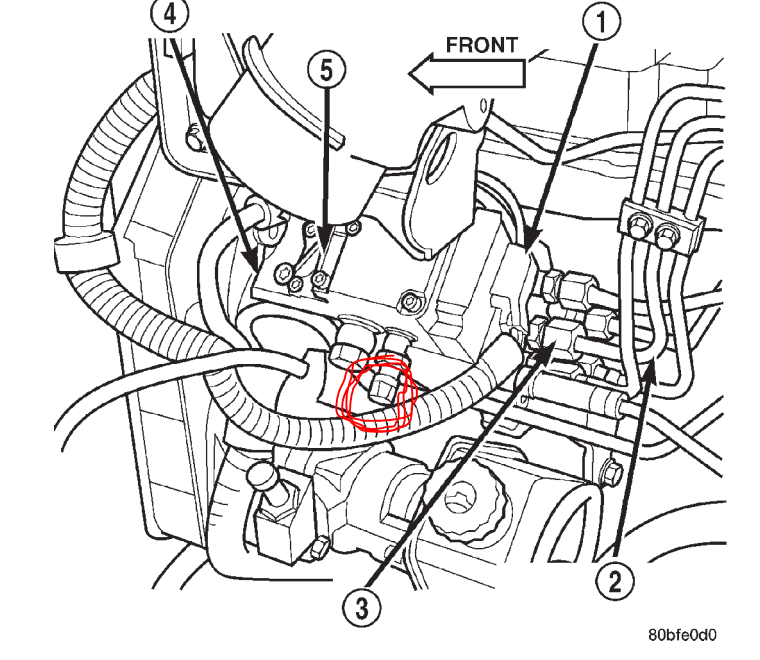
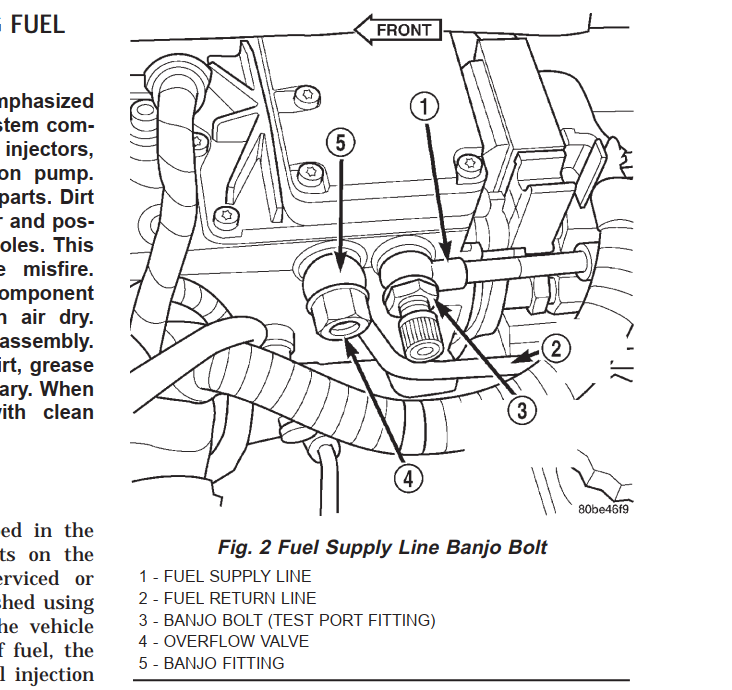
No gauges is no excuse. Unless someone has fubared it, there is a schrader valve on the lines from the factory. Test port here (between lift pump and inlet to fuel manager, circled in red) And a test port here (inlet to VP circled in red) I don't remember this exact size, but most of the standard GM pressure testers will screw right on. both of the zone stores "rent" fuel pressure test systems. I.E. you buy it, use it, and return it for a full refund. If you want to see it while driving, buy the pressure test system and extend the hose so the gauge comes out of the hood right near the wipers. Works great for testing. GL Hag

-
Ok, spent the last few days digging down to try and repair the deep water Horizon... (lifter gallery gasket) As I was taking off the the VP, whoever was there before did not reinstall the rear bracket. Does anyone have an extra one laying around? I will buy it if you do. Thanks! Hag
-
Somehow you are developing too much pressure. (or too much temperature) You may actually have a threaded adapter on the lift pump to fuel manager banjo bolt. (I know mine and my brothers 01 had them there) (if you don't add one or move the one from the VP there, it will help diagnose your problem) this would let you compare the pressure before and after the filter. This would help you diagnose the issue. I see you have an Aux tank, so you have something special for a lift pump system. I think somehow you are getting some high pressures. Another thought may be the fuel heater. Could it be heating without control and getting the fuel there too hot? This would weaken the strength of the fuel manager cap. GL Hag
-
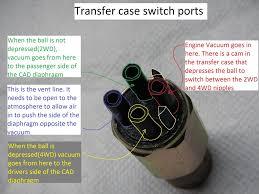
Zim, If your check valve is bad, loss of vacuum to the actuator would allow it to release. It is sort of spring loaded to "open" or go to 2 wd. (plus the loading will tend to spit it out also) To stay in 4wd, I have to lock my cable. To get out of 4wd, all i have to do is release the lock. Within a minute or two (couple stop and goes etc) the coupler will spit itself out of 4wd. So constant vacuum "on" or "off" is preferred. Hag
-
Steve, The ball on the end of the overflow is a plug. pushing it is like kicking the front tire. The fact that it started after would have nothing to do with that plug. Now is it saying that you grounding the VP did something? (I am sure you were leaning on the fender to reach in) You pushing on the VP did something? Did you disturb some wiring to reach it? Not certain. Don't stay focused on the plug in the overflow. Start looking at the other things that happen when you go to push this plug.... See if one of the other things you are doing while going to push this is what is helping it run. GL Hag
-
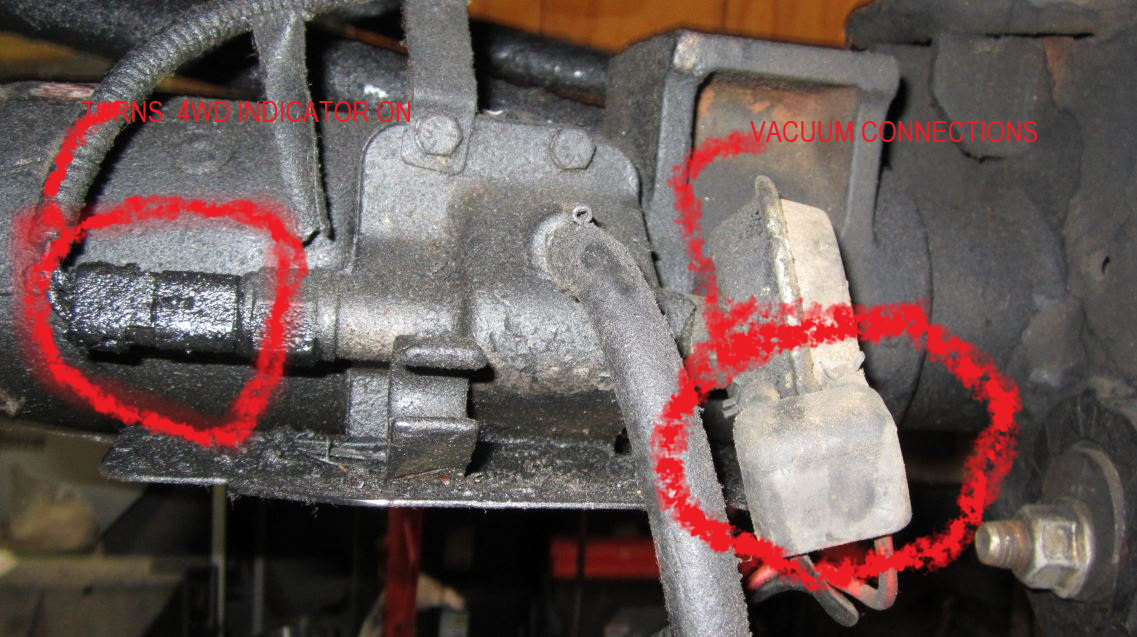
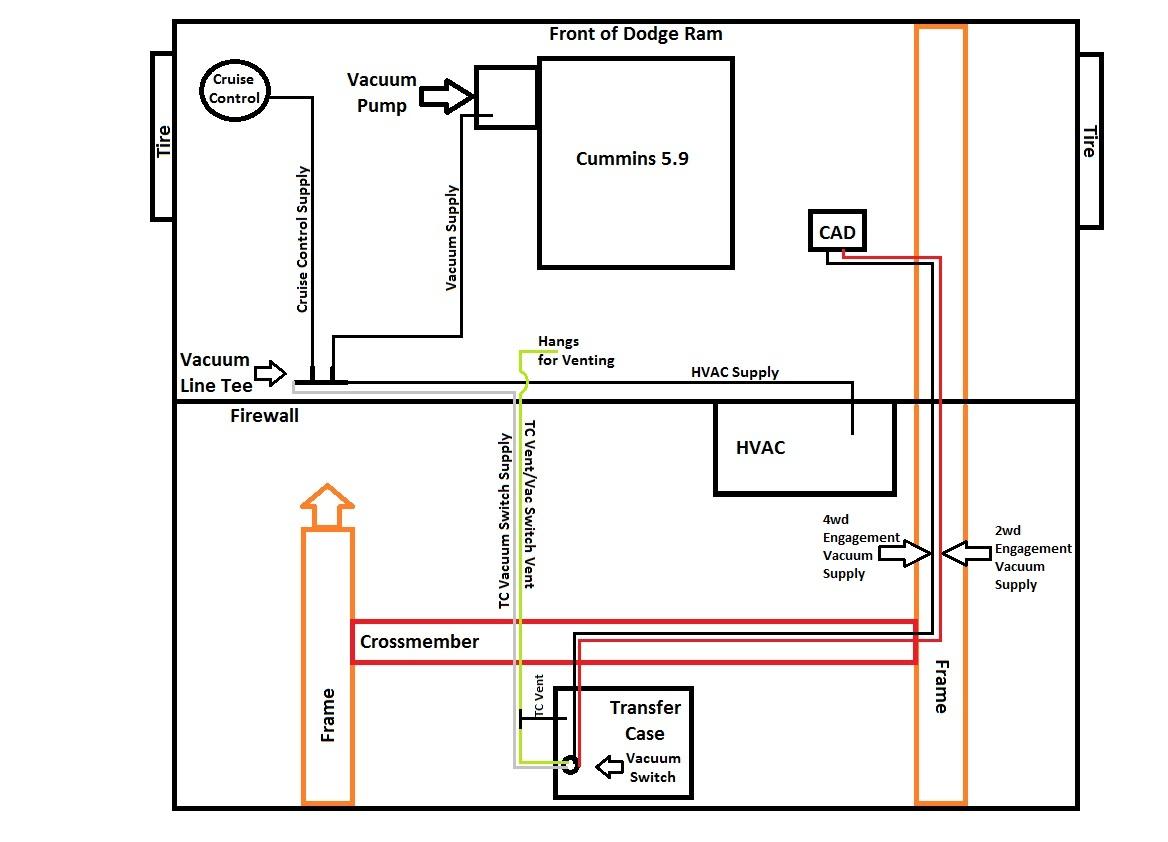
No, all of my lines go toward the back of the vehicle, not the front of the vehicle. the actuator tubes go to some metal lines. the metal lines run towards the TC. the metal lines turn back into tubing and attach to The transfer case switch. The transfer case switch is (IIRC) just above the TC linkage, I think it is oriented to the bottom of the truck. I control my cad mechanically. I love it. that gives me 2wd low. If you have a manual transmission and back big trailers either learn to slip the clutch or go low. I go low. HTH Hag
-
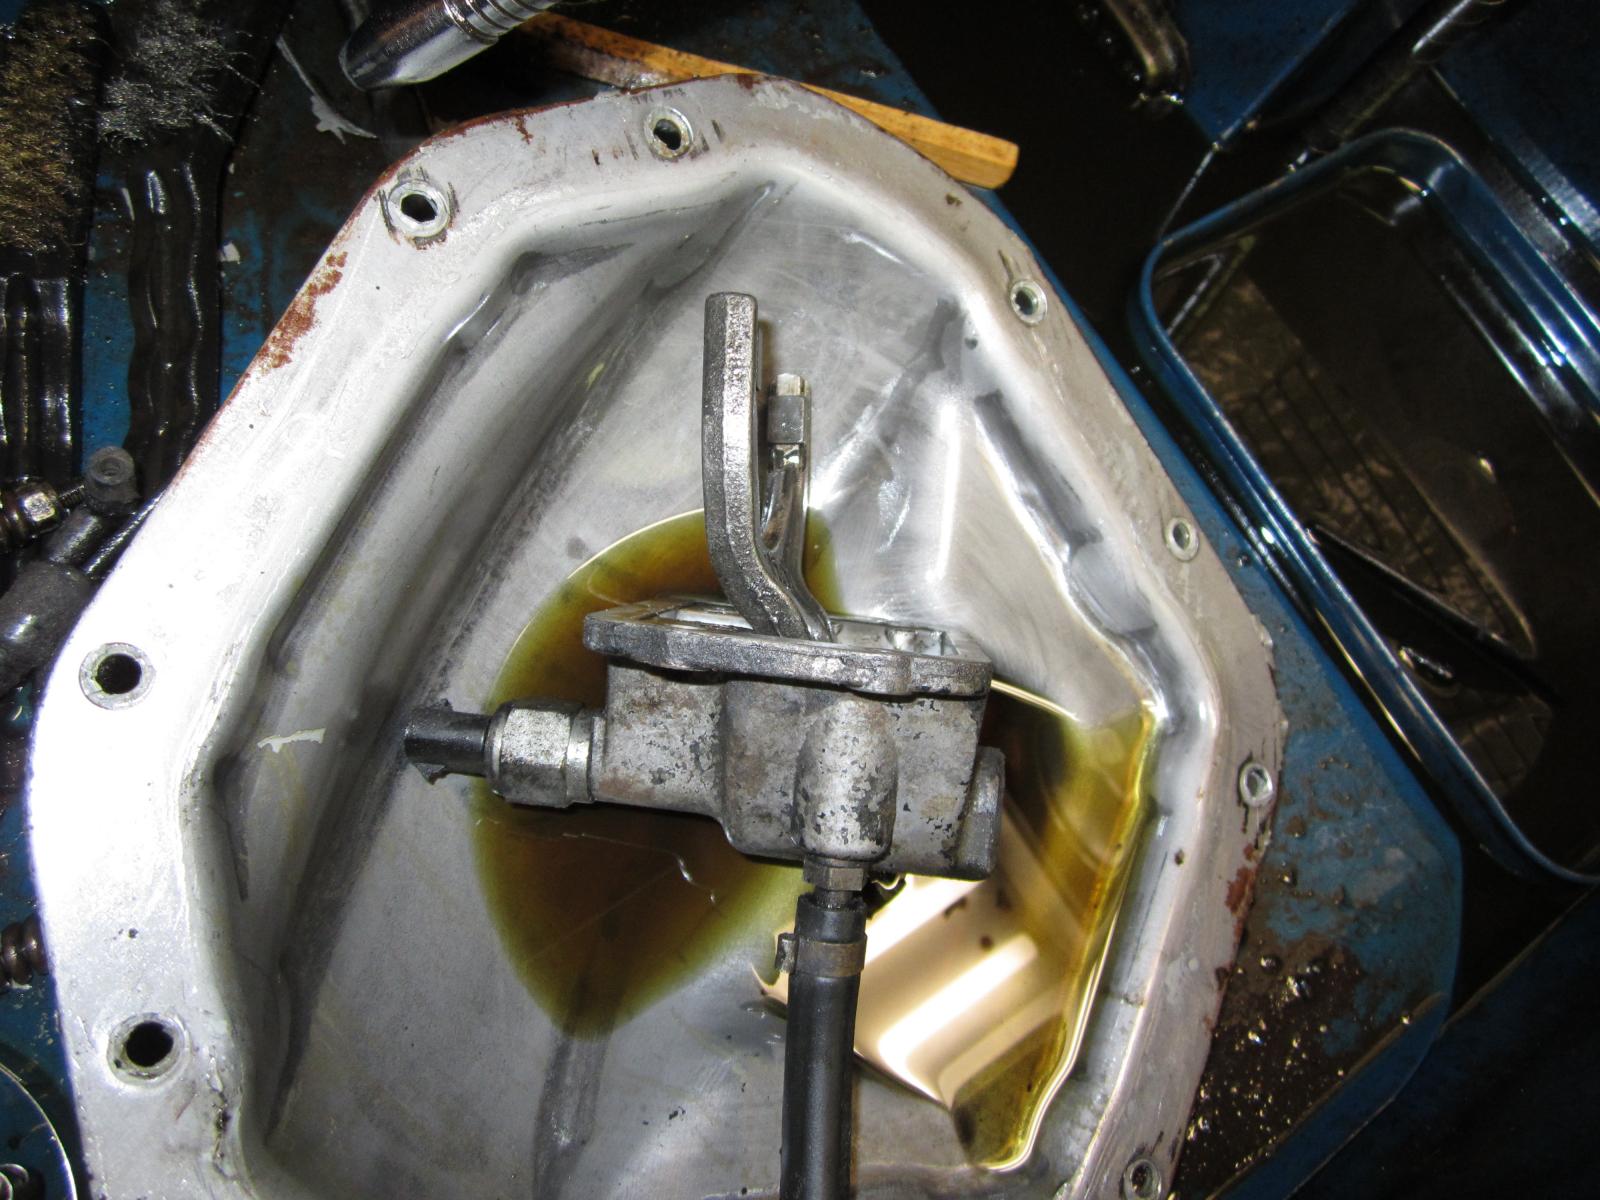
Here are a couple pictures. The second picture is where I have removed the actuator assembly from the axle (and removed the vacuum motor) the switch is still installed. Notice the shift forks that extend out. These forks need to go into the grooves on a sleeve coupling that slides from one axle half to the other depending on if you "want 4wd" or don't want it.
-
How are you pushing the "overflow valve ball"? The only way to touch the ball in the overflow valve shown, would be to remove it completely. The "ball" you may see in the end of it is just a plug. (it could be a screw or another type of plug) If pushing it makes a difference something is really weirdly wrong. If that valve being open drops your pressure enough that the engine stalls, you have other problems. Behind that valve is a VERY small hole the flow through which is much less that the injection pumps use of fuel during running. If you are losing pressure during running, this valve not working properly, I highly doubt is the problem. You are either experiencing a failing pump, you are sucking air into the pump, or your fuel filter (or in tank sock) cannot flow enough to maintain pressure. Speaking of that, where do you pick up your pressure? can you check pressure before the fuel filter? GL HTH Hag
-
It can be two different things. Power steering pressure is not high enough or Brake booster leaking by internally to return. Power steering pressure not high enough. the pump is driven by a coupling on the end of the vacuum pump. Sometimes this will fail. Did you look at it closely? This would show up really quickly with a pressure test. The other possibility is the new ps pump is bad or the pressure regulator on the PS pump is bad. The hydraulic fluid pressure goes to the brake booster then feeds the power steering. remove the return line from the PS pump reservoir that is from the brake booster. if there is more than just a little bit of flow there (and you are not using the brakes) your problem resides in the brake booster. (in a perfect world there should be no flow from brake booster until you press and release the brakes.) HTH Hag
-
DT, We all seem to have that feller. Not sure where it goes etc. But it has been loose on almost everyones vehicle. Some people put it to ground. HTH Hag
-
lol, can't wait for others with real solutions to chime in, but let me send you my lifter gallery cover gasket. If you stay moving pretty fast, it will coat everything from the bellhousing back. Including the front of the trailer. If you are stopped, it just puddles under the oil pan. you gotta stay moving. I am sort of a rolling superfund site though at the moment..... Hag
-
98, Look where the apps is. there should be a good way to mount a switch there especially since you don't have an AUTO. The TV cable area should be open.... We always mounted the nitrous and fuel solenoid switches at the carb. There was a lot more room than the throttle pedal area. (unless you needed to hide it. then you ran a TV cable on a manual and mounted the switch near the bell housing. most people would not think twice seeing a TV cable at the carb. even when it was a manual.) HTH Hag
-
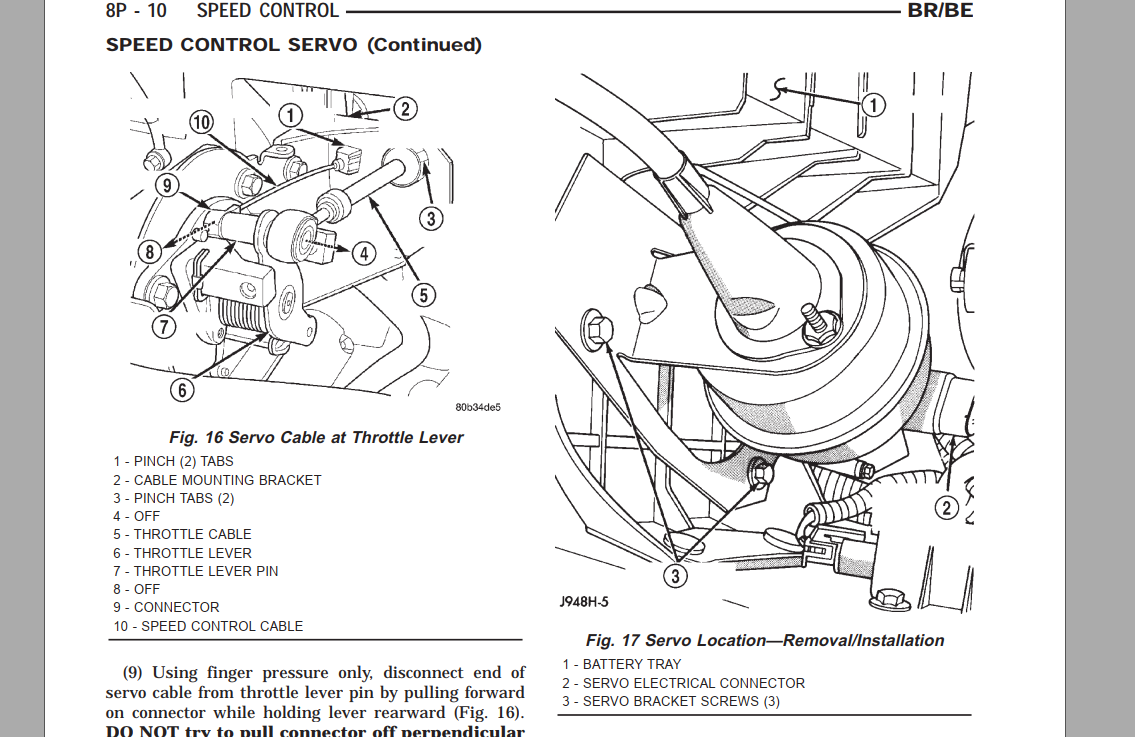
Evan, For an automatic, The vacuum goes to a servo (providing the force) a cable comes from the servo to the throttle linkage at the APPS.