Jump to content

Welcome To Mopar1973Man.Com LLC

We are privately owned, with access to a professional Diesel Mechanic, who can provide additional support for Dodge Ram Cummins Diesel vehicles. Many detailed information is FREE and available to read. However, in order to interact directly with our Diesel Mechanic, Michael, by phone, via zoom, or as the web-based option, Subscription Plans are offered that will enable these and other features.  Go to the Subscription Page and Select a desired plan. At any time you wish to cancel the Subscription, click Subscription Page, select the 'Cancel' button, and it will be canceled. For your convenience, all subscriptions are on auto-renewal.

Posted

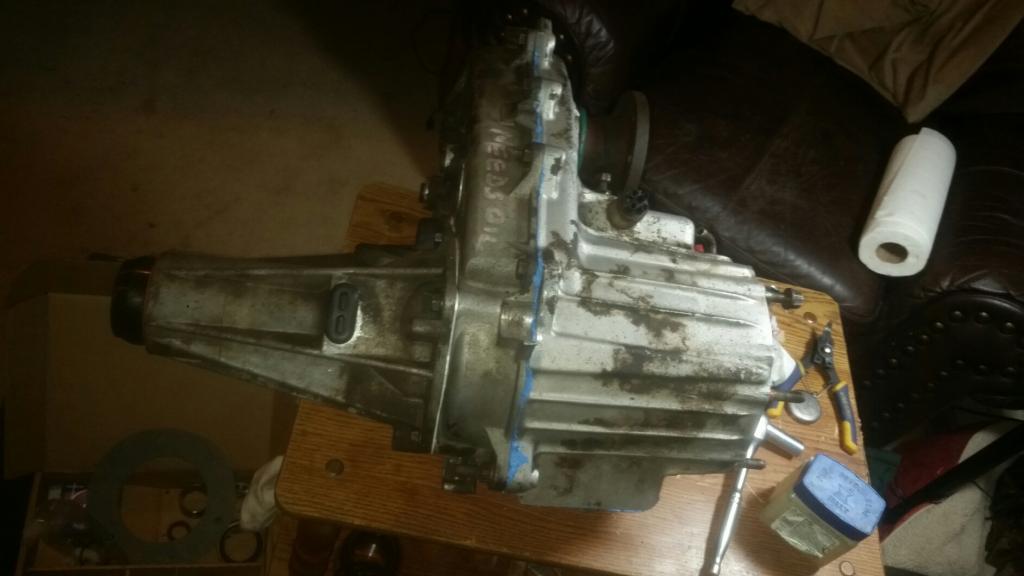
Well the time has come to tear into my NP241DHD,  I just bought an overhaul kit, ( seals and bearings only).  I will be dropping the transfer case at some point next week / weekend.  


Issues are I have a random grinding when I hit bumps, either in the CAD system or in the transfer case.  Pulling the stick back to 4x4 makes the noise go away, but I not longer have a working vacuum actuator either so I don't know if it CAD is to blame as I really doubt it is able to move the collar.  


I also have no ability to go into N or 4l in the transfer case.  It literally hits a wall trying to push from 2wd into N, so I am GUESSING that the shifter collar inside is FUBAR, but I won't know until I tear it apart.  


I am gonna go to the junkyard on friday and get a replacement CAD actuator and new vacuum lines as I can't even look at them without them busting / cracking.


Gonna take a bunch of pictures as I go.  

Also as a side note, I finally decided to figure out exactly what axle is under my truck.  It is a 610428-4  so a 3500 1994 front axle. nice to know rather than guessing.

  • Replies 70
  • Views 9k
  • Created
  • Last Reply

Top Posters In This Topic

Most Popular Posts

  • Big thanks to dynamic and his advice   The main shaft position is set by the rear main bearing in the transfer case.  

  • I honestly have no idea.     I do some cross checking on the parts.   Tyler and i should be a

  • Wild and Free
    Wild and Free

    A press is the best tool for changing the hanger bearing and Then spin balance it afterwards. Having worked at a shop with a driveline spin balancer it is amazing how little weight it takes to cause a

Posted Images

Featured Replies

  • Author

Yea I am gonna look into it.

A press is the best tool for changing the hanger bearing and Then spin balance it afterwards. Having worked at a shop with a driveline spin balancer it is amazing how little weight it takes to cause a vibration and by simply changing a u-joint or hanger bearing can totally throw off the balance of a driveline not to mention out of balance driveline is the main cause for u-joint and bearing failures to start with. Fix the cause along with the symptom and worn parts when dealing with drivelines.

Edited by Wild and Free

  • Owner
59 minutes ago, Wild and Free said:

A press is the best tool for changing the hanger bearing and Then spin balance it afterwards. Having worked at a shop with a driveline spin balancer it is amazing how little weight it takes to cause a vibration and by simply changing a u-joint or hanger bearing can totally throw off the balance of a driveline not to mention out of balance driveline is the main cause for u-joint and bearing failures to start with. Fix the cause along with the symptom and worn parts when dealing with drivelines.
Funny you happen to say that... I'm in the process of locating a local driveline shop to rebuild my rear drive shaft, new carrier bearing, and spin balance my drive shaft. I look at this way it been under the truck smacked by all kinds of debris for 258k miles and 14 years. Why not invest the money and have the shaft rebuilt right. Mine start acting goofy on the last trip towing the RV. Vibration and odd bucking. Come to find the carrier bearing rubber is shot. 

I have seen good driveline guys do a realignment / balance of a shaft and not even touch a weight just by hitting the tube with a bit of heat with a torch in specific spots to help pull one end a bit straighter at the weld area of the yoke to shaft area depending on what he sees in the balance and dial indicator checks.

Edited by Wild and Free

Mine is do too. I have a couple of drive line shops here at home. Just have to find the time to get it off and let them have it and the front one. They all  have 14 years and  365k on them. Hope I can find as good of parts that came with it.

  • Author

Well it appears that my issue was due to a spring that was caught in the roaster comb in the transfercase.


20160223_195751.jpg.9ef27e69cb799b789b1920160223_202909_resized.jpg.cb42a03fb4d5


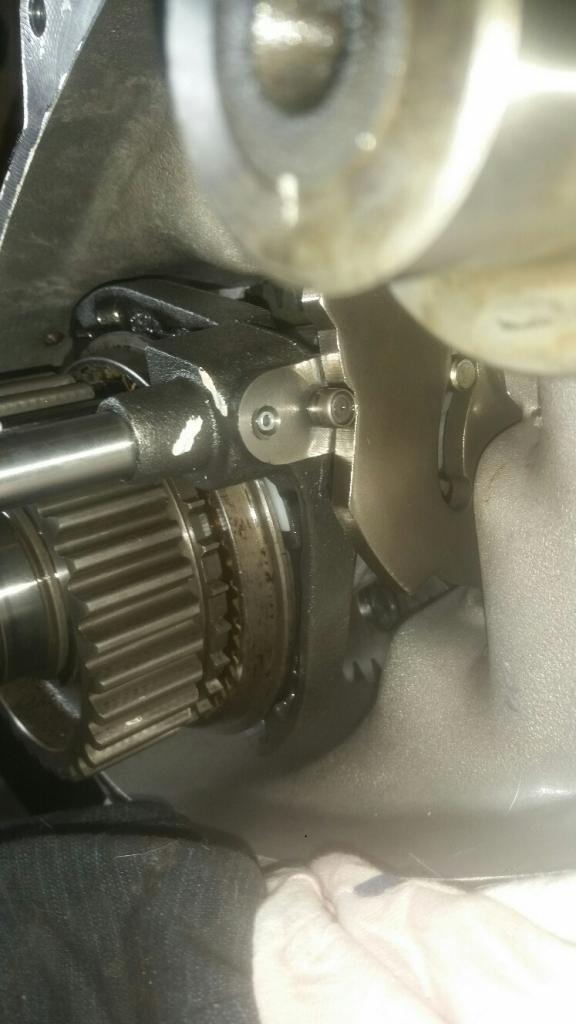
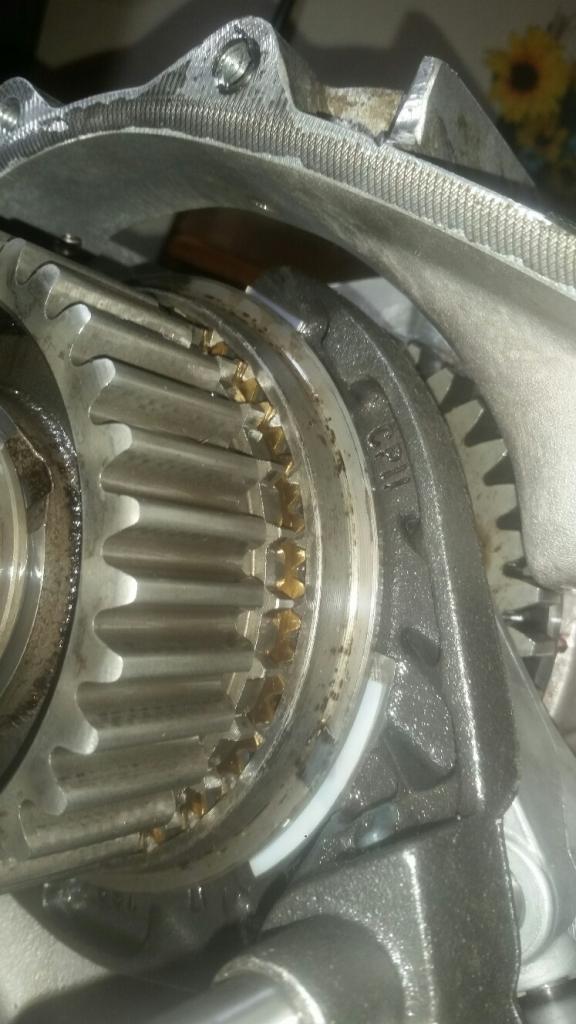
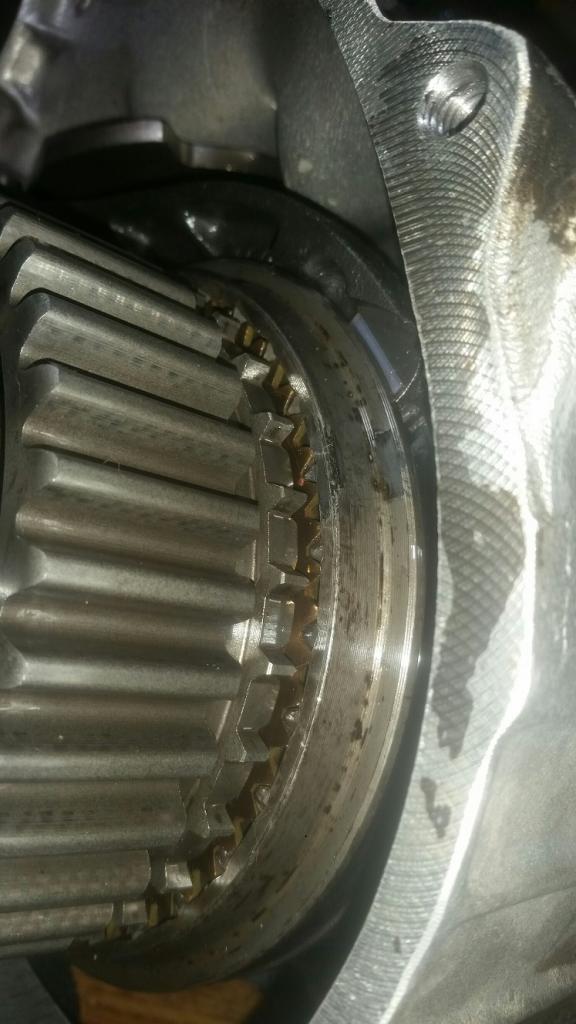
I found the noise I was having.  It appears that the 2wd --> 4wd collar is not backing off the main shaft fully.  There is a VERY slight overlap of the collar.  


I have no idea what is causing it..... If I was to shim the main shaft slight the issue would be resolved, but there was no shim to start, so why should I need one now.

So the collar physically won't push far enough to disengage? Only way that could happen is if the two shaft surfaces have worn each other down.

It's been a while since I've had one apart, where did that spring come from?  

  • Author

It's the spring that holds the shift position.


Tyler the collar can't move back far enough to fully disengage 4wd.  If I move the main shaft forward by 1/16 it does.  I need to figure out of there is a shim or something.  Nothing is worn that I can see.

Never seen a shim in the two I've had open. When you say forward... you mean push the shaft indo the carrier correct? Could it be because the axle was from a 3500? Not sure what the differences are.

If you don't want to mess with shims you could always take a bit of material off the face of the collar.

  • Author

Pull it out of the carrier.  As far as I can tell there is no way anything outside the t case could do what I need.  Thought about the collar but that is kinda like using a noise filter to solve lockup issues.


I will take a picture.


Pictures would help... I guess I'm forgetting which way it slides to lock and unlock.

  • Author

2wd is the collar slid to the front of the truck 4wd is collar slid back.  


I forgot I tore it down last night so no picture until I get it back together.   


Here is another picture though  The spacing between the brass teeth and 4wd chain section doesn't seem to be enough.  The collar seems to come to rest on the 4wd section, or close enough that it grinds.

PB111557.jpg


https://mopar1973man.com/external-media/pdf/2000Ramparts.pdf#view=FitB&page=555


I need to take the main shaft apart and see if something between the cogs/ gears is beat up.  


Edit:


This may be my issue.  I didn't place the outer gear so the teeth where pushing down on the brass looking pad circled.


Capture.PNG

:doh: My bad I thought we were talking CAD not Tcase.

SOOOO is it fitting like it's supposed to now? Funny how these look exactly like the transmission syncros.

  • Author

not my pictures, I will have to see if that makes a difference.  I kinda doubt it will as the issue started happening a few months ago, so I can only assume something wore out causing the main shaft to slide back a little more and thus my grinding happens.

Did you feel if the thrust was loose before you tore it apart? Did your kit come with some shims?

  • Author

...phsh you think I checked something before I tore into it :whistle:  


No shims or anything.  I am looking through the parts blow out now and I don't see much in terms of shims.  There are some in the planetary set, but the old ones don't look worn at all.....

  • Author

Alright here are some pictures.  both are the collar in 2wd position, you can see in picture 1 that there is an overhang and the slight damage to the teeth. 

20160224_181912_resized.jpg.76814d3d19d9

2nd is what I would think it should be like

20160224_181811_resized.jpg.b50abbfa36c8

Edited by Me78569

  • Author

Doesn't matter,

the roaster comb controls how much throw is in the collar.

20160224_192933_resized.jpg.251a0431af70


 I think I have it figured out.  Not sure if I am doing it right, but you can set the main shaft depth by part #7 on page 556

https://mopar1973man.com/external-media/pdf/2000Ramparts.pdf#view=FitB&page=556

20160224_192637_resized.jpg.f93efe925b6e

The main shaft bottoms out on it.


How my shaft sits now

20160224_192304_resized.jpg.985b6e41a9e6


I dunno if you are supposed to set it there, but that's the only place I could find.

Edited by Me78569

Did This Forum Post Help You?

Show the author some love by liking their post!

Welcome To Mopar1973Man.Com LLC

We are privately owned, with access to a professional Diesel Mechanic, who can provide additional support for Dodge Ram Cummins Diesel vehicles. Many detailed information is FREE and available to read. However, in order to interact directly with our Diesel Mechanic, Michael, by phone, via zoom, or as the web-based option, Subscription Plans are offered that will enable these and other features.  Go to the Subscription Page and Select a desired plan. At any time you wish to cancel the Subscription, click Subscription Page, select the 'Cancel' button, and it will be canceled. For your convenience, all subscriptions are on auto-renewal.