

Leaderboard
-
Dieselfuture
Yearly Subscription2Points5,783Posts -

Royal Squire
Yearly Subscription2Points901Posts -
dripley
Retired Staff1Points11,788Posts


Popular Content
Showing content with the highest reputation on 10/03/2017 in all areas
-
This will show the progress in installing the Holset he351ve into my 2nd gen Cummins Second Gen Cummins should be considered 94-02 but there may be some difference depending on year. I will update as I go along. This is not dealing with the controller needed for the he351ve. The thread that covers the controller can be found here The Holset He351 ve vgt turbo was found on the Cummins 6.7 L trucks on late 3rd and 4th gen dodge trucks. It is a very tough turbo and was selected for use due to the ability to improve low throttle boost and the built in Exhaust brake. It should be good for near enough to 500 hp not to matter. Parts - HX40 style Downpipe click to go to vulcan for the part ($125) - t3 to wgmt flange adapter to mate the he351ve to the t3 exhaust manifold. ($150) - 2x he351ve turbo exhaust gaskets ($10) - 1x hx35 exhaust gasket ($5) - 4 Ft of 5/8' coolant hose for your local parts store ($10) - 5/8" oil rated hose 2' worth ($5) - 10 x 5/8" pipe clamps. - T3 oil drain ( ebay, if I was to do it again I would have gotten one with a bend in it to help with the oil drain. - 2 x 5/8" T fitting ($5) Local Parts Store I - HE351Ve turbo ( $300-$600) depending on where you get it. I would suggest CumminsForum or here of course if one is for sale. - You will need some way of attaching the hotside intercooler tubes/boots to the turbo since the output from the Turbo faces forward rather than down like the 2nd gen turbos. went with the charge tube from Stainlessdiesel.com HERE ($85) - You will need a 2.75" to 3" silicon boot reducer and clamps for this to work. There are also reports that a 45* reducing elbow will work also. unsure on that but you can try. I got min efrom www.siliconintakes.com First Specs on the Turbos LEFT Holset HX35 56/60/12 60ish lb/min vs RIGHT Holset HE351ve 60/68/3-25 69ish lb/min The Install Start pulling the old turbo off Use PB blaster or similar on the flange bolts for a few days prior to removal. Double nut the two bottom studs and remove them. Take your time use PB Blaster or similar. Bolt the adapter flange to the manifold. The short bolts go in the bottom and the long bolts with the nuts attach the top holes of the flange. You will need to use the hx35 exhaust gasket between the manifold and the first section of the Adapter plate. Next if your truck is like mine (auto) there is a hard coolant line just behind the exhaust manifold that will block the rear most bolt on the adapter flange from being used. you can see the bolt hole in question. Use the 5/8" coolant hose and a 5/8" T fitting to remove the hardline and replace it with the coolant hose. You will need to run this to just in front of the oil filter and also to the output of the coolant line from the HE351ve. Next you need to remove the old downpipe if you don't already have an HX40 style installed. this is a PITA to say the least. I had to cut mine out. The hx40 style downpipe flange will attach to the back of the he351ve without the elbow. Next it is time to pull apart the turbo into it's 3 sections. The turbo weights a lot so it is much easier to install it one section at a time. There are 2vband clamps that hold it together, one fo the compressor housing and one for the exhaust housing. Once the turbo is apart attach the other half of the flange adapter to the exhaust housing of the turbo. You will need to install one of the he351ve gaskets between the flange and the turbo. Use the long bolt for the through hole on the exhaust housing. I also had to cut one of the bolts to make it fit better. Without cutting the bolt I couldn't clock the center as nicely as I wanted. Ensure you remote the alignment dowels out of the compressor cover and exhaust housing. This will allow you to clock the turbo as you need. Once you have the flange tightly bolts to the turbo you can install the exhaust housing. ENSURE you put the last he351ve turbo gasket between the 2 sections of the adapter flange. It is somewhat hard to center it, but not impossible. Tighten down the 4 Allen head bolts supplied with the kit to hold the flanges together. You will need to tighten them very tight. In order to allow for a more vertical position of the center section I cut off the top of the strut nut. This will allow you to clock the center section of the turbo to within the 30* off vertical for the oil drain spec'd by holset. Next you need to install the Center section of the turbo. I would practice this beforehand on a bench to get the feel for it Take your time doing this as the fins on the vgt section must slide into the exhaust housing in their slots. This can be tricky, I found it best to extend the vgt all the way out and then try and sldie it in gently by rotating slightly. Here you can see the Center Section installed. Notice the clocking of the center section. You will need to loosed the oil supply line and rearrange it to make it bend nicely. Follow the hard oil drain tube down the the rubber joiner and remove the clamp holding the hard tube on. You will slip your PFE hose into the joiner and tighten it. This hose is not under pressure so you just need to ensure it is a good fit. Run your pfe hose to the oil drain on the turbo, using a hose clamp to hold it on. You can see in this picture that I just reused the OEM banjo bolts for the coolant connections. I used a hack saw to cut the braided section off so it was just a solid metal banjo bolt. I then just pushed the 5/8" coolant line over and used a hose clamp. I will do an fittings at some point, but for now this will work. Then install the Compressor cover onto the turbo. Be careful not to damage the compressor fins. Once the housing is on tighten the vband clamps tight enough to hold the housing, but not too tight as to keep you from rotating the housing. Use the preferred method of connecting the charge pipe, I choose the stainless diesel pipe and a 2.75" to 3" reducer then reused the oem 3" to 3.5" elbow at the inter cooler. Align all boots and tighten down the clamps. Once everything is lined up tighten the vband clamp so that the compressor housing can't move. Note the position of the passenger side neg battery cable to the engine block. I might have to redo this with a new longer cable, I have been meaning to anyways, but I haven't gotten to it. Hard to see in the picture but run the other coolant line into the bottom of the turbo and T into the other heater core line. Ensure you leave some space between the exhaust manifold and the coolant hose. You might use zip ties or something similar to hold the hoses together. Then install the air filter and you should be good to go. Check for any coolant or oil leaks. there you go the holset he351ve has been installed into your 2nd gen Cummins. Some Videos Exhaust brake apply at 55 in 3rd with TC locked. Turbo builds 50ish psi of backpressure quickly. http://www.youtube.com/watch?v=qyvpx-p6e5U Here you can see smoke output from standstill at %50 throttle. You can see it clears up nicely http://www.youtube.com/watch?v=Kx681iLXSvw Sea Level smoke at %100 throttle http://www.youtube.com/watch?v=Rc2NSMaPYCc http://www.youtube.com/watch?v=3m3sPPji2gs1 point
-
This is what I woke up to yesterday. Was 22 degrees this morning. I'm not ready either
 1 point
 -
I've got the Jacobs Brake from Dodge bolted to the back of my HX35/40 turbo (3" inch outlet) with 4" exhaust now. With my current tune on the Quadzilla I've got a hard time exceeding 1,200*F EGT's even towing. Tunning is more important than exhaust size. I'm towing 8,000 pound RV with +75HP (7x0.0085) Injectors from DAP.1 point
-
I have a BD that bolts to turbo with 5 bolts, it comes with a flange that replaces stock one. It is a 3" and not sure if there are any that come as 4" only inline ones are bigger. That's why I had a turbo built out of hx35 to be 62/67/12 not as good on spooling as hx35 but moves more air at same psi and I got to keep my exhaust brake. I'm pretty happy with it. If you're planning on bigger exhaust and different turbos in future maybe worth going with inline set up. I do have a 5" exhaust, comes out of turbo as 3" and right of way changes to 4" for down pipe and then to5. I do think that @Me78569 has a great set up that I looked into but decided to go the way I did. If you want good spool up I would say check it out1 point
-
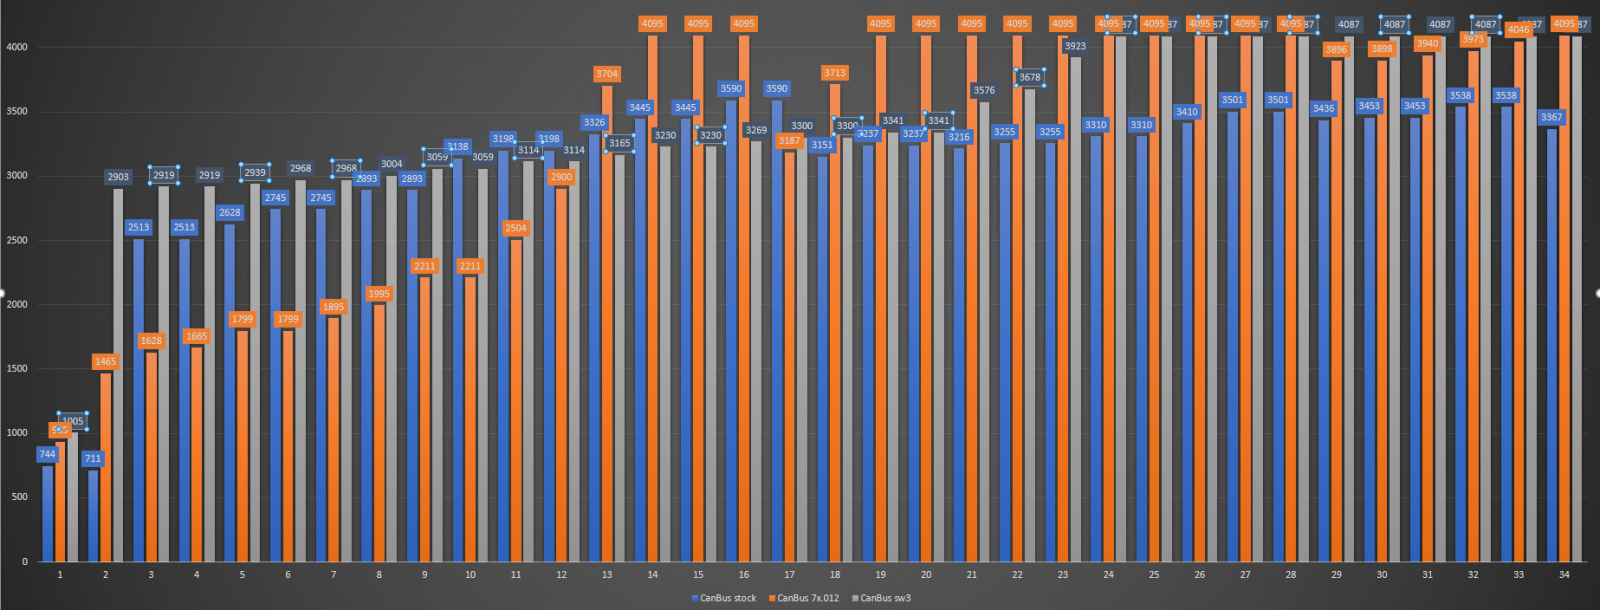
@pepsi71ocean Heres an example of these 7 x .012's on stock tuning Snap input and lug down tests.1 point
-
Too much power / torque down low when towing breaks things. Head gasket, trans, etc. With that in mind, I think @Me78569 has a great setup.1 point
-
HE351VE here, built in EB. It is very hard to find a better turbo for sub 450 hp when towing. You can find them all day long for $500, few hundred bucks for a controller from lilbb.com or make your own with my code and off to the races you go.1 point
-
jlbayes, Thanks for the reply. Truck has codes: P1698 and P0216, but the P0216 is only shown after the P1698 is triggered. P1698 is not present during periods of nirvana. My history with electronics on this truck: I replaced battery cable to starter (it had a broken battery clamp) and I had nirvana for a couple of months; I thought I was a hero - ha. Then I discovered that I can remove the instrument cluster (clean or not clean connectors) and the codes will be reset and things work for a bit. Local shop that does the alignment for my Miata, said that they'd look at it and they replaced one of the connectors between dash and cluster and it worked for a week or two. I had the original cluster rebuilt (United Radio) and things were good for a day or two. Local diesel experts said the original PCM was noisy on their scope. They swapped in another from a truck they had and it worked (for a test in shop). Had PCM rebuilt. Rebuilt PCM worked for a day, maybe two. Experts said it must have been a bad rebuild, found a new PCM and it worked for a week. Experts said everything looks good on their scope as the signals go to cluster (I expect from a location under hood) and they recommended another cluster. I found a used cluster and swapped it in, yep, it worked for a couple of days... Experts tightened the 6mm bolt and it worked for 3-4 days. I decided to explore this connection, had questions and filed original post. I suspected that the block was designed such that it could not be overtightened. Is the goal to tighten the screw as much as it will allow? Or is the goal to simply screw it all the way in such that it is loose-ish, but fully seated? If the goal is to have this bolt as tight as possible, mine loosens with a few miles or few hundred miles, I can try to fix that with blue locktite. If it is supposed to be tight, I'll also claim it's a lousy design. I haven't replaced ECM or wiring harness...1 point
-
You are comparing different injector sizes. the 7 x .009's have a starting point of %15 below OEM fueling commands, the 7 x .012's start at %35 less than OEM duration. Timing curves are the exact same in the videos @pepsi71ocean I have never noticed a big difference in smoke as a result of small timing changes. The smoke contorl you are seeing is %100 the fine tuning of the canbus fueling command and the better atomization due to pop pressure. I am cutting OEM fueling by ~%35 offidle. You can see the fueling graph below. All Snap throttle input to %100 TPS from idle. Orange is my Quadzilla tune, Blue is OEM and gray is SW3 on a smarty. If I was to run on oem tuning it would be a smoke show, same as sw3. No amount of Revo settings would help.
 1 point
 -
1 pointWell in my case ever since I put on 62/67/12 HX35 hybrid, I can't seem to be able to go passed 35 psi and that is almost with all the fuel I can toss at it without exessive smoke, yes I could possibly still have a boost leak I only check for leaks at 25psi so I will double check at 35 if my home made contraption doesn't blow appart. But long story short when I did change scale from 40 to 35 boost went up to 37, guessing that little bit more fuel helped. I'm only running 75hp injectors so I think that's my limitation at this point, sometimes in future I'll get 100 or 150hp. But I'm pretty happy with what I got as it is, when that wire tap kicks in it feels like nitrous on my mustang I used to have. And got it tuned in decent too not much smoke at all, I still use go pedal for most of that control though. But even if I floor it off the line it clears up pretty quick. Little update, found that my boots were leaking some boost right through the rubber. Put new boots on now I can hit 42psi on mechanical gauge and quad reporting 50psi. So I now put boost scaling back to 40.1 point
-
Yep very similar to a boost fooler. The HE351ve is a GREAT turbo so long as you don't push it too hard. That's the issue with 6.7 guys, they expect it to take too much. You could write in a DP control routine, but I have found that if you keep the turbo under 450 hp the turbo is happy and DP is nearly 1:1 up top. That's the beauty of the shaft speed controlled system, when you start seeing shaft speeds of 120,000 rpm the vanes open to keep shaft speeds in check AND keep the turbo in it's map.1 point
-
I'm one of the rare ones. Still got factory OEM tie rods yet and they are still tight. Only replaced one set of ball joints and one track bar. 316k miles and still going... In another thread I'm going to get ready to do a steering box reseal soon. Other than that its still tight like factory.1 point


This leaderboard is set to Boise/GMT-06:00