ISX
Unpaid Member
-
Joined
-
Last visited
Everything posted by ISX
-
I knew about how the edge worked and that wire after you told me. I just never could figure out why you had to stack things that adjusted the same variables. So it goes out of the ECM's limits then you get the box and fuel it from there. Now it all makes sense. Is there a benefit to stacking rather than just getting a good box (like that 150HP one maybe)?And what is a "chip" supposed to technically be?
-
I searched around and found some tidbits. One of them said something there are 3 things; programmers, chips, and fueling/timing boxes. So here is what I have been able to put together: Programmer Changes ECM values for more timing/fuel (is that all it changes?) Fueling/Timing Boxes Messes with VP44 fueling and timing Chip What I don't get is why you can't do JUST a programmer OR a fueling/timing box if they do the same thing but at different locations. Do both locations have thresholds so you can only go so far with the ECM and after that you have to go with a fuel/time box to go any further? I don't see why you can't just set the programmer even higher. The carpet is my fuel plate
-
How does stacking even work? I know you get another chip and put it on the other and somehow it gives it more fuel but how?
-
I think mine would be the same as an 01 since I have dana 80 and 2wd nv4500.. The back one is 33" from yoke weld to yoke weld, and the front is 37" from weld to weld. Here is stuff on splines: Dodge 4WD Heavy-Duty NV4500 (1993-98) This transmission is normally used up to the Cummins Diesel. This transmission is best suited for Dodge 4WD Getrag 5 speed replacements and Toyota Land Cruisers retaining the stock six cylinder engine. We DO NOT advise using this transmission for other applications because you will be required to change the Heavy-Duty front input and rear output shafts of this transmission. Identification of this transmission can be obtained by using the identification charts on this site or in an Advance Adapters manual. Due to the interchangeability of other New Venture components, we also recommend that you verify the following information. Starting at the front, this Dodge transmission should have an input shaft pilot tip diameter of .750”. The spline of the input is 1-1/4” diameter 10 spline and protrudes approximately 7-1/2” from the face of the transmission. This input shaft can be interchanged with other New Venture input shafts with this 5.61 1st gear ratio. The front bearing retainer index is 5.60”, and has a snout diameter of 1.75” for the release bearing. Most bellhousing adapters for this transmission will require some machining. The shifter stud on the top cover is a male square connection. The rear of this transmission has an aluminum adapter housing which measures 6-1/4” long, and the output shaft is 29 spline. Dodge 4WD Heavy-Duty NV4500 (1999 & Newer) These transmissions are identical to the 1993-98 Dodge HD transmission, with the exception of the transmission shift stud. Dodge changed the square style shift handle receiver to a metric 14mm threaded stud. Dodge 2WD Heavy-Duty NV4500 (1993-98) These transmissions have the same front bolt pattern and bearing retainer index as the Dodge 4WD Heavy-Duty NV4500 transmission. This transmission should only be used for the Cummins Diesel Getrag replacement. Identification of this transmission can be obtained by using the identification charts on this site or in an Advance Adapters manual. The tailhousing of this transmission is 13” long and uses a slip yoke with 31 splines. If you obtain a 1998 Heavy-Duty transmission, you will be required to change the tailhousing on output shaft to components from an earlier Heavy-Duty Dodge 2WD if you wish to have a working speedometer. Dodge 2WD Heavy-Duty NV4500 (1999 & Newer) These transmissions are identical to the 1993-98 Dodge HD transmission with the exception of the transmission shift stud. Dodge changed the square style shift handle receiver to a metric 14mm threaded stud. On these Heavy-Duty 2WD transmissions, New Venture moved the speedometer pickup from the tailhousing back to the rear axle. If you obtain one of these Heavy-Duty transmissions, you will be required to change the tailhousing back to the rear axle. If you obtain one of these Heavy-Duty transmissions, you will be required to change the tailhousing and output shaft to components from an earlier Heavy-Duty Dodge 2WD if you wish to have a working speedometer. All that was found here http://www.nv4500.com/newsdesk_info.php/newsPath/12/newsdesk_id/32
-
Have to leave that part to John since he took it back home Hmm, I just found this which might be better than anything John can get since the wastegate is down on the bottom engine side of the turbo.
-
He said that 20 min after the thing runs, it hits the max temp. After running around in an 01, it remains at that max temp for hours. I don't know what temperature limit he will set for that thing but if the engine block is not below that temp, it will just heat the VP right back up. He hasn't gave any details as to how it will run or when it will run. All he said was the 20 min thing. Mike also proved that there is no return flow through the VP if the engine is off, chip supposedly has an answer for this though. He needs to hurry up and get more details out there because as it is, I am in more doubt than anything else.
-
Its the same as this only with 2 hooks on the ends, rather than one hook and one fisheye thing.
-
His EGT's were a lot lower. Boost has a big effect on that. Clamping off the wastegate also helps since you don't have to outflow it to get more than 20psi. His is nice because the chip will defuel at 30psi or something, so you kinda still have a virtual wastegate.
-
:stuned:Annnywhoo lmaoI got a video of that thing when it was on the very brink of stalling. If the trans was any colder, it would have stalled. EGT's go from like 280F to 430F by just putting it in D.
-
How far did the RPM drop this time anyways? I think the most it would drop and not stall was down to 500rpm, if it went any lower it would die. If you didn't need a supervisor to hold your hand, I could have got it done in 5 min I didn't realize the injector lines were that much of a PITA, compared to mine anyways. Good thing I wasn't the one messing with all the line clamps and clamp bolts
-
Thats a lot of the reason I am staying away from that new stuff. The 12V's and VP44 trucks will pass a lot of little crap through the injectors. How often do you ever hear of them getting clogged up? The new stuff has to have some good filtering to make sure they don't clog up, which the filtering is usually lacking. If you had a really good filter on it, I think it would be fine. I don't think AH64 or Dorkweed have ever had any issues as far as I know.
-
The big white thing that goes into the tank and has all the connections (whatever you call that contraption) has some vent things on mine. It has to vent or it wouldn't be able to handle temperature changes. I've never had any pressure at all on mine. Maybe your vent has mud in it.. That area seems to collect all the dust and mud from every road you drive on.
-
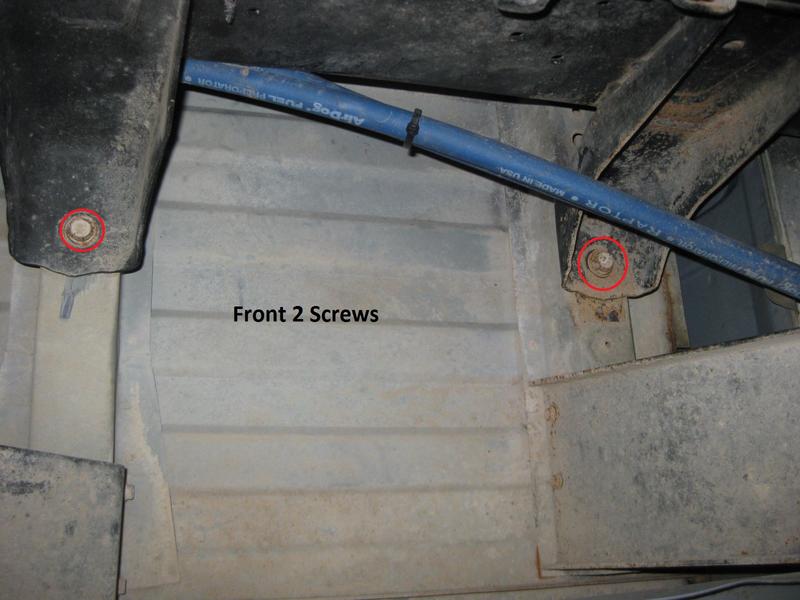
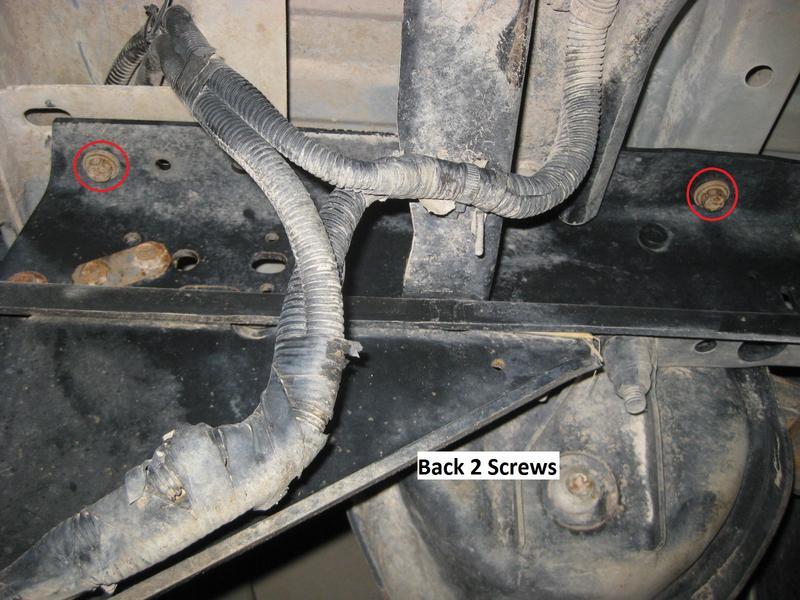
They are just about 1.5" long screws, no nuts. They are very easy to get to with a long extension. They should all be 15mm.Those pictures are of one side, the other side of the truck has the same bolts. The back bolts are on the inside of the frame and the front bolts are on the outside.

-
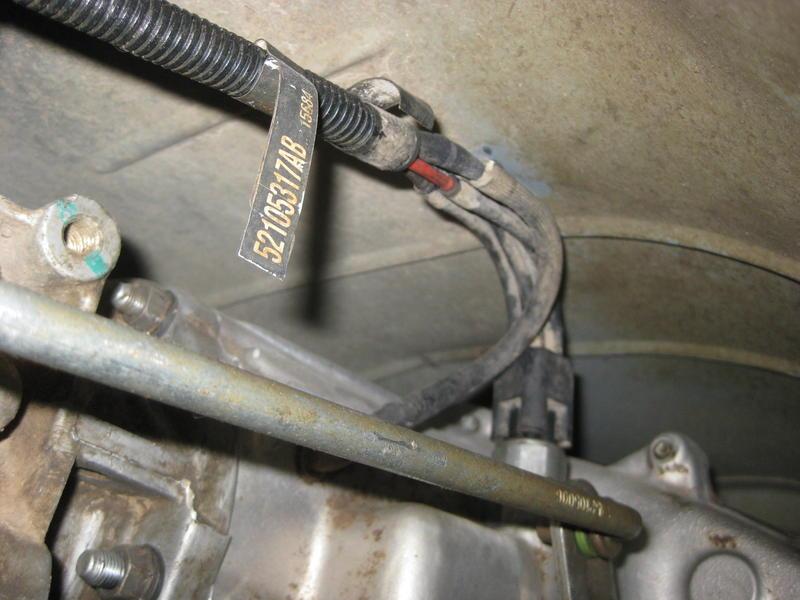
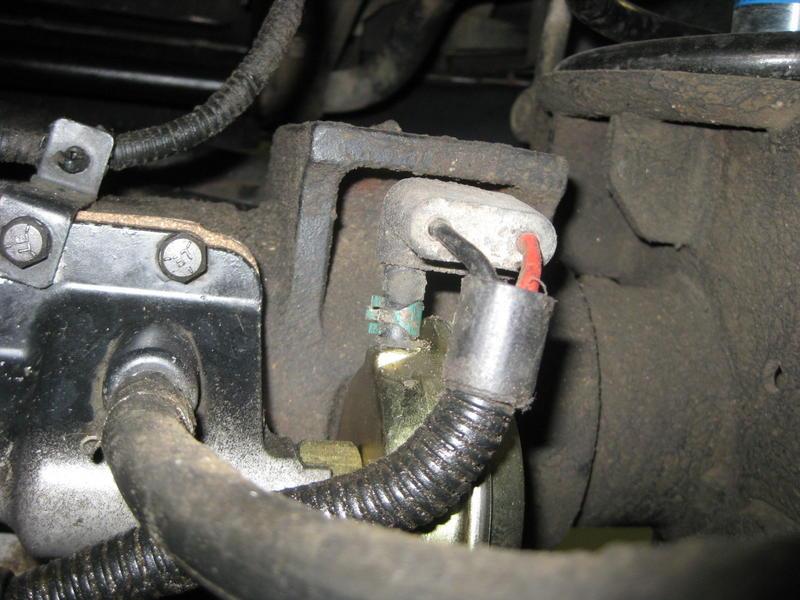
The green one should run straight down to the switch on top of the transfer case, along with 3 other lines. Two of the lines (red/black) run to the CAD unit. I assume the green one T's into 2. These are pics of an 01' so it might be different.
-
Well that's why I don't see why they don't just buy a 12V and stick it in. There is a 215HP on craigslist here for $2200 right now that includes everything...Now putting a 24V head on a 12V would be different. I think you could do it under 1000, which is 10x more than I want to spend Especially when the only reason I want it is for idle EGT
-
deja vu What I found from searching around is the 24V pistons have the bowl centered because the injectors are also centered. 12V injectors are off the side so the bowl is also off to the side. So you would need the 24V pistons. The injection lines also need to be changed since mine go straight to the top of the injector, and they would have to go to the connector tubes instead. They make kits for all this though thanks to the 24V people swapping in p-pumps. I think I read that the head bolts are different lengths on a 24V head, so you would have to make sure to get the 24V bolts. That's about it. Simple but not exactly my kind of cheap.
-
He has an 01 so I take it he has the 01.5 with all disc brakes. I need all new caps anyways. Those wheels look so awesome though. You got a pic of your truck?How do they even fit when I thought they went to metric sizes or something in 2003?
-
Look what I woke up to! Probably means it's summer in Alaska Welcome to the site!

-
You would be relying on the FASS to build up enough pressure to do anything. It might run, but I don't think it would run well. The pressure forces fuel into everything and the overflow allows the pump to build pressure. Just as an example, my p-pump basically works by changing the amount of time the fuel has to go into the plungers, thats basically what pushing down on the pedal does. Now when I had my old overflow, I could not get any black smoke, nothing. The pressure topped out around 22psi. It didn't go up or down, so the flow was there. The hole going into the plunger is only so big, so if it were designed to run on 22psi, it would have used a bigger hole. But it needs the pressure to force the fuel into the plunger, so when I got a new overflow and got back to 45psi, I now get smoke and everything is back to normal. I know the VP has an internal vane pump but I think you need pressure too in order to force the right amount into everything.
-
I would just take everything off that you are wondering about and go to lowes or something and see what screws onto the threads, then you will know what they are.
-
I'm thinking it could be done in about 6-8 hours each way. There really isn't that much to it. [*]Take off radiator, intercooler, all that front end stuff [*]Take off fan, belts [*]take off compressor for a/c, if you left it charge, then you leave all the a/c stuff on the truck [*]take off power steering pump [*]take off transmission bolts and stuff [*]take off vacuum line that goes onto vacuum pump [*]take off battery cables from engine block/starter [*]disconnect exhaust [*]disconnect throttle linkage [*]disconnect wiring [*]disconnect fuel lines After all that is disconnected you can pull it out. Thats the crash course through it anyways.. You may or may not have to raise the engine and get at the oil pan to take it and the oil pickup line off. I think some people have enough clearance to not have to do this. You can't really take then engine and trans out all in one go because you would be looking at 1500+ lbs. It is possible, but I doubt many people try it. My cherry picker was straining so much with just the engine I thought I missed a bolt..
-
Perfect! I never knew exactly what the back half had on it and now it's crystal clear. Thanks for taking those pics :thumbup2:That thing sure did shine up!I gotta see this thing when it is red, that is just gonna be incredible. If it looks as good as I think it will I will take mine back out real quick and paint it too
-
The bolt goes through the damper and everything but has a taper on the side that goes through the tie rod. When you tighten it, it wedges into the bolt of the tie rod. You have to beat it out or put heat to the tie rod.
-
Can you get some more of the drivers side? [*]Side of VP44 [*]Back of VP44 [*]Lower shot of drivers side [*]a shot standing at the drivers side back corner showing everything That should do it for me. Now that I have worked on a 24V it is all coming together, if you could get those pics I think it would all make more sense. Get a pic of that cam sensor too, wherever it is. Yours was as greasy as mine was. I just got degreaser and soaked the frame and power washed it. You can scrub all you want but the power washer really made the job go easily. Same thing with all the oil on the engine.
-
It means the injection pump electronics are done for and you have to get a new one. They are ~$1000-1500. This is probably the cheapest you will find it. http://www.dieselautopower.com/category_s/4.htm