


IBMobile
Staff
-
Joined
-
Last visited
Everything posted by IBMobile
-
I'd go to Napa with the old stud. There they will be able to measure it (pitch, diameter and length) and either have one close in size, same pitch and diameter but slightly longer would work, or order it. If they don't have any available you will at least know the size. If you just want to order them straight away try this place .http://www.enterpriseengine.com/product/injection-pump-mounting-stud-p-7100-vp-44/ I hope this isn't contagious!
-
I'm trying to keep a Mexican worker in Mexico. So are you saying you don't know any good auto upholstery shops in Tijuana?
-
The leather on the front seat bottoms is starting to go bad and needs to be redone. Over the years I've heard about and seen some of the work out of upholstery shops in Tijuana for a third to half what it would cost here in the States . Tijuana is about 55 minutes south of me and my son goes down there from time to time so getting the seat bottoms there is no problem. Does anyone have any recommendations or experience with a shop there?
-
Would something like this work? Put nut on all thread bolt, place bolt with nut through large fender washer, place short peace of pipe over injector then put bolt with nut and washer into the injector. Now tighten the nut against the fender washer while counter holding the bolt head. This should 'suck' the injector out. You may have to take the valve rocker arms off but at this stage of the game what else can you do.
-
Are you talking about the Soldier Creek & Red Cloud Camp grounds? When going to an unfamiliar camp ground I pull up the site map along with Google Earth. On Google Earth I check out the sites an see what trees are near by and with the map orientated north you can see the shadows that are cast and what time of day the picture was taken. With this info I go to the site map, find the site, pull up the particulars and see if it's available. Using Google Earth you can see that a lot of the Soldier Creek camp sites have shade but not all. June is the time of the summer solstice so The sun will be straight up at noon with no large amounts of shade. There are several sites with a good amount of shade so pull up the maps and take your best shot. I also read the reviews seeing what they have to say knowing if it has one or two poor comments and the rest are fair or better then the poor ones were written by someone with their shorts in a bunch that day and are disregarded.
-
That's three hundredths of a volt. This much voltage goes right along with the amp draw of 17mA. Nothing I'd worry about. if you want to find out what is using .03V start by removing, in the junction block, one fuse at a time: #1, #4, #12, #13, #14, and circuit breaker #2.
-
I see that you're in San Diego. When registration is up for renewal will you need a SMOG inspection. If one is needed be careful of the upgrades. Most performances boxes are not CARB compliant and any smoke from tailpipe other than at start up is a failure.
-
Transfer case: NV231HD, NV241LD, NV241HD, fluid ATF+4 type 9602, fill to bottom edge of fill plug, drain and fill plugs tightening torque 30-40ft-lb
-
2002 and older: MOPAR MS 5931 or equivalent 2003 and newer: MOPAR ATF +4 type 9602 or equivalent
-
I started writing yesterday "Installing protective lift pump relay". I hope to have the Article finished by next week.
-
I put my lift pump relay in the PDC using the O2 front heater relay socket and drew power from the spare fuse socket. I didn't use the quad light socket for the same reason you have. I went to an auto salvage yard were I found a 1999 ram gasser. I cut the wire harness to the PDC and then with a pair of dikes, pocket screwdriver and medium screwdriver I pulled and pried the connectors out of the PDC. There are two different size connectors for that socket. large size for pins 30 and 87, smaller one for pins 85 and86. They snapped in to my PDC with no problem. I also grabbed a couple of the micro relays that fit that socket and used one it for the lift pump. They provide surge protection with a resistor.
-
Napa has a 30 amp relay that will work, part # ECH AR272 https://www.napaonline.com/en/p/ECHAR272
-
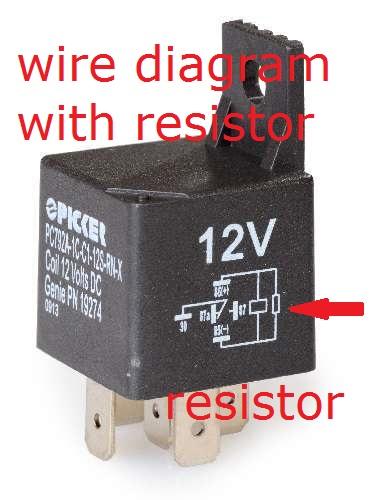
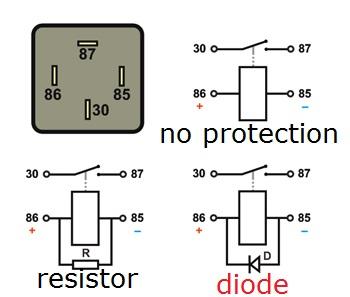
A relay will have the protective resistor or diode built into it. A wire diagram will be either printed on or etched into the cover. The one below is printed on and shows that it has a resistor running parallel with the coil. Here are some basic wire diagrams you will find on the side of an automotive relay. Terminal 87a is not shown.
-
Do it your self with either Rust Oleum Aircraft Remover or Klean Strip Aircraft Paint Remover. Both have methylene chloride and methanol as the main active ingredient and are very toxoid. Eye, breathing and skin protection should be followed. Media blasting takes a long time to do because the frication of the media striking the power coating causes it to melt. Sand blasting would pit the stainless steel. A dustless blaster works well if you can find someone that has one.
-
16 gauge wire will handle 20 amps up to 10'. The relay should be at least twice the amp draw of the motor (20-40 amps). If your fuel pump motor draw 10 amps at start up then the minimum relay will be 20 amps. The relay should also have a resistor or diode in parallel with the coil to suppress back flowing voltage spikes that can damage the ECM. These voltage spikes can reach well over 100 volts and are caused when the power to the relay is shut off and the magnetic field around the coil collapses. Most relays denote the use of a suppressor as a symbol of a resistor or diode in the wiring diagram on the side of the relay. Don't go high amperage on the fuse or every thing will burn before the fuse blows. To find the fuse size calculate the load and multiply by 135% (1.35). You can find the load by doing an amp draw test. My back up fuel pump draw tested at 6.5 amps, times 1.35 = 8.77 amps, next size fuse is 10 amps so I installed a 10 amp fuse.
-
Who do these people sell out to, and who do those people sell out to, etcetera, etcetera? Is there one person, or a very powerful group at the very top of the ladder and what is the philosophy espoused: Capitalism, socialism, communism or progressivism, because we know the finial agenda is world domination. These groups are nothing more than useful idiots with their petty self absorbed interests and reasoning, for they know not what they say.
-
The wire diagram shows three things on fuse #13, the two front window switches and the central timer module. You can unplug the window switches and see if the draw stops but at 17.5mA I think it's the central timer module which is all so known as a body control module that's drawing the power. The CTM is connected to the CCD data bus network and controls automatic door locks, central locking, chimes, timed illuminated entry, heated seats and a host of other things. 17.5mA is what one would think a control module uses and I wouldn't worry about it.
-
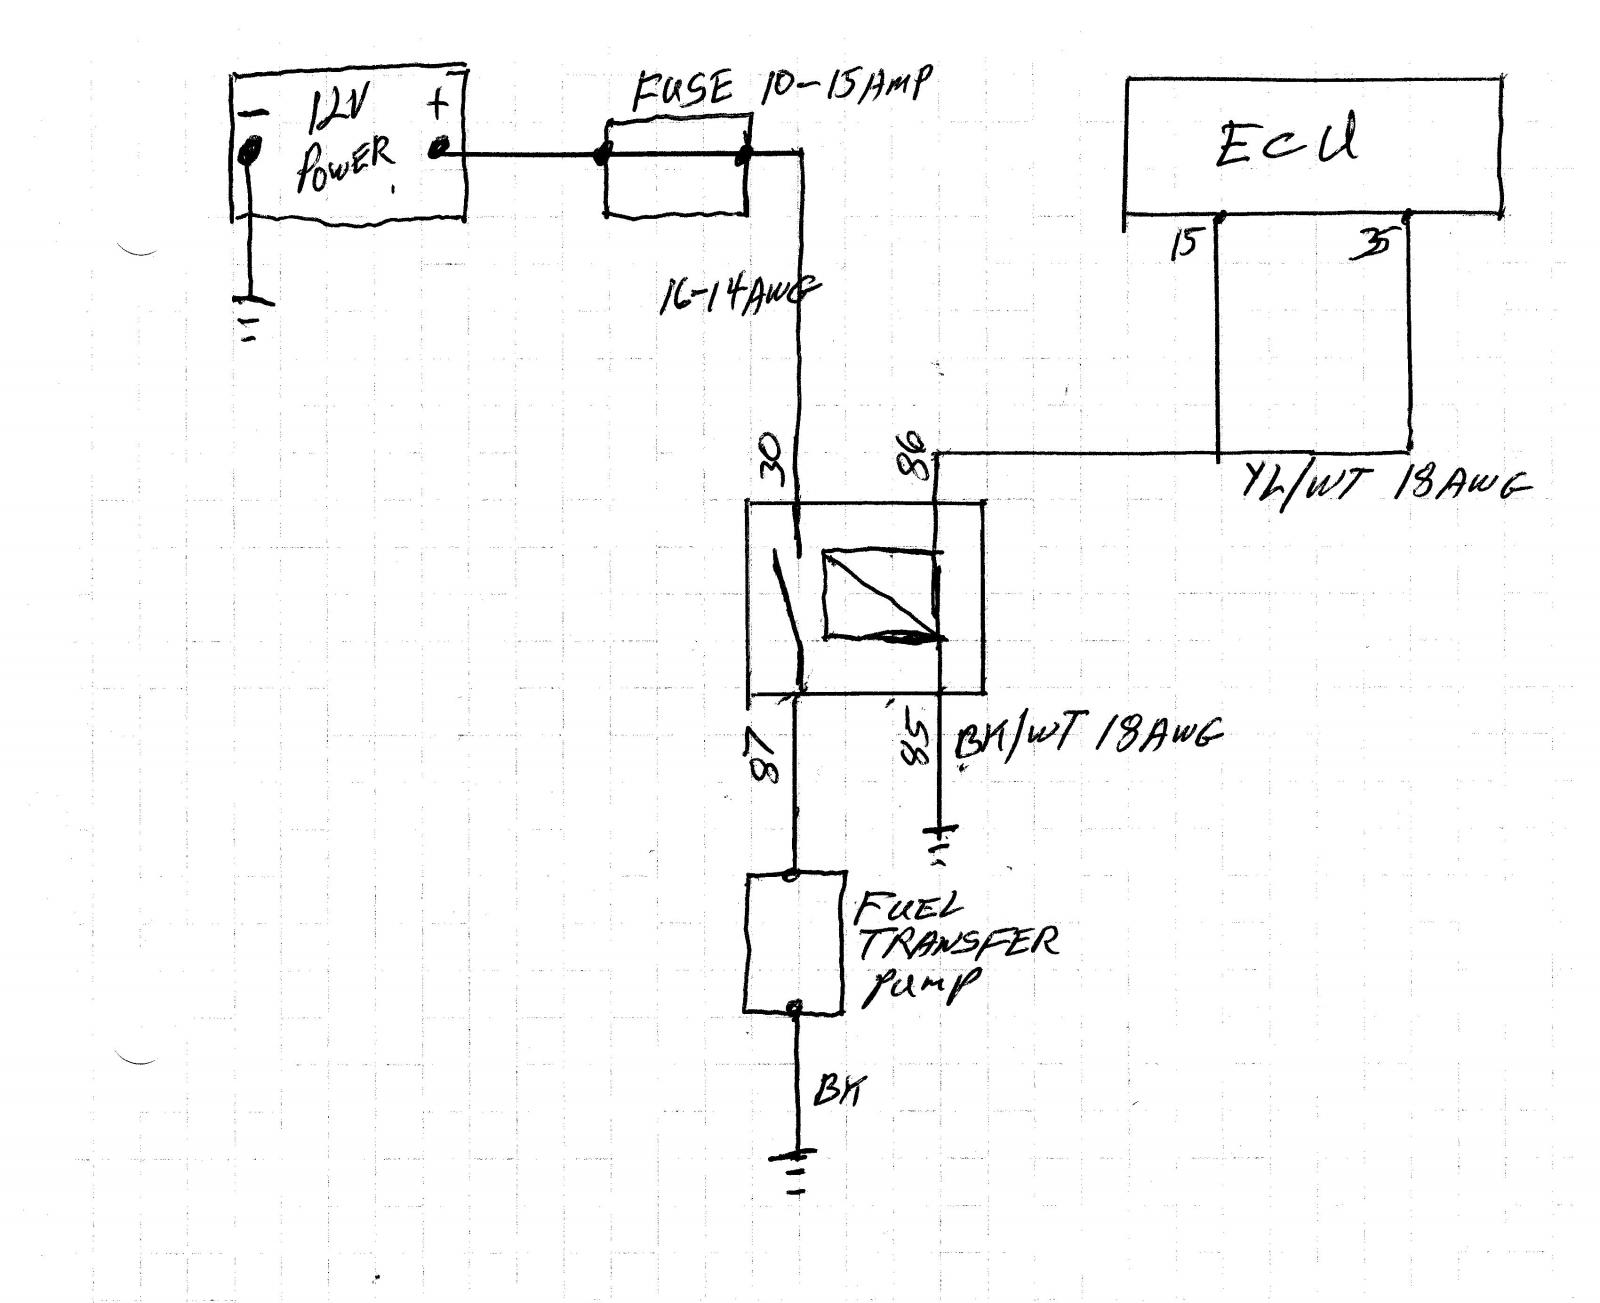
This is a typical automotive relay you can buy at any auto supply store. Do not use pin 87a. I've had some relay terminals marked 1, 2, 3 and 4. terminal 1 = 86 terminal 2 = 85 terminal 3 = 30 terminal 4 = 87 The yellow/white wire comes from the ECM and was uses to power the stock fuel pump. This is the wire you want to trigger the new fuel pump relay at pin 86.
-
Do you have the ability to obtain live data. A good OBD 2 code reader will have that function and if it graphs all the better. You would want the throttle position sensor percentage (TPS %) along with the calculated load percentage (calc load %) figures. Here is some data from my truck. Idle cold: ECT 73°F, calc load % 5.5, TPS% 0 Idle hot: ECT 188°F, calc load % .4, TPS% 0 Driving no grade: ECT 190°F, calc load % 25.9, TPS% 34.9, 70MPH Driving up grade: ECT 190°F, calc load % 47.1, TPS% 40.7, 70MPH
-
Your welcome, glade it helped. Here's that diagram for anyone else that may need it.
-
Best to check with an automotive paint supplier as well as the technician who will be applying it so you get the desired results now with minimal problems in the future. Here's a supplier near you: https://www.google.com/?gws_rd=ssl#q=automotive paint supplies store near oregon city&tbs=lf_msr:-1,lf_od:-1,lf_oh:-1,lf_pqs:EAE,lf:1,lf_ui:2&rflfq=1&rlha=0&rllag=45346982,-122590069,2366&tbm=lcl&rldimm=16742333198580450465&rlfi=hd:;si:1417004879806245545;mv:!1m3!1d413504.96044763655!2d-122.72783715000001!3d45.29640845!2m3!1f0!2f0!3f0!3m2!1i246!2i442!4f13.1
-
Not only did my home team not make it but my home team up and left home and moved to L A.
-
Mike, be carful who paints it. Auto body/paint production shops like Macco and the like will put the cheapest paint on. The paint will look good for about 6-12 months then fade and lose it's shine, compounding or waxing will not bring it back. It all depends on the quality of paint and the experience/care of the painter. I've seen good paint costing over $400/gl. I've seen paint jobs where the parts sticker was still on the body panel and painted over. That tells me the prep man didn't prep the car and either the painter was blind or didn't care.
-
Don't know, never had to measure it on the truck but it should be about the same as other vehicles to keep memory for radio, ECM, PCM (if needed) and clock going . There may be a light on, a door or mirror switch stuck on. A small light will draw 3+ amps.
-
If a wire was pinched then there would be either and open circuit with no draw or a shorted to ground circuit which would either blow a fuse or start a fire. Is this 2.8 and 4.6mA or 28 and 46mA, most normal parasitic draws I see around 50mA Is the fuse you're talking about here?

