


Haggar
Unpaid Member
-
Joined
-
Last visited
Everything posted by Haggar
-
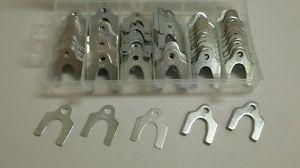
Yeah the too far thing is spooky... You have to get leverage to push it. With the height of our trucks, you will probably need to stand on another truck sitting right next to it. (you won't push hard if you are on a bucket or ladder...) It takes time as you have to move that truck out of the way each time. (or maybe you could stand on the tailgate, and fold that up to check door operation....) I have helped my neighbor a couple times.... it can take days to get it right. (putting a total restore back together, or getting all the old stuff back to middle of adjustment, so you know where to put the new quarter panels on...) Sometimes it just wont work out, so he would cut/weld the door to make even gaps at all the right places... the shims are "C" shaped, not "O" shaped (washers) so you just loosen the bolts and slip them in.
-
Wagn, 22.8mV (22.8 milli volts) = 0.0228 Volts So your AC voltage seems to be fine. Hope a more saavy automatic person will chime in. I have attached the pages from the FSM that show test port locations. HTH Hag 2001 FSM Ram 21-659.pdf
-
This gets fun.... but you can reshape the top of the door with a 2x4.... I wouldn't believe it if I had not seen it.... getting the stuff to match back is odd. its not hard, but you do some weird stuff. and you have to do it in small small increments. Before you do this, make sure that the out at the top is a door problem, not that you have it adjusted out at the top. Before bending, try to use shims. (like shim bottom hinge out.) Take a 2x2 or 2x4 and put it between the A pillar (near the hinge) and the door then push the top of the door... you will be tweaking how the door leans out at the top..... be careful it is harder to undo. (you are slightly bending the door to close at the top.) as you learned its like building a house of cards, so many things need to line up... so what you are doing is chasing your movement. once the front door is right, then you need to readjust the latch and rear door to match. there is some movement in the latch part of the quad doors to the front door.(if you readjust the front door as much as you needed to (assuming everything else was perfect) you will need to readjust the latch.) you need to figure out what it pinched on.... sounds like the front of the door is "in" (toward the cab) a bit too far, causing a pinch making that last 1/2 to 3/4 a force fit. Keep playing with it. you will get it. you just need to keep moving toward something else that has adjustment. then you have to "accept" the happy middle ground when you get them close.... GL Hag Oh btw its looking a LOT better. looks like you could lift the fender a tad and move the fender in a bit and look really good. Keep in mind it is not just a 2 dimension problem, but 3 dimension. You may or may not have control of all dimensions so you have to guess and cheat. Hag
-
Keep playing with it. You don't want it to "flare" as you push the clutch in. (engine speed up) You are correct that "flare" would be more clutch wear. I guess I am starting to lift off the go pedal as i am pushing the clutch in. Not enough that I feel engine braking (letting off the go while still in gear) but as close as I can get. My shifting is slow too, so I will basically blip the throttle once or twice keeping the rpms up but to too much as i catch the next gear. Down shifting under load is a lot harder for me, I get it exactly right only about 25% of the time on our hills. but that takes braking in lets say 4th gear until a speed that will be good for 3rd gear at 2200 rpm or so, then pushing in the clutch bringing the rpm up to 2200, selecting 3rd, then letting the clutch out pretty quick.... since I am then speeding up rolling down the hill..... and both feet are occupied... I usually get a little jerk (clutch heat and wear) or engine trying to head for the red line (speed increased too fast between gears and load pushing like a rocket...) Keep in mind, we are just trying to be perfect. It sounds like your normal shifting is so close to good enough that you couldn't measure the wear difference. Speed matching will make shifting smoother and reduce wear that little bit more. Hag
-
Wow, I started on a small encyclopedia and gave up... Clutch wear is increased at LARGER differentials of speed between the engine and what the last speed the clutch was turning. SMALLER differentials of speed have reduced clutch wear. Let that sink in. It has nothing to do with total speeds (within reason but we are talking stock stuff at the moment.) If you floor your truck at a stop and slowly let the clutch out, that is much more wear than leaving the truck at idle and slowly letting the clutch out. (assuming the TIME it took to let it out was about the same.) If you were running 55mph in 4th gear at 1800 rpms, and put it in neutral, (assuming on a slight down hill so you maintain 55) then later push the clutch back in, reved the engine to 1800 re-selected 4th and let the clutch back out, that would be perfect. Synchros matched AND almost zero wear to the clutch. (since 1800rpm was almost exactly the right speed for what the transmission was being spun by the rear wheels. So there was ZERO differential speed, but 1800rpm actual speed) oh i hope this makes sense... Hag
-
ohhhh, that gets fun!!!! (which part is right? or were any of the parts right? or just take the best you can with the pieces you have...) At first I would say fender, but the fender looks good to the rocker. I think your door looks low. There is no gap at door to rocker.... FSM page attached (23-56) shows 7.7mm +/- 2.0 Hope that helps! Hag 2001 FSM Ram 23-56.pdf 2001 FSM Ram 23-58.pdf
-
The closer you match the engine RPM to the selected new gear RPM at the speed you are attempting is better for the transmission. This could be speeding the engine up A LOT in a downshift situation or picking the engine speed up a little (from idle) for an upshift. HTH Hag
-
Steven, You may want to double check for an exhaust leak. The ISB just seems to love cracking an exhaust manifold and/or losing an exhaust stud near #6 cylinder. Rattle Monster happens to have both at the moment, and over the weekend buddies had trucks over and of the other three in my driveway, 2 were missing exhaust studs. Hope it is something simple like that! Hag
-
I am pretty sure right next to the line going to the turbo is an unused port on the filter adapter. You can put a mechanical gauge right there. HTH Hag
-
Tickled you had enough wire! That way you won't ever wonder..."did I do the right thing?...." Looks super! thanks for the info on the harbor freight crimper! Hag
-
Leather, If you have just recently done it, it should not be a problem. Wash the flux off with warm water and soap. The problem that happens is after you are done soldering, there is still flux left around the solder area. It absorbs water and migrates the acid around. Acid is not really good for copper. You should be fine if you spend some time washing it as best as you can. Use baking soda and warm water if you want too. It will fizzle if there is still acid around. (similar to when you are cleaning the battery) Hag
-
A lot of alternator shops don't look for AC output of the alternator. In most cases it does not cause a problem in vehicles. For some reason our machines are more susceptible to it. My favorite alt/starter shop here, we talked about this. He does not usually look for it. I brought my brother's Alt in as it had a high AC output. When I dropped it off, I told the rebuilder what I saw, and what I was trying to eliminate. He didn't call back for a few days, but it was no big deal. He works hard to only replace what needs replacing, and not overcharging a customer. He could see what I was talking about (while he didn't normally check for it, he was looking for it for me, but the alternator passed every other test possible.) He called a buddy of his that runs a local (and good) transmission shop. (basically to verify my explanation) He said the transmission rebuiler had run into similar situations, and that it was theoretically possible and to keep looking at the alternator. So he went ahead and started removing the rectifier board. The last contact that he was removing on one of the diodes, was bad. He put the new rectifier in, and all was good. He said he never would have found that if not for the AC that I was worried about. The rebuild cost me like $125 instead of the normal 35 to 40, but was worth it. (I think he had more time in it than that, and his hunting/searching etc. but I also didn't call and bug him while he was thinking it through.) (mine and my brother's alt are the Denso not the bosch, so the parts seem a bit more expensive. This is why getting a "rebuilt" alt from a box store is a crap shoot. They don't "replace every part" they replace what the tests show them to replace. So that one failed solder on the rectifier board would have been missed. While you got it as a "rebuilt" and have new bearings some paint and clean, it would still have had the AC noise. Johnny go back to the alternator shop and show them the AC noise. (he should have a volt meter there, but if not, maybe you will have yours.) The volt meters that harbor freight gives away (with a coupon usually) are not terrible. They can't take a beating (I have fried quite a few) but they are worth what you paid for them!. (don't check resistance on a powered circuit!!!) I find good deals on meters at pawn shops too. Fluke or Simpson are my favorites. Once he sees what your problem is, it could be the rectifier bridge, brushes etc. (I think someone found a problem in the rotor once too that was causing it... can't verify it at the moment.) HTH Hag
-
Ride, Sorry, what a total pain in the behind! I still don't see how the missing ball could cause that issue. you can see that the ball moves out of the way when there is pressure from the pump. When the pump is stopped (engine off) the ball should roll and plug the orifice, so that the pressure cannot return to the pump backwards. A self apply after a rebuild can come easily from two places. the first is not fully seating the brake rod into the spool valve. this will make the hydroboost think you are stroking the brake. Did you leave the rod connected to the brake pedal, or did you remove this with the unit? The other thing I have heard is that the lever can go back on backwards. (I am looking for the thread where the guy was trouble shooting his rebuild, and found he put something in backwards. I think his would self apply also.) (I looked through my pictures... I can't see what can go in backwards or upside down, but I know there was something.) On the GM hydros, I have pictures of measuring the back of the hydro to the center of the actuator rod. after you do the rebuild the location has to be nearly the same or "it won't work." I never new what the "it won't work" symptoms are, because after assembly it was back inthe location within a 1/16". (apparently GM was bad about having a bunch of different rod lengths. So when swapping from vehicles and such you had to control that, or adjust it so it would work.) I hope you find it! Hag
-
1) It is a testing rpm from the factory manual. They didn't pick it from science completely but a way for the technicians to get similar results everytime they tested. (remember that was a guideline for hundreds of technicians doing it all over the country.) Going down the highway at 2000 rpms, it probably will lock and unlock occasionally. Some cars you can feel this (my honda is a prime example.... no guts and less guts when compressor running.) (our trucks we notice the alternator more than the compressor, due to the load of the grid heaters lol.) once settled down, I would not expect to have it happen more than once every few minutes. If it begins happening more than that, I take it off of MAX for a few minutes. It happens to me more than most people as I try and run a bit lower suction pressure (running the risk of freezeup) for a potentially lower duct temperature. but sometimes I don't notice or forget, and freeze the evaporator up... (have not on the dodge yet, but one of my suburbasaurus is wicked for that....) 2) YES. when the low side pressure is that low, its physical temperature is nearly the theoretical temperature. Any pressure below 28 is basically guaranteed to create ice. (this is why the low limit of the low side pressure switch drops the compressor out at 23 and doesn't let it re-start until 38 or so.) 3) The MAX setting changes nothing about the actual air conditioning. It re-routes the duct work inside the cab to "recirculate" the air we have cooled. (it brings in NO outside air) While we are testing, we want the evaporator to do WORK. There is very little work involved cooling already cool air.... so the AC system doesn't really know what to do, you may not get all the vapor/liquid refrigerant to turn to a vapor... you don't get the proper phase change and heat transfer going on. etc... in other words it will make your pressures act a bit funny. So I think for where you are at, you will get better pressure results using more outside air. (Max setting in daily use is a must for you if you live in a humid area... you will NEVER be happy if the AC has to constantly remove the water from outside air..... there is too much water stealing your potentially cool air.) HTH Hag
-
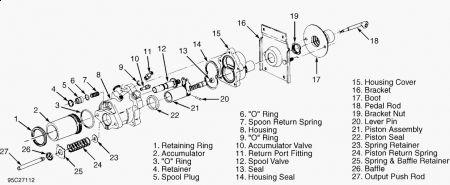
Sorry, I didn't go in that far. Just from a manufacturing aspect, I would think is a "cartridge" like most hydraulic valves are. Not like a loose ball in a trans valve body or in a carburetor. I am going on a limb here, but the schematic is showing it more like a cartridge than a ball trapped in a path too. So if you didn't see one fall out, it was probably all part of the item you pulled out. I can tell you, I don't think it would be a catastrophic failure if it were missing (unless it fell somewhere else inside the unit). You would not have any accumulation though, and so your boosted brake force would vary with engine speed, and in case of engine off or (not our system) a power steering belt failure, you would have no reserve boost for applying brakes. Now if you were rebuilding it because it was something wrong in the accumulation system, you may have found the problem! Here found another exploded view.... It shows a complete cartridge, no loose ball. see item 10. GL HTH Hag
-
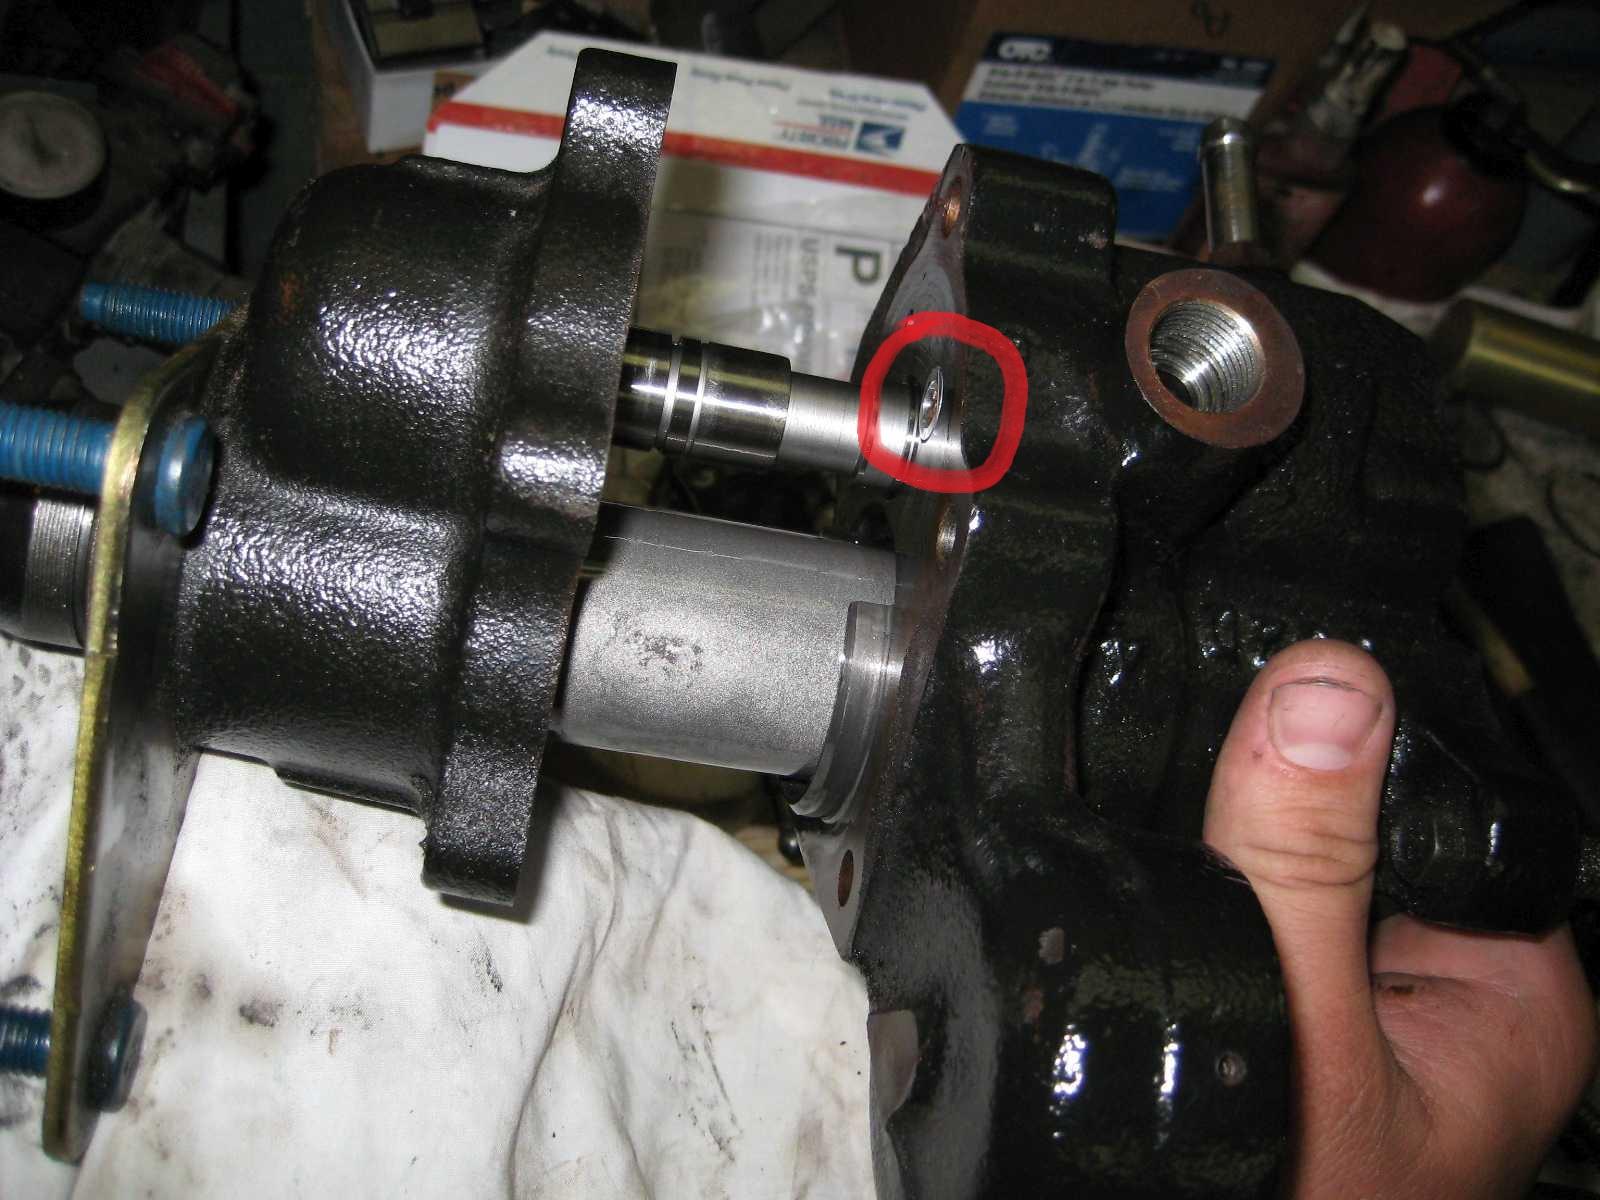
Ride, I looked through all my pictures of my rebuilds. No loose check ball. In this cross section, notice that the accumulator charging check valve, is behind a plug (appears to be o-ring sealed, but can't tell if there are threads) If you were doing a standard reseal, I don't think you took it apart far enough to have done anything with it. I added a picture where I circled it. I did not remove it during rebuild. Hope that helps! Welcome to the forum! Hag

-
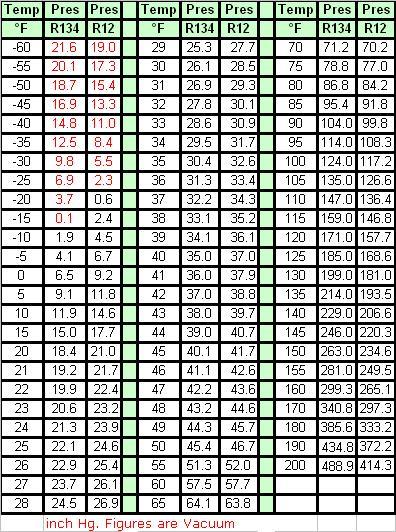
leather, I hope this helps a bit in your visualization. if we hold a bunch of other variables constant, refrigerants have a very defined table of temperature of the refrigerant to the pressure of the refrigerant. The chart IBM posted is good, but it is ESTIMATING an air temperature given an ambient temperature and pressure ranges. Here is a chart of refrigerant temperature at a refrigerant pressure. (it is useless EXCEPT it may help you see why a high "low side pressure" is not what you want. It will be what you get, but not what you want.) Notice that at a refrigerant pressure of 26.1psi the temperature in F is 30. That is below freezing. So in our cars we try to stay above the point of freezing on the evaporator coil. This is why the "low side" switch can bounce between operation and not. IF you have a 2001 FSM look at pages 24-20 and 24-21 that explain the operation of the low and high side switches. To have low temperatures in the cab you want low pressures on the suction side (low side) of the system... You may have let the refrigerant out too quickly, and that is why you missed your "perfect" point. I can't find it in the FSM, but GM vehicles during this type of testing (oh btw, FSM says 1,000rpm not 1500 on our trucks) The compressor is allowed to cycle once every 2 minutes or so. (in the CCOT system (Constant Cycling orifice tube) pressure control usually comes from the low side switch.) I hope this helps your endeavor. But from where you are at, I would get the low side to keep the compressor locked for more than a couple minutes and call it good. (as the interior temperature goes down, your ambient is going down so harder to keep the low side from going too low.) Add the freon slowly. stop occasionally and let it balance out. and like IBM says, don't use MAX. It should be more stable when the "ambient" temperatures are high.
-
Welcome Doc! Dripley's suggestion is dead on. I would definitely pull the radiator and clean it. I would try and clean it rather than replace it with a cheap one. I know the thought process, "If I went to the trouble to pull it, why not put an "new" one in, they are only $150"... Well, for some reason the cheap "new" ones... always seem to have troubles... seems to surround the fitting of the trans cooler in the tank.. YMMV... I am still on my original radiator at 300k+ miles and I pull pretty heavily. Cleaning is a must though.... (especially if you still have the stock front vent....not pointed at you, that is me...I have not moved mine yet...) Hag
-
drip, Our humidity is terrible right now! you will probably make a quart an hour or more condensate. Glad you got it worked out! The gassers, have a vacuum reservoir under the cowl, and the black line going to the HVAC comes from a tee there. I don't think the diesels have that reservoir, but not certain. pick up a little hand powered vacuum pump. I have one in a box with a bunch of adapters, so I can troubleshoot problems like this. GM TDs have lots of trouble with the wastegate actuator system... I end up testing them a bunch.... Hag
-
Drip, Here is the page from the FSM. You should be able to check where you are losing the vacuum down at the multi-tube connector. The mode knob on the instrument panel actually changes vacuum paths. (as best as I can tell.... I know GM does this, I am going totally on the fsm and can't prove the dodge does.) Hope this helps. 2001 FSM Ram 24-12.pdf
-
I am thinking pre-1967 mustang or falcon. It has a single reservoir master cylinder. Kinda confused by the double brace to the fender. I had '68 cougars and a 67 mustang neither had a tower support and a support going forward of that. One of my best friends had a '65, but we never pulled the motor out and i just don't remember that brace. Hag
-
AH and Drip, I agree I don't think I would have made the connection. Great job Wild! AH, I guess it didn't really "keep the brake light on." That was a symptom of the pedal not returning fully. With the reservoir holding back pressure on the drain from the spool valve, it could not travel fully to return. The return springs could not force it fully back. This was not enough "residual" pressure to apply the brakes, but the spool could not fully return. (though it eventually could have gotten to that point.... a plugged return line on the hydroboost will eventually fully engage the brakes.) Since there was some air in the system at the top of the reservoir, it could work for awhile cold, but the volumetric expansion of the fluid as it heated reduced the air volume and increased the back pressure. Glad you found it.
-
BBD, mine was more like yours.... I beat, banged torched etc... bought the special ATC adapters for the air chisel... I eventually cut the ball joints, so I could get the knuckle off. I used the 100 ton press at work.... It took nearly 30 tons to push it out.... Just helped a buddy of mine with his. I brought all kinds of tools of destruction... just a few taps and his fell out. lol. (his truck is SIGNIFICANTLY rustier than mine.) I think its the luck of the draw. Hag
-
The engineers in drive train development or the guys in marketing and sales? The perspective is completely different. Its my vote that marketing and sales do the most to obfuscate the terms and realities of what is really going on. I do agree to the counter point though: that if I wrote the promotional pamphlets, they would be minimum of 46 pages long, and the average purchaser would have fallen asleep at paragraph 3. I can see it (me) now.... Sales indian "how does the power get the front axle?" Engineering indian".......(10 minutes)...... and finally we decided that the double cardan would work, though not nearly as good as an Rzeppa and not nearly as costly as a bendix-weiss....... (at least 10 more minutes)" Sales indian "we'll call it a CV joint." Engineering indian "omg no you can't.....(minimum 10 minute explanation of why its not really one) Sales chief to sales indian (whispered) "you say one more word about this and you are fired. It is a CV joint. get on to the ..." Engineering chief to engineering indian (whispered) "you say one more time that it is not a CV joint, and they might figure out that it isn't really 300 miniature horses in there on tread mills making the power. you will be fired." If that's not exactly how it went I can bet it was really close! Dilbert is my hero! Hag
-
Leather, You can't go wrong with the activator. It speeds up curing time, and will help cure larger gaps. The anaerobics harden when oxygen is not available. The primer helps with a chemical reaction that removes free oxygen so it will harden. It is not needed for threaded connections, but it won't hurt. GL! Hag
