Tractorman
Yearly Subscription
-
Joined
-
Last visited
Everything posted by Tractorman
-
"So from what you said, ecm must trigger power wires to energize coils and not the grounds" .... Yes. This brings another question that I may have asked, did you tie in both positive coil wires to a single switch? .... Yes. The two positive wires from the ECM are not used - I removed them and sealed the ends for protection. I ran a light gauge wire from a "hot" source, through a fuse (5 amp is adequate), and then to the momentary switch. From the switch, I ran a light gauge wire to one of the exposed coil terminals. I ran a jumper wire from that terminal to the other exposed terminal. So when you push a button you're energizing both grids? .... You got it! Now you can be the boss and tell them electrons when to flow! Your alternator will thank you. - John
-
I have used a toggle switch for operating grid heaters since my truck was new. My switch is a momentary switch that is fused to a hot source. This way I can engage the grid heaters without turning the key to the "on" position. Being that the switch is "momentary", the switch cannot accidently be left on. The two codes that are set are inconsequential. This setup has worked flawlessly for 17 years and over 300,000 miles. No unnecessary post heat cycles and a lot less stress on the alternator - I wouldn't have it any other way. - John
-
If suspension components are in good condition and the track bar is too short: * The axle will be pulled toward the driver's side of the vehicle and remain there. * The bottom of the sway bar links will follow the axle making it appear that the top of the links are leaning toward the passenger side of the vehicle. This relationship will not change after you have driven and parked the truck. For clarification, the track bar has only one purpose. It controls only side to side movement between the front axle and the chassis / cab, but still allows for up and down movement of the axle. So, if the sway bar links are sometimes tilted, but the axle is remains centered all the time then the track bar is not the problem. It could be as Dave110 suggests, that the sway bar is sliding in the bushings that mount it to the frame making it appear that the axle is moving.. It is easy to get off track when diagnosing suspension problems. At this point I would start from scratch and document your observations in detail. For example, in your first post you mention that the axle has shifted to the driver's side 1 1/2 inches and the sway bar links are tilted (this is very significant). Later you mention that the sway bar links are sometimes tilted and are sometimes straight, but you don't mention anything about the axle shifting to the driver's side or whether the axle is centering when the sway bar links are straight. - John
-
Are you absolutely positive the axle was centered and the sway bar links were vertical when you first installed the track bar? Also, is this the first time the track bar has been replaced? There are two reasons that I ask this question. One reason is that if everything was aligned correctly and then shifted at least 1 1/2 inches over within a month, something very significant had to happen - like a coil spring broke, or something. The other reason I ask is that I replaced a track bar on my brother-in-law's 2002 3/4 ton 4x4 truck (a May build date) and the original OEM track bar that came off of the truck was about 3/4" longer than the replacement track bar. I was replacing a lot of steering components at the time and I did not notice the shifting of the axle and the misalignment of the sway bar links until after I test drove the truck. It took me awhile to figure out what was going on. I ended up removing the replacement track bar and placed both track bars on the floor side by side and found there was a difference in length - about 3/4 of an inch. There is only one stock track bar sold for the second generation 4x4 truck - they are all the same length no matter who you get one from. I know because I checked with three different auto part stores and NAPA bent over backwards trying to solve my problem, but to no avail. I ended up using Luke's Link on the original track bar. If this is not your case, then you can disregard. - John
-
These trucks should have had an eight or ten speed manual transmissions available from the OEM. Putting a 10 speed Roadranger behind a twin-turboed 5.9 is an excellent combination. Great design and installation - I wish I could drive the truck!
- 1 comment
- 4 reviews
-
-

- 1
-
-
Yes, you should be able to hear an in-tank pump while it is running and you should be able to hear a engine mounted pump running, as well. Without knowing what fuel modifications a previous owner did and if you can't hear an in-tank pump running, then, unfortunately, you will have to pull the fuel cartridge from the tank (as mentioned above). I bought my truck new and the VP-44 failed at 87,000 miles. The dealership replaced the VP-44 and removed the engine mounted lift pump and installed an in-tank lift pump complete with wiring harness and relay - all under warranty. This was the factory fix at the time. Keep us posted... - John
-
That's good news - I was hoping for that kind of an explanation. Thanks. - John
-
Yes, I did. It was your suggestion in a different topic that prompted me to do that earlier today. Thanks for that tip. I am going to loosen more supports that hold the fuel line and try the method again. It is just seeping now, but I need to get it stopped. - John
-
I bought 6 new Bosch RV275 injectors one year ago (the price was right - $425 for the set) and finally installed them last Friday. The original injectors operated for 303,000 miles and had never been removed. They were still performing well – as in smooth idle, good power, and good fuel economy. I didn’t want to push a good thing too far. The job went smoothly with the help of this site. All of the old injector tips were clean considering the miles and years on them. I did notice however, that there is a black coating of something kind of oily / powdery (not sure what it is) in the intake area just below the grid heaters. It is not present in the air horn and the hose from the intercooler – they are very clean. I wonder if worn valve guides combined with lots of exhaust brake usage could be the cause. Maybe someone who has had experience with this can shed some light. The marks are from me using a scraper. I am having a problem with a very small leak with #1 injector line at the injector. When I removed the injector lines, I did it in groups of three, but I left all of the blue clamping points tight. When I put everything back together, the connection at the #1 injector showed signs of leaking (wetness on the head around the fitting) on a 5 mile test run. So, I loosened the #1 injector line at the injector and loosened the blue clamp nearest the injector and then tightened the injector line followed by tightening the blue clamp. No evidence of a leak on a 5 mile test run. However, after a 50 mile trip the head is slightly damp around the injector connection. I will try again, but this time I think I will loosen the clamps and the mounts and repeat the procedure to get the leak stopped. If anyone has any tips, please speak up. I like the performance of the RV275’s. I immediately dialed the Smarty tune back a setting. OEM injectors: SW5 – Torque Management 5, Timing 1, Duration 5 RV275 injectors : SW3 – Torque Management 4, Timing 2, Duration 2. Smarty Settings: Torque Management (1-6) Each higher number incrementally reduces torque management at low engine rpm’s. Example: TM-6 equal zero torque management and allows for high torque at low rpm’s. Timing (1-4): Each higher number incrementally advances ignition timing . (#1 is stock, #2 is stock with after market injectors) Fuel Duration (1-5): Each higher number incrementally increases fuel duration. (#1 is stock) The RV275 injectors definitely deliver more fuel. So far, the tune I am using with these injectors is performing well, lots of torque on the low end easy to drive without smoke. I am setting the tune as to how I drive with a manual 6 speed transmission and operating engine rpm’s between the 1500 to 2000 rpm range for almost all driving conditions. I will post more information as I get some miles on the new injectors and let you know which tune I end up with. - John
.jpg.7e6787d709fd89d1270ea2098568bcd1.jpg)
.jpg.565ae7ce62ce7a4cdd5afc62bcd979ac.jpg)
-
I don't see a problem with the alternator - it looks to me like it has a quick-connect feature. - John
-
I agree, and that is my method. I have jump started many vehicles in this manner. I still have the original Bosch alternator (brushes and bearings at 215,000 miles) with 303,000 miles on the alternator now. - John
-
Some things that your video doesn't show... * You say "some hesitation starting" - does that mean the starter is cranking slowly?, or is it cranking at normal speed and just takes longer for the engine to start? (Starting the video before you turned the key would help us diagnose.) * Are you operating the throttle or is the engine going to high idle on its own? * What is the ambient air temperature? Is this a cold start? - as in the first start of the day? I am going to assume some things here. It was the first start of the day. You waited to start the engine until the "Wait to Start" light went out. The starter cranked for a longer than normal period of time. When the engine started either you brought the engine rpm up and held it there or the high idle feature was enabled. (Thanks KATOOM for this information) So, if this was your procedure, I would say that the alternator was charging normally throughout the duration of the video. The grid heaters would have drawn 200 amps while waiting for the "Wait to Start" light to go out. The starter would have drawn about 400 amps while cranking. After the engine started the post cycling of the grid heaters would have begun - again drawing 200 amps continuously because of the high idle. The alternator puts out 136 amps maximum - much less than the 200 amp draw from the grid heaters. The battery voltage falls to around 12 volts and remains there ( as it should) because the alternator that really is charging just can't keep up. The grid heaters draw whatever current is available from the alternator (which is not enough) and draw the remaining current from the batteries which drops the voltmeter down to around 12 volts and holds there.. I noticed in your video that when you said the alternator just kicked in, it appeared that the engine had dropped to an idle and the grid heaters had cycled off just a moment before. That would explain the rise to 14 volts in the voltmeter. If the starter is cranking slowly, then I would be looking at batteries that are in poor condition, corroded or loose wiring connections, worn starter contacts, etc. - John
-
Only the people near sea level elevation have the rounded figure of 14 psi. Where you are in Colorado Springs, the atmospheric pressure is about 11.8 psi. Just being technical. - John
-
I think the "0" pump pressure and "lost power and started smoking" symptoms are likely to be from the same problem since they occurred at the same time. If the fuel flow to the VP-44 is restricted for whatever reason, it could cause the "bluish" smoke. - John
-
You only need to turn the steering wheel back and forth enough to load the steering linkage (no more than 30 degrees each way). The friction of the tire to the ground helps to load the linkage. This way you can use your wife's cookie sheets for other things. - John
-
You will get better "real life" test results if you set the vehicle back onto ground for the tie rod end, center link, drag link, and track bar checks because the joints will have to do some actual work. I block the rear wheels, set the park brake, and have someone operate the steering wheel back and forth with the engine running while I perform the inspection. I like your method for checking suspension ball joints and wheel bearings. - John -
-
Still have the "Y" style myself - just over 300,000 miles still on original left and right tie rod ends, have replaced center link and drag link once. Of course I am using those ridiculously small tires recommended by Mopar1973Man and the goofy sticker on my driver's door. - John The above post was an attempt at humor. - John
-
Set the voltmeter to display AC millivolts (not DC) - John
-
Stick with your previous procedure. As IBMobile says, Fuse #10 (50 amp) goes to the part of the ignition switch that gives power to the BLk/WHT wire that you were testing. Test it again with Fuse #10 pulled. Post your results. One step at a time... - John
-
I have made assumptions on what you are testing, what tool you are testing with, how you are connecting with the testing tool, and the state of the connection with the ignition switch. I have made these assumptions (correctly or incorrectly) because you did not state the details. Here are my assumptions about your test: * You are using a multi-meter displaying voltage. * You are testing the output of the ignition switch, specifically the black wire with the white tracer and the light blue wire shown in the wiring diagram provided by Mopar1973Man. * You are performing your test with the wiring harness connected to the ignition switch (normal condition). * The ignition switch is in the off position. * Your multi-meter black test lead is connected to a known good ground * You are probing the BLK/WHT wire with the red test lead and you are recording 11 volts. * You are probing the LGTBLU wire with the red test lead and you are recording 10.7 volts. If this is how you are doing your ignition switch test, then your recordings may not be conclusive because the multi-meter does not place a load on the circuit - you could be reading stray voltage, or a back feeding voltage. By simultaneously connecting a test light at the same connections as your multi-meter, you can place a small electrical load on the circuit, thus eliminating any stray voltage. * If the test lamp does not light and the voltage drops to zero, then the ignition switch is not likely the problem. * If the test lamp does light and the voltage remains the same or near the same, then the ignition could be the problem, OR, another circuit could be back feeding. - John
-
Not necessarily - for a couple of reasons.. For clarification, I am assuming that you are performing the ignition switch tests with the wiring harness connected to the ignition switch. A multi-meter does not load the circuit when performing a voltage test. Consequently, stray voltage can influence the test results. Using a test lamp simultaneously with the multi-meter will be beneficial here. If the test lamp does not light and the voltage drops to zero, then the ignition switch is not likely the problem. If the test lamp does light and the voltage remains the same or near the same, then the ignition could be the problem, OR, another circuit could be back feeding. Electrical troubleshooting can be a challenge. You need to be diligent in following specific steps and always double check your work along the way. - John
-
First, let's make sure are talking about the same fuse locations. My FSM is for a 2002 truck, so fuse locations could be different than yours. Is your PDC (Power Distribution Center with fuses and relays) under the hood beside the left battery? Is the Junction Block (another fuse distribution center) on the left side of your dash with a removable cover and only visible when the driver's door is open? If both of these are true, then we have the same setup for the most part. Next question, is fuse #12 (IOD) in the Junction Block? If so, look at the wiring diagram below to count how many components are powered by this fuse - you will see plenty. You could have something as simple as a glove box light staying on and you would never know it. Looking at the diagram below shows that there are several electronic devices or switches that operate lights downstream of Fuse 12 (IOD). This is why your test light is bright when the fuse is in place. The test light is a fixed load with a specific amount of resistance. The test light by itself does not tell you how much current is flowing (amps). This is why the multi-meter with a 10 amp current testing capability is needed and is used in conjunction with the test light. One thing you can do is make sure that things like the dome light, vanity light, glove box light, under hood light, etc. are off. Here again, using the test light alone can be misleading. Because the test light bulb limits current flow, things can buzz and do strange things because the current flow is restricted by the test light bulb itself. Example: a relay coil can't get enough current flow so the contacts open and close rapidly causing a buzzing sound. Also, Fuse 13 powers the Central Timer Module. Hope this helps, - John
.JPG.4e1c1753f41b692e8356441c1ee3b6f8.JPG)
-
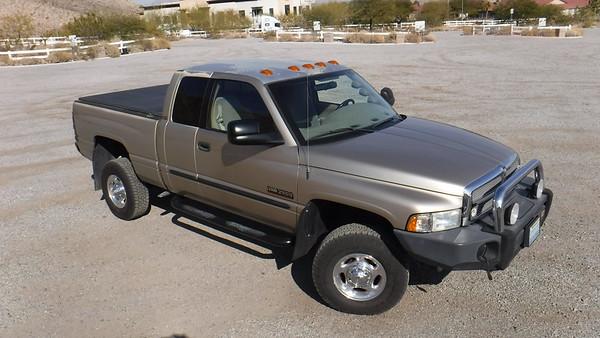
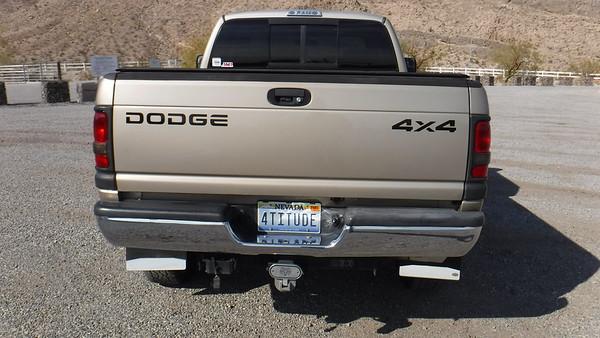
Here's the description in case you didn't open the document. The guy lives in Las Vegas. - John $17,500 as delivered 2002 Dodge Ram 2500 HO purchaced new 12/15/2001 Quad Cab 139" wheel base VIN# 3B7KF23C92M224456 High Output motor (ETH) NV 5600 manual transmission (DEE) factory towing package - class IV receiver hitch exterior - almond light metalic pearlcoat, interior - camel/tan cloth condition 137350 miles as of Nov/03/2018 Complete mileage, service, alteration records, factory service manual no rust, no dents, paint is sun worn engine and drivetrain Southbend ConOFe Clutch BD Short Shifter Bob V's Deluxe 2-Wheel Low Kit Exhaust Brake (Jacobs) - switch on shifter 4" Magnaflow Exhaust F1 Mach 1.6 85HP injectors (stock HO injectors included) Fuel Preporator - Air Dog ISSPRO pillar-mounts gauges - fuel pressure, boost, exhaust temp Amsoil oil bypass kit new Blue Chip Diesel VP44 - premium pump x17 (5/5/2018) silicon air and water hoses new (reman) ECU (8/17/2018) new clutch hydraulics (master/slave cylinders, reservior, and lines) (11/3/2018) relocated crank case breather steering and handling Tires - (5) Goodyear Wrangler Trail Runner LT265/75R16E (3/10/2017) lower ball joints replaced (04/12/2017) replaced headliner and visors in 2016 Borgeson steering box Borgeson steering shaft Rock Solid Steering Bushing replaced tie rods and drag link with T-style heavy duty and steering dampner G3 trackbar kt (DSS) DSS (Darin's Steering Stabilizer) Maxx Link heavy duty swaybar links front & rear Bilstein Shocks accessories 50-gal in-bed TransferFlow Fuel tank w/TRAXII controller ARB Sahara Bull Bar IPF lights with "high-beam" floor switch and indicator light on pillar Viair Air compressor and tank with in-cab gauge and pressure switch Air horns (22 & 24-inch) - switch on shifter Mag-Hytec rear diff cover Jordan Brake Controller Painless Wiring Kits #70207 (2) (all electrical accessories are fused & relayed) Smittybuilt Wheel-to-Wheel step bars (with spare step pads) drivers side bed step, front and rear bumper steps Noise Reduction - triple sprayed cab and hood Alpha-Liner bed lining Swing-away storage box in bed tailgate pop-a-lock Truxedo tonneau cover Mud Flaps 2 under-seat locking boxes Dashmat dash cover (since new) extras MAD's Smarty ECM is currently stock and the MADs unit should not be VIN-locked 5th-wheel tail gate, Handy, steel, black (not installed) BHAF Heat Shield (not installed) BHAF - Fleetguard AH19037 (not installed)
-
This one was just posted in the TDR a few days ago. It was very tempting to purchase. The guy wants $17,500 - one owner, 137,350 miles as of Nov/03/2018 - John 11-17-2018 2002 Dodge Cummins.docx
-
Good job selecting the circuits to test. You were very detail oriented in performing the above tests; however, the test results have no value. You need to know how much current each circuit is drawing. This is the test that you want to perform. Many of the circuits that you tested have parasitic draws which are normal due to some electronic components needing to have power to them at all times for memory. These circuits should stabilize and go into sleep mode a few minutes after the truck is shut down. The maximum current at that point for all combined circuits should be very low - 35 milliamps (.035 amps) for my truck according to FSM. Most likely you will have something drawing at least 500 milliamps or more in one of the circuits. You will need a test light and multi-meter. Your multi-meter should have a 10 amp setting for doing a current draw test. You will want to disable anything on your truck that could draw excessive or unwanted amperage - for example be sure to disable the driver's door switch so you won't activate the interior light circuit when you open the door. * Remove all the fuses that you did in your first test. * Disconnect ground cables from both batteries. * Temporarily secure one end of the test light to the negative battery post and the other end to the ground cable. You can use either battery location. The test light should not illuminate or if it does, it should be very dim. If it is bright, keep pulling fuses or eliminate the source of the electrical load until the light goes out or gets very dim. * Set your multi-meter to the proper setting and connect the multi-meter in the same manner as test light, but with the positive lead on the negative battery cable. Remove one end of test light to force any current to flow through the multi-meter. Observe the multi-meter display. It should read zero or very near zero milliamps. * Reconnect test light and disconnect the multi-meter. Insert one of the removed fuses. Observe that the test light remains unlit or very dim. Repeat above test with multi-meter. Continue testing until all remaining fuses are installed. Record the findings in milliamps of each individual test and add them all up. The total should be less than 35 milliamps. In reality if the total is less than 50 milliamps there should not be a problem. 50 milliamps is only 1/20th of an amp. Be sure the test light is always connected and the multi-meter is disconnected as described when you install a fuse. This will avoid a surge of current (such as charging a capacitor) to pass through the multi-meter. You will have to be careful with the multi-meter during testing as it is very easy to blow the internal 10 amp fuse. I wish you luck, - John