

Leaderboard
There are no members to show
Popular Content
Showing content with the highest reputation on 05/01/2016 in all areas
-
Won't blow. Truck wears out from metal fatigue. Then engine gets sold and wears out two more trucks.2 points
-
1 pointSeveral guys have expressed interest in a thread about the 392 stroker Hemi that I'm building. I figured I'd go ahead and chronicle everything the best I can. I'm still waiting for some parts to show up, but here's the basics of what I'm doing. The stock Dodge 5.7 Hemi has a bore of 3.917", and a stroke of 3.58", for a total displacement of 345 cubic inches...or 5.7 liters. I am having a little fun with this one, so I'm boring it .010" just to clean up the bore. I'll be using Mahle forged pistons specifically designed for the crankshaft and rods that I'm using. Speaking of crankshafts, that's where all of the fun will come from on this particular engine. Several manufacturers make a crankshaft for both the 5.7 Hemi as well as the 6.1 liter Hemi (they share the same stroke) with a stroke of 4.05". Why 4.05"...? That's kind of an arbitrary number, isn't it? Well, with a 5.7L block, bored .010" over, and a 4.05" stroke, the engine displaces exactly 392 cubic inches, and the same crank in a 6.1L block (also bored .010" over), yields a displacement of exactly 426 cubic inches... Both of these numbers are throwbacks to the Hemis of old...the old elephant engines. Up top, I'm keeping the 5.7 heads, but I'm installing the larger stainless valves from the 6.1L's. Replacing the intake seats is something you'll want to do on ANY Hemi engine that you build because they are notorious for dropping them even when mildly overheated. There is not much of a press-fit from the factory, and they drop right out when they get hot enough. So, since I was having the seat replaced anyway, I had larger seats installed in both the intake and exhausts to accommodate the larger 6.1L valves. The OEM 5.7L valves measure 2.0" inches on the intake side, and 1.55" on the exhaust. The OEM 6.1L valves are 2.08" on the intake, and 1.6" on the exhaust. Plus, the 6.1L valves are much lighter due to the hollow stem on the intake valve, and the exhaust stems are sodium filled for better heat transfer away from the combustion chamber. I am using PSI LS1511 valve springs with Comp Cams spring locators to keep them in place at the bottom. These were both made for the GM LS engines, but work great in the Hemi after machining the top of the valve guide down to .510". Valve spring installed height is set at 1.8". These springs have exactly 135 lbs of pressure on the seat at 1.8" installed height. Perfect... As far as the camshaft goes, the stock 5.7L cam is VERY small...! In the last Hemi I built (in my wife's Durango), I used a 6.1L SRT8 camshaft, which is quite a bit "larger", and runs very nice. On this build, I'm taking things a step further and had a camshaft ground with 221 degrees of duration (at .050") on the intake, and 227 degrees on the exhaust side. Lift is .575" on the intake, and .585" on the exhaust, and the lobe centers (LSA) are pretty wide at 115 degrees. This will help it play nice with the computer at idle. So, that's what I'm building...a 392 cubic inch "stroker" Gen III Hemi engine with ported big-valve heads and a custom ground camshaft for an '04 Durango that I bought. Pictures to come...1 point
-
I set about searching the internet and looked at 20+ videos and 40+ threads that all seemed to be somewhat incomplete and decided to write an article based on my experience. My original nightmare dealer experience thread: https://mopar1973man.com/topic/11382-front-crank-seal-help-and-show-and-tell-of-what-the-dealer-did/ Tools Required 1. LocTite 620 ($12) http://www.amazon.com/Loctite-234772-Temperature-Retaining-Compound/dp/B003T7UXUI/ref=sr_1_1?ie=UTF8&qid=1460479397&sr=8-1&keywords=loctite+620 2. Astro Bearing Race and Seal Driver ($40) http://www.amazon.com/Astro-7824-Bearing-Driver-Master/dp/B00061SGFO?ie=UTF8&psc=1&redirect=true&ref_=oh_aui_detailpage_o00_s00 3. 1 Ton Press ($59.99 - 20% coupon) http://www.harborfreight.com/1-ton-arbor-press-3552.html 4. Three M8 x1.25 120mm Long Bolts ($4 each). Lowes carries them. These will be used to align the timing cover and slide it home so you don't make a sloppy mess. I also found a pack of 10 on amazon for $6.45 http://www.amazon.com/dp/B00A30JI7I/ref=biss_dp_t_asn 5. Razor blade scraper to remove old seal from gear housing http://www.amazon.com/Hyde-Tools-13050-Scraper-Blades/dp/B000BPEPSC/ref=sr_1_4?ie=UTF8&qid=1460569550&sr=8-4 6. Sand paper (220 fine grit) to remove old seal bits from gear housing 7. Acetone to clean up gear housing 8. Piece of 2x4 or wood to bang on so you don't mess up the crank sleeve Optional Tools: Electric Torque Adapter ($56). All shops should have these IMO. Makes life easy. http://www.amazon.com/ACDelco-ARM602-3-8-Inch-Measurement-Adapter/dp/B004VYUKTC/ref=sr_1_12?ie=UTF8&qid=1460478588&sr=8-12-spons&keywords=acdelco+electronic+torque&psc=1 Barring Tool ($34) http://www.genosgarage.com/product/tool-ltbt/tools Important Note About Tools: Do yourself a favor and just buy the 1 ton press and seal driver set. It is a lot cheaper than messing up a seal. From the thread above, most people usually mess up at least one seal. Parts Required 1. RTV Ultra Black. Get the pressurized one like this. Makes it so easy. http://www.autozone.com/sealants-glues-adhesives-and-tape/rtv-adhesive/permatex-ultra-black-maximum-oil-resistance-rtv-silicone-gasket-maker/491386_0_0/ 2. Cummins factory seal kit with sleeve ($50 to $124 depending on where you get it): 3802820 Parts Note: 3802820 Cummins Seal Kit can be had on ebay for for as little as $50 shipped. You cannot buy them from the dealer. Random Notes 1. Cummins installation tool sets the depth form the REAR of the timing cover 2. Everything is a 10mm except the crank pully is a 15mm Torque Specs Crank Pully/Balancer: 92ft/lbs Fan Support Bracket: 18ft/lbs Timing Cover Bolts: 18ft/lbs Tear-Down Procedures 1. Remove the 4 nuts on top of the radiator to get positive battery cable out of the way 2. Remove the oil catch can on the bottom of the timing cover (just a 10mm nut that holds it on) 3. Disconnect gear case breather tube 4. Remove the upper radiator hose. You will lose a little coolant... just a little bit, but it makes the job SOOOO much easier. 5. Remove the coolant overflow bottle. There is a little "button" at about the middle of the back of the white plastic can that pops into a slot on the fan shroud. Push that button in w/ something hard then pull up on the coolant overflow bottle. Remove the little hose from the radiator to the coolant overflow bottle. 6. Remove the windshield wiper reservoir. It is annoying to fight for space. Easy to remove. First pull up on it to remove it from the fan shroud. Then disconnect two electrical connections from the bottom of the truck. The lower one is to the wiper fluid motor. You just pull and wiggle off the black connector to the fluid motor while supporting the fluid motor. I am sure you can twist and pull out the whole motor assembly, but why mess with an old O-ring. The low level connector which is slightly higher on the bottle is a standard clip you pull back and pull down on the connector. Remove the hose to the bottle. Remove the reservoir from the top. 7. Remove the accessory/serpentine belt. Put a 3/8" socket and breaker bar (or actual breaker bar) into the hole on the front of the tensioner (see image below) and rotate left relieving tension while pulling off the belt. 8. Loosen the fan shroud. There are two clips on the top of the radiator. Two bolts on each side of the radiator. Then lift up as there are two tabs the shroud sits in on the bottom of the radiator. 9. Remove the 4 bolts to the fan hub. One is blocked and you cannot remove, but you can unscrew and the fan hub will come off. I personally had to grind down a 10mm closed wrench to fit inbetween the space of the back of the fan pully and engine block. An open wrench started to strip the nut. 10. Lift the fan and fan shroud out in one piece. Thank me for removing your upper radiator hose first. 11. Remove the front crank pully/balancer (4 bolts). You may need a barring tool. Geno's Garage has them for 34 dollars as noted above. Even without a baring tool I had my neighbor attach a wrench to one of the four bolts while I loosened the other three. Then we tightened back one of the three I loosened and broke the last one. 12. Remove the timing cover bolts. Two of them are threaded studs. They simply remove just like any other bolt. To get the timing cover off I used a heat gun to loosen the ultrablack gasket in there and used a pry bra from the top of the cover to start to pop the thing off. I recommend marking on the front of the timing cover where the long bolts and studs go. It will make life easier when you are trying to re-assemble. You can't see my markings b/c I marked under the bolt in silver marker. 13. Clean the gear housing surface with a razor blade scraper, sand paper, and some acetone. Ensure it is super clean and oil free. Clean out any gunk in the bolt holes. I threaded a screw in each hole to ensure I wouldn't have any issues when it came time to install the timing cover as the dealer got the holes filled with RTV. 14. Clean and inspect the crank nose before sleeving. It must be perfectly clean and dry. Clean with acetone and grind down/buff any burs. The dealer used a seal puller and put huge gouges into my crank nose which caused high sharp burs. I ground them down with a dremel and polished them with some jewelers compound. Your gear casing should look as clean as this before you even attempt to RTV down a new one: Sleeve Install Procedure This is the sleeve. It is metal. The outside of it on both size are NOT beveled. ONE side on the INSIDE is beveled. The beveled portion goes IN TOWARDS the engine to help assist it sliding over the crank nose. I called cummins to confirm this. I did not get pictures of the next steps but here are the procedures: 1. Put LocTite 620 on the inside of the sleeve 2. Clean up the crank nose with acetone and ensure there are no sharp burs (should have been done above) 3. Put more LocTite 620 on the crank nose 4. Place the sleeve onto the crank nose with the bevel facing inward towards the engine 5. Put the wood block on the front of the sleeve and whack it a few times with a hammer. Get it on about 1/4 to 1/2 the way. It will get hard to move if not impossible. 6. THE MAGICAL STEP: Go get your crank pully/damper and the 4 15mm bolts. Put the crank pully in front of the sleeve and put in all 4 bolts as if you are trying to install the crank pully. Finger tighten all 4 bolts up to the sleeve. In a clockwise motion around the 4 bolts, turn each bolt 1 turn until the pully bottoms out on the crank nose. Boom... no tool required. No frustrated banging. No messing up the sleeve. Remove the crank pully. Seal Install Procedure This is the cummins seal install tool that comes in the sleeve kit. It is meant to set the depth from the BACK of the timing cover. To set the dept, the rounded nose portion of the cummins tool goes DOWN from the back of the timing cover. It will not hit the teflon seal. Just ride the edges. The seal press kit I mentioned above fits perfectly into the cummins install tool Again I didn't get pictures of me pressing in the seal, but this is what I found after much research and destroying one expensive seal. Both cummins-b and mopar service manuals say install the seal from the back. The seal CAN be installed from the front while the cover is on the engine, but it is a royal PITA from what I hear. Just because you can do something, doesn't mean you should. This is what the dealer did to my crank nose trying to install from the front. I found when I tried to install from the front, the cummins seal with a new timing cover was so tight that the timing cover shaved off metal from the seal. This is how I did it: 1. Put the timing cover with it's back down to my bench 2. Remove the plastic seal guide/protector 3. Put LocTite 620 on the inside of the timing cover and around the outside of the seal. DO NOT get any on the teflon seal itself. 4. Install the seal crooked from the front. I put one side about 50% of the way down through the hole in the timing cover. 5. Put the appropriately sized seal die onto the front of the seal (this is the side w/ the little arrow showing clockwise directional rotation.) Since once side of the seal is below the lip of the timing cover, the die will not slide around. 6. Use the 1 ton press to press down on the high side of the die. With a lot of squeaking and pressure it will go in. Don't try to press down directly on the seal. I tried this and wound up with a bent seal. Hence, use the die. 7. Once the high end is down into the timing cover about 4mm, flip the cover over 8. Put the die into the cummins installer tool like I have pictured above 9. Pushing again on the high side of the seal, slowly work it down into the timing cover with the press 10. Re-install plastic guide/protector from the back (teflon side) so that the wide opening of the seal is going to go onto the crank nose Eventually everything will bottom out and you will have a properly depthed seal with the cummins tool pressed on by the die/press. A note about depth, since you are sleeving your crank, it doesn't really matter as long as you are on the new sleeve. Optimally you want the new seal to be anywhere from flush with the front of the cover to 1/4 into it. ALTERNATIVE SEAL INSTALL METHOD You can go to autozone. Buy a 3" O.D./ 3" I.D. muffler coupling ($2.99) which is the perfect size for the front of the seal and use that and a piece of wood to try to pound it in. I couldn't even get mine started when I tried it and had to go out and buy a press. You can be like me and try to save money and do this method first, but you will kick yourself for damaging an expensive seal. Re-Install Procedure 1. Clean all the old seal off the timing cover with a razor blade and acetone 2. Use some fine sand paper to scuff up the surface. If it is slick the ultrablack will just slide around. Clean with acetone. 3. Apply a bead of ultrablack in the groove on the rear of the timing cover. Go fully around each bolt hole. 4. Take the M8x1.25 bolts I suggested above and use them as guides to hold and guide the timing cover in square. You can do it without, but it is a real PITA to get things aligned. With this method I didn't get RTV on a single bolt nor did I have to move the cover around at all. Picture of the location for each bolt. Obviously take them out and thread them through the cover one at a time like the next picture. 5. Slide the cover on, but don't moosh it on. Just make contact. Otherwise you will moosh seal into the bolt holes and get rtv on your bolt threads. You may have to push hard to get the seal to move over the crank nose and off the plastic guide. This is ok. 6. Per ultrablack instructions, finger tighten all the timing cover bolts. Let the cover sit for 1 hour. Torque to spec - 18ft/lbs. 7. Remove plastic protection sleeve. You don't want to do this before letting it sit for an hour b/c the cover will move back slightly when torqued and move the seal along the crank nose. You want that puppy to get on the crank nose and never move again. 8. I used my baring tool to turn over the crank (turn left so the crank goes right) twice. This allows the teflon seal to mate with absolutely zero oil in the crank case. 9. Per ultrablack, do not put the vehicle in service for 24 hours. I let the truck sit for 8 hours on a 75 degree day then let it run for 15 minutes. The ultrablack was hard before I chose to start the engine. The next day I let the truck run for 30 minutes while topping off my coolant with a bubbler. This is a good video I used to make this write-up. The kid however wants $100 to rent his tool with a $400 deposit. If you are going to spend $100, buy a press and die set like above which is less than $100. Then you will have tools you can use over and over. You don't need a tool to put the sleeve on the crank. Just use the fly wheel like I posted above.1 point
-
1 pointUpdate. Shop buddy. Found a complete 80 with mag hytec front d60 cover and rear cover for 1200, no core charge. I kept my brakes and the internals of the axle looked really clean. I will be changing the axle bearings and seals eventually, but for now it works. I ordered new u bolts in 9/16ths over the stock 1/2 inch, as nobody I found would make or stocked 15x3 1/2 u bolts. I also had to get my driveshaft shortened by about 1.75 or so. There is a good shop in Denver I used, bills performance driveshaft. And no, that isn't my shop, it broke at the family farm several hours away... but, John deere makes a nice hoist. Haha. I also sent my steering box to blue top. Quick shipping and low cost. I cross threaded two bolts on the install... I'm not sure if it was like that when I pulled it or if I damaged it on the install. I do wish I had chased and lubed the threads prior to install. The truck steers vastly better now.1 point
-
I never you guys are making me feel bad, I know I need to update my sig, but cant figure out how to do it.I actually got rid of my KN filter after watching Mikes video. and put the stock paper element back in a year ago. maybe one of these days might upgrade to a BHAF. but for now the stock is just fine. As far as my oil change, I have been with shell rotella 15/40, and mostly Napa or wix filters since day 1. and Ive been the sole driver of my truck since 2003, and I do plan on keeping it around for at least 500k miles or more. I also live in a harsh environment with -25 temps in winter and close to 100 in summer and a lot of steep mountain driving. mostly recreational with 5 th wheel and toys behind it. One reason I never went with synthetic (besides the price) is that I would feel guilty about going 12-15000 miles between oil changes, it just doesn't fit me, I would rather be under my truck every 7500 or so and gives me chance to look thing over and I might see something before it does become a problem. Its just good old school maintenance to me.1 point
-
262k miles running solely 15w-40 oils even with temps as low as -25*F.1 point
-
That's what CajFlynn did... The truck ended its life in a traffic accident at 1.3 MILLION miles. The engine got sold and lives on in a new truck body.1 point
-
1 pointMaking some progress. I'm in the process of building the crossmember and will update later
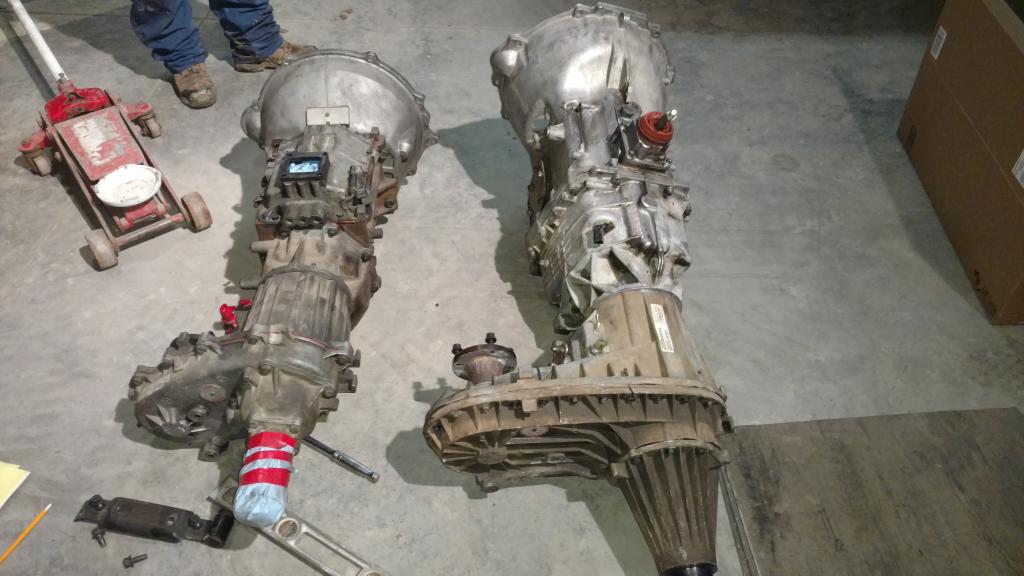 1 point


This leaderboard is set to Boise/GMT-06:00