notlimah
Unpaid Member
-
Joined
-
Last visited
Everything posted by notlimah
-
Oh nice! Looking forward to seeing where this goes!
-
I saw this and at first I was like.. Then I saw it doesn't support apple products and was like..
-
Yea the distortion is on the side facing the turbo, so not touching the bottom, that's what got me thinking that maybe it was heat induced, causing the material to break down prematurely and weaken it. It seems a little weird to think that if it were to be damaged because of too much suction that it would happen on that side of the filter and not the top or bottom which is much more flat and weaker.
-
The main reason I chose to get this filter over the paper BHAF was due to the fact it seemed like it was a better quality part. If this damage is in fact due to it not having a heat shield then it's completely my fault. Then my question is, is the damage or whatever you want to call it shown in the picture enough to warrant a new one? Or is it ok to continue using? I don't have a zoomed out pic but it is identical to this PIC.
-
Sorry guys, I probably should have approached this a little different. I was assuming that the filter was not supposed to end up looking like this and had failed when I should have asked for reasons why it could be like this due to other reasons, which you guys provided. The filter is and has been supported so it hitting something isn't likely. It does fit in the engine as far as I'd say, but I'm no mechanic. It is in fact a 4510 as per the sales receipt and matching pictures on the web. So that leaves me with running this filter without a heat shield. Dumb, I know, but I was in the process of getting a heat shield made and just never got around to it. Either way, I bought this filter before I joined this forum and that would've lead to me purchasing a different filter altogether. Didn't mean to bash a product or try and talk bad about it. I'm learning as I got when it comes to a lot of these things on this truck! Thanks for the replies!
-
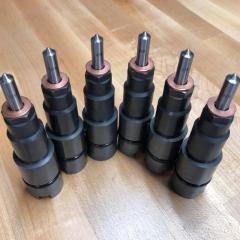
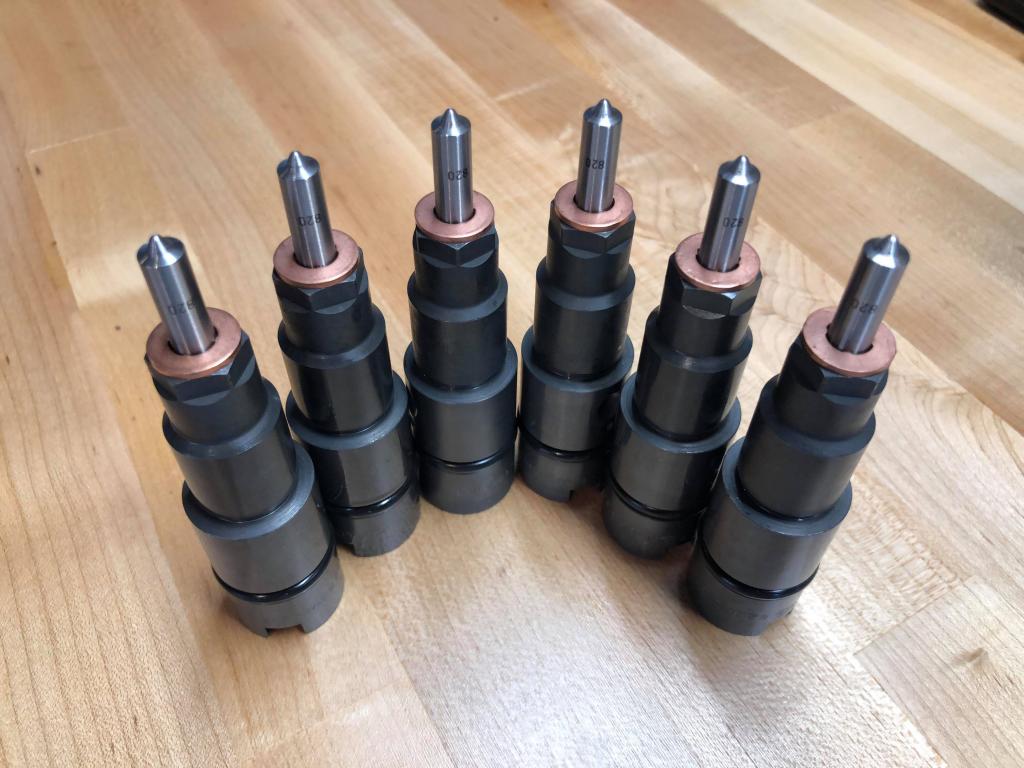
Well, looks like my Amsoil can't hack it! I'm pretty dissapointed with this as I'd only read and heard good things about this filter before installing it, with the only failures or negative comments coming from a guy who was running twins. Either way, my truck has no tuning and exhaust only so it's hard to think that a truck in pretty much stock form could do this to a 'premium' air filter! Anyone know a place I can pick up a BHAF on the cheap?!
-
Thanks guys! I'm really happy with it! Definitely got what I was hoping for and then some!! I think the fact the truck is 15 years old is what makes me like it so much! Haha
-
Thanks Brian, I appreciate it! After listening/watching this video back I realized I should have chose to record the idle portion in a different spot because my house is only a few feet behind the camera and it caused to sound to bounce around and sound a little different then it actually does. Either way I don't think it sounds too bad in the video though. I definitely took your advice and I primarily ride around with the passenger window down! haha
-
So finally a write up about my install of the exhaust. First I'll say that if you didn't already know, Diamond eye's exhausts kits ship fitting a wide range of different year trucks. They'll fit every model, cab size and bed length for the given year range. You'll have parts you won't use for your application and the instructions may/should be read as more of guidlelines. With that being said, the instructions 'guidelines' did help in the overall big picture set up for the system. Removing the stock system is pretty straight forward and I followed those instructions almost verbatum. I chose to leave the downpipe in place while I cut in order to help is stay more steady, but I did cut the stock system right where the downpipe flattened out by the transmission and another cut just before the rear axle. I did make a third cut to help make it easier but that's also because I did not have my truck on jack stands on anything. Putting in the Diamond Eye, I installed the downpipe first, then slid a 4ft straight pipe over that. Next I installed the muffler delete pipe, and installed the Diamond Eye provided exhaust hangers LOOSELY so I could see how things were going to line up and to see how much pipe I would have to cut to finish off the exhaust. Next I installed the first section of tail pipe (the one that goes over the rear axle) and let it hang loosely from the exhaust hanger. Then it was the final exhaust tail pipe and I just had to fuss around with that to get it lined up but that wasn't hard, just push the two pipes together and twist it around until it lines up how you like it. With all these parts lined up, I had maybe a 4in gap between the over the axle part of the tail pipe and the muffler delete piece. This is where understanding that this exhaust kit is open for interpretation will help ease your mind (hopefully!). The instructions state that you may need to cut 3in off of the over the axle tail pipe to help with fittement and athstetics, I didn't see the need for this and did not cut it. The instructions also state that the muffler delete should on the over the axle tail pipe piece but I chose to attach it to the other side simply because the smaller piece that I was going to need to cut to complete the install would be easier to clamp together a little further back. I ended up cutting the other 4ft straight pipe down to 10in total. The gap I was left with was 4in, and I added 5in to account for the slip joint and an extra inch just for slop. It ended up fitting perfectly! Overall it went together fairly smoothly. Had I known what I knew now, it would've shaved down some time, but probably not much. Here's my takeaways... - Don't bother with the provided exhaust clamps. They created such a loud vibration at idle and I felt like I wasn't getting a good seal at the joints so I replaced those with 4in alluminum exhaust clamps from NAPA. - Don't worry about only one exhaust hanger being able to fit back on the exhaust tip. The spare tire makes it pretty obvious that one hanger wont fit so common sense is key here. - Speaking of spare tire, I did NOT need to remove mine although I've read many people that did need too. Personal preference I think, or however you have your truck setup for the instal ie jacks, lift or on the ground. - I was able to do this install without getting the truck off the ground, and mine is a 2wd! Granted my neck and back weren't happy the next day but it is doable if need be! - With the exhaust on the way it is now, I still have a bit of a rattle coming from the very tip of the exhaust. I THINK it's happening because with only one exhaust hanger being back there now, and it being a good distance away, its causing some extra vibration/resonation at idle (mostly when cold) and when decellerating down to idle. You can hear it in the video when I pull up to the stop sign. I'm looking into possible adding some 3/8th's rubber around the exhaust hangers, or cutting a few inches off of the exhaust and adding an exhaust tip to maybe add some weight and make it resonate less. - As far as in cab drone, it does exist, although not as bad as I would've imagined. I've had cars and trucks that had bad exhaust drone before and this one definitely isn't as bad as ones I've had before. It's a decent hum when it's lugging around 45ish mph's and starts to hum again under slight load around 60ish mph's. Obviously under hard acceleration the hum is replaced but all kinds of other noise! Good noise! I'll update this later after I have some more highway miles on it. Hopefully this helps! Here's the VIDEO!! https://www.youtube.com/watch?v=aUstfEtIRh0&feature=youtu.be
-
If I could weld or had the means to have someone do that I would've gone that route as well. I talked to Diamond Eye and they said that their kits are made to be able to fit such a wide range of different year trucks that everything is included so no matter what truck year you have, you'll have enough or what you need to complete the job. So, they said only one exhaust hanger on the tail pipe will fit, which makes sense from the spacing issues I saw on mine. My only concern now is that with only one exhaust hanger on the tail pipe and the next one being back up in front of the rear axle, I'm getting a good amount of exhaust vibration and idle or low rpm/slow moving speeds. The Diamond Eye tech seems to think it could just be because of the lightweight of the system and it not having a muffler on it. If that's the case I'm ok with it, but I would like to be able to lessen it if I could.
-
Couple questions for the guys that have installed this kit... Did you anyone use these parts? Also, I never used part # A445008 which is the second to last hanger you would use on the tail pipe. The hanger wouldn't fit with the way the exhaust came over the rear axle, plus the spare tire didn't leave much wiggle room. Just wanted to see if I was the only one in this situation or not. Instructions found here
-
Subscribing to this thread for future reference! Let us know how it goes!
-
Well I went to O'reillys today to pick up some band style clamps but they only had 2 in stock, going to try NAPA tomorrow since I need 2-3 more. I'm loving this exhaust!! So far no drone but I haven't had it up to proper highway speed ie: 65+ Still working on putting a before and after video together, I'm not the best at video editing but it's coming along. I'll keep you all posted!
-
Yea I wanted to use those as well, I just didn't have time to pick some up and today was my only day I'd be able to install the exhaust. They'll work for now but will definitely be swapping to the band style. Do they secure the exhaust as tight? Or is it mainly preventing exhauat leaks?
-
Thanks for the pic! Puts it into perspective a little more now! I FINALLY got mine installed today! Ran into a couple things that held me up a bit, but I'll take pics and post a video and put all that in there. Did you guys use the diamond eye supplied exhaust clamps? I got 3/4 the way through and realized the way I was tightening them down wasn't working. I had to make sure the base piece was touching both joining pieces of exhaust before tightening otherwise it would still move. Anyone else experience this?
-
Yea I'd like to see a pic! I'm definitely not looking for anything flashy as my trucks already not much of a looker anyways. Just something tasteful.
-
I'm the same way as far as the tail pipe goes too! I've heard some people said it stuck out way to far and others said it lined up perfect. What tip did you end up using? I sort of like the way the exhaust looks without a tip but I'll see how I like it once it's on the truck! I think I'm going to end up buying an oscillating saw Saturday and getting it on then. My main concern is it looks like that muffler replacement piece is going to add A LOT of extra length to the system so I'm sure I'll have to cut a decent amount so I want to have the tools to do it myself. Plus this is an easy justification to buy tools! haha
-
Although I have no experience with the FASS, I'd have to agree with you on this one Jeremy! Every review or post regarding the FASS Titanium system has been great, unfortunately at the time I needed a new lift pump, that was my only option, even though I knew full well the FASS was the better choice, it just wasn't an option for me unfortunately. Thankfully, now that the isolator is out of the way, my fuel pressure is a lot more consistent, albeit, a much larger spread then I'd like, it does 'know it's role' sort a speak as it only drops down to 14psi when WOT headed up an incline, and usually sits right at 20psi for idle and floats between 15.5 and 18.5 for normal driving. I really wish I had rock solid pressure like you! A FASS Titanium system is on my list for next upgrade! Hopefully it will be at a time that works for me and not because my Raptor sh*ts itself and am forced to shell out the cash!
-
LOL! I'm working on it! Unfortunately it seems like when it rains, it pours! Work has been laying it on thick as of late, so when I get it on, you guys will be the first to know! I was looking back through the instructions and it says "add 5in for the slip joints" so I'd assume that 2.5 on each end? I'm not sure, I figure I'll get it laid out as best I can under the truck and go from there!
-
I'll definitely look into both options. How many inches did you add to compensate for the pipe fitting into the joining pipe?
-
Yea I really don't want to bust out the hack saw. I thought worst case I could get the stock exhaust off with it but I'd still be at a standstill if I had to cut the diamond eye. I'm going to ask around and see if anyone has a oscillating saw or chop saw I can borrow otherwise it might be time to get one for myself. 18inches seems like a lot to cut! Although I was looking at all the pieces and thinking that it looked longer then the truck!
-
Thanks guys, that's pretty much what I figured. When I put my exhaust on my GMC is was the same situation, tried saving the stock exhaust if possible but just really wasn't any other way around it, but only needed one cut on that. Now my problem is I currently only have a hacksaw which might be ok for the stock exhaust, but the instructions said it might be needed for the DE. Did you guys have to cut any pieces of the DE to get it to fit correctly? I'm using the muffler replacement piece so I'm hoping I don't have to!
-
Well I got my exhaust in and everything looks good! I was reading through the instructions and it said to cut the stock exhaust in a couple places with a hacksaw or something similar. Unfortunately I don't have a hacksaw so I'm going to have to crawl under the truck and see if it looks possible to get the stock exhaust off without cutting anything. The 4in is WAY bigger then I thought it would be though! haha I'm excited to hear how it sounds!
-
Do you have a link Mike?
-
Yea, I'm going to do it myself as well. Did you have to get the truck up on jacks or did you just crawl under?