


Tractorman
Yearly Subscription
-
Joined
-
Last visited
Everything posted by Tractorman
-
I am curious as to where that switch would be mounted (just for my own information), whether it is at the throttle in the cab or by the APPS in the engine compartment. I have an older style vacuum operated PacBrake that I wired in myself. I did not use a throttle switch or a clutch switch. I relayed the solenoid valve and the relay is operated with a momentary foot switch that I mounted on the floor right beside where my left foot rests. This setup makes it not very likely to operate the throttle and the exhaust brake at the same time. However, if the PacBrake micro switch would be a reliable setup, I would be interested in mounting one in my truck. Let us know how you resolved your problem. - John
-
I may not be able to help much here, but if you answer some questions, others may be able to help. Is the air solenoid for the PacBrake valve controlled by a relay? If so, is it your intention to have the ECM wired to the coil of the relay so that the ECM determines when the engine is at idle and allows for the exhaust brake to work? Does PacBrake provide detailed information (such as theory of operation) as to how the system is intended to work? I don't know what Pin #20 from the ECM's job is. I just went through my factory service manual wiring diagrams and I did not find pin #20 from the ECM - I could have missed seeing it, though. This site provides wiring diagrams for your truck. They should be available to you. - John
-
Don't skip the step of checking battery voltage while the engine is running as outlined in my previous post. It is a basic step, but it is important. Let us know the results. - John
-
I don't know where the scanner senses system voltage, so I would use a regular DVM and check voltage at each battery. Should be right around 14.0 volts - a little higher if ambient temperature is low and a little lower if ambient temperature is high. Each battery should be within about .03 volts of each other. - John
-
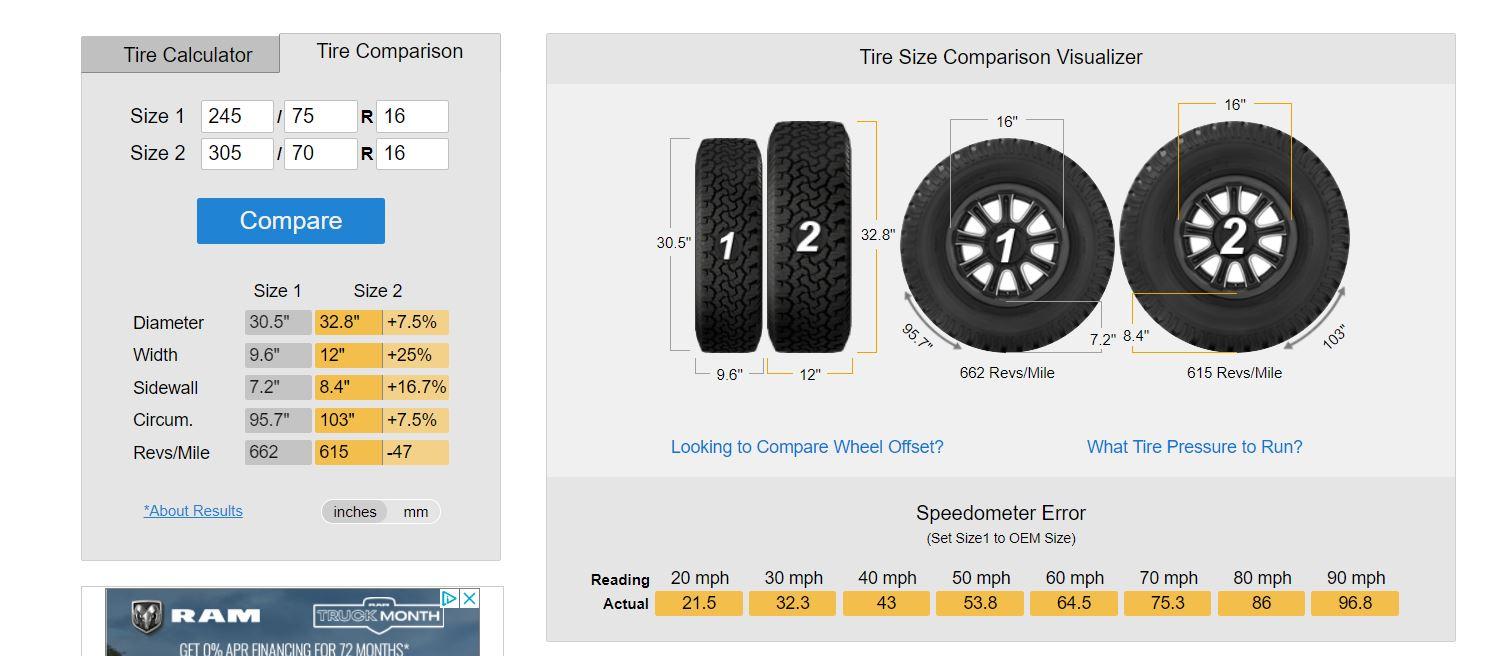
Wow! I had no idea! Sorry for that suggestion. When I increased the caster on my truck, I just cranked the adjustment to make the the lower control arm longer, almost to the maximum setting. I just guessed. I had to make a couple of minor adjustments to allow for the crown of the road. When I had it like I wanted, I could let go of the steering wheel and the truck would track very slightly to the right over a long distance.. Of course, in the UK it would be to the left! Then I had it checked at an alignment shop just to have a record (4.5° positive both sides). It is unfortunate that you cannot do this. Then end result was good. The truck steered much better going straight down the road as well as into and coming out of curves. Coming out of curves, the steering wheel returned to center quickly on its own - very responsive. For you, I am sure it will be worth the hassle. I know that you are not going to change your tire size, but here is the difference between the stock tire size vs the tire size that you are running. The tire info from my door jamb on my truck shows 245/75R-16 for tire size. I think your '99 truck is the same. - John
-
@wil440, you might consider taking the truck to an alignment shop to get a printout of your current caster, camber, and toe settings. That would give you a reference point as to where your caster setting is currently and help you to determine whether or not you want to change it, or how much you want to change it. My truck came from the factory with about 3 degrees positive caster. The truck was a wanderer. I reset the caster to 4.5 degrees positive and the wandering ceased. One of the best and least expensive steering mods I have made. - John
-
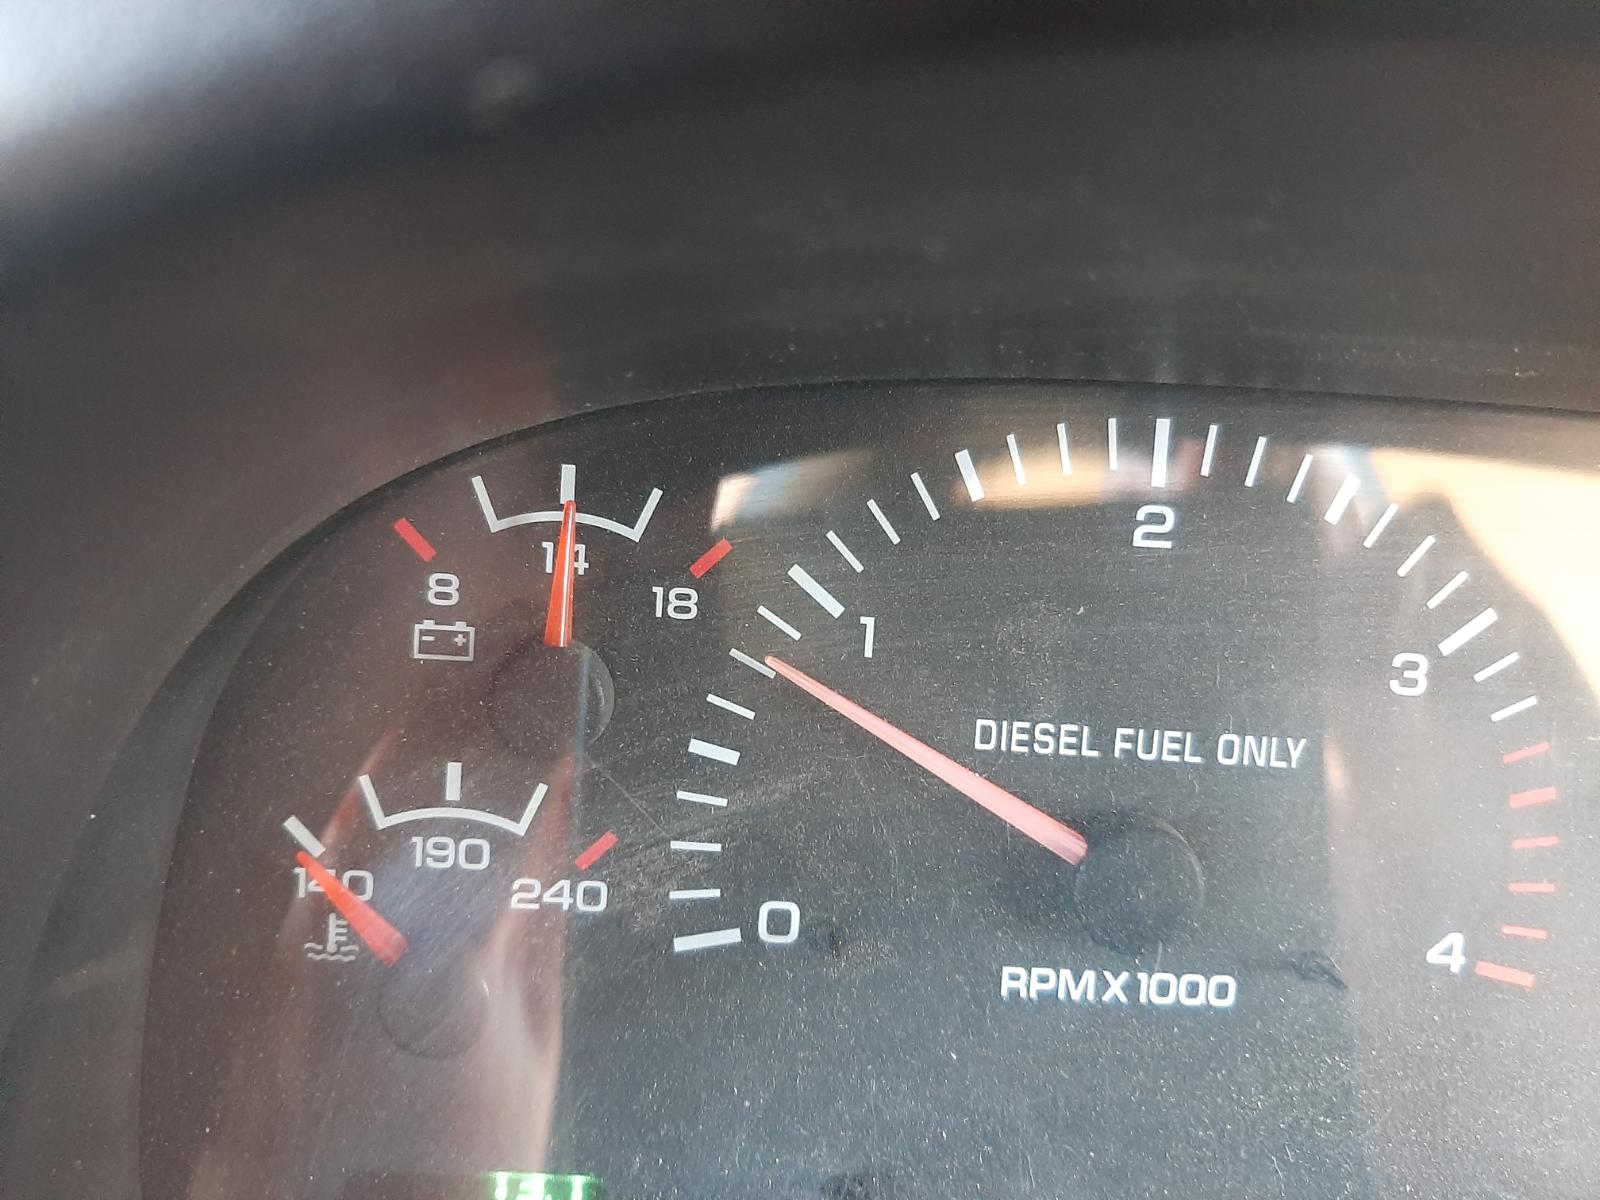
The lines are important. Each graduation is 125 rpm - rather stupid in my opinion. Watching your video, I see the tach needle just below the 750 rpm graduation mark on your truck. 800 rpm would look more like the photo below. Just took the photo using my truck. - John
-
@dripley, you might not have known it at the time, but the gremlins probably came out of the electrical wires for a few minutes and were laughing at you. You were given a chance to catch them, but no, you were probably all focused on where your truck was heading. I actually installed a clutch safety switch on my tractor just to protect myself from doing the very same thing. It was always tempting to just reach over and start the engine while standing beside the tractor. Now I have to sit in the seat and depress the clutch pedal to start the engine. The switch has kept me out of trouble. - John
-
I think that is a good way to go. I think the sealed ball bearing will keep out contamination better because it has its own seal and sealing surface. My replacement needle bearing has a seal on both ends, but its ability to seal is largely determined by the surface condition of the input shaft which is no longer in good condition on my truck. I would not count on that. In my instance I was driving in a rural area about ten miles from my destination when I noticed a subtle change in the way the transmission was shifting - no noises at all. At the next stop sign, I could not select any gear from neutral. I had to shut the engine off, select first gear and then restart the engine to get moving again. The rest of the trip I just floated the gears and did California stops. However, I needed to make a left turn across two very busy lanes of a four lane road to a place of business. So, while I was waiting for an opportunity to turn, I had the transmission in first gear, clutch pedal depressed with engine idling - something I normally never do. I knew it was going to be a couple of minutes before I would be able to turn. About a minute later there was a muffled screech (barely audible) that lasted about 1/4 of a second (that was when the needle bearings left their home). I am certain that was when the input shaft damage occurred. The good news was that the transmission was instantly back to shifting normal again because the pesky pilot bearing left the premises, which made parking the truck easy and the trip back home much less stressful. Who needs a pilot bearing anyway!! I think the sealed ball bearing will a good choice for you, but what is more important (I learned this the hard way) is to schedule a clutch replacement at a specific mileage, not run it until you have problems. - John
-
You have made some good observations. I really have nothing to back up what I am going say, but I think there might be more to the story. I think there may be other factors that give the needle bearing a long life. 1. there is not a lot of weight resting on the needle bearing. Most of the weight is supported by the transmission input shaft bearing. (some gasoline powered engines do not even support the transmission input shaft on the flywheel side). 2. the pilot shaft end would ride on a thin film of lubricant which would allow for each bearing to slide while it rotated. I could not imagine a needle bearing surviving at 6400 rpm. I think they are rotating much slower - but I could be wrong about this. From Wikipedia (the source for everything!) : "Compared to ball bearings and ordinary roller bearings, needle bearings have a greater surface area in contact with the races, so they can support a greater load." I do think that contamination is the downfall of the needle type pilot bearing. Anyway, just some thoughts. - John
-
I don't have any suggestions for a pilot bearing / bushing, but I just wanted to pass on some information. I had an OEM pilot bearing failure at 297,000 miles (original clutch). The failure did some damage to the transmission input shaft pilot bearing surface. I elected to not replace the input shaft and I used the LUK replacement clutch and flywheel which basically replicates the OEM assembly. I also installed a needle type pilot bearing. I am not recommending anything here; it is just what I decided to do. I get to live with the consequences. Sometimes trying to get the maximum life out of everything is not the best decision. As hind sight I should have just replaced my clutch at around 250,000 miles. If I would have done that, the pilot bearing failure never would have occurred. The replacement clutch assembly, flywheel and needle type pilot bearing have since logged over 54,000 miles and the transmission / clutch operation is performing well at just over 350,000 miles on the original transmission. I plan on doing a scheduled clutch replacement again when I approach between 150,000 - 200,000 miles on the new clutch. Hopefully, the pilot bearing will last that long. In my case I think I could have had a pilot bearing failure with any type of pilot bearing with nearly 300,000 miles of operation, so I was not that concerned about using a needle type pilot bearing again. - John
-
This is true, but I don't think it is relevant in causing the "squeal and jump" that he is experiencing. That is why I stated it the way I did. For example, if there was any resistance from a faulty u-joint in the front driveshaft, the driveshaft would simply stop rotating - the differential gears would allow for that. - John
-
If his truck has a CAD on the front axle (which I think it does), there shouldn't be any noise from the front driveshaft even with worn out u-joints because the driveshaft would not be rotating unless 4wd was selected. @White wondee, I would first do a preliminary check of engine mounts, transmission mount and bell housing bolts, etc. just to make sure nothing is moving around when it shouldn't be. Check the rear driveshaft and carrier bearing, too. - John
-
If you compared your Quad speedometer with a GPS unit and they agreed with each other, then I'm thinking you have 4.10 gears - which would be a good match with the tires you have on your truck. - John
-
Are you sure about the 3.55:1 ratio? Have you checked your speedometer against a GPS unit? Only reason I am asking is because I have almost the same setup as Mike with the exception of me having an NV5600 (only a small difference in overdrive ratio). 245/75 R16 tires 3.55:1 axle ratio NV5600 transmission Tire size recalibrated by Smarty S03 My tach is approximately 1950 rpms at 65 mph in sixth gear. I have verified the speedometer with a Garmin GPS unit. - John
-
Good info from @Dieselfuture. @Takendad, is it possible that you were unintentionally getting water on the PSG unit mounted on the VP44 injection pump while you pouring water on the ECM? If so, it is more likely that you are having solder problem in the PSG rather than the ECM. - John
-
Originally, my clutch pedal would not pull up. But one time while trying to detect a squeak under the dash, I pulled upward on the clutch pedal a little bit too vigorously and I heard a noise. From then on the clutch pedal could be raised at least a couple of inches with no resistance. I think a plastic tab broke where the pushrod goes into the master cylinder. It has had no ill effect on clutch operation and as I mentioned before, I am still running the OEM hydraulics. @dripley, this could have been why a new master cylinder corrected your situation. @Doubletrouble, I don't think that the upward travel distance of your clutch pedal is a factor in the problem you are experiencing. - John
-
I don't think so. Mine pulls up quite a bit farther than that and I still have the OEM hydraulics that are working fine. As long as the pedal sees resistance right away (from where the pedal rests), I think what you are describing is normal. It still doesn't exclude the possibility of having air in the system. - John
-
The truck may only have 151,000 miles on it, but it also has almost 20 years. Time takes a toll. I am still running the original hydraulics at 351,000 miles, but I lost the OEM pilot bearing at 297,000 miles. A pilot bearing that is dragging will display the symptoms you are describing. - John
-
Did you hear the gremlins laughing at the installer? - John
-
They hide in the electrical wires. The only time you can see them is when you let the smoke out. They like smoke. I can hear them sometimes..., but only when they are laughing at me. - John
-
Thanks for the clarification. I will have to check these wires on my truck. I hope you have fixed the problem. Keep us posted. - John
-
As long as your suction lines are unobstructed, you will not get cavitation. The only way to get a specific pressure reading would be to temporarily tee in a test port on the suction side of the lift pump and hook up a vacuum gauge. This test is normally unnecessary because there are other ways to prove that fuel is flowing without restriction. - John
-
So, are you saying the individual wires are showing bare copper? Or, are you saying the individual wires are still insulated, but the sheathing doesn't quite extend to the end? - John
-
Could you post a photo of the specific location you are referring to? - John


