


IBMobile
Staff
-
Joined
-
Last visited
Everything posted by IBMobile
-
When you get that new mechanical fuel pump the electric pump can be plumbed into the system as a back up and used for priming like this.

-
Start with this:
-
They are disingenuous about the movement and use it as a vehicle to promote their political agenda. They want control over your daily life by imposing stricter and stricter regulations most of which have marginal environmental benefit but have a regressive effect on the economy which in turn costs individual house holds hundreds if not thousands of dollars and Pounds every year. These are environmentalists that are known as watermelons. They are green on the outside and red on the inside. This is where the communist party went with the fall of the USSR and now have infiltrate parts of world governments as well as the UN under the guise of climate change. Why else would the United Nations Climate Chief Christiana Figueres inform us "that Communist China has the right type of governmental system to fight Global Warming". They espouse that the world as we know it is coming to an end and tell us to drive less or drive and electric car, turn the thermostat down to 68° in the winter and up to 78° in the summer. Here in California they run ads telling us not to use electricity between the hours of 4pm and 9pm and with these new smart meters they charge a premium price if you do so for the cheaper rate you do you run your high demand appliances on off peak hours, this is control through the peruse. In California they also just signed into law that every new home built in the State is required to have solar panels installed, this is control by legislation. These are but two examples of the controls imposed on the citizens of this state with so many more that could fill a book. I'm sure you've seen your choices and freedoms slowly eroded over time in the name of environmentalism. These people and groups say do as I say and do not doubt for those that doubt and question are heretics an blasphemers and must be denounced and persecuted. Any one in the public eye or academe that dares speak out has aspersions cast upon them with their careers stifled or ruined. The major news organizations are complicit and work in unison to accomplish this nefarious deed. In 2008 President-elect Barack Obama said "the moment when the rise of the oceans began to slow and our planet began to heal." In 2015 on Earth Day President Obama said that "rising sea levels are putting a national treasure...at risk". He also said "So climate change can no longer be denied- or ignored" and "This is an issue that's bigger and longer-lasting than my presidency." Later that year Obama issued an executive order for the armed forces and various federal offices to consider rising sea levels in planning new federal work projects. Now for the classic do as I say and not as I do, ex- president Obama with his wife Michelle have purchased a $14.58 million 29 acre estate Edgartown, MA on the island of Martha's Vineyard. I guess the all and powerful Obama stopped the rise of the oceans and our planet is healing or is it 'Do as I say and not as I do'? Oh by the way the Obamas are doing ok for a couple that just 3 years ago was only making $400,000 a year.
-
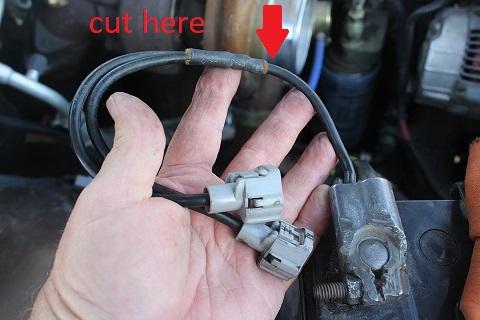
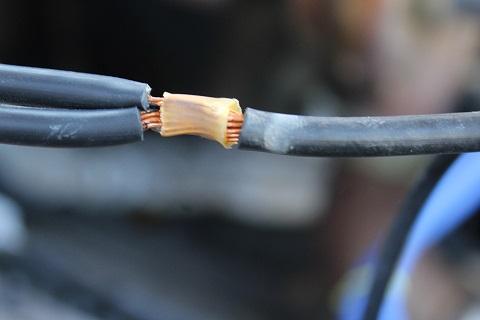
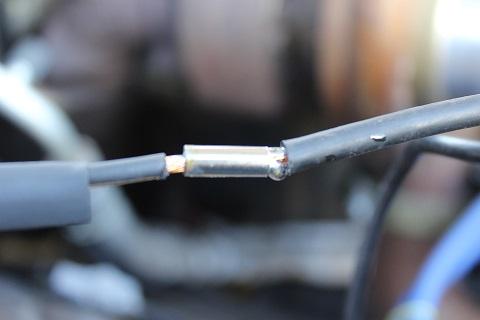
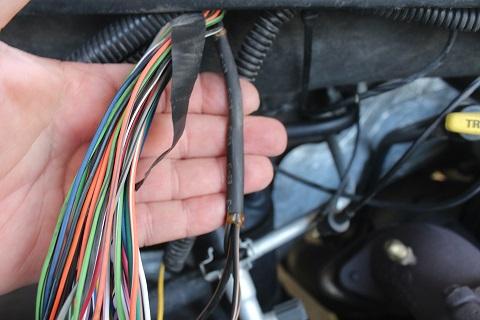
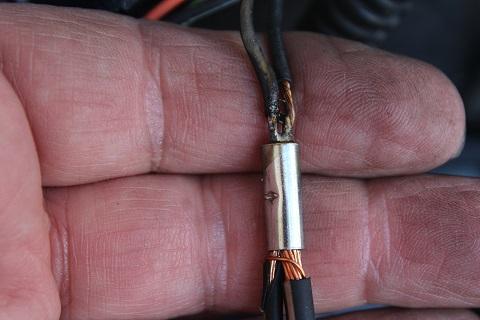
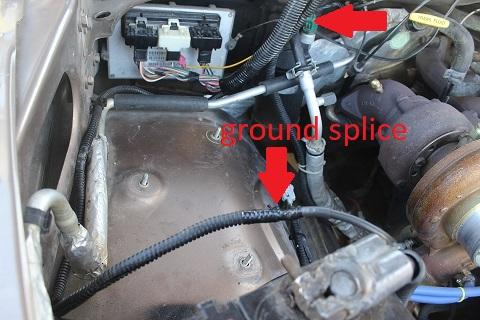
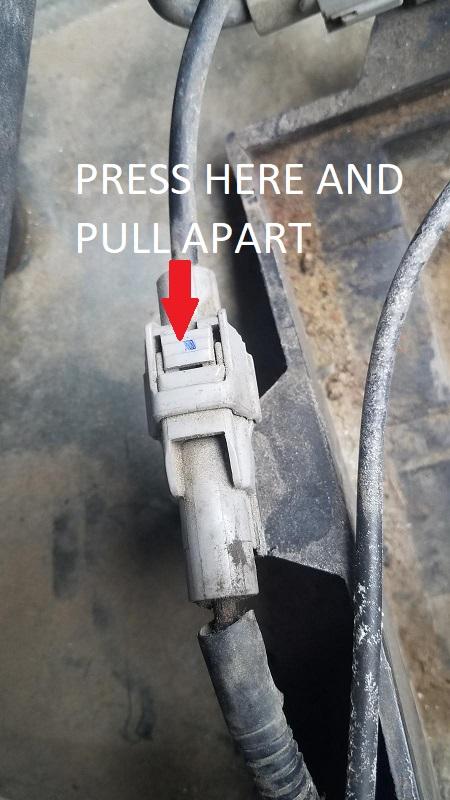
Check the wires and connection from the trans to the PCM. When I was testing my trans with the trans unplugged from the PCM I would have the trans temp and O/D light on. If the connections are good then have the PCM tested.Does terminal #87 of the ASD relay power up when cranking. Also check fuse #9 in the junction block. This fuse powers terminal #86 of the fuel pump relay and connector C1 terminal 2 at the PCM.All of the photos in his posts and articles have been removed; don't know why.So, that $550 covers shipping cost both ways?Thanks for the photos; their great. In the first pic it looks like you're on the wrong side of the road for that part of the world and there is even some blue sky The dog is cute. She looks like some of my customers when I'm explaining car stuff to them. Sure, an amateur found a Viking treasure of more than 1500 pieces in a field with his metal detector in Staffordshire, EnglandWhen I started my mobile repair shop any time I saw a Volvo I placed a flyer on the windshield, that brought in a lot of work. You will want to stock some of the fast moving parts and supplies, this will cut down on running around or waiting for parts down time.Your loosing prime, the fuel is draining back to the tank. You have a fuel fitting that not tight or an O-ring that is old and falling apart. Check all of your fuel lines and fittings. The fuel return line fitting at the back of the head has given problems. A few people have had the O-rings go bad.After testing and conferring the consensus is my truck needs a new torque convertor. The truck is used 95% of the time towing a 8,000+ pound 5th wheel and the transmission is basically stock. Which brand is good and which type, stock or billet? Should it be a single or triple disk? High or low stall speed? Any thing else you can think of.It sound like you had a mixed bag holiday with fun and new sights along with will we make it home in one piece. £500 to go 600 miles, that's about $1/mile. It might be cheaper to come to the States or Canada and rent a motorhome. You can go camping with @JAG1 and me.Good luck with the 21 year old. See if he offers to super size it. I think the clip you're looking for is part number 52028680AB and it is no longer available. https://www.moparpartsgiant.com/parts/mopar-retainer~52028680ab.htmlI have two scanners that I use and on will give me codes with live data from the ECM and the other will only give me codes with no live data. I think it's the protocol set up between the scanner and the Cummins ECM.You can apply dielectric grease on the connections or you can redo the ground wire from the PCM to the passenger (right) side battery like I did below. IBMobile ASE Certified Master Auto Technician Board Of Directors 1,635 1,821 posts San Marcos, CA Report post (IP: 75.39.180.178) Posted May 28, 2018 I finally got around to cleaning up the ground wire splices for the PCM this week end. It's not hard and took very little time to do. NOTE: Do this after the other modifications have been done or you will lose the ECM, VP and grid heater grounds. You need: 2 10-12 gauge butt connectors 2 1/4 heat shrink tube 2" long rosin core solder 140 watt solder gun (Weller) or small butane torch roll of electrical tape razer knife wire cutters wire striper Remove air cleaner housing this will open up the whole area to work in. No need to disconnect the batteries, just unplug the gray connector at the ground wires of the right (AUX) battery. The other gray connector has already been disconnected when the ground wires were relocated to the back of the timing cover. Disconnect the 3 plugs at the PCM Cut and strip the 8 gauge wire then cut the connector off the 10 gauge wire and strip it back to fit the butt connector. This is the connection with the cove off. This is splice #S109 that the grounds for the ECM, PCM, VP44, grid heater relay and data link connector. Slide the heat shrink on to the wire were it won't be affected by the heat of soldering. Remove any plastic covering on the butt connector, insert the wires into the connector and solder. Let cool then cove with the heat shrink. At the PCM find the two 14 gauge black with tan stripe wires. They go up into the split wire cover about 10" that's were you'll find splice #S126 There are two 14 gauge black with tan strip wires coming down to the connector. One is the ground for the data link connector and the other is not used. Repeat the cut, strip and solder process as above. When done it should look like this. 1 1 dripley and JAG1 reacted to this Quote Edit Options 2000 2500 quadcab, lwb, 4.10 ls, auto, edge ez, manual boost controller, RV275 injectors, 4" s/s magnaflow, fuel boss pump, BHAF,cold air box, issapro: trans temp, boost, egt, fp on A pillar, mystery switch, wife riding shotgun.
 Pin #11 of the ECM is the common sensor ground for: the water in fuel sensor, engine coolant temperature sensor, intake air temperature sensor, and engine oil pressure sensor. There is a common splice point in the harness for this black with light blue tracer wire. When ohm testing between the #11 pin and the sensors the reading should show continuity with low resistance. I think @dripley has had problems with that splice.Thanks, I pulled that up when I got the code and most of it deals with the overdrive which in this case works fine. Ohm testing from pin #87 of the transmission relay to the PCM shows the wiring is good and when the TCC solenoid is grounded going down hill I feel the TCC lock up. I'm starting to wonder if running 100% +4 synthetic fluid is causing the TCC to slip since this started after flushing and replacing the fluidIn March the transmission had a no or delayed 1-2 and 2-3 shift condition. The transmission and cooling lines were flushed, the 3-4 accumulator spring, along with the governor solenoid and pressure/temperature transducer replaced. The fluid was changed to Valvoline synthetic +4. The transmission shifted great after the repair. The end of July I go on a 1000 mi "camping trip" pulling my 5th wheel with the boat behind it. I find out that I have no torque convertor lock up! This had happened once before in May of 2018 for about 10 miles. Now, cruising at 60 mph the RPMs are1900±; when accelerating from 60 mph the RPM increase rapidly to 2400-2700 depending on the load and peddle position; when the accelerator peddle is released at 60 mph the RPMs drop to 1400. The transmission temperature, measured in the cooling line between the pump and engine coolant heat exchanger, is normally 160-170° but with no lock up the temperature is 190° ±100°. When going up long grades the temperature climbs rapidly and when it reaches 240° I pull off the road, put the transmission in neutral with the engine at idle, and after 15 minutes the fluid cools to 190° then I can finish the grade. At 60 mph with the 'Mystery' switch on the RPMs still increase rapidly when accelerating indicating the torque convertor is not locked; when the accelerator peddle is released there is a drop of only 50 RPMs and there is engine breaking going down hills but the truck can come to a full stop in 3ed or 4th lock up, with the switch still engaged, and the engine will not stall. The fluid is still clean and full, the APPs in live data shows good with a smooth 0-100% transition and AC voltage is at .03v ±.005. Ohm testing the solenoids shows: 3-4 shift solenoid 32.8Ω, TCC solenoid 32.8Ω, and the new Borg Warner governor solenoid 6.2Ω. What I'm thinking is either a lose of pressure to the TCC, a poorly opening weak solenoid, or a bad TCC.Those are grounds, nothing special. Clean them up, then take this nut off, clean some of the paint off the nut and fender and attach.
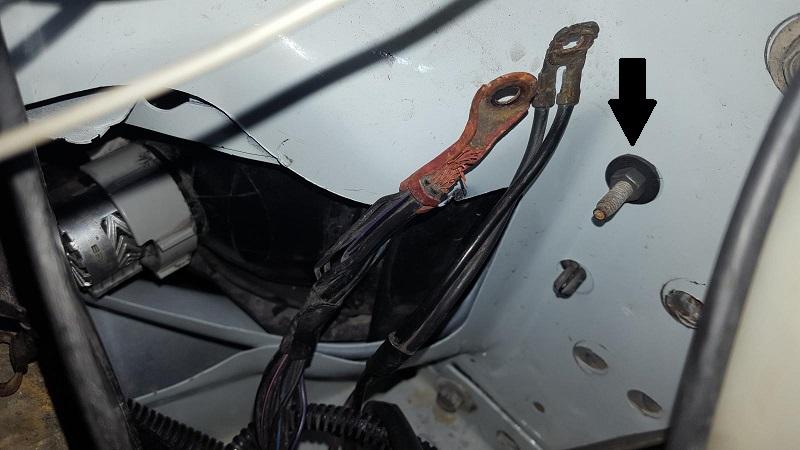 Was my wife cooking there? If the smoke alarm isn't going off it ain't done.I have the same problem. Before each trip I do a complete contain inventory of the 5th wheel. If I have 12 rolls of paper towels on board for a 10 day trip she adds another 10 rolls; 90 paper plates add another 100. Sugar, flower, walnuts, bananas, crushed pineapple, banking powder packed just incase to make a banana-nut bread; it was not made, had to carry it back in to the house.


Account
Navigation
Search
Configure browser push notifications
Chrome (Android)
- Tap the lock icon next to the address bar.
- Tap Permissions → Notifications.
- Adjust your preference.
Chrome (Desktop)
- Click the padlock icon in the address bar.
- Select Site settings.
- Find Notifications and adjust your preference.
Safari (iOS 16.4+)
- Ensure the site is installed via Add to Home Screen.
- Open Settings App → Notifications.
- Find your app name and adjust your preference.
Safari (macOS)
- Go to Safari → Preferences.
- Click the Websites tab.
- Select Notifications in the sidebar.
- Find this website and adjust your preference.
Edge (Android)
- Tap the lock icon next to the address bar.
- Tap Permissions.
- Find Notifications and adjust your preference.
Edge (Desktop)
- Click the padlock icon in the address bar.
- Click Permissions for this site.
- Find Notifications and adjust your preference.
Firefox (Android)
- Go to Settings → Site permissions.
- Tap Notifications.
- Find this site in the list and adjust your preference.
Firefox (Desktop)
- Open Firefox Settings.
- Search for Notifications.
- Find this site in the list and adjust your preference.