


Haggar
Unpaid Member
-
Joined
-
Last visited
Everything posted by Haggar
-
I agree with the above, you need to see the live data and codes from your vehicle. There is a link here somewhere, you use your phone and something like the OBDLink LX (search here. We talked about it quite a bit.) It may help you. The codes will help diagnose it quickly. You could have your exact symptoms and no codes. It starts getting harder to trouble shoot in that case. GL HTH Hag
-
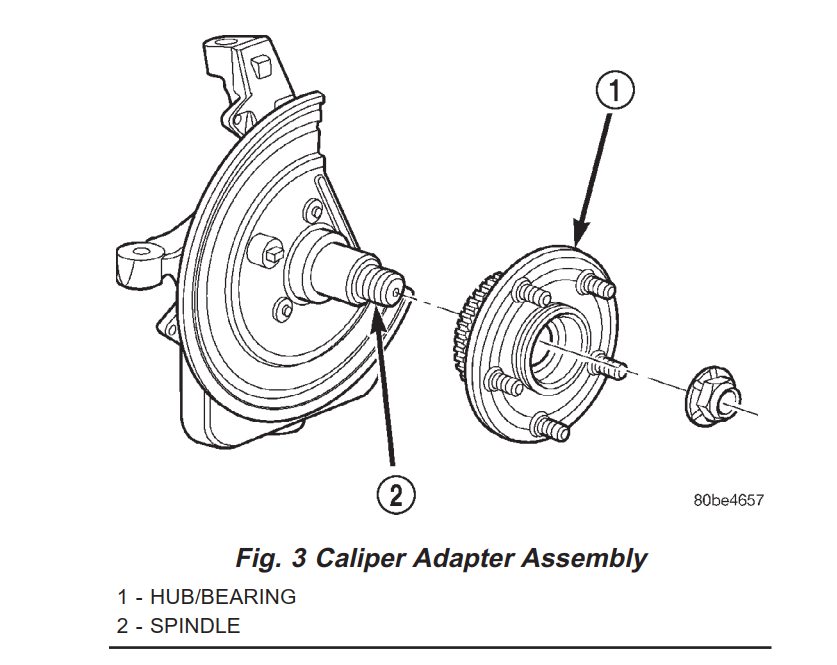
Tractor man is dead on if you have a pair of tapered rollers. That is how to get a proper preload on them. (I go tighter than 20 to make sure everything is seated, but usually finger tight or a bit tighter is good. But if you put a cartridge in like the picture, it will be the 250 ft*lb number. I "think" the cab/chassis solid front axle still utilized the non cartridge approach on front wheel bearings. Hope that helps. Hag
-
grease gun hose is usually 1/8" NPT on the ends. get some couplers and hook more hose to it. Harbor freight has 2' hoses some times. hose barb and clamps is iffy at 300. what sucks its really a mess if it blows loose. Another option look for a local hydraulics shop. He might have an old hose laying around and most ends are like $12 installed. HTH Hag
-
Primer does not seal out water or air. If you want to leave it primer looking, you need to shoot clear over it. I think that is what got you. Try it again and use at least some rattle can enamel over the repair and see if that doesn't help. Take a look at more products. I believe the rust converter is designed to take iron oxide and close its chains and make existing rust stop. It will not prevent future rust from starting. That is usually a different product (phosphoric acid IIRC) Good luck! Hag
-
Full fielding was a diagnostic in the old days when regulators were separate from alternators (or other computer components...) To diagnose if your issue was voltage regulation or alternator (or generator....) you needed to separate the two. By full fielding the alternator, you would command it to put out full voltage and amperage output. if you didn't get like 16v (at idle) and it starting to get warm (from making amps) you knew the alternator was bad. If it did produce the voltage and heat up, you knew your regulator was bad. HTH Hag
-
sounds like the alternator was full fielded. The PCM provides the control for voltage regulation. It sounds like the PCM was not properly communicating with the alternator. I have attached the charging system wiring for an 01 and how the regulator works. HTH Hag 2001 FSM Ram 8F-31.pdf 2001 FSM Ram 8W-20-3.pdf
-
South, Since you have the 6 speed, I am pretty sure you have the dana 80 not a hybrid (70U) like the automatics got. Double check it. All the manual transmissioned cummins that I have seen that had the correct rear axle, have the dana 80. Hag
-
Just add an "add a circuit" to fuse 5 in the junction block for your gauge illumination. This fuse follows the voltage that the dimmer does on your dash lights. It will dim as the dash lights dim. 2001 FSM Ram 8W-12-9.pdf HTH Hag 2001 FSM Ram 8W-12-9.pdf
-
@NIsaacs, I didn't use the 2002 inner nor did I have outer issues at all. (though I am glad you pulled that together. the taper on the 99 inner at the pitman arm is slightly longer. So I made a spacer and it works fine.) (to not run a different inner, you should be able to use the pitman that went with the original '99) I do run Chevrolet rims so the offset is a bit different, but from the pictures I have seen I agree some could be close. Though this doesn't make any sense.... 17" rims were not offered in '99.... so I don't know why Chrysler would have designed an upgraded part that couldn't be used until the new body style came out in 2003.... I did mine before there were nay sayers advising me against it.... Here is a copy of a post from Danny Gaston (Dodge off road) I'm posting this because there is a lot of misinformation on the web and I feel like the right info needs to be posted somewhere. Please do not make this thread confusing; ask unrelated questions in a new thread. EDIT: The new DOR steering kit info is added near the bottom of the post. 94 to 99 trucks have one size taper in the knuckles and pitman arm. 00 to 02 trucks have another size taper in the knuckles and pitman arm. 03 to 08 trucks have the same size taper in the knuckles and pitman arm as the 00-02 2nd gens. 08.5 to 12 trucks have the same size taper in the knuckles and pitman arm as the 00-02 2nd gens and 03-08 3rd gens. On 94 to 99 models, the distance between the knuckles is different than all other models. With all of that said, there are two "factory" HD steering options available. One is the 98 HD setup, which is very good. It converts the steering from a Y design to a T design, which means that the drag link now attaches to the tie rod in a position that is very close to the knuckle. The idea is that the less distance between the drag link and knuckle, the firmer the steering will be. It's a good idea on paper. The 98HD setup works on all 94 to 99 trucks. I will post the part numbers later. You will see people saying that they used the 98HD on their 00-02 trucks. It will fit, but the taper is smaller on the steering than the taper on the truck, so it actually doesn't sit in the taper correctly. This causes premature wear and some extra play from day one. The 00-02 trucks also use a wider knuckle-to-knuckle distance so the 98HD tie rod ends need to be threaded out more than normal. The other HD kit is the 08.5 steering upgrade, which can be used on all trucks from 2000 to 2012. This is similar to the 98HD setup in many ways (they look very similar), however it uses larger everything. The tapers, the TREs, the OD of the tube are all larger. This is the largest steering kit ever produced by Mopar. It uses 1.625" OD solid stock on the tie rod, and I believe on the drag link as well (not verified). This steering kit uses the exact same tie rod end ball, socket, taper, and thread as the earlier models (00 to 08). I cut one apart and measured it with a caliper. There is no difference at all. So while the bars themselves are much larger, the TREs are not. You will see people saying that they used this kit on their 94-99 models. Some will agree that they had to ream the knuckles out, some will say "it fit just fine." The correct answer is that the tapers are larger than the tapers on the knuckles and pitman arm, so again you don't have the proper fit. The TRE won't go in the taper all the way and even though there is enough thread to tighten the TREs down, the contact patch is not matched to the truck. You will also read that people had to shorten the tie rod end all the way or even modify it to make it fit because it was too long for their older 2nd gen. This is because it is longer than what 94-99 trucks use. So make sure you buy the right kit for your truck if you want to go this route. Keep in mind that some early 99 models may have the 98HD steering setup, depending on the date of manufacture. Dodge seems to make all of their changes in the mid year, usually after March. So there can be some exceptions to the size of the taper around 98, 99, and 2000. There are other HD steering options out there, which all have their ups and downs. Thuren Fabrication makes a really awesome crossover steering kit using heims at all four ends. The tubing is 1.5" OD .250" wall and is bent for clearance around the sway bar bracket, and clearance for the diff cover. This is the strongest kit on the market and is one of only two crossover steering setups that I'm aware of. The downside to Thuren steering is that you can't run it on trucks with factory wheels. You will read where people say it won't fit with less than 3" of lift, and this is not accurate. It's all about the wheels and clearing the bolt on the passenger side knuckle. If you have a stock truck and have aftermarket wheels that are either 17" or bigger, or offset more, then you'll be able to run this setup. But Don may tell you otherwise because there seems to be some hangup on "the truck has to be lifted 3" or more." This kit requires you to drill your knuckles and pitman arm out to 3/4" straight bores, so you cannot go back to stock steering or any other steering setup once you do this (unless you replace the pitman arm and knuckles). The other down side is that you can't run a steering stabilizer without either welding some tabs on the tie rod, or using a clamp. Don sells the clamp for $90 and DOR has it for much less if you want to buy one of ours. It's the same thing. Don's steering seen here: Pure Performance makes a really good steering kit that is also a true crossover setup, but instead of heim joints, it uses TREs. Ford TREs to be specific. This kit is only marketed for 3rd and 4th gens, however it will work on the late model 2nd gens from 2000 and up. You can buy the kit from DOR or any Pure Performance dealer, but you will need to buy all of the tie rod ends and adjusters separately unless you get it from DOR. The down side is that the kit is very expensive; about $1000 for the whole thing. The TREs and adjusters are $500 and the kit itself is $500. Pure's kit seen here: Another option I just discovered is the DT Pro Fab steering kit, which has zero info on their site. It only fits 94-99 trucks and uses large uniballs at the knuckles, and a high misalignment heim for the T-connection at the tie rod end. It appears you use the stock TRE for the pitman arm. The retail is $675 for this kit. DT Pro Fab seen here: There are other kits out there from Bulletproof Steering (the most expensive one) and other companies I can't think of right now. Shakerbuilt was one that used to be around and is now out of business. The problem with all of these options is that there is a downside to every one of them. UPDATED WITH INFO: DOR's new steering kit is definitely the best setup available, and I'll explain why. This is one of those posts where "yes I own/make the stuff but I'm typing this from an unbiased point of view" applies. So please do your own research if you feel that I'm being too much of a salesman. I'm including this much info because it's important to compare the DOR kit to other kits and understand why it's a better setup. DOR's steering kit is a totally bolt-in, drop-in setup. No drilling required. It fits all trucks from 94 to 12 and works with any lift height, any size wheel, any backspace/offset, etc. There are no exceptions to this. If you have a 94-12 Ram with a solid front axle, it works. Additionally, if you have already drilled your knuckles and pitman arm out for Thuren's kit, we can sell this in a less-expensive version where it will bolt up to the modified parts. We use a 1.5" OD 1026 DOM tube with .40" wall for the tie rod, almost twice as thick as other options. The tie rod ends are bent for clearance and this allows the tie rod itself to be totally straight, which means it can be adjusted on the truck without having to remove one side or the other. You just loosen the jam nuts and spin it in place. The drag link is made from 1.5" OD 1026 DOM tube with .25" wall, and it is also adjustable on the truck without having to remove either end. This is a huge time savings and also allows you to be much more precise than if you had to remove one end and then reinstall it. So now that the tubing is covered, let's talk about what joints we are using. The drag link uses extremely high quality FK heim joints with a 3/4" shank and 3/4" bore. These heims have a load rating of 55,696 lbs each. They are heat treated, zinc plated, and Teflon lined. I have seen these heim joints last over 5 years in daily driver applications, with zero maintenance. We use misalignment spacers on both ends to prevent the heim from binding up. One thing we did better than anyone else is put the heims in the proper orientation where they do not bind up so quickly. Most kits mount the drag link to the tie rod so that the bolt holding the heim or TRE in place is in a vertical orientation. Common sense would tell you that as the suspension moves up and down, this will eventually bind, as is the case with the Thuren steering on my truck. So by putting our heim joint where the bolt is in a horizontal orientation, now the heim never binds up. The limiting factor for the steering is the misalignment of the heim at the pitman arm, which has a 26 degree misalignment before it binds up. This is more than just about anybody can use. As an example, my truck with 14" travel coilovers and 11" of down travel will not bind these up. The drag link is where other stock kits seem to have so many problems, as I will explain at the end of this post, so we are using heim joints on both ends of the drag link similar to what Thuren does. However, ours doesn't connect directly to the knuckle, so it's not a true crossover system. This will allow the kit to fit any truck with any wheel or lift height, period. By using heims, the angle of the drag link will not be a problem for longevity of the kit. Another benefit to not mounting on the knuckle is that you can have no bumpsteer at all. One problem that some people experience with Thuren steering is that it's hard to get rid of bumpsteer. That is created when the track bar and drag link are not parallel, but also when they are not the same length. Most people don't know that. The two parts being at the same angle but in different lengths is the same thing as having a long lower arm and a short upper arm on the control arms. Your pivot points vary so the arc that they travel during the suspension cycle is different, which causes binding in the suspension and bumpsteer in the steering. Our kit is the only one on the market that makes the track bar and drag link the same angle AND the same length. Bumpsteer is completely designed out of this kit. Now the best part... the tie rod ends. These are custom made by us, in our shop. They are rebuildable, replaceable, fully awesome. There simply is not a stronger tie rod end made anywhere. We take an FK uniball assembly with a 37,000 lb radial load rating and a 7,730 lb axial load rating, that is PTFE lined and takes a 3/4" bolt, weld the housing to some 1.5" OD .250" wall DOM tubing, bend the tube to allow the tie rod itself to be offset from the knuckle to knuckle center line, and the end of the TRE is threaded so they just thread right in to the straight tie rod. The last piece of the hardware is what makes this whole thing a bolt-in, no drill install. We had some custom bolts machined for this application that allow the straight 3/4" bore of the uniballs and heims to be attached to a tapered bolt that matches the taper in the knuckles and pitman arm. These are machined from stainless steel. The retail is $599 for the full kit. There are less expensive options if you want to go with thinner wall DOM tubing or if you don't need our tapered bolts (due to having the knuckles and pitman arm drilled out to 3/4" already). With all of that said, here are some final steering design notes. I had mentioned earlier that the T-style steering is a good idea on paper. And it's true, that a T style design is better in terms of the tie rod going knuckle to knuckle instead of allowing the drag link to pull the toe in. But here's the deal - people switch to a T style and think that all of their problems are solved. In reality, people are having problems with the 98HD and 08.5 steering just like with the older Y steering. The reasons are very simple: 1) T style only references the way that the tie rod and drag link connect. Y style allows the drag link to pull the toe in as the truck's suspension droops, and push the toe out as the truck's suspension compresses. The T style eliminates this issue. You can see the difference here - notice how the T style allows the knuckles to stay connected even if the drag link is removed, where the Y style needs both the drag link and tie rod to connect the knuckles. This setup causes the toe to change as the suspension cycles. 2) Tie rod ends aren't designed to run at an angle like they are on these trucks. If you look at the drag link, even on stock trucks, the TREs on each end of the drag link are operating at an angle. They are not flat. Now add in the suspension movement and the steering box pulling back and forth, and the TREs on the drag link will simply loosen up over a period of time, more quickly than the TREs on the tie rod, which never change angles. There are a lot of different directional forces hitting these TREs all the time, but they are only designed for lateral force. This is also why the stock 2nd gen track bars suck so bad. They use a TRE in an application that it was never designed for. The tie rod end itself is fine because it never articulates, but the tie rod ends on the drag link are wearing out just as fast as before. If you look at how they mount up, you can see why. Also remember that the new "beefy" 08.5 TREs are actually the exact same size, they just look bigger due to the size of the shafts attached to them. 3) No steering kit will fix all of your problems, because there is much more to steering than just the tie rod and drag link. You also need to look at the track bar, hubs, ball joints, control arms, and of course the rest of the steering components (pitman arm, steering box, steering shaft, steering column) before diagnosing your truck as needing a new steering kit. It is easy to throw new parts on, and maybe you will get lucky and fix the right one the first time, but spending a few minutes under your truck checking for play will save you a lot of money and time. If you don't have time or the tools, then any alignment shop should be able to pinpoint the problem areas. As I have always said, don't just replace with stock parts... upgrade. You can often get a much stronger aftermarket part for the same price as a stock replacement. I will continue to update this with pictures as I have time.
-
Welcome to the site. If it is truly a 2001 engine still (and it should be), KDP is not an issue. Somewhere along the line, cummins made a change to the timing housing. They built a retainer for the dowel pin in the housing itself. My 2001 has this timing housing. Agreed, get gauges on it. Drive it some and slowly upgrade from there. For power, well I have decided I won't be the fastest. All of my friends rides are faster. But I have pictures of their trucks on my trailer. They have no pictures of my truck on their trailer.... Just be ready as you add power, the slush box will be your limiting factor. One man's built, is another man's "well someone has been in there and messed around...." The 99HD steering does not require bigger wheels. GL Hag
-
Glad you got it! My suspicion was one was not correct and the long one seemed to be most likely the culprit. Just surprised someone replaced it and never got it working.... That's what made me think it was a rear axle swap and no one ever checked it. I like parking brakes. Even on an automatic. Thanks for the update! Hag
-
You need to use a scan tool to help you. No display of RPM could be 2 problems but you can't sort it out without seeing the live data from the ECM and PCM. Same with the engine only going to a low RPM. The map sensor may be lying to the computers. Since it works sometimes when you wiggle wires and then quits, it is possible you are starting to have grounding issues for the sensors. again that should show up in the live data because the signals from those sensors should be unrealistic. GL Hag
-
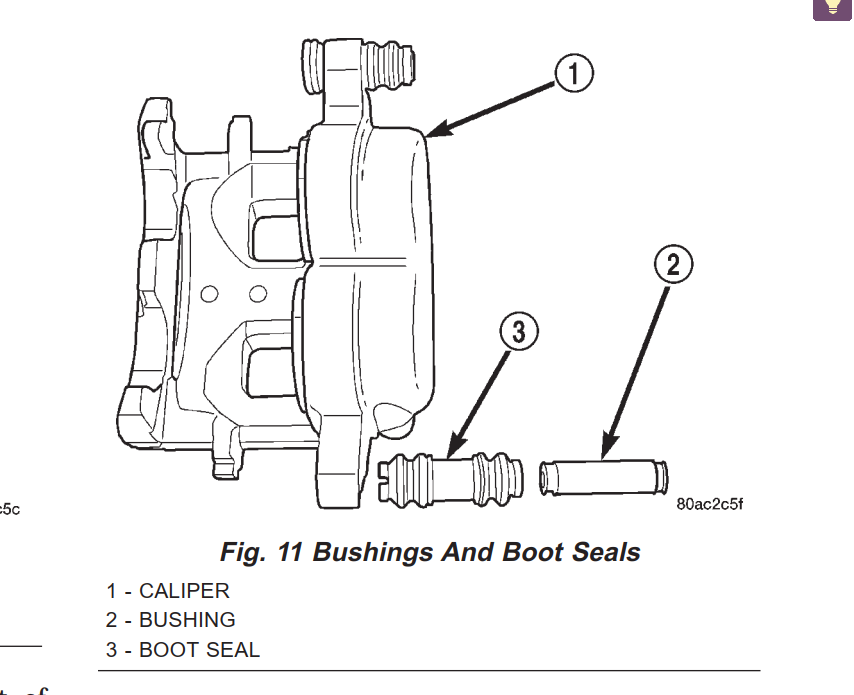
Hammer, Don't get hung on what the rubber things look like. They should operate the same way..... In my newer one the bushing (item 2) is trapped by the bolt and caliper bracket and stays rigid. It is a nice smooth tube. The item 3 boot seal, is firmly mounted in the caliper. the caliper "floats" by the boot seal sliding on the bushing. HTH Hag
-
JL, That sounds like complete control arms with ball joints. AC delcos are in the 70 each range still. GL Hag
-
Hammer, I don't have a FSM for your truck, but here is a picture from a newer one. the "boot seal" should lock into the caliper. the bushing slides inside of it. I suspect the rebuilt caliper you got is 1. the wrong caliper so the right bushings and seals didn't fit 2. the rebuilder used the wrong seal in the caliper 3. the rebuilder used the wrong bushing or it could all be the wrong stuff..... I think I would try oem replacement seals. Just make sure the seals are hard to put in. then the bushing should drag pretty hard inside of the seal. GL Hag
-
Drip, Yeah the pump operates at about 1500psi and 3 gpm. so in those couple minutes you have turned the system over quite a few times. GL Hag
-
Drip, You are hearing the relief valve. The thick oil just doesn't want to go through the orifice. That is usually what squeels. Do a down and dirty turkey (chicken?) baster fluid change and see if it helps. (get a cheap turkey (chicken?) baster, and a can you can discard. Take out what you can from the reservoir and discard, replace with new.) Next evening do the same thing again. Do it about 4 or 5 times and you will have replaced most of the old oil. if it does... no need to change pumps. GL Hag
-
Crazy, Just keep a couple wrenches under the seat. You can bleed it on the side of the road if you have to. completely beats any of the alternatives. The big thing is if you are on it hard, don't come off of it hard. Keep looking, there was another discussion on here about this same subject. I think the consensus was that the dynamic compression ratio of the cylinder was enough to push compressed air backwards into the injectors. I am not sure if I agree, but I have not run the numbers to get an idea. GL Hag
-
Jag , sorry couldn't remember and its not in your sig. The shop is not lying to you. The 4wd is stupid easy if you have a chassis lift. disconnect shock. disconnect sway bar. Raise frame to droop front axle, zip out 3 bolts on upper spring mount. spring is out. they won't even pull the springs out on yours. they will just take the buffers out. The worst they would want to fix is sway bar mounts or shock bushings. Hag
-
Jag, your truck is 2wd right? If it is, take given notes with a grain of salt, most of who is suggesting stuff is 4wd. The spring procedures are completely different. On a 2wd with no leveling kit (my brother's), we have just blocked the frame and let the A arm down with a jack. I am thinking yours will be that simple. (that is how the factory manual says to do it.) GL Hag
-
Wild, Good Luck! I would like to know how it turns out! I guess the original cables could have stretched that much, just seems so weird though. Hag
-
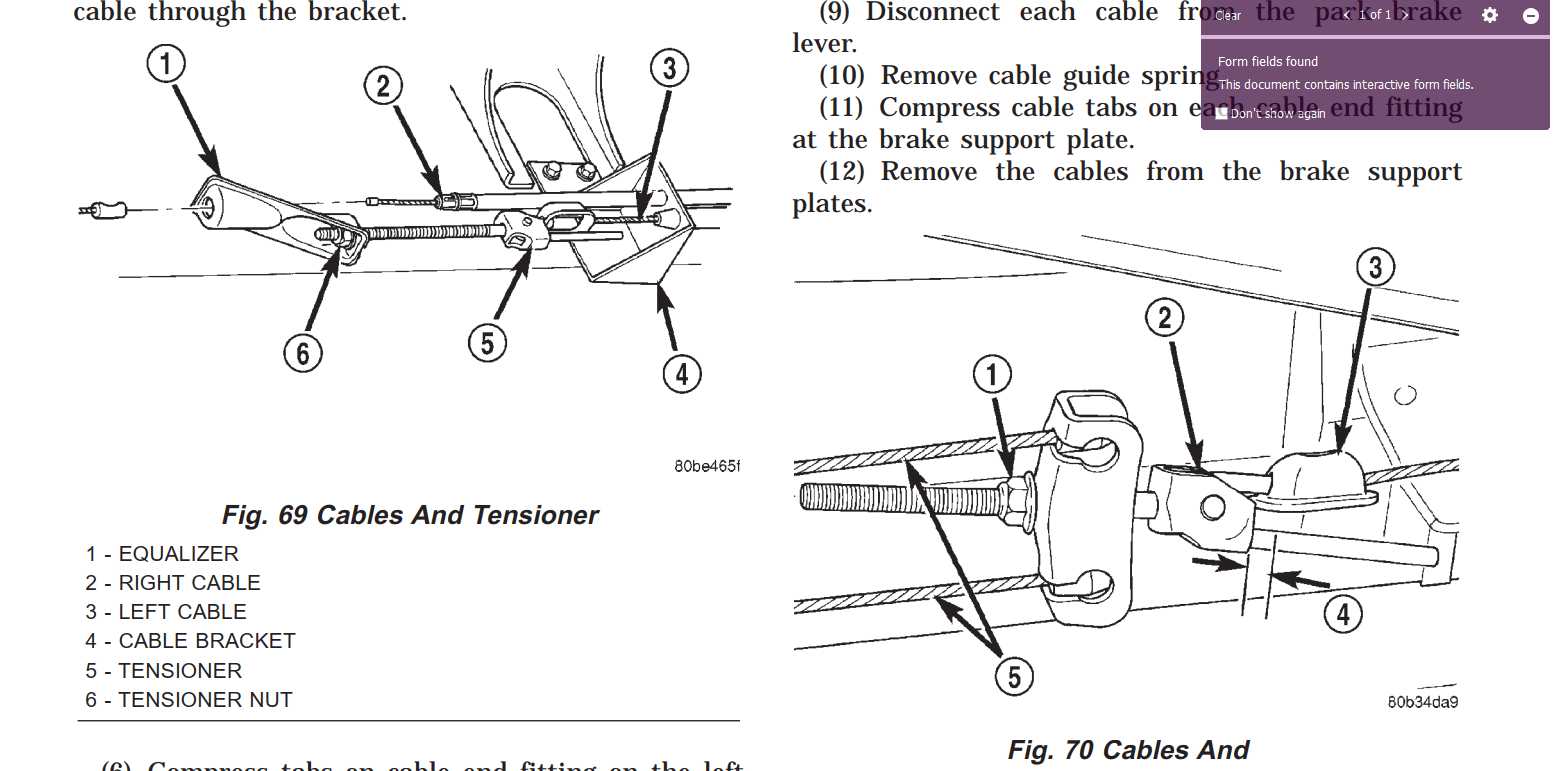
Grrrrr, There is not much for you except getting the correct cable. Look for signs of a rear axle swap. (new U bolts, damage on spring eye bolts etc.) If you see this, then you will know they just swapped an axle from a truck and didn't swap the brake cables, as they were close but not close enough. and therefore you just need to source the right cable. It will help you know that there is really nothing designed wrong, just a wrong match of parts. it will suck in some ways because you won't know exactly if it is correct until you have put it all in. You could measure what you have and "try" to make sure the one you will replace it with is x shorter.... Looking at the 01 parts manual there seems to be an "intermediate" cable. Could you purchase a shorter version of that. (it looks like there is a cable attached to the lever. two cables coming from the wheels, and hook to the balancer, one being longer and going to... an intermediate cable.)(i hate the parts book just says cable, parking brake for a description on all of these.....) would you be able to buy a custom cable from someone like https://push-pull.com/wire-rope-assemblies/ I don't know them specifically, but I know we purchase wire rope assemblies from different manufacturers at work. Someone has to make smaller brake/throttle type cable assemblies. Good luck! Hag
-
Wild, when you pull the balancer, would the 2" be enough? Which type balancer do you have? The one on the left seems to be the rear drum. if it is, you have a harder time adjusting the one brake. it seems they got the lengths exactly correct for the passenger side, and you just adjusted the other side to match. There seems to be NO way to adjust the overall length of the main cable....? Hag
-
Guys, My Spanish it terrible, but I found this video very informative on how the VP mechanically works on our engines. I wonder who developed this (it looks like bosch, or someone did a really nice job of making solids of everything.) and why there is not an English version. I think most of you will like it. Hag
-
Wild, Awesome! you have checked all the right stuff. It sounds like someone along the way replaced a cable with the wrong thing. (or the originals have stretched tremendously.) (now thinking of it, could the rear axle have been swapped from another truck? I can see that being an issue. Quick axle swap to get the job out, not realizing the park brakes didn't operate......) You use the word slack. Does this mean that the 2 inches of travel does not move the rear actuators, or the cables are too long and you don't have enough adjustment in the threads? if it is the axle swap i bet this is the case. GL! Hag

