


Mopar1973Man
Owner
-
Joined
-
Last visited
Everything posted by Mopar1973Man
-
Thank you @IBMobile those photos bring back memories.
-
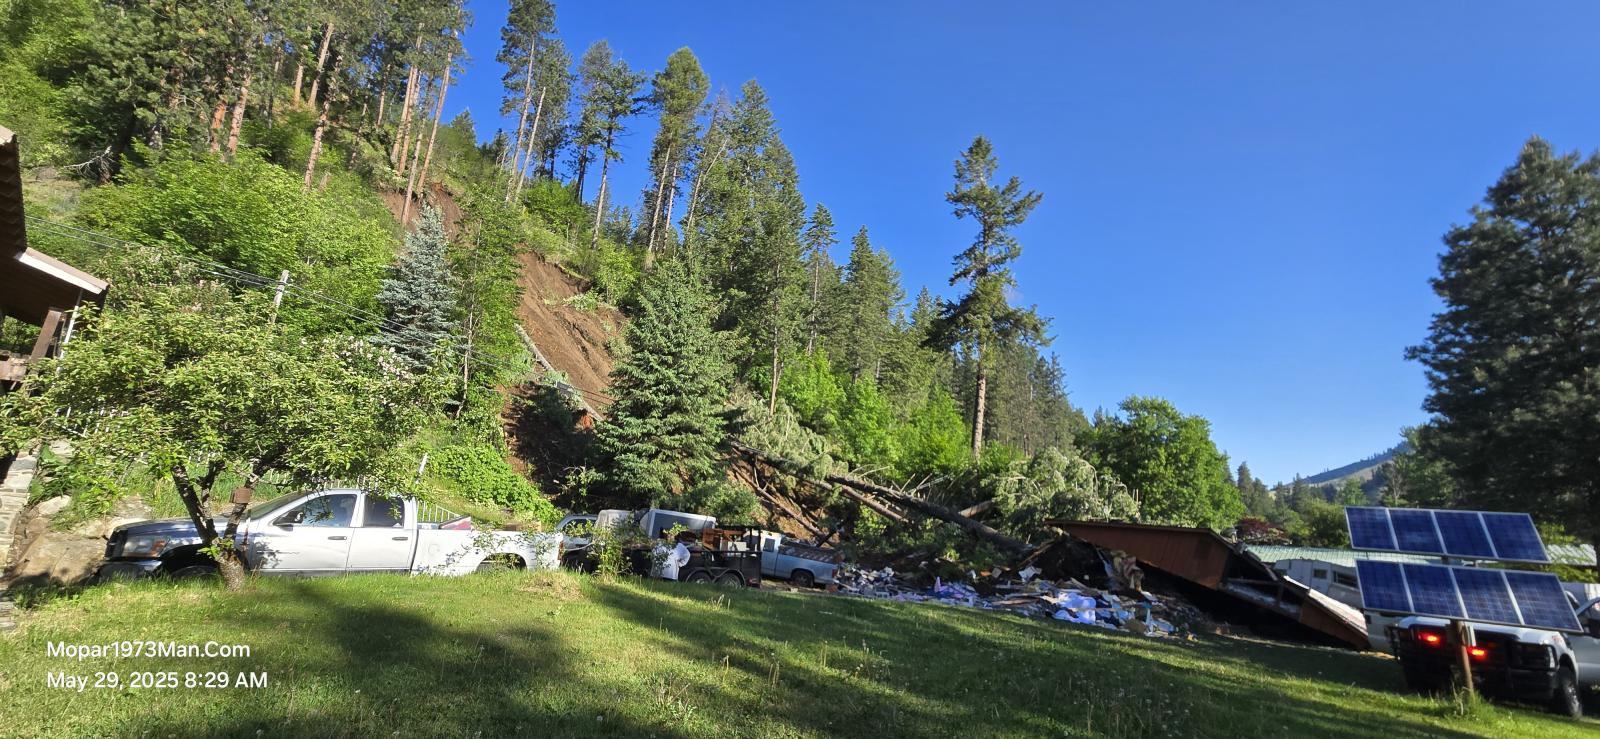
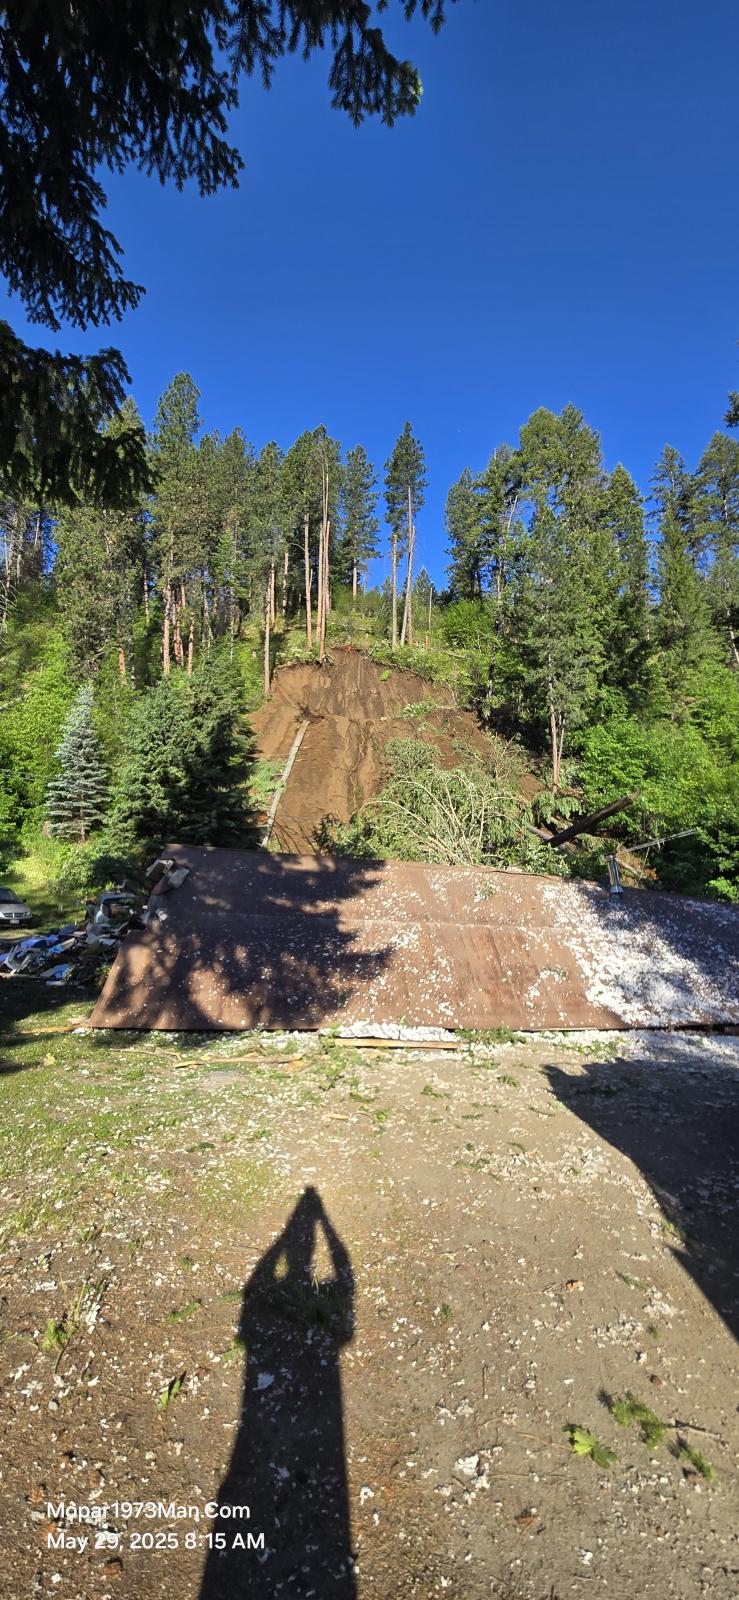
Mopar1973Man.Com Shop was leveled by a landslide.Yeah, with a heavy heart, I lost my entire shop and guest house to a landslide. I won't discuss how this all happened yet. The biggest thing I lost was the entire building. My Best Friend, Mark Hall, was living in my guest house. He was one of the few who helped me out with my cancer. He was protected by a guardian angel. I just saw where his bed landed and what pinned Mark in the house. Mark's Dog Hachi made it too, and no injuries. We managed to hunt for stuff. Like my huge black tool box it was there under the roof lot of our tools between Mark and I. There are tools but scattered all over the ground, spilled out during the landslide. As you can see I had a load of stuff from @Tweety Bird on my BigTex trailer pulled by Thor. We got home at 1:30am and hit the bed by 2am. This event happened at 6am roughly in the morning. I would like to apologize in advance for my being missing in action for the last few weeks, I've been busy getting @Tweety Bird moved in with me. Then the landslide issues were another that really took all my attention from the website for the last few weeks.
-
Look at my article for injector cleaning to shim the shim which is under the spring in the body.
-
Should see positive pressure at all times. Say above 5 PSI. Optimal would be no less than 10 PSI at WOT at highway speed.
-
All the check valve and regulator is in the sender. There are only 4 wires. +5V (gauge), sender GND (not body ground), +12V for pump, GND for pump (body ground) Like my previous pump made noise but zero pressure.
-
Just one in the fuel tank about 300 dollars for a quality pump. One of the few reasons I ditched stock in my 2006. Even with a new lift pump in my 2006 I was able to pull fuel pressure into a vacuum state. The in tank pumps are low quality and should be replaced with an AirDog (suggested).
-
Most likely the in tank fuel pump died. Double check to see if there is 12V power at the fuel sender. If there is power you need a new lift pump (tank sender).
-
Yes. The cluster will work without the PCM or ECM.
-
@Tractorman Thank you sir. There is a lot of stuff in the ball of mud under the edge of the roof. We have not seen big things like refrigerator or couch yet so it all balled up. @kbf98520 right now donations like even some basic tools would be helpful. I lost several thousands of dollars of hand tools not to mention welder and other equipment. You all have to remember since my cancer I've been without a job or Social Security. The small income from the site barely pays the bills but leaves nothing for replacement of tools or anything. Mark has lost everything both trucks took damage. House is gone. All his clothes and belongings are gone too.
-
As the day closes. I've got to give thanks to... Sharon Gould for helping Suzanna get a bed made up for Mark. Albert and Jesse for helping get Marks truck moved to safety. Andrew and Taz for coming down to dig some dirt out so we could access the water valve to the building. Also brought clothes for him to wear. Alan from the Salmon River FD to saving Mark's life and rescuing him. Thanks to all the many emergency crews that showed up. Idaho and Adam's County Sheriff Salmon River FD and New Meadows FD Riggins EMTs, New Meadows EMTs, and McCall Paramedics. The emergency is over but I still have a roof laying in the middle of the driveway, then all the trees and mud here. The amount of debris is unreal. You have to realize ive lost a serious amount of tools. I've not been able to find big items like my tool box or couch thing like this I'm not sure what weight of all that mud did.
-
Sadly i was woken up early this morning to a landslide. My buddy Mark has been living down in the house next to my shop helping me out. Mark survived, but bruised up. We lost his dog who unfortunately got crushed with no response of life. Mark was life-flighted out. He's being released today. Please...I need help! I'm physically incapable of handling the physical labor due to my physical limitations resulting from cancer, to handle this fancy one, could use assistance with machinery or clean up. Any help would be much appreciated!!

-
Yes sir I'm running brass syncros in my NV4500 and no problems to report even with subzero temperature in winter still shifts good. My problem was with higher HP I was eating the hardfacing off the gear teeth. 50 SAE transmission fluid stopped this problem. Typically sold as a GL-4 fluid synthetic.
-
Might try that being the dash should be the same but let's see what difference you might get. Oh be sure to allow enough time for the CCD bus to quit talking. True data would be using a oscilloscope to see the bias voltage and any data pulse occurring. Cheap solution to being able to see what is happening. https://a.co/d/eH3Q65C
-
Here is the weird part the head ground is at the driver side kick panel. Head power is from the PDC fuses. The OBDII port is powered from the IOD fuse in the cab. Then the ground pin uses the same ground at the driver side kick panel. Then all power is funneled through the PDC power lead to the battery. Might check this electrical and possibly fuses and socket of the fuse. Be aware ive seen fuses crack and test good but do weird things.
-
Battery terminals condition? Ground wires condition? PDC fuse box weak connection? Voltage only drops because of weak connections or poor wiring. In other word electrical load is exceeding something in the circuit. Connector with corroded pins, oxidized wiring...
-
Should not do anything per se being the gear is missing. It should be like a second neutral. I would suggest changing to 50 SAE Transmission fluid. Much thicker lube and should stop the wear like that bearing. I was losing hard facing on the gears.
-
Yeah i plan on ditching all this quick connect junk and create a write up on where to find what. I might request @dieselautopower or another vendor to create a kit for us to ditch the junk fittings.
-
It should work just remember that 5th gear is MISSING. I totally get what you are saying just don't need the bad bearing and gear banging around. Yes it should work just be aware.
-
P1688 and P1689 codes show possibly a dirt power and possibly high fuel heat. Yeah i know there is a code for that but I've only seen 1 person ever report the code. Dirty power with lots of AC ripple can create the heat in the PSG circuits. For sure you need to look towards vendors that sell certified Bosch pumps to be sure to get anew PSG that has been on the test stand for 3 hours to be flashed. There are lots of cheaper pumps but used PSG and no calibration done P1688 basically the software on the PSG no longer correct. Technically the VP44 should be capable of starting and idling without a ECM. Software issue for sure. P1689 code can be truly a communication error cause from CANBus header being damaged. Double check the fuel pump relay to be sure it's hitting power.
-
From the album: Thor - 2006 Dodge Ram 3500
-
Got up today and hopped out after Thor to finish up the front seats. The driver's side repaired seat looks patched and actually appears correct in the roll of the foam. Being I've got 3 days plus of clear warm weather coming we need to get @Tweety Bird moved out of Nampa ID, promptly. The Big Tex trailer is all hitched up and tested, all tail light functions are present and even for short trip down the driveway and back up the side yard I had good brakes on the trailer and you can feel it tug back some. Found the factory truck side of the taillight loom behind the fender had a broken ground wire. Now the parking lights work correctly. Then seen the other wire from the brake controller had to be butchered to make it work again. Sucks, but gotta make Thor work right now we need this truck now for the job at hand. The seat repair turned out great. I'm enjoying the driver seat again, being my left hip is not sitting on the steel seat frame any longer. As I said in my previous blog, right now funds or thin for this project, so I've gotta hold tight for funds.
-
I was coming back from Lewiston, ID, a few days ago. I looked down at my fuel gauge in Riggins, ID and just above 3/4 of a tank. Within about 2 miles, it popped the elbow quick connect off the return line and started pumping fuel on the highway. I notice the fuel gauge rapidly dropping shut the key down. The AirDog pump stopped and pulled over, found the quick connect fitting blew off, and dumped $100 of fuel on the highway in under 2 miles. I'm in the process of hunting down the old steel JIC connectors for the AirDog 150. I'm not a fan of these junk plastic fittings, so here really soon I'll post up the fitting part numbers and where to buy them. I'm no longer going to use these cheap plastic connectors and hope and pray the fuel system doesn't blow apart in the back country hauling my trailers. @dieselautopower - Mitchell I'm working on it!
-
Pull the alternator have it tested. My test is under no-load to see the AC ripple. Typically a OK range compared to full load which the AC ripple will typical be higher that 1.0 Volt AC.
-
Yes sir. +5V is supply, signal is the returning result of the APPS sensor. Then of course ground is 5V ground on the sensor. Beware the sensor ground is NOT body ground.
-
Hey there gang, I'm looking for people who truly want to get involved with the website. I'm adding functions like the Gallery so people can place there truck photos up and show them off to the rest of the world. The Event Calendar is going to be set up for the idea that we might plan travel trip to places and share our location so people can meet up with me. I also want to bring the Zoom meetings together too. I'm going to be building articles on Thor here shortly we are going to have more information on 3rd Gen Trucks soon. I'm serious I'm looking for people who want to get involved in building up this website. I'm willing to teach and show you around. Most of the stuff you would be handling is from the front end and no code knowledge is required. Anyone wishing to become part of the staff please contact either @Mopar1973Man or @Tweety Bird and we will interview you and see what you have to offer the website.


