War Eagle
Unpaid Member
-
Joined
-
Last visited
Everything posted by War Eagle
-
I think skid steers use a standard mounting system. If this is true then skid steer attachments are pretty much interchangeable between manufacturers. This would mean that you wouldn't necessarily have to buy a Bobcat to use any special Bobcat or other manufacturer attachments. I think you could shop for the skid steer feature set and price that would work for you. I don't own a skid steer but I have many hours on them. Mostly CAT and diesel engines. You will also need a suitable trailer to move your skid steer from location to location if you are likely to do odd jobs with it.
-
Has anyone seen the Bosch injector flap? The issue seems to be surrounding who is authorized to market and sell Bosch and BMS injectors and/or use the Bosch name in their marketing. Seems like some vendors are being implicated as using fraudulent methods in selling Bosch and/or BMS. I don't need injectors and don't have a dog in this fight, but would like any insight into this issue. http://www.cumminsforum.com/forum/3rd-gen-powertrain/2297658-regarding-jkidd-dap-bosch.html
-
What brought me here is the LACK of belligerant manners and belittling response that seems so common on the other sites.
-
When I had kids here at home I could do that as well. Just put one on each corner and lift it off. I have a heavy fiberglass canopy and the challenge comes when you don't have multiple people to call on to help take it off then put it back on. With this system I can easily get it on or off when I need it.

-
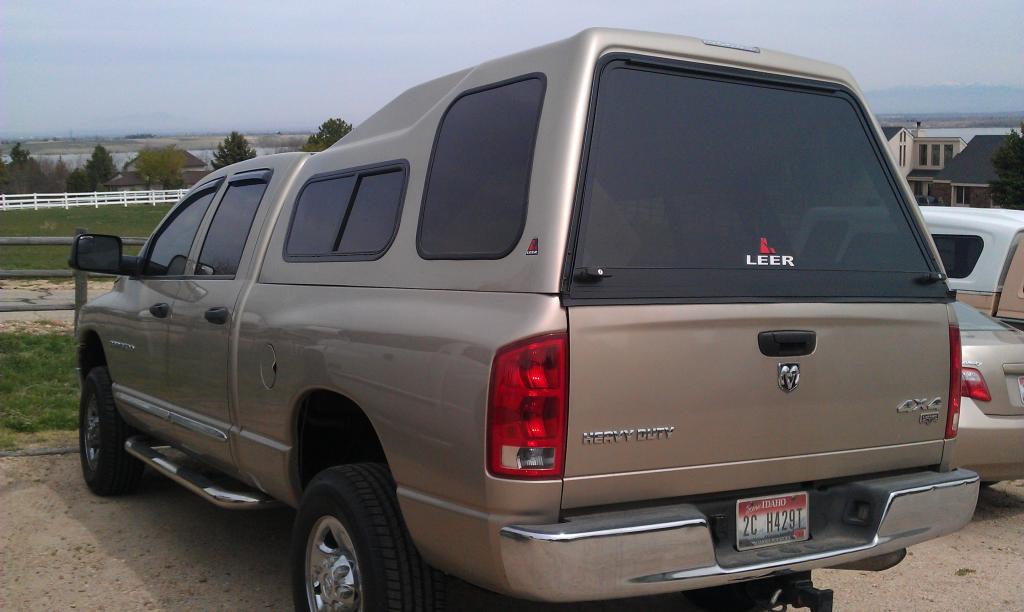
I struggled over a similar decision. How could I remove my truck canopy when I wanted to load my slide in camper? After looking at a lot of different ideas, I decided on a relatively simple and somewhat efficient design. I parked my truck in the area where I wanted to store my canopy and then marked places to sink four posts in the ground. One off each corner of the truck bed and about 6" wider (on each side) than the truck body. I then installed 4 posts (set in concrete). Then I installed 2x6 rails between each of two posts and parallel to the length of the truck. Those rails were set about 4" higher than the top rail of the bed when the truck was parked between them. This design allows me to back the truck between these posts. Then I get in the bed of the truck and standing there use my back to lift up either the front end of the canopy (or the back end) then my wife slides a 2x4 across those 2x6 rails and under the canopy that I have lifted up. I then set the canopy down on that cross rail and move to the opposite end and repeat the process. Then I just drive the truck out from under the canopy that is now sitting on the cross rails. Loading the canopy back on the truck is just the opposite procedure. Then I also take two nylon straps and put them over the canopy (one in the front and one in the rear) and cinch them up to insure the canopy is not at risk of being blown off this resting place if a big wind of some kind was to come up. I don't have a picture of the canopy off the truck but with this enclosed picture I hope you can see what I am trying to explain.
-
I have a 2012 Passat TDI SEL. Been a great car. It has the DSG tranny and I love it. Very sporty if you want to drive it like stick shift. Service is a bit spendy on the tranny. You need to change the oil every 40k miles and its a little touchy to do. Has to be exact amount. No more and no less. It's about a $600 to 800 job at the dealer. Oil for it (if you are going to try and do it yourself) is way north of $150 for the refill. Lots of room in the car and I'm getting 42+ mpgs around town with my driving style and 47+ on the road. But alas, as others are doing I'm, selling it back to VW. It's worth far more money to me going back and I'm through dealing with the diesel emissions crap that EPA is requiring. With the pay out I've bought a new Sonata hybrid. I have been getting over 50 mpg around town (where most of my driving is done) and the car is just as big as the Passat and has far more bells and whistles. Been a fun car VW is not offering anymore diesel cars in the US. At least out through 2019, but I'm betting its never again in the US I also have a 2001 Jetta TDI. stick shift. You couldn't pry this one out of my hands. It's not as nice and cushy as the Passat but it has been very reliable. Had it since new and I have it chipped. Gets me 48 in town all day long and in the mid 50's on road trips.
-
I think you are on the right track. In theory you should have about 15% of the total trailer and content weight on the tongue. So in your case you should have 600 + 300 = 900 x .15 ~ 135ibs. This is such a small load the that you could move the load way ahead of the axle and be good. Just don't put the weight behind the axle because that will take all the weight off the tongue and the trailer will likely sway a lot.
-
I have a 2012 Passat SEL TDI that I have been very happy with but I have chosen to sell back to VW. (More on that later) I get 42 in town and 46-48 on the road with the current emission setup on this vehicle. I have the DSG tranny and have enjoyed its performance. VW is supposedly working on an emission fix but I never thought about doing the repair option as I don't believe we'll get a bump in reliability out of the various equipment and operating conditions that will be modified in order to fix the emissions problem. I also believe the vehicle economy will go down with any emission mods that VW has to make. I have thought about taking the buyout and then purchasing a new TDI that I assumed would actually be designed around operating under the current diesel emission criteria. But alas VW is not offering any TDIs in the US for the next several years and they may not ever offer them again in the US. I thought VW would surely offer a special deal to the TDI owners to buy a new VW and try to keep potentially 500K TDI owners in the family rather than making it easy for these owners to just take their buyout money and go to some other brand. But they have yet to do that as well. So I have come to the conclusion that I will take the buyout and use the money to buy some other brand. I am getting $20.5k for my vehicle and $6.2k for lost value etc., as a bonus. So it's not hard to see why I'm taking my nearly $27k buyout across the street to another brand. Bill, when I submitted all my paperwork with the application for buyout, VW asked if the car was wrecked and had a salvage title. Don't really know why but assumed it would impact the buyout and or bonus payout. Of course they have the ability to verify what is reported in the paperwork. Also it was my understanding that there was no payout if the owner made the choice to keep their vehicle and not have it modded for the emission performance. In otherwords, money is only paid out if you get the emission mod or you sell the car back to VW. If you keep the car and do nothing then no money is exchanged. I wish you good luck with your decision and hope it works out the way you want.
-
Mike, I think you will like that turbo if you get it put on. I have the HX35/40 hybrid (with a larger cm2 exhaust housing) on my gen 2 and with the RV275's and Quad ZXT it really adds pulling power on the low end as well as the higher rpms. Very noticeable above the HX35 capability. You probably have seen my older posts but with my auto and positrac rear end I can spin both rear tires from a non boosted launch when I mash the go pedal. I could never do that with the HX35 and RV275's with Quad ZXT. Mike, I think you will like that turbo if you get it put on. I have the HX35/40 hybrid (with a larger cm2 exhaust housing) on my gen 2 and with the RV275's and Quad ZXT it really adds pulling power on the low end as well as the higher rpms. Very noticeable above the HX35 capability. You probably have seen my older posts but with my auto and positrac rear end I can spin both rear tires from a non boosted launch when I mash the go pedal. I could never do that with the HX35 and RV275's with Quad ZXT.
-
I have a set of Michelin LTX2 M&S tires that are guaranteed for 80k from Discount Tires. LRE on my gen 2 truck and they have 60k on them now and they look to me like they are a bit over half worn and will go past that 80k mileage guarantee. I have 19.5s on my gen 3 with just shy of 30k miles on them (Hankook AH11) and the tread depth hardly shows any wear. They will go well over 100k. Actually I am expecting close to 200k but in reality the tires will time out before I wear them out. I decided to take a chance with the XRF million mile guarantee joints and have just shy of 25k miles on them now. Just had the alignment checked when I re-installed my 19.5s this spring and they are still nice and tight. So far my expectations for these units are very positive. They are greaseable and have zerk fittings on top and bottom.
-
I have used one for about 3 years now. However, it has a rubber snap on cover that goes over the key lock side of the pin to keep crud out of the lock. I have also spayed some WD40 into the key lock mechanism at the beginning of winter and then in spring time. still works easy, so I still have mine in place.
-
On the Smarty web site a user posted this information for the UDC Pro dongle. "1 866-211-1533, call these dudes. The key is $349 until the end of the month, then $449 I think. These guys have the key in stock now."
-
If you go the slide in camper route then you will need to look closely at your bed weight. A heavy camper can easily overload your rear tire ratings on a SRW rig. You would likely have to upgrade your tires and/or wheels to carry the load. That's not bad thing, just a reality you should consider in your cost analysis, I carry a slide in camper and I wear 19.5 tires. Carries the load well, eliminates sway from soft sidewall LT tires, and gives you much better tire mileage than LT tires.
-
Check out my onboard air install on the gen 3 forum on this site. Been there for almost 2 years now and nary a problem. I use this onboard air system to power my PacBrake, airhorn and 2 outlets to use air for other functions (i.e. air up tires etc.). My experience tells me that the PacBrake doesn't require a lot of air to work.
-
I wonder if there was something else going on with your hybrid or truck. I did the hybrid with RV275 injectors and Quadzilla ZXT with 4" exhaust and I have a completely different truck than the stock HX35. Everyone that drives it comments on it being a real "jackrabbit" I have posi in the rear with auto and I can easily spin the wheels in a non boosted launch. Couldn't come close to that before the injectors and turbo. No lag, no surge no strange behavior. No smoke. Push the go pedal on the line or when passing and you are off to the races!
-
Ya, that wing thing (whether rotary or fixed) is rather defining of a bad experience that is about to happen!
-
X2
-
X2. Have had one forced landing. Concentration is very demanding and after the fact you thank the Lord you made it through. Then you feel emotionally drained. That's assuming you haven't lost or damaged any of your blades!
-
LED Under hood lighting for Dodge Ram Trucks I wanted more light under the hood when I am working there or when I was just checking oil or other fluid levels etc. I decided to try installing some LED lights to see if this would improve the situation. Since this was to be an experiment to see if it could improve things and if I would like it I didn't want to spend a lot of money to start with. I checked around for various light options and looked at how they could be mounted. I liked the idea of using a small multibulb bar setup because I could tuck it in an area that wouldn't come in contact with the body or engine when I closed the hood. My thinking was that if I installed 2 of these lights I could focus the out put on each side of the engine bay. I finally opted for a small 6 bulb (6w) bar that was sold by Super Bright Led. The output was rated at 600 lumens for each light assembly and came with its own ss mounting bracket and hardware and sold for $19.95 for a pair of lights. This would give me 1200 lumens under the hood. The assembly was small enough that I could mount it on the front lip of the hood (just on the backside of the grill) and I could close the hood and the lights would easily clear the radiator support cross member and when the hood was open the lights would be up high and out of the way and give a good unobstructed light input into the bay area. So I marked the install location and mounted the brakets for the light assembly. When I installed the light assembly in its bracket I then adjusted the swivel location so the light pointed directly into the center of the engine bay. The swivel feature also allows the light to be adjusted or re-aimed as needed. Checking the closure of the hood verified that everything cleared with inches to spare. I wanted to have the lights operate just like the stock underhood light (open the hood and the light comes on and close the hood and the light goes out). Keep it simple with no additional wiring or switches. This dictated that I would just connect my wiring to the stock underhood light. After removing the stock light assembly I drilled 2 small holes in the plastic housing for a place to have the 18ga wiring enter into the assembly and connect to the existing light setup. I decided to solder my leads onto the existing brass tangs built into the stock light assembly. After soldering the leads in place I then installed a 1/4" wire loom covering to keep these new wires from be abraded of scuffed when they were finally installed inside the hood stiiffening bracket. This bracket proved a natural channel for the wire to be housed in and it led to the front of the hood near where I had mounted my LED light assemblies. After I hooked everything up I replaced the IOD fuse to check if the lights worked as I had hoped for. They did and here is a picture of the assembly lighted. It was a little hard to get a picture of the lights on because they over powered the eye sensor on the camera so I had to point the camera away from the lights so I could take a picture. Of course when you do that you can't see how bright the lights are. But it will give you an idea of the finished set up with the wires tir wrapped up out of the way. I also placed plug-in barrel connectors on my connections to the LED lights so if I decide to use a different light then I don't have to cut wire or run new wiring. Here is a picture of the underhood light that is put out by these LED assemblies. This is no flash and the time is at dusk. This is a big improvement (over the weak stock light) and I have light enough to even easily read a paper by.
- 5 comments
- 1 review
-
LED Under hood lighting for Dodge Ram Trucks I wanted more light under the hood when I am working there or when I was just checking oil or other fluid levels etc. I decided to try installing some LED lights to see if this would improve the situation. Since this was to be an experiment to see if it could improve things and if I would like it I didn't want to spend a lot of money to start with. I checked around for various light options and looked at how they could be mounted. I liked the idea of using a small multibulb bar setup because I could tuck it in an area that wouldn't come in contact with the body or engine when I closed the hood. My thinking was that if I installed 2 of these lights I could focus the out put on each side of the engine bay. I finally opted for a small 6 bulb (6w) bar that was sold by Super Bright Led. The output was rated at 600 lumens for each light assembly and came with its own ss mounting bracket and hardware and sold for $19.95 for a pair of lights. This would give me 1200 lumens under the hood. The assembly was small enough that I could mount it on the front lip of the hood (just on the backside of the grill) and I could close the hood and the lights would easily clear the radiator support cross member and when the hood was open the lights would be up high and out of the way and give a good unobstructed light input into the bay area. So I marked the install location and mounted the brakets for the light assembly. When I installed the light assembly in its bracket I then adjusted the swivel location so the light pointed directly into the center of the engine bay. The swivel feature also allows the light to be adjusted or re-aimed as needed. Checking the closure of the hood verified that everything cleared with inches to spare. I wanted to have the lights operate just like the stock underhood light (open the hood and the light comes on and close the hood and the light goes out). Keep it simple with no additional wiring or switches. This dictated that I would just connect my wiring to the stock underhood light. After removing the stock light assembly I drilled 2 small holes in the plastic housing for a place to have the 18ga wiring enter into the assembly and connect to the existing light setup. I decided to solder my leads onto the existing brass tangs built into the stock light assembly. After soldering the leads in place I then installed a 1/4" wire loom covering to keep these new wires from be abraded of scuffed when they were finally installed inside the hood stiiffening bracket. This bracket proved a natural channel for the wire to be housed in and it led to the front of the hood near where I had mounted my LED light assemblies. After I hooked everything up I replaced the IOD fuse to check if the lights worked as I had hoped for. They did and here is a picture of the assembly lighted. It was a little hard to get a picture of the lights on because they over powered the eye sensor on the camera so I had to point the camera away from the lights so I could take a picture. Of course when you do that you can't see how bright the lights are. But it will give you an idea of the finished set up with the wires tir wrapped up out of the way. I also placed plug-in barrel connectors on my connections to the LED lights so if I decide to use a different light then I don't have to cut wire or run new wiring. Here is a picture of the underhood light that is put out by these LED assemblies. This is no flash and the time is at dusk. This is a big improvement (over the weak stock light) and I have light enough to even easily read a paper by.
-
Same result for me. ^
-
Hillary's new strategy!
-
I will take a shot at a real simple discription of the questions you have asked. DPF (diesel particulate filter) is designed to take the particulate out of the air that is created when diesel is burned in the combustion chamber. The filter collects the particulate matter and the the cleaning of the filter (regeneration) when it gets full (loaded) to a specific prescribed level is the addition of extra diesel into the exhaust stream to physically burn the collected particulate matter out of the filter. This creates very high temp in the filter to burn this particulate. It takes extra fuel and is one of the causes of lower mpg that is a function of vehicles equipped with DPF emission type system. Diesel engines are usually setup run with an lean air-to-fuel ratio in an attempt to get full combustion of soot and to prevent the exhaust of unburnt fuel. This is done by supplying excess of oxygen to the combustion process but then this creates NOx (nitric oxides), which are viewed as harmful emmissions. Selective catalytic reduction is used to reduce the amount of NOx . DEF (diesel exhaust fluid) is a urea based solution that is injected into the diesel exhaust system SCR (selective catalytic reduction) in order to lower the NOx discharge from the exhaust system.
-
I was dead on the road (out of town and out of state) and didn't have a reader with me at the time but had the truck towed to a shop. They diagnosed and replaced the cam position sensor and I was on my way. I didn't ask them about the code it threw (if any) but I believe 0340 is the likely code. Also, it is my understanding the the crankshaft position sensor can also cause similar symptoms if it goes bad. Likely code for that is 0336 I believe. You can check for loose connector or damaged or loose wiring near the sensors.
-
Here is an option for under $200. http://www.mts-diesel.com/product_info.php?manufacturers_id=&products_id=302 SFI 29.1 rated. I know you weren't much interested in an SFI rated unit but this one is one of the least expensive ones I have seen. I don't have any experience with it but thought I would pass it on as an FYI!