


Haggar
Unpaid Member
-
Joined
-
Last visited
Everything posted by Haggar
-
Just replace the seal. The reason this area can leak so bad, there is a pump on the output shaft and the bushing just forward of this seal is positively lubricated from the pump. there shouldn't be much pressure on the seal but there is constantly flow near it. But if you keep having issues, you may need to replace the tailshaft bushing. As the bushing goes bad, the wobble in the yoke really works on and wears out the seal quickly. GL Hag
-
I think you will be ok pressure wise. Hag
-
Jag, don't be afraid, but don't be stupid either. You may have to spray lubricant a few times before trying to remove. Try to do it without prying. I usually have to pry them carefully. (that is why I like most asian models, they use a stud and nut on top so you can use a puller....) just don't pry directly against the windshield. Just go slow and work them. you can usually stack some plastic or wood to distribute the prying force. ours are nice the latch "automatically" releases when you pivot them away from the windshield. Clean everything up before you put it back together and use a little anti-sieze. I don't worry about position really. Once they are apart and you have cleaned them you can reposition easily. So I just look at travel. I am tall in the seat, so I like longer than stock wiper blades, so I usually have to reposition them so they don't hit the edge of the windshield. If you like where yours are, the tape idea is a great method. GL Hag
-
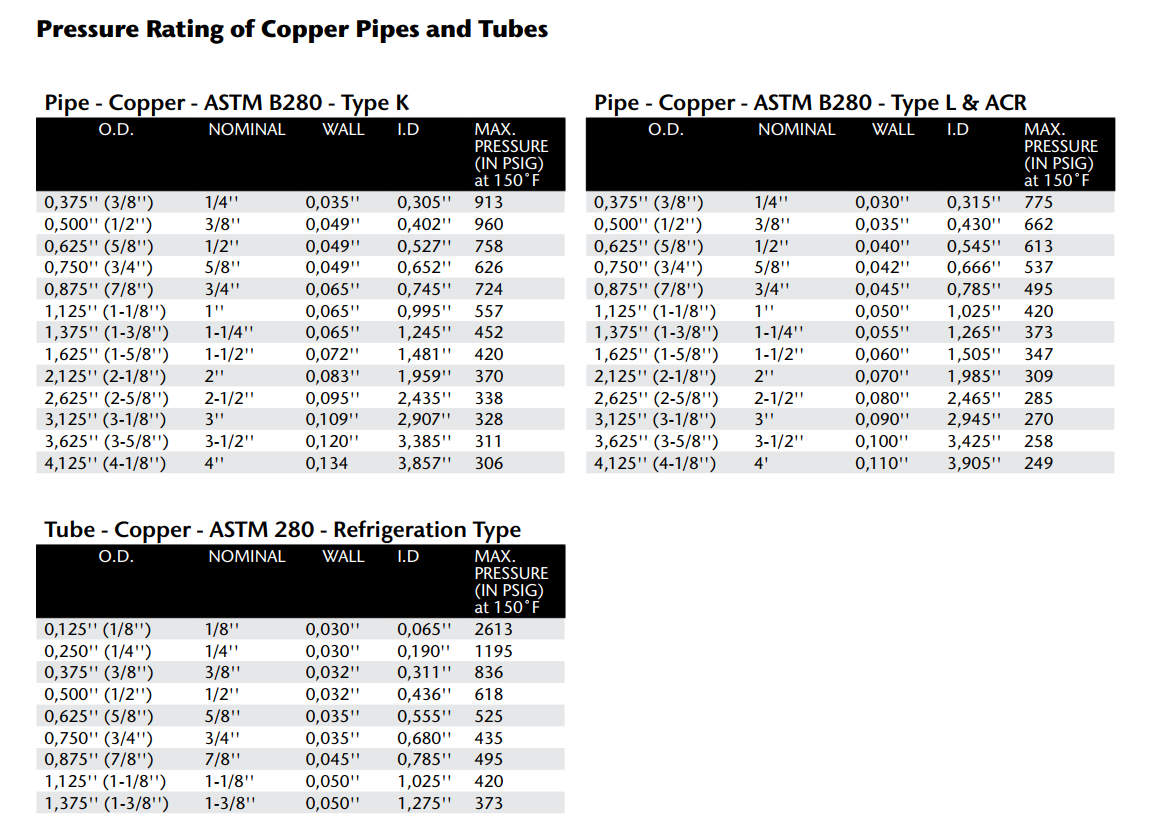
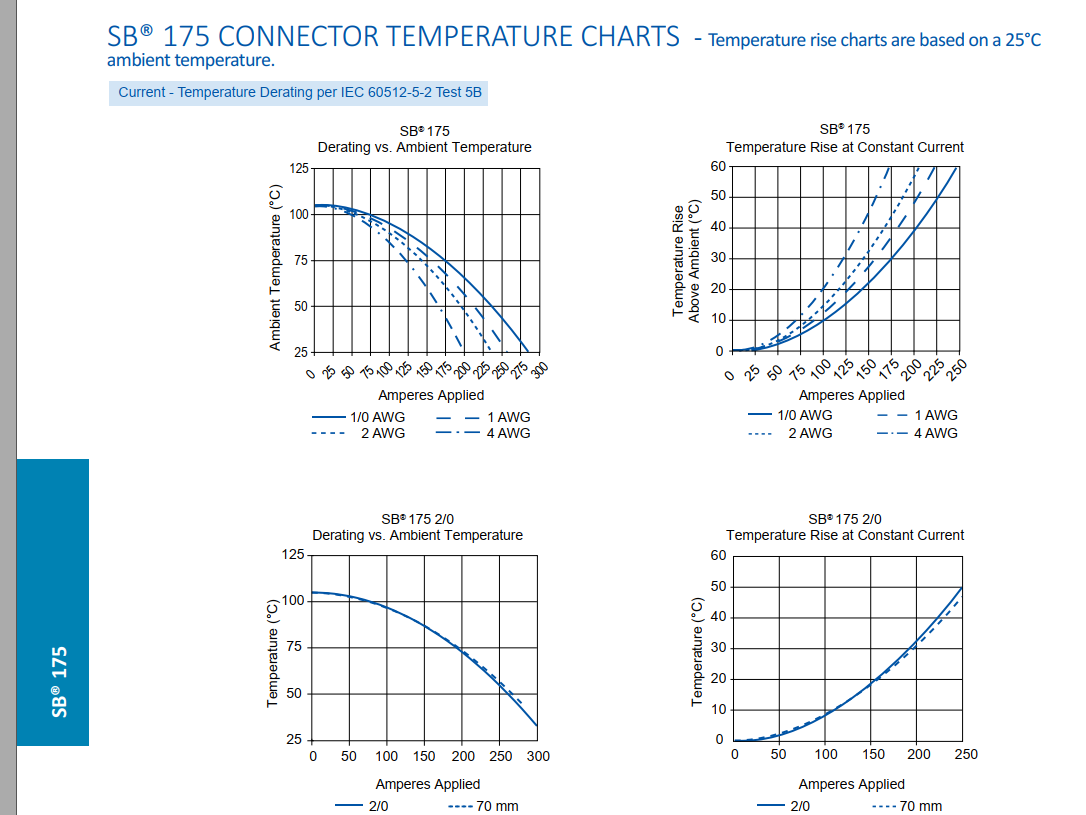
The real engineering answer for why you can't get a good easy to understand answer. " IT DEPENDS " my friends know it is gonna be a long day when I start the explanation that way.... It is hard to give a straight answer because none of the variables stay constant long enough. For wiring, the whole problem is temperature rise. The very second amps are applied the temperature of the conductor changes. So the amp carrying capacity changes..... It is a snake eating its own tail constantly. So if you look at the derating vs ambient 4 gauge goes from 200 amps to 175 amps when ambient changes from 80F to 110F or so... 1/0 goes from 290 to 250 in the same range.... There will be no perfect answer for you. It will depend on how long at what amp draw you need to run. You will be fine with short pulls at full amps. If you need to pull longer you will just need to stop and let it all cool for a bit, or upgrade everything to handle it. HTH Hag
-
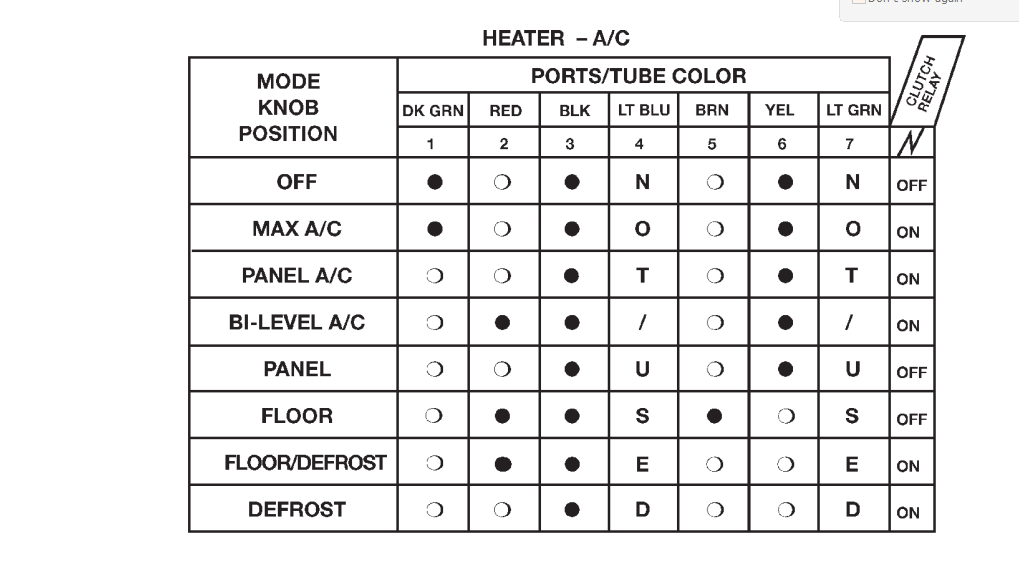
@JAG1 unfortunately no. This system was too simple. (but not simple enough to just have a stupid compressor button.....my explorer sport has a compressor button, but when you pick defrost modes it will bypass the stupid button..... sorry I digress.....) Notice the clutch relay is forced "on" electrically by our selection of modes. The heater doors are controlled by vacuum, but in certain positions the clutch is engaged irregardless of what temperature we would like. I know why they do this, they are trying to remove the humidity so your windows won't fog as easily, but there are just times when I think I am smarter than they are, but apparently not..... lol Hag
-
That sounds good really (the temp differential). But, the incoming temperature sounds low. What thermostat are you running? The incoming temperature if you are running a 190, should be closer to 200. (This could be your measuring method also. IR thermometers read an average temperature over an area. unless you have a good one that will give you an average and a peak also...) That is why i mentioned the thermocouple and insulation. Now, throw a thermometer in your closest outlet vent and compare it to the ambient temperature in your cab. minus some losses, you might see this 30 degree difference. If the output is significantly lower than the temperature split, the system could be pulling in too much outside air. You could try removing the AC compressor relay (so compressor does not actually run the AC), and running the system on Max AC. (this closes/reduces the outside makeup air to a minimum) and see if that helps. GL Hag
-
You could try to measure the temperature of the water going into and out of the heat exchanger. (use thermocouples on the metal tubing with lots of insulation around it so you get good readings) If the water temp is the same in and out, then you know the air is not blowing well through the exchanger. If the temperature is very different, you know that not enough water is passing through the exchanger and that there is a coolant flow restriction somewhere. I would expect 5 to 10 degrees temperature differential. I am not certain of this at all. I have not needed to make these measurements yet. In my 01 I swear the replacement heater core did similar to yours. The replacement was not as hot as the original.... It not as important in my part of the country as it is in your part though... GL HTH Hag
-
Your description is that it only happens over time. So I would check for pressure when they seem to have self adjusted too far. It seems so strange that properly applied self adjusters would over tighten over time. I can't believe you back up that much! The system is looking at the reverse motion of the brake shoes relative to the backing plate. If there is no looseness (the brakes are adjusted pretty tightly) there is no movement of the shoe relative to the backing plate to allow the arm to tighten the adjuster. So it really can't over tighten. Good luck! I hope you find the issue. That is no fun at all. You can just remove the cable from the lever if you like to disable the function. (make sure the lever can't rotate too far or something with the cable gone.) I would double or triple check that the adjuster rotation is proper. I think if someone swapped them, they may tighten during forward stopping action. (not sure, not enough coffee for mental models to work properly yet....) HTH Hag
-
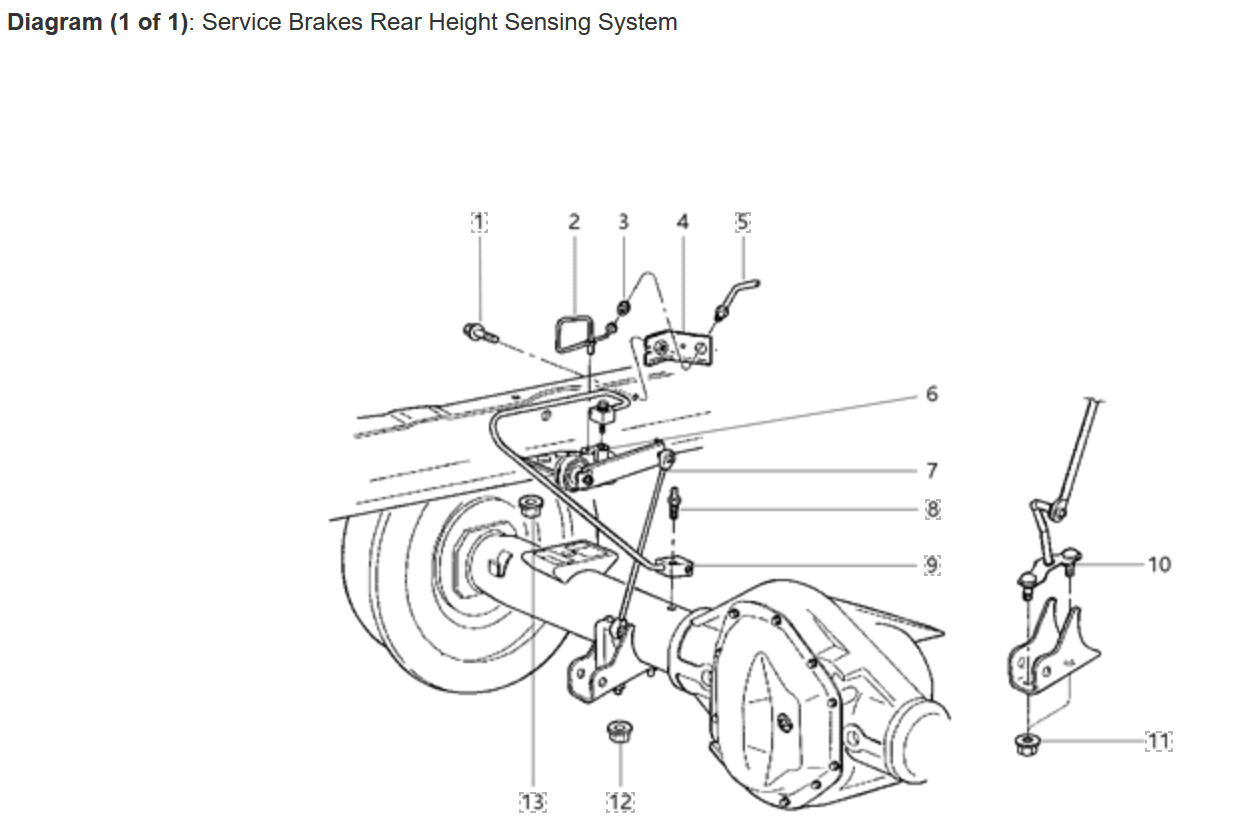
By chance do you have the Mechanical load system on the rear axle of your truck? (some had it. trying to find a picture) SOme had it in the combination valve. (so you could have an issue in your combination valve... ) This was a mechanical way to prevent the rear wheels from locking up, when the axle stayed stationary and the bed lifted. It would also do the reverse, allow more flow to the rear brakes when the bed moved down relative to the axle.... (pulling a trailer, weight in the bed etc.) anyway, that is one thought. The other you mention changing all kinds of things EXCEPT the hose/hoses in the rear brake system. IF you don't have the mechanical rear anti-lock there is only one hose. If you have the mechanical anti lock there may be 2 hoses. Dodge brake hoses have been NOTORIOUS for failure on the inside limiting/preventing fluid returning to the master cylinder. (a tsb uses the 2 hoses to remove the mechanical valve.) Next time you think they have approached their too tight adjustment, loosen the bleeder on one side or the other. If you get any squirting of fluid from the brake system, you have yourself your own pressure accumulator somewhere, and I bet it is a hose but it could be the combination valve if it has the proportioning valve internal or the external proportioning valve. Merry Christmas and Happy New year! Hag
-
"Puff the magic Dragon lived by the sea..." Very nice tailgate art. Would love to hear the story. You don't look old enough, but I could be wrong. Have been many times.... Merry Christmas and Happy New year from a 12 Bush. Cheers! Hag
-
Here is what the 01 manual has for that. Step 8 is install the outer bearing, so this is the tightening process. Merry Christmas! Hag
-
if the main latch works, the rods are ok. you need to look closely at your cable. (the inside latch pulls the cable to work the latch.) notice where the cable end attaches to the latch. (circled in red) is it broken. This is the most common failure. The cable housing becomes loose, so when you pull the cable, you lose stroke of the cable because the cable housing moves also. I just fixed these on my 99 F 250. (it looks like the cable ends for fixing a ford will work on these trucks too, but cannot confirm) Pull the lower door panel and work the inside latch and see what is wonky. GL HTH Hag here is a video of the latch working and the trouble this guy had, which was a loose pivot.

-
This is their website: https://www.fixinrams.com/ Gould Gear is their company name. Give them a call. they are in Western North Carolina. Super friendly people. HTH Hag
-
All turbo vehicles should have a timer.... Because few humans have the proper discipline to treat their equipment properly. Be the oil in your turbo as you have pulled off the interstate pulling a load and hit the fuel island and slam her off. Think about it. Turbo is really hot and you just cut it off. What we did was stop the oil pump from pushing cool oil through the turbo. By allowing the truck to idle for a period of time, the temperatures in the turbo come down quickly. If we could run the oil pump for a bit longer, the engine would not have to run. In fact there was a pretty popular oil accumulator that did this. When running the accumulator filled up. When you shut the vehicle off, the accumulator would push the oil through the turbo bearings for about a minute after shutdown. (I think the oil temps were too hard on the bladder so it didn't stick around....) Oil begins to change when in the 300 to 400 degree range. When you shut off without cooling, you run the risk of trapped oil going beyond this range. Does it matter? Depends on if you want your turbo to last 100k or 500k. While I was in the army, all of our turbo equipped vehicles had stickers on the dash saying that all vehicles will idle 5 minutes before being turned off. This was the same on the dozers and loaders, as well as the 2 1/2 and 5 ton trucks. If they had a turbo they had the time to idle. No turbo, no prescribed time to idle. I don't have a turbo timer, but I always idle my vehicle until the egt has gone below 200F. Agreed that is exhaust temp not turbo temp. I hope that is long enough to knock some temperature out of the turbo. I do notice on humid days it takes longer to cool off than dry days. Have not scienced that out yet.... Hag
-
Wow, Totally not what I expected! Good luck! Hag
-
Ski, That is how my brother's VP died. It took us quite awhile to determine that it was the VP. No codes. We swapped ECM between my truck and his (both '01) problem stayed with his truck. The problem was when engine was cold, there would be no/little throttle response. As the engine temperature increased (or fake engine temperature using heat gun on the vp) it would begin to run normally. So we took the jump, ordered at VP from DAP and it has run normally since then. Something in the VP was bad. My hunch was the circuit board that drives the pump internally had resistances that changed as it warmed up. Possibly cracked solders that were open/high resistance cold, but made contact hot. Really don't know actual cause. GL HTH Hag
-
DT, A lot of "death wobble" is caster related. Look at your control arms and bushings closely. Max out the length of the lower control arm. (since caster is not adjustable, the only thing we can do is rotate the axle) GL HTH Hag
-
Exactly. The 70u and 80 set actual clearances for pinion (no "crush sleeve" bs). pinion nut torque just needs to be high to prevent loosening. or lock tite hint hint. during set up you just shim to get zero axial movement on the pinion to get backlash and pattern right. When those are correct, you remove the proper amount of shim and tighten till you can tighten no more. or tighten reasonably with red locktite. (yes use the first set of bearings to make sure the bearing cups are seated fully.... sucks to get that far then it all moves just a bit) Other than case spreading, the 80 is the easiest I set up except for an early dana 60 that had the adjustable carrier bearing holders.... (it was in a 70's plymouth) you just turned these parts and it moved the carrier left and right. after pattern was set, you turned each a (half turn?) tight to get preload....it was awesome. If you had the pinion depth tools, you could set that rear end up in one pass. no putting together, checking, disassembling, moving shims, putting together, rinse repeat ad nauseum. Hag
-
Evan, Just rebuild it. IF you can't find a complete rear, just yank it apart and rebuild. It goes easy. just heavy. The only special tool is a good case spreader (and a dial indicator and magnetic stand but everyone should have those). (you can do it without a case spreader, but you do not get the proper pre-load on the carrier bearings so they will fail sooner but it will be years). Purchase one extra set of bearings (or just the cones really). Use a flap wheel to open up the ID of the bearings so they slip on. This way you can easily slide the bearings on and off to move shims around to get clearances and contact pattern exactly correct. If you know what you are doing it will take a Saturday. If you are unsure and need to double check everything and think about it a lot and are unsure it will take a weekend and a week of evenings. It still takes me a week of evenings.... Next time I do it I will drop the axle out of the truck. I think I would overall be faster. The differential at full suspension droop has the carrier rolling out the back of the housing making it harder to get that heavy sucker in. HTH Hag
-
Wes, I am sure a couple others that know will chime in. The long blocks are basically identical. It comes into needing to move things like Cam sensor (i think your 02 has) and the 99 block does not (nor provision for) so swapping things like timing cover housing etc. It's not a drop in replacement, but good pre planning will get you going just fine. Think of it this way. the long blocks are the same. All the electronics need to be what the 02 had. So you list out and change everything to do with the electronics from the 02 to the 99 long block. HTH Hag
-
It is true that the pump is the spindle. But they (cummins engineers) reduced the radial clearance around the pump gear so that it could not easily leave mesh. Go slow. Make a mark and make sure it is turning while you turn the crank. It was designed such that it won't bounce out of mesh while us gorillas monkey around with a pump, BUT you will have the leverage with the crank to roll it out of mesh. Like I said go slow make sure it turns and doesn't get into a bind. GL HTH Hag
-
I would think that would happen with pressure in the tank. Take your fuel cap off and see if the issue stops. Once it starts it may siphon and keep running. make sure the end of the stock line is higher than the top of the tank to prevent siphon. GL HTH Hag
-
Leaky, yes bearings used to come in sets. Tapered rollers were always available separately too though. (It has to do with their design. Proper clearances are set during assembly so the surfaces just need to be good) It is really amazing, but the newer manufacturing processes allow "matching" of bearings just from their normal stock. The bearings are manufactured just that much more closely to their design numbers. I have had to learn to adjust. Amazingly though I have not had obvious issues with high speed spindle bearings that used to come in "matched sets" but now just come individually. The manufacturing tolerances are just that much better. Tapered rollers have also suffered from stocking issues. 1 cone part number can be used with 3 to 7 different cups. I can stock 1 cone part number (buying 10 at a time) and 2 each of the cups that work with it, and have less capital invested in stock that may or may not move quickly. I can keep that in a smaller area too. HTH Hag
-
according to the earlier schematic, it is the Junction Block, but interior fuse panel seems good too. Hag
-
These pieces are designed to give a non-adjustable camber/caster front end like ours adjustable camber/caster. So yes they are eccentric and you will want to figure out exactly which way to put them back. This video should help you out! GL HTH

